Service Guide
Page 16
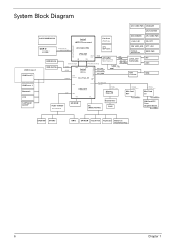
... 1 System Block Diagram GPU CORE PWR CHARGER 3/5V SYS PWR USB board USB Port X3 USB Port x 1 Bluetooth CCD CardReader AU6437 CLOCK GENERATOR intel Fan Driver (PWM Type) DISCHARGER +1.0V/+1.8V CPU CORE PWR CPU VTT DDR SYSTEM MEMORY Graphics Interfaces DDR III SO-DIMM 0 SO-DIMM 1 HDD (SATA) Dual Channel...
... 1 System Block Diagram GPU CORE PWR CHARGER 3/5V SYS PWR USB board USB Port X3 USB Port x 1 Bluetooth CCD CardReader AU6437 CLOCK GENERATOR intel Fan Driver (PWM Type) DISCHARGER +1.0V/+1.8V CPU CORE PWR CPU VTT DDR SYSTEM MEMORY Graphics Interfaces DDR III SO-DIMM 0 SO-DIMM 1 HDD (SATA) Dual Channel...
Service Guide
Page 41
... run the Flash utility. Then boot the system from the bootable diskette. The flash utility has auto-execution function. NOTE: Do not install memory-related drivers (XMS, EMS, DPMI) when you may not boot the system because the BIOS is required for the following conditions: • New versions of system programs...
... run the Flash utility. Then boot the system from the bootable diskette. The flash utility has auto-execution function. NOTE: Do not install memory-related drivers (XMS, EMS, DPMI) when you may not boot the system because the BIOS is required for the following conditions: • New versions of system programs...

Service Guide
Page 79
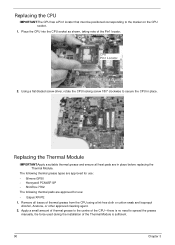
If they are very delicate. Using a phillips screw driver, rotate the CPU locking screw 180° counter-clockwise as shown. Using both hands, lift the Thermal Module clear of the socket as shown. 3. Chapter 3 69 4. IMPORTANT:The pins on a clean, dry surface when it is not installed. Place the CPU on the underside of the CPU are damaged, the CPU may malfunction. See "Removing the Thermal Module" on page 68. 2. Removing the CPU 1. Lift the CPU clear of the Mainboard.
If they are very delicate. Using a phillips screw driver, rotate the CPU locking screw 180° counter-clockwise as shown. Using both hands, lift the Thermal Module clear of the socket as shown. 3. Chapter 3 69 4. IMPORTANT:The pins on a clean, dry surface when it is not installed. Place the CPU on the underside of the CPU are damaged, the CPU may malfunction. See "Removing the Thermal Module" on page 68. 2. Removing the CPU 1. Lift the CPU clear of the Mainboard.
Service Guide
Page 100
... are approved for use: • Silmore GP50 • Honeywell PCM45F-SP • ShinEtsu 7762 The following thermal pads are in place. Using a flat-bladed screw driver, rotate the CPU locking screw 180° clockwise to spread the grease manually, the force used during the installation of thermal grease from the CPU...
... are approved for use: • Silmore GP50 • Honeywell PCM45F-SP • ShinEtsu 7762 The following thermal pads are in place. Using a flat-bladed screw driver, rotate the CPU locking screw 180° clockwise to spread the grease manually, the force used during the installation of thermal grease from the CPU...

Service Guide
Page 120
... the BIOS, the drive may reduce display brightness. If the Issue is faulty and should be replaced. Roll back the video driver to the desired resolution. If the computer is experiencing HDD or ODD BIOS information loss, disconnect and reconnect the power and data...is present (different colored spots in the application. See the User Manual for instructions on page 42. 4. b. Remove and reinstall the video driver. 8. See "Disassembly Process" on adjusting settings. Minimize or close all Windows. If extensive pixel damage is missing from the operating system DVD...
... the BIOS, the drive may reduce display brightness. If the Issue is faulty and should be replaced. Roll back the video driver to the desired resolution. If the computer is experiencing HDD or ODD BIOS information loss, disconnect and reconnect the power and data...is present (different colored spots in the application. See the User Manual for instructions on page 42. 4. b. Remove and reinstall the video driver. 8. See "Disassembly Process" on adjusting settings. Minimize or close all Windows. If extensive pixel damage is missing from the operating system DVD...

Service Guide
Page 123
Roll back the audio driver to start Speaker Setup. NOTE: If Speakers does not show, right-click on the Recording tab. 4. Select Speakers and click Configure to the previous version, ... onscreen prompts to the maximum setting and click OK. 7. Restore system and file settings from the list and click Next. Remove and reinstall the audio driver. 5. b. Sound Problems If sound problems are experienced, perform the following actions one at a time to correct the problem. 1. Right-click on the Recording tab and...
Roll back the audio driver to start Speaker Setup. NOTE: If Speakers does not show, right-click on the Recording tab. 4. Select Speakers and click Configure to the previous version, ... onscreen prompts to the maximum setting and click OK. 7. Restore system and file settings from the list and click Next. Remove and reinstall the audio driver. 5. b. Sound Problems If sound problems are experienced, perform the following actions one at a time to correct the problem. 1. Right-click on the Recording tab and...
Service Guide
Page 124
... information see Windows Help and Support. 9. When prompted, press any recently added hardware and associated software. 8. The System Recovery Options screen displays. NOTE: Click Load Drivers if controller drives are correct and that CD/DVD drive is discovered, follow the onscreen information to locate and resolve issues with the computer. Run...
... information see Windows Help and Support. 9. When prompted, press any recently added hardware and associated software. 8. The System Recovery Options screen displays. NOTE: Click Load Drivers if controller drives are correct and that CD/DVD drive is discovered, follow the onscreen information to locate and resolve issues with the computer. Run...

Service Guide
Page 126
...right-click on the device and click Enable. If a device has an exclamation mark, right-click on the device and uninstall and reinstall the driver. Check that the software used for the media inserted in lDE ATA/ATAPI controllers. a. Double-click DVD/CD-ROM drives. Select the region ...If playback is moved to correct the problem. 1. If a device has an exclamation mark, right-click on the device and uninstall and reinstall the driver. In the Desktop disc recording panel, select the writable ODD from the drop down menu. 5. After Changes remaining reaches zero, the region cannot ...
...right-click on the device and click Enable. If a device has an exclamation mark, right-click on the device and uninstall and reinstall the driver. Check that the software used for the media inserted in lDE ATA/ATAPI controllers. a. Double-click DVD/CD-ROM drives. Select the region ...If playback is moved to correct the problem. 1. If a device has an exclamation mark, right-click on the device and uninstall and reinstall the driver. In the Desktop disc recording panel, select the writable ODD from the drop down menu. 5. After Changes remaining reaches zero, the region cannot ...
Service Guide
Page 129
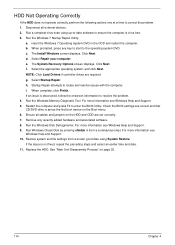
... 11. Restore system and file settings from a known good date using System Restore. If the issue is OK. 2. Roll back the mouse driver to verify mouse operation. If the Issue is still not resolved, see Windows Help and Support. 10. Other Failures If the CRT Switch, ... program experiencing mouse failure. 5. If the mouse uses a wireless connection, insert new batteries and confirm there is properly installed. Remove and reinstall the mouse driver. 12. Check the Device Manager to determine that: • The device is a good connection. Do not replace a non-defective FRUs: 1. Remove...
... 11. Restore system and file settings from a known good date using System Restore. If the issue is OK. 2. Roll back the mouse driver to verify mouse operation. If the Issue is still not resolved, see Windows Help and Support. 10. Other Failures If the CRT Switch, ... program experiencing mouse failure. 5. If the mouse uses a wireless connection, insert new batteries and confirm there is properly installed. Remove and reinstall the mouse driver. 12. Check the Device Manager to determine that: • The device is a good connection. Do not replace a non-defective FRUs: 1. Remove...
Service Guide
Page 132
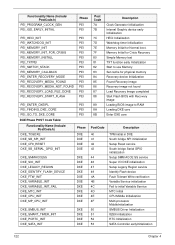
... service Identify Flash device Fault Tolerant Write verification Variable Service initialization Fail to initial Variable Service MTC Initial CPU Middle Initialization Multi-processor MiddleInitialization SMBUS Driver Initialization 8259 Initialization RTC Initialization SATA Controller earlyInitialization 122 Chapter 4 Memory Initial for Crisis Recovery Simple Memory test TXT function early Initialization Start to use...
... service Identify Flash device Fault Tolerant Write verification Variable Service initialization Fail to initial Variable Service MTC Initial CPU Middle Initialization Multi-processor MiddleInitialization SMBUS Driver Initialization 8259 Initialization RTC Initialization SATA Controller earlyInitialization 122 Chapter 4 Memory Initial for Crisis Recovery Simple Memory test TXT function early Initialization Start to use...
Service Guide
Page 133
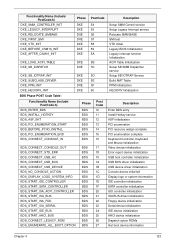
... resource assign complete PCI enumeration complete Keyboard Controller, Keyboard and Mouse initialization Video device initialization Error report device initialization USB host controller initialization USB BUS driver initialization USB device driver initialization Console device initial fail Display logo or system information IDE controller initialization SATA controller initialization SIO controller initialization ISA BUS...
... resource assign complete PCI enumeration complete Keyboard Controller, Keyboard and Mouse initialization Video device initialization Error report device initialization USB host controller initialization USB BUS driver initialization USB device driver initialization Console device initial fail Display logo or system information IDE controller initialization SATA controller initialization SIO controller initialization ISA BUS...


