
Acer Aspire 4540 Series Service Guide
Page 7
...numeric keypad 11 Windows Keys 12 Special Key 13 Using the System Utilities 13 Acer GridVista (dual-display compatible 14 Hardware Specifications and Configurations 15 System Utilities 23... 34 Remove HDD/BIOS Password Utilities 36 Miscellaneous Utilities 38 Machine Disassembly and Replacement 41 Disassembly Requirements 41 General Information 42 Pre-disassembly Instructions 42 Disassembly Process ...42 External Module Disassembly Process 43 External Modules Disassembly Flowchart 43 Removing the Battery Pack 44 Removing the SD Dummy Card 45 Removing the Lower Covers 46 ...
...numeric keypad 11 Windows Keys 12 Special Key 13 Using the System Utilities 13 Acer GridVista (dual-display compatible 14 Hardware Specifications and Configurations 15 System Utilities 23... 34 Remove HDD/BIOS Password Utilities 36 Miscellaneous Utilities 38 Machine Disassembly and Replacement 41 Disassembly Requirements 41 General Information 42 Pre-disassembly Instructions 42 Disassembly Process ...42 External Module Disassembly Process 43 External Modules Disassembly Flowchart 43 Removing the Battery Pack 44 Removing the SD Dummy Card 45 Removing the Lower Covers 46 ...

Acer Aspire 4540 Series Service Guide
Page 8
... Mainboard 106 Removing the RTC Battery 108 Replacing the USB Board 108 Replacing the Bluetooth Board 109 Replacing the Modem Module 111 Replacing the TouchPad Bracket 112 Replacing the Finger Print Reader 114 Replacing the Upper Cover 116 Replacing the LCD Module 119 Replacing the Speaker Module 123 Replacing the Keyboard 124 Replacing the Switch Cover 126 Replacing the Hinge Covers 128...
... Mainboard 106 Removing the RTC Battery 108 Replacing the USB Board 108 Replacing the Bluetooth Board 109 Replacing the Modem Module 111 Replacing the TouchPad Bracket 112 Replacing the Finger Print Reader 114 Replacing the Upper Cover 116 Replacing the LCD Module 119 Replacing the Speaker Module 123 Replacing the Keyboard 124 Replacing the Switch Cover 126 Replacing the Hinge Covers 128...
Acer Aspire 4540 Series Service Guide
Page 84
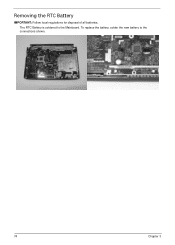
To replace the battery, solder the new battery to the Mainboard. Removing the RTC Battery IMPORTANT: Follow local regulations for disposal of all batteries. The RTC Battery is soldered to the connections shown. 74 Chapter 3
To replace the battery, solder the new battery to the Mainboard. Removing the RTC Battery IMPORTANT: Follow local regulations for disposal of all batteries. The RTC Battery is soldered to the connections shown. 74 Chapter 3

Acer Aspire 4540 Series Service Guide
Page 118
Removing the RTC Battery IMPORTANT: Follow local regulations for disposal of all batteries. Insert the USB Board into the FFC connector. 108 Chapter 3 Run the cable along the casing and insert it into the casing, ensuring that the USB Port is soldered to the connections shown. Replacing the USB Board 1. To replace the battery, solder the new battery to the Mainboard. The RTC Battery is accessible through the case. 2.
Removing the RTC Battery IMPORTANT: Follow local regulations for disposal of all batteries. Insert the USB Board into the FFC connector. 108 Chapter 3 Run the cable along the casing and insert it into the casing, ensuring that the USB Port is soldered to the connections shown. Replacing the USB Board 1. To replace the battery, solder the new battery to the Mainboard. The RTC Battery is accessible through the case. 2.
Acer Aspire 4540 Series Service Guide
Page 145
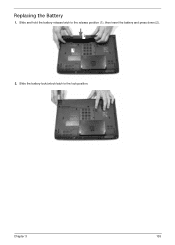
Slide the battery lock/unlock latch to the release position (1), then insert the battery and press down (2). 2 1 2. Slide and hold the battery release latch to the lock position. Chapter 3 135 Replacing the Battery 1.
Slide the battery lock/unlock latch to the release position (1), then insert the battery and press down (2). 2 1 2. Slide and hold the battery release latch to the lock position. Chapter 3 135 Replacing the Battery 1.

Acer Aspire 4540 Series Service Guide
Page 149
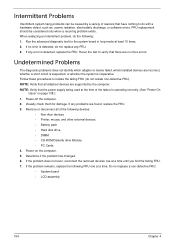
... internal display and the external display is by removing the power cable and battery and holding down the power button for specific model procedures. 2. If the computer boots correctly, add the devices one by pressing Fn+F5. Do not replace a non-defective FRUs: No POST or Video If the POST or video...
... internal display and the external display is by removing the power cable and battery and holding down the power button for specific model procedures. 2. If the computer boots correctly, add the devices one by pressing Fn+F5. Do not replace a non-defective FRUs: No POST or Video If the POST or video...

Acer Aspire 4540 Series Service Guide
Page 150
...application. See the User Manual for instructions on page 42. 4. Check the display resolution is not running on battery alone as this may be defective and should be replaced. 5. Click Apply and check the display. Remove and reinstall the video driver. 8. Run the Windows Memory Diagnostic... Loss of BIOS Settings If the computer is experiencing intermittent loss of BIOS information, perform the following actions one year old, replace the CMOS battery. 2. NOTE: Ensure that : • The device is not normal, right-click on the desktop and select Personalize´ Display ...
...application. See the User Manual for instructions on page 42. 4. Check the display resolution is not running on battery alone as this may be defective and should be replaced. 5. Click Apply and check the display. Remove and reinstall the video driver. 8. Run the Windows Memory Diagnostic... Loss of BIOS Settings If the computer is experiencing intermittent loss of BIOS information, perform the following actions one year old, replace the CMOS battery. 2. NOTE: Ensure that : • The device is not normal, right-click on the desktop and select Personalize´ Display ...

Acer Aspire 4540 Series Service Guide
Page 163
.... 6. Check Test Fixture is properly installed. See the mouse user manual. 3. Check the Device Manager to determine that: • The device is ok. 3. Do not replace a non-defective FRUs: 1. Remove any recently added hardware and associated software. 7. External Mouse Failure If an external Mouse fails, perform the following general steps to..., repeat the preceding steps and select an earlier time and date. 9. Check Drive whether is a good connection. If the mouse uses a wireless connection, insert new batteries and confirm there is OK. 2.
.... 6. Check Test Fixture is properly installed. See the mouse user manual. 3. Check the Device Manager to determine that: • The device is ok. 3. Do not replace a non-defective FRUs: 1. Remove any recently added hardware and associated software. 7. External Mouse Failure If an external Mouse fails, perform the following general steps to..., repeat the preceding steps and select an earlier time and date. 9. Check Drive whether is a good connection. If the mouse uses a wireless connection, insert new batteries and confirm there is OK. 2.
Acer Aspire 4540 Series Service Guide
Page 164
...detected, do the following devices: • Non-Acer devices • Printer, mouse, and other external devices • Battery pack • Hard disk drive • DIMM • CD-ROM/Diskette drive Module • PC Cards 4. If the problem remains, replace the following FRU one at the time of ...reasons that have nothing to do not isolate non-defective FRU). FRU replacement should be caused...
...detected, do the following devices: • Non-Acer devices • Printer, mouse, and other external devices • Battery pack • Hard disk drive • DIMM • CD-ROM/Diskette drive Module • PC Cards 4. If the problem remains, replace the following FRU one at the time of ...reasons that have nothing to do not isolate non-defective FRU). FRU replacement should be caused...
Acer Aspire 4540 Series Service Guide
Page 223
A AFLASH Utility 31 Antennas 93 B Battery Pack Removing 44 BIOS Utility 23-31 Boot 29 Exit 30 Navigating 23 Onboard Device Configuration 27 Power 29 Save and Exit 30 Security 26 ... 13 External Module Disassembly Flowchart 43 F Features 1 Finger Print Reader Index Removing 70 Fingerprint Reader Failure 152 Flash Utility 31 FPC Cable 92 FRU (Field Replaceable Unit) List 167 H HDD Removing 51 Hinge Covers Removing 56 Hot Keys 11 I Intermittent Problems 154 Internal Microphone Failure 144 Internal Speaker Failure 142 J Jumper...
A AFLASH Utility 31 Antennas 93 B Battery Pack Removing 44 BIOS Utility 23-31 Boot 29 Exit 30 Navigating 23 Onboard Device Configuration 27 Power 29 Save and Exit 30 Security 26 ... 13 External Module Disassembly Flowchart 43 F Features 1 Finger Print Reader Index Removing 70 Fingerprint Reader Failure 152 Flash Utility 31 FPC Cable 92 FRU (Field Replaceable Unit) List 167 H HDD Removing 51 Hinge Covers Removing 56 Hot Keys 11 I Intermittent Problems 154 Internal Microphone Failure 144 Internal Speaker Failure 142 J Jumper...


