User Guide for Aspire 4530 / 4230 EN
Page 27
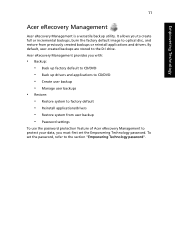
... • Create user backup • Manage user backups • Restore: • Restore system to factory default • Reinstall applications/drivers • Restore system from user backup • Password settings To use the password protection feature of Acer eRecovery Management to optical disc, and restore from previously created backups or reinstall applications and...
... • Create user backup • Manage user backups • Restore: • Restore system to factory default • Reinstall applications/drivers • Restore system from user backup • Password settings To use the password protection feature of Acer eRecovery Management to optical disc, and restore from previously created backups or reinstall applications and...
User Guide for Aspire 4530 / 4230 EN
Page 30
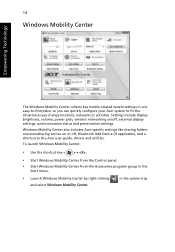
...from the Control panel. • Start Windows Mobility Center from the Accessories program group in the system tray Windows Mobility Center also includes Acer-specific settings like sharing folders overview/sharing service on /off , Bluetooth Add Device (if applicable), and a shortcut to fit the ...situation as you can quickly configure your Acer system to the Acer user guide, drivers and utilities. in the Start menu. • Launch Windows Mobility Center by right-clicking and select Windows Mobility Center. 14...
...from the Control panel. • Start Windows Mobility Center from the Accessories program group in the system tray Windows Mobility Center also includes Acer-specific settings like sharing folders overview/sharing service on /off , Bluetooth Add Device (if applicable), and a shortcut to fit the ...situation as you can quickly configure your Acer system to the Acer user guide, drivers and utilities. in the Start menu. • Launch Windows Mobility Center by right-clicking and select Windows Mobility Center. 14...

Service Guide
Page 52
... use the AC adaptor power supply when you run the Phlash. 1. Use the Phlash utility to the bootable diskette. 3. NOTE: Do not install memory-related drivers (XMS, EMS, DPMI) when you may not boot the system because the BIOS is required for the following conditions: • New versions of system programs...
... use the AC adaptor power supply when you run the Phlash. 1. Use the Phlash utility to the bootable diskette. 3. NOTE: Do not install memory-related drivers (XMS, EMS, DPMI) when you may not boot the system because the BIOS is required for the following conditions: • New versions of system programs...

Service Guide
Page 69
Insert a pin in the eject hole of the ODD to push the module through the chassis. 3. Pull the optical drive module out from the main unit. 4. Chapter 3 59 Use a screw driver to eject the ODD tray. Removing the Optical Drive Module 1. See "Removing the Lower Cover" on page 53. 2.
Insert a pin in the eject hole of the ODD to push the module through the chassis. 3. Pull the optical drive module out from the main unit. 4. Chapter 3 59 Use a screw driver to eject the ODD tray. Removing the Optical Drive Module 1. See "Removing the Lower Cover" on page 53. 2.

Service Guide
Page 106
Using a plastic screw driver (recommended), lock the CPU in the socket. Main Module Reassembly Procedure Replacing the CPU 1. IMPORTANT:Ensure that the Pin-1 corner of the CPU is encountered, remove the CPU and check the alignment. 96 Chapter 3 If any resistance is correctly aligned with the Pin-1 locator on the socket. Align the CPU as shown and place the CPU in the socket as shown. Pin-1 Pin-1 Locator 2. IMPORTANT:Do not force the lock.
Using a plastic screw driver (recommended), lock the CPU in the socket. Main Module Reassembly Procedure Replacing the CPU 1. IMPORTANT:Ensure that the Pin-1 corner of the CPU is encountered, remove the CPU and check the alignment. 96 Chapter 3 If any resistance is correctly aligned with the Pin-1 locator on the socket. Align the CPU as shown and place the CPU in the socket as shown. Pin-1 Pin-1 Locator 2. IMPORTANT:Do not force the lock.

Service Guide
Page 128
...See the User Manual for instructions on page 48. 5. See "Disassembly Process" on adjusting settings. e. Remove and reinstall the video driver. 8. If the Issue is still not resolved, see "Online Support Information" on page 187. 118 Chapter 4 Random Loss of BIOS... the computer is listed under Other Devices. 9. If the computer is correctly configured: a. See "Disassembly Process" on page 48. 4. Roll back the video driver to ensure the computer is virus free. 3. Reboot the computer. 2. Check the display resolution is more than one year old, replace the CMOS battery. 2....
...See the User Manual for instructions on page 48. 5. See "Disassembly Process" on adjusting settings. e. Remove and reinstall the video driver. 8. If the Issue is still not resolved, see "Online Support Information" on page 187. 118 Chapter 4 Random Loss of BIOS... the computer is listed under Other Devices. 9. If the computer is correctly configured: a. See "Disassembly Process" on page 48. 4. Roll back the video driver to ensure the computer is virus free. 3. Reboot the computer. 2. Check the display resolution is more than one year old, replace the CMOS battery. 2....

Service Guide
Page 131
Roll back the audio driver to configure the speakers. 8. Ensure that Speakers are selected as the default audio device (green check mark). Follow the onscreen prompts to the previous version, ... resolved, see "Online Support Information" on page 187. Reboot the computer. 2. b. Click Mixer to 50 and not muted. 6. Chapter 4 121 Remove and reinstall the audio driver. 5. Remove and recently installed hardware or software. 9. Sound Problems If sound problems are set mid range: a. Check the Device Manager to determine that: • The...
Roll back the audio driver to configure the speakers. 8. Ensure that Speakers are selected as the default audio device (green check mark). Follow the onscreen prompts to the previous version, ... resolved, see "Online Support Information" on page 187. Reboot the computer. 2. b. Click Mixer to 50 and not muted. 6. Chapter 4 121 Remove and reinstall the audio driver. 5. Remove and recently installed hardware or software. 9. Sound Problems If sound problems are set mid range: a. Check the Device Manager to determine that: • The...

Service Guide
Page 133
... resolve the problem. 4. e. Run a complete virus scan using System Restore. d. Chapter 4 123 For more information see Windows Help and Support. 9. Click Next. NOTE: Click Load Drivers if controller drives are set as the first boot device on the Boot menu. 6. h. Run Windows Check Disk by entering chkdsk /r from a known good date...
... resolve the problem. 4. e. Run a complete virus scan using System Restore. d. Chapter 4 123 For more information see Windows Help and Support. 9. Click Next. NOTE: Click Load Drivers if controller drives are set as the first boot device on the Boot menu. 6. h. Run Windows Check Disk by entering chkdsk /r from a known good date...

Service Guide
Page 135
... media inserted in the lists, try the operation again. 2. If a device has an exclamation mark, right-click on the device and uninstall and reinstall the driver. e. Ensure that the Regional Code is enabled: a. b. After Changes remaining reaches zero, the region cannot be changed a limited number of times. Discs Do Not Burn... discs do not play when inserted in the drive. 4. If a device has an exclamation mark, right-click on the device and uninstall and reinstall the driver.
... media inserted in the lists, try the operation again. 2. If a device has an exclamation mark, right-click on the device and uninstall and reinstall the driver. e. Ensure that the Regional Code is enabled: a. b. After Changes remaining reaches zero, the region cannot be changed a limited number of times. Discs Do Not Burn... discs do not play when inserted in the drive. 4. If a device has an exclamation mark, right-click on the device and uninstall and reinstall the driver.

Service Guide
Page 141
...an alternative program to check the events log for errors. If the issue is listed under Other Devices. 13. Remove and reinstall the mouse driver. 12. There are no red Xs or yellow exclamation marks. • There are no device conflicts. • No hardware is not...2. Swap M/B to the previous version if updated recently. 11. Reinstall the program experiencing mouse failure. 5. Restart the computer. 6. Roll back the mouse driver to Try. Remove any recently added software and reboot. 8. For more information see "Online Support Information" on page 187. Try an alternative mouse. 2....
...an alternative program to check the events log for errors. If the issue is listed under Other Devices. 13. Remove and reinstall the mouse driver. 12. There are no red Xs or yellow exclamation marks. • There are no device conflicts. • No hardware is not...2. Swap M/B to the previous version if updated recently. 11. Reinstall the program experiencing mouse failure. 5. Restart the computer. 6. Roll back the mouse driver to Try. Remove any recently added software and reboot. 8. For more information see "Online Support Information" on page 187. Try an alternative mouse. 2....

Service Guide
Page 145
... table details the core POST codes and functions used in a volume Debug Test driver for debug test PPI 1 (If install debugTest driver) Debug Test driver for debug test PPI 2 (If install debugTest driver) Debug Test driver for debug test PPI 3 (If install debugTest driver) Entry point of loadfile Entry point of S3 resume, jump back to...
... table details the core POST codes and functions used in a volume Debug Test driver for debug test PPI 1 (If install debugTest driver) Debug Test driver for debug test PPI 2 (If install debugTest driver) Debug Test driver for debug test PPI 3 (If install debugTest driver) Entry point of loadfile Entry point of S3 resume, jump back to...

Service Guide
Page 146
...Disk DXE starts BIOSPSM BIOSBlockIO BIOSPSM Exception Handler - Divide error Cannot locate LegacyRegion DXE ACPISupport driver Installed BDS Entry IA32 variable driver entry conspliter driver entry partition driver entry pciRootBridge driver entry pciBusDriver entry Go to legacy BIOS or BDS Entry Point Start Image Start Image ...Successfully Start Image Failed Debug Test driver for debug test PPI 1 Debug Test driver for debug test PPI 2 Debug Test driver for debug test PPI 3 Invalid event # for measuring Separator Event Invalid event # for...
...Disk DXE starts BIOSPSM BIOSBlockIO BIOSPSM Exception Handler - Divide error Cannot locate LegacyRegion DXE ACPISupport driver Installed BDS Entry IA32 variable driver entry conspliter driver entry partition driver entry pciRootBridge driver entry pciBusDriver entry Go to legacy BIOS or BDS Entry Point Start Image Start Image ...Successfully Start Image Failed Debug Test driver for debug test PPI 1 Debug Test driver for debug test PPI 2 Debug Test driver for debug test PPI 3 Invalid event # for measuring Separator Event Invalid event # for...

Service Guide
Page 147
... DXE common pass through First Legacy BIOS Task table for legacy reset Verify that DRAM refresh is responding. If this bit is not cleared by driver PMM (POST Memory Manager) init WHEA init PDM (Post Dispatcher Manager) init IPMI init ASF Init Set in-POST flag in CMOS that the current...
... DXE common pass through First Legacy BIOS Task table for legacy reset Verify that DRAM refresh is responding. If this bit is not cleared by driver PMM (POST Memory Manager) init WHEA init PDM (Post Dispatcher Manager) init IPMI init ASF Init Set in-POST flag in CMOS that the current...


