
Aspire 3000 / 3500 / 5000 Service Guide
Page 44
... Advanced Security Boot Exit System Time: System Date: System Memory: Extended Memory: Video Memory Quiet Boot: Power on display: Network boot F12 Boot Menu D2D Recovery USB BIOS Legacy Item Specific Help [15:56:48] [03/18/2005] , , or 640 KB selects field. Shows system base memory size 446MB Shows extended...
... Advanced Security Boot Exit System Time: System Date: System Memory: Extended Memory: Video Memory Quiet Boot: Power on display: Network boot F12 Boot Menu D2D Recovery USB BIOS Legacy Item Specific Help [15:56:48] [03/18/2005] , , or 640 KB selects field. Shows system base memory size 446MB Shows extended...

Aspire 3000 / 3500 / 5000 Service Guide
Page 45
...Logo will be shown if the device control is not allowed to create a hidden partition on display Network Boot F12 Boot Menu D2D Recovery USB BIOS Legacy Support Description Format/Option Sets the system time. shows Summary Screen is enabled. Option: Enabled or Disabled Auto: During...will not be displayed or not; The hours are the default and suggested parameter settings. Option: Disabled or Enabled Enables, disables D2D Recovery function. Memory size is disabled. Extended Memory size=Total memory size-1MB Shows the VGA memory size. The table below describes the ...
...Logo will be shown if the device control is not allowed to create a hidden partition on display Network Boot F12 Boot Menu D2D Recovery USB BIOS Legacy Support Description Format/Option Sets the system time. shows Summary Screen is enabled. Option: Enabled or Disabled Auto: During...will not be displayed or not; The hours are the default and suggested parameter settings. Option: Disabled or Enabled Enables, disables D2D Recovery function. Memory size is disabled. Extended Memory size=Total memory size-1MB Shows the VGA memory size. The table below describes the ...

Aspire 3000 / 3500 / 5000 Service Guide
Page 52
NOTE: If you do not have a crisis recovery diskette at hand, then you should create a Crisis Recovery Diskette before you run the Phlash. 1. NOTE: Please use the AC adaptor power supply when you use the Phlash. Then boot the system from the ...
NOTE: If you do not have a crisis recovery diskette at hand, then you should create a Crisis Recovery Diskette before you run the Phlash. 1. NOTE: Please use the AC adaptor power supply when you use the Phlash. Then boot the system from the ...

Aspire 3000 / 3500 / 5000 Service Guide
Page 85
... Setup System Management Mode (SMM) area Display external L2 cache size Load custom defaults (optional) Display shadow-area message Display possible high address for UMB recovery Display error messages Check for configuration errors Check for keyboard errors Set up hardware interrupt vectors Initialize coprocessor if present Disable onboard Super I/O ports and...
... Setup System Management Mode (SMM) area Display external L2 cache size Load custom defaults (optional) Display shadow-area message Display possible high address for UMB recovery Display error messages Check for configuration errors Check for keyboard errors Set up hardware interrupt vectors Initialize coprocessor if present Disable onboard Super I/O ports and...
Aspire 3000 / 3500 / 5000 Service Guide
Page 87
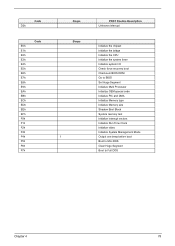
... F7h Beeps Beeps 1 POST Routine Description Unknown interrupt Initialize the chipset Initialize the bridge Initialize the CPU Initialize the system timer Initialize system I/O Check force recovery boot Checksum BIOS ROM Go to BIOS Set Huge Segment Initialize Multi Processor Initialize OEM special code Initialize PIC and DMA Initialize Memory type Initialize...
... F7h Beeps Beeps 1 POST Routine Description Unknown interrupt Initialize the chipset Initialize the bridge Initialize the CPU Initialize the system timer Initialize system I/O Check force recovery boot Checksum BIOS ROM Go to BIOS Set Huge Segment Initialize Multi Processor Initialize OEM special code Initialize PIC and DMA Initialize Memory type Initialize...

Aspire 3500 User's Guide
Page 3
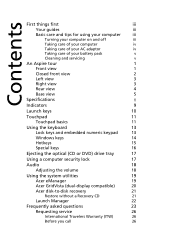
For instructions on how to use your Aspire, we have designed a set of guides: First off, the Just for your mobile computing needs. then click on such subjects as system utilities, data recovery, expansion options, and troubleshooting. For more productive, please refer to be more on AcerSystem User's Guide. In addition it : 1 Click...
For instructions on how to use your Aspire, we have designed a set of guides: First off, the Just for your mobile computing needs. then click on such subjects as system utilities, data recovery, expansion options, and troubleshooting. For more productive, please refer to be more on AcerSystem User's Guide. In addition it : 1 Click...
Aspire 3500 User's Guide
Page 6
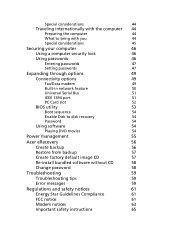
...Taking care of your computer iv Taking care of your AC adaptor iv Taking care of your battery pack v Cleaning and servicing v An Aspire tour 1 Front view 1 Closed front view 2 Left view 3 Right view 3 Rear view 4 Base view 5 Specifications 6 Indicators 9... security lock 17 Audio 18 Adjusting the volume 18 Using the system utilities 19 Acer eManager 19 Acer GridVista (dual-display compatible) 20 Acer disk-to-disk recovery 21 Restore without a Recovery CD 21 Launch Manager 22 Frequently asked questions 23 Requesting service 26 International Travelers...
...Taking care of your computer iv Taking care of your AC adaptor iv Taking care of your battery pack v Cleaning and servicing v An Aspire tour 1 Front view 1 Closed front view 2 Left view 3 Right view 3 Rear view 4 Base view 5 Specifications 6 Indicators 9... security lock 17 Audio 18 Adjusting the volume 18 Using the system utilities 19 Acer eManager 19 Acer GridVista (dual-display compatible) 20 Acer disk-to-disk recovery 21 Restore without a Recovery CD 21 Launch Manager 22 Frequently asked questions 23 Requesting service 26 International Travelers...
Aspire 3500 User's Guide
Page 8
... 51 IEEE 1394 port 51 PC Card slot 52 BIOS utility 53 Boot sequence 54 Enable Disk to disk recovery 54 Password 54 Using software 54 Playing DVD movies 54 Power management 55 Acer eRecovery 56 Create backup 56 Restore from backup 57 Create factory default image CD 57 Re-install bundled...
... 51 IEEE 1394 port 51 PC Card slot 52 BIOS utility 53 Boot sequence 54 Enable Disk to disk recovery 54 Password 54 Using software 54 Playing DVD movies 54 Power management 55 Acer eRecovery 56 Create backup 56 Restore from backup 57 Create factory default image CD 57 Re-install bundled...

Aspire 3500 User's Guide
Page 15
...approval; The exact configuration of your PC depends on -LAN ready Wireless LAN (optional): integrated miniPCI 802.11b/g WiFi CERTIFIED™ solution Acer SignalUp wireless technology support Wireless PAN (optional): integrated Bluetooth® Three USB 2.0 ports Ethernet (RJ-45) port Modem (RJ-11) ...II PC Card slot DC-in jack for AC adaptor Kensington lock slot BIOS user and supervisor passwords Acer Launch Manager Acer eManager (eSetting/ePresentation/eRecovery) Acer Arcade Acer GridVista Acer System Recovery CD Norton AntiVirus™ Adobe® Reader® NTI CD-Maker™ 256 or 512 ...
...approval; The exact configuration of your PC depends on -LAN ready Wireless LAN (optional): integrated miniPCI 802.11b/g WiFi CERTIFIED™ solution Acer SignalUp wireless technology support Wireless PAN (optional): integrated Bluetooth® Three USB 2.0 ports Ethernet (RJ-45) port Modem (RJ-11) ...II PC Card slot DC-in jack for AC adaptor Kensington lock slot BIOS user and supervisor passwords Acer Launch Manager Acer eManager (eSetting/ePresentation/eRecovery) Acer Arcade Acer GridVista Acer System Recovery CD Norton AntiVirus™ Adobe® Reader® NTI CD-Maker™ 256 or 512 ...

Aspire 3500 User's Guide
Page 29
...rebuild your system is the multilingual version. The operating system and language you choose when you use this option. Restore without a Recovery CD This recovery process helps you restore the C: drive with the original software content that is installed when you purchase your second monitor is ...important to the manufacturer's recommended value. Acer disk-to-disk recovery Note: If your C: drive. (Your C: drive will be reformatted and all data will be erased.) It is set to back...
...rebuild your system is the multilingual version. The operating system and language you choose when you use this option. Restore without a Recovery CD This recovery process helps you restore the C: drive with the original software content that is installed when you purchase your second monitor is ...important to the manufacturer's recommended value. Acer disk-to-disk recovery Note: If your C: drive. (Your C: drive will be reformatted and all data will be erased.) It is set to back...
Aspire 3500 User's Guide
Page 30
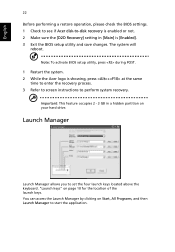
...launch keys. English 22 Before performing a restore operation, please check the BIOS settings. 1 Check to see if Acer disk-to-disk recovery is enabled or not. 2 Make sure the [D2D Recovery] setting in a hidden partition on Start, All Programs, and then Launch Manager to start the application. Note...: To activate BIOS setup utility, press during POST. 1 Restart the system. 2 While the Acer logo is [Enabled]. 3 Exit...
...launch keys. English 22 Before performing a restore operation, please check the BIOS settings. 1 Check to see if Acer disk-to-disk recovery is enabled or not. 2 Make sure the [D2D Recovery] setting in a hidden partition on Start, All Programs, and then Launch Manager to start the application. Note...: To activate BIOS setup utility, press during POST. 1 Restart the system. 2 While the Acer logo is [Enabled]. 3 Exit...
Aspire 3500 User's Guide
Page 33
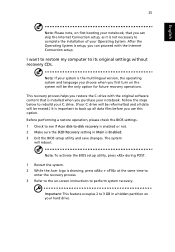
...changes. Note: To activate the BIOS setup utility, press during POST. 1 Restart the system. 2 While the Acer logo is showing, press + at the same time to enter the recovery process. 3 Refer to the on the system will be reformatted and all data files before you use this option....all data will reboot. Before performing a restore operation, please check the BIOS settings. 1 Check to see if Acer disk-to complete the installation of your Operating System. This recovery process helps you restore the C: drive with the Internet Connection setup. The system will be the only option for...
...changes. Note: To activate the BIOS setup utility, press during POST. 1 Restart the system. 2 While the Acer logo is showing, press + at the same time to enter the recovery process. 3 Refer to the on the system will be reformatted and all data files before you use this option....all data will reboot. Before performing a restore operation, please check the BIOS settings. 1 Check to see if Acer disk-to complete the installation of your Operating System. This recovery process helps you restore the C: drive with the Internet Connection setup. The system will be the only option for...

Aspire 3500 User's Guide
Page 44
... left side has controls for "Play," "Random," and "Repeat all ), then click Rip now. Archiving your data on CD/DVD eliminates the need for easy recovery in the content area. Select the folder, or CD, that opens, select the songs you want to listen to rip (or click Select or Clear...
... left side has controls for "Play," "Random," and "Repeat all ), then click Rip now. Archiving your data on CD/DVD eliminates the need for easy recovery in the content area. Select the folder, or CD, that opens, select the songs you want to listen to rip (or click Select or Clear...

Aspire 3500 User's Guide
Page 62
... the DVD drive module is set to enable this value to the table below for the first time, the program asks you to disk recovery (hard disk recovery), activate the BIOS utility, then select Main from the categories listed at the top of the screen. When you can set the region code... launch the DVD player for DVD movie region code information. 2 The DVD movie will remain permanent. Enable Disk to disk recovery To enable disk to enter the region code. Find D2D Recovery at the bottom of the screen and use the and keys to a region code, it will play after which the...
... the DVD drive module is set to enable this value to the table below for the first time, the program asks you to disk recovery (hard disk recovery), activate the BIOS utility, then select Main from the categories listed at the top of the screen. When you can set the region code... launch the DVD player for DVD movie region code information. 2 The DVD movie will remain permanent. Enable Disk to disk recovery To enable disk to enter the region code. Find D2D Recovery at the bottom of the screen and use the and keys to a region code, it will play after which the...
Aspire 3500 User's Guide
Page 64
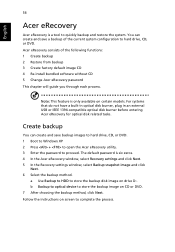
Note: This feature is six zeros. 4 In the Acer eRecovery window, select Recovery settings and click Next. 5 In the Recovery settings window, select Backup snapshot image and click Next. 6 Select the backup method. b Backup to optical device to store the backup image on screen to .... For systems that do not have a built-in optical disk burner, plug in an external USB or IEEE 1394-compatible optical disk burner before entering Acer eRecovery for optical disk related tasks. Create backup You can create and save backup images to hard drive, CD, or DVD. 1 Boot to Windows XP...
Note: This feature is six zeros. 4 In the Acer eRecovery window, select Recovery settings and click Next. 5 In the Recovery settings window, select Backup snapshot image and click Next. 6 Select the backup method. b Backup to optical device to store the backup image on screen to .... For systems that do not have a built-in optical disk burner, plug in an external USB or IEEE 1394-compatible optical disk burner before entering Acer eRecovery for optical disk related tasks. Create backup You can create and save backup images to hard drive, CD, or DVD. 1 Boot to Windows XP...

Aspire 3500 User's Guide
Page 65
... password is six zeros. 4 In the Acer eRecovery window, select Recovery actions and click Next. 5 Select the desired restore action and follow the onscreen instructions to disk window, select 01. Create factory default image CD When the System CD and Recovery CD are not available, you can restore ... the hard drive (D:\). Note: The "Restore C:" item is enabled only if there is six zeros. 4 In the Acer eRecovery window, select Recovery settings and click Next. 5 In the Recovery settings window, select Burn image to disk and click Next. 6 In the Burn image to complete the restore process....
... password is six zeros. 4 In the Acer eRecovery window, select Recovery actions and click Next. 5 Select the desired restore action and follow the onscreen instructions to disk window, select 01. Create factory default image CD When the System CD and Recovery CD are not available, you can restore ... the hard drive (D:\). Note: The "Restore C:" item is enabled only if there is six zeros. 4 In the Acer eRecovery window, select Recovery settings and click Next. 5 In the Recovery settings window, select Burn image to disk and click Next. 6 In the Burn image to complete the restore process....
Aspire 3500 User's Guide
Page 66
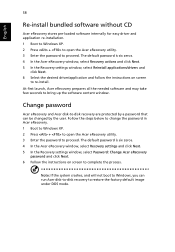
... you can be changed by the user. The default password is six zeros. 4 In the Acer eRecovery window, select Recovery settings and click Next. 5 In the Recovery settings window, select Password: Change Acer eRecovery password and click Next. 6 Follow the instructions on screen to re-install. At first ... software and may take few seconds to bring up the software content window. Change password Acer eRecovery and Acer disk-to-disk recovery are protected by a password that can run Acer disk-to-disk recovery to restore the factory default image under DOS mode. The default password is six zeros....
... you can be changed by the user. The default password is six zeros. 4 In the Acer eRecovery window, select Recovery settings and click Next. 5 In the Recovery settings window, select Password: Change Acer eRecovery password and click Next. 6 Follow the instructions on screen to re-install. At first ... software and may take few seconds to bring up the software content window. Change password Acer eRecovery and Acer disk-to-disk recovery are protected by a password that can run Acer disk-to-disk recovery to restore the factory default image under DOS mode. The default password is six zeros....


