Aspire 3000 / 3500 / 5000 Service Guide
Page 35
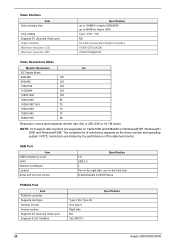
... 2.0 USB 2.0 3 Two on the driver version and operating system. The complete list of slots Access location Supports ZV (Zoomed Video) port Supports 32 bit CardBus Type II (No Tpye III) One type II Right side NO Yes (IRQ17) Specification 26 Aspire 3000/3500//5000 NOTE: 16:9 aspect ratio...memory size Chip voltage Supports ZV (Zoomed Video) port Graph interface Maximum resolution LCD Maximum resolution CRT Specification up to 128MB for Aspire 3000/5000 up to 64MB for Aspire 3500 Core / 2.5V, 1.5V, NO 4X AGP (Accelerated Graphic Port) Bus 1600X1200 (UXGA) 2048X1536@60HZ Video Resolutions Mode...
... 2.0 USB 2.0 3 Two on the driver version and operating system. The complete list of slots Access location Supports ZV (Zoomed Video) port Supports 32 bit CardBus Type II (No Tpye III) One type II Right side NO Yes (IRQ17) Specification 26 Aspire 3000/3500//5000 NOTE: 16:9 aspect ratio...memory size Chip voltage Supports ZV (Zoomed Video) port Graph interface Maximum resolution LCD Maximum resolution CRT Specification up to 128MB for Aspire 3000/5000 up to 64MB for Aspire 3500 Core / 2.5V, 1.5V, NO 4X AGP (Accelerated Graphic Port) Bus 1600X1200 (UXGA) 2048X1536@60HZ Video Resolutions Mode...

Aspire 3000 / 3500 / 5000 Service Guide
Page 52
... utility to the bootable diskette. 3. If the battery pack does not contain enough power to run the Phlash utility. NOTE: Do not install memory-related drivers (XMS, EMS, DPMI) when you run the Phlash. 1. Copy the Phlash utilities to update the system BIOS flash ROM. Then boot the system from the...
... utility to the bootable diskette. 3. If the battery pack does not contain enough power to run the Phlash utility. NOTE: Do not install memory-related drivers (XMS, EMS, DPMI) when you run the Phlash. 1. Copy the Phlash utilities to update the system BIOS flash ROM. Then boot the system from the...
Aspire 3000 / 3500 / 5000 Service Guide
Page 55
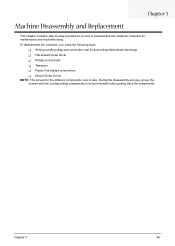
... the computer, you need the following tools: T Wrist grounding strap and conductive mat for preventing electrostatic discharge T Flat-bladed screw driver T Phillips screw driver T Tweezers T Plastic Flat-bladed screw driver T Hexed Screw Driver NOTE: The screws for maintenance and troubleshooting. Chapter 3 46 During the disassembly process, group the screws with the corresponding components to...
... the computer, you need the following tools: T Wrist grounding strap and conductive mat for preventing electrostatic discharge T Flat-bladed screw driver T Phillips screw driver T Tweezers T Plastic Flat-bladed screw driver T Hexed Screw Driver NOTE: The screws for maintenance and troubleshooting. Chapter 3 46 During the disassembly process, group the screws with the corresponding components to...
Aspire 3000 / 3500 / 5000 Service Guide
Page 60
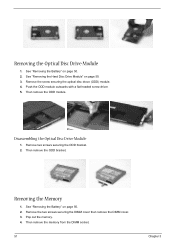
See "Removing the Battery" on page 50. 3. Push the ODD module outwards with a flat headed screw driver. 5. Disassembling the Optical Disc Drive Module 1. Remove the screw securing the optical disc drove (ODD) module. 4. Then remove the ODD bracket. Then remove the ODD ...
See "Removing the Battery" on page 50. 3. Push the ODD module outwards with a flat headed screw driver. 5. Disassembling the Optical Disc Drive Module 1. Remove the screw securing the optical disc drove (ODD) module. 4. Then remove the ODD bracket. Then remove the ODD ...
Aspire 3000 / 3500 / 5000 Service Guide
Page 63
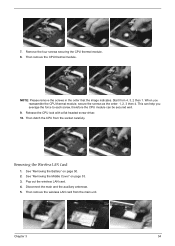
... that the image indicates. Then remove the wireless LAN card from 4, 3, 2 then 1. Start from the main unit. Release the CPU lock with a flat headed screw driver. 10. See "Removing the Middle Cover" on page 50. 2. See "Removing the Battery" on page 53. 3. Pop out the wireless LAN card. 4. Removing the Wireless...
... that the image indicates. Then remove the wireless LAN card from 4, 3, 2 then 1. Start from the main unit. Release the CPU lock with a flat headed screw driver. 10. See "Removing the Middle Cover" on page 50. 2. See "Removing the Battery" on page 53. 3. Pop out the wireless LAN card. 4. Removing the Wireless...
Aspire 3000 / 3500 / 5000 Service Guide
Page 64
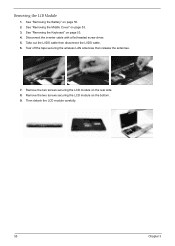
Disconnect the inverter cable with a flat headed screw driver. 5. See "Removing the Battery" on the bottom. 9. Remove the two screws securing the LCD module on page 50. 2. Then detach the LCD module carefully. 55 Chapter 3 See "Removing the Keyboard" on page 53. 3. Tear off the tape securing the wireless LAN antennae then release the antennae. 7. See "Removing the Middle Cover" on page 53. 4. Remove the two screws securing the LCD module on the rear side. 8. Take out the LVDS cable then disconnect the LVDS cable. 6. Removing the LCD Module 1.
Disconnect the inverter cable with a flat headed screw driver. 5. See "Removing the Battery" on the bottom. 9. Remove the two screws securing the LCD module on page 50. 2. Then detach the LCD module carefully. 55 Chapter 3 See "Removing the Keyboard" on page 53. 3. Tear off the tape securing the wireless LAN antennae then release the antennae. 7. See "Removing the Middle Cover" on page 53. 4. Remove the two screws securing the LCD module on the rear side. 8. Take out the LVDS cable then disconnect the LVDS cable. 6. Removing the LCD Module 1.
Aspire 3000 / 3500 / 5000 Service Guide
Page 68
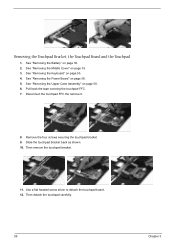
... Power Board" on page 53. 4. See "Removing the Keyboard" on page 58. 5. See "Removing the Upper Case Assembly" on page 53. 3. Use a flat headed screw driver to detach the touchpad board. 12. See "Removing the Middle Cover" on page 58. 6. Then remove the touchpad bracket. 11. Slide the touchpad bracket back...
... Power Board" on page 53. 4. See "Removing the Keyboard" on page 58. 5. See "Removing the Upper Case Assembly" on page 53. 3. Use a flat headed screw driver to detach the touchpad board. 12. See "Removing the Middle Cover" on page 58. 6. Then remove the touchpad bracket. 11. Slide the touchpad bracket back...

Aspire 3000 / 3500 / 5000 Service Guide
Page 76
... damage to the drive or cause the drive to be tested. If the error still remains: 1. Do the following to isolate the problem to a controller, driver, or diskette. See if FDD Test is correctly seated in the connector on the system board. Do the following one label attached to FDD Test. 3.
... damage to the drive or cause the drive to be tested. If the error still remains: 1. Do the following to isolate the problem to a controller, driver, or diskette. See if FDD Test is correctly seated in the connector on the system board. Do the following one label attached to FDD Test. 3.

Aspire 3000 / 3500 / 5000 Service Guide
Page 89
... 34. Battery pack System board PCMCIA-Related Symptoms Symptom / Error System cannot detect the PC Card (PCMCIA) PCMCIA slot pin is from hibernation mode. Audio driver Speaker System board Speaker System board Action in Sequence Enter BIOS Setup Utility to execute "Load Default Settings, then reboot system. The system doesn't resume...
... 34. Battery pack System board PCMCIA-Related Symptoms Symptom / Error System cannot detect the PC Card (PCMCIA) PCMCIA slot pin is from hibernation mode. Audio driver Speaker System board Speaker System board Action in Sequence Enter BIOS Setup Utility to execute "Load Default Settings, then reboot system. The system doesn't resume...

Aspire 3000 / 3500 / 5000 Service Guide
Page 90
...BIOS Setup Utility is set to Enabled. Keyboard System board Reconnect touchpad cable. Onboard Devices Configuration Run printer self-test. Printer driver Printer cable Printer System Board Ensure the "Serial Port" in Sequence Enter BIOS Setup Utility to Enabled. USB does not work...to execute "Load Default Settings", then reboot system. Refresh battery (continue use battery until power off, then charge battery). Device driver Device cable Device System board Keyboard/Touchpad-Related Symptoms Symptom / Error Keyboard (one or more keys) does not work correctly....
...BIOS Setup Utility is set to Enabled. Keyboard System board Reconnect touchpad cable. Onboard Devices Configuration Run printer self-test. Printer driver Printer cable Printer System Board Ensure the "Serial Port" in Sequence Enter BIOS Setup Utility to Enabled. USB does not work...to execute "Load Default Settings", then reboot system. Refresh battery (continue use battery until power off, then charge battery). Device driver Device cable Device System board Keyboard/Touchpad-Related Symptoms Symptom / Error Keyboard (one or more keys) does not work correctly....

Aspire 3000 / 3500 / 5000 Service Guide
Page 114
Microsoft Windows XP Environment Test Processor Item Memory LCD LCD Hard Disk Drive Specifications Aspire 3000: MOBILE SEMPRON 2800+ 25W D MOBILE SEMPRON 3000+ 25W D Aspire 5000 MOBILE TURION 64 ML28 MOBILE TURION 64 ML30 MOBILE TURION 64 ML32 MOBILE TURION 64 ML34 MOBILE TURION 64 ML37 SO-DIMM DDR333 1GB ... 15.4" WXGA NB LCD QDI QD15TL02-04 GLARE TYPE LEAD-FREE 15.4" WXGA NB LCD N154I1-L07GLARE TYPE 15" XGA NB LCD AUO B150XG01V2.XXXXX (Driver IC:MEC/TOS 15" XGA NB LCD SAMSUNG LTN150XB-L03-C00 MADE IN CHINA 15" XGA NB LCD LG LP150X08-A3MADE IN CHINA 15" XGA...
Microsoft Windows XP Environment Test Processor Item Memory LCD LCD Hard Disk Drive Specifications Aspire 3000: MOBILE SEMPRON 2800+ 25W D MOBILE SEMPRON 3000+ 25W D Aspire 5000 MOBILE TURION 64 ML28 MOBILE TURION 64 ML30 MOBILE TURION 64 ML32 MOBILE TURION 64 ML34 MOBILE TURION 64 ML37 SO-DIMM DDR333 1GB ... 15.4" WXGA NB LCD QDI QD15TL02-04 GLARE TYPE LEAD-FREE 15.4" WXGA NB LCD N154I1-L07GLARE TYPE 15" XGA NB LCD AUO B150XG01V2.XXXXX (Driver IC:MEC/TOS 15" XGA NB LCD SAMSUNG LTN150XB-L03-C00 MADE IN CHINA 15" XGA NB LCD LG LP150X08-A3MADE IN CHINA 15" XGA...

Aspire 3000 / 5000 User's Guide
Page 32
... may be blocking the ports. • Make sure you have the appropriate software running on both devices (for file transfers) or you have the appropriate drivers (for more detail. • If headphones, earphones or external speakers are IrDA-compliant. Simply insert the tip of 1 meter apart. • Make sure there is...
... may be blocking the ports. • Make sure you have the appropriate software running on both devices (for file transfers) or you have the appropriate drivers (for more detail. • If headphones, earphones or external speakers are IrDA-compliant. Simply insert the tip of 1 meter apart. • Make sure there is...
Aspire 3000 / 5000 User's Guide
Page 54
Traveling internationally with the computer When you are traveling • Spare, fully-charged battery packs • Additional printer driver files if you plan to use another printer • Proof of purchase, in case you need to show it for traveling. English 46 .... What to bring with you Bring the following items with you: • AC adaptor • Spare, fully-charged battery pack(s) • Additional printer driver files if you plan to use another printer Special considerations In addition to the guidelines for taking the computer home, follow these guidelines to protect...
Traveling internationally with the computer When you are traveling • Spare, fully-charged battery packs • Additional printer driver files if you plan to use another printer • Proof of purchase, in case you need to show it for traveling. English 46 .... What to bring with you Bring the following items with you: • AC adaptor • Spare, fully-charged battery pack(s) • Additional printer driver files if you plan to use another printer Special considerations In addition to the guidelines for taking the computer home, follow these guidelines to protect...

Aspire 3000 / 5000 User's Guide
Page 68
...password to re-install. English 60 Re-install bundled software without CD Acer eRecovery stores pre-loaded software internally for easy driver and application re-installation. 1 Boot to Windows XP. 2 Press + to open the Acer eRecovery utility. 3 Enter the password to restore the factory default .... The default password is six zeros. 4 In the Acer eRecovery window, select Recovery actions and click Next. 5 In the Recovery settings window, select Reinstall applications/drivers and click Next. 6 Select the desired driver/application and follow the instructions on screen to bring up...
...password to re-install. English 60 Re-install bundled software without CD Acer eRecovery stores pre-loaded software internally for easy driver and application re-installation. 1 Boot to Windows XP. 2 Press + to open the Acer eRecovery utility. 3 Enter the password to restore the factory default .... The default password is six zeros. 4 In the Acer eRecovery window, select Recovery actions and click Next. 5 In the Recovery settings window, select Reinstall applications/drivers and click Next. 6 Select the desired driver/application and follow the instructions on screen to bring up...


