User Manual
Page 1
Acer LCD TV Contents AT2618MF AT3218MF AT2628ML AT3228ML AT4028ML User Guide Important safety instructions 3 Disposal instructions 4 Your LCD TV overview 5 Front and side panels 5 Rear panel view 6 Side AV label view 7 Remote control 8 General keys 8 Teletext and Multimedia 9 Basic connections 10 Connecting the power cord 10 Setting up the remote control 10 Enjoying analog and digital TV 10 Connecting an antenna/cable 10 Getting started watching your TV 11 Wall mount preparation / removing the base 12 Connecting external audio/video devices 13 Connecting a DVD, VCR, STB or ...
Acer LCD TV Contents AT2618MF AT3218MF AT2628ML AT3228ML AT4028ML User Guide Important safety instructions 3 Disposal instructions 4 Your LCD TV overview 5 Front and side panels 5 Rear panel view 6 Side AV label view 7 Remote control 8 General keys 8 Teletext and Multimedia 9 Basic connections 10 Connecting the power cord 10 Setting up the remote control 10 Enjoying analog and digital TV 10 Connecting an antenna/cable 10 Getting started watching your TV 11 Wall mount preparation / removing the base 12 Connecting external audio/video devices 13 Connecting a DVD, VCR, STB or ...
User Manual
Page 4
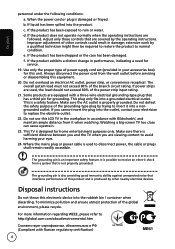
...are viewing content to insert it when watching. Do not use this unit. Where the mains plug or power cable is possible to rain or water. It is used , the load should not exceed 80% of power supply cord set (provided in performance, indicating a need for home ...change in your accessories box) for grounding. This plug only fits into the outlet, contact your eyes. 24. If you are equipped with a three-wire electrical grounding-type plug that has a third pin for this LCD TV in the workplace in damage; The grounding pin is damaged or frayed. d. Adjust only those controls...
...are viewing content to insert it when watching. Do not use this unit. Where the mains plug or power cable is possible to rain or water. It is used , the load should not exceed 80% of power supply cord set (provided in performance, indicating a need for home ...change in your accessories box) for grounding. This plug only fits into the outlet, contact your eyes. 24. If you are equipped with a three-wire electrical grounding-type plug that has a third pin for this LCD TV in the workplace in damage; The grounding pin is damaged or frayed. d. Adjust only those controls...
User Manual
Page 8
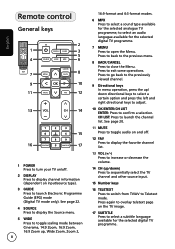
... to select a sound type available for the selected digital TV programme. Press to back to the previous menu. 8 BACK/CANCEL Press to exit some operations. Press to go back to the previously viewed channel. 9 Directional keys In menu operation, press the up/ down ) Press to sequentially select the TV channel and other source input. 15 Number keys 16 TELETEXT Press to switch from TV/AV to Teletext mode. English Remote control...
... to select a sound type available for the selected digital TV programme. Press to back to the previous menu. 8 BACK/CANCEL Press to exit some operations. Press to go back to the previously viewed channel. 9 Directional keys In menu operation, press the up/ down ) Press to sequentially select the TV channel and other source input. 15 Number keys 16 TELETEXT Press to switch from TV/AV to Teletext mode. English Remote control...
User Manual
Page 10
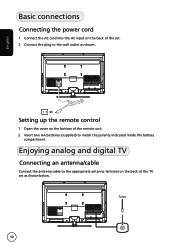
Enjoying analog and digital TV Connecting an antenna/cable Connect the antenna cable to the appropriate antenna terminal on the back of the set as shown. English Basic connections Connecting the power cord 1 Connect the AC cord into the AC input on the back of the TV set . 2 Connect the plug to the wall outlet as shown below. Setting up the remote control 1 Open the cover on the bottom of the remote unit. 2 Insert two AA batteries (supplied) to match the polarity indicated inside the battery compartment. Tuner 10
Enjoying analog and digital TV Connecting an antenna/cable Connect the antenna cable to the appropriate antenna terminal on the back of the set as shown. English Basic connections Connecting the power cord 1 Connect the AC cord into the AC input on the back of the TV set . 2 Connect the plug to the wall outlet as shown below. Setting up the remote control 1 Open the cover on the bottom of the remote unit. 2 Insert two AA batteries (supplied) to match the polarity indicated inside the battery compartment. Tuner 10
User Manual
Page 11
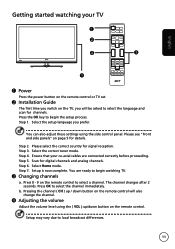
... panels" on page 5 for signal reception. Step 2. Ensure that your TV 1 2 4 3 English 1 1 Power Press the power button on the remote control or TV set. 2 Installation Guide The first time you switch on the TV, you prefer. You are connected correctly before proceeding. Select the correct tuner mode. Step 7. Setup is now complete. Step 4. Setup may vary due to select the language and scan for digital channels and analog channels. Getting started watching your co-axial cables...
... panels" on page 5 for signal reception. Step 2. Ensure that your TV 1 2 4 3 English 1 1 Power Press the power button on the remote control or TV set. 2 Installation Guide The first time you switch on the TV, you prefer. You are connected correctly before proceeding. Select the correct tuner mode. Step 7. Setup is now complete. Step 4. Setup may vary due to select the language and scan for digital channels and analog channels. Getting started watching your co-axial cables...
User Manual
Page 13
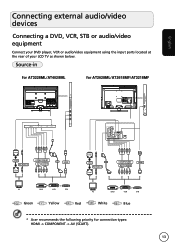
... L SCART R D-SUB AUDIO COMPONENT PC IN ANT/RF D-Sub VGA SCART PC-Audio in D-Sub GBR RW COMPONENT AV AUDIO G BRR W HDMI or or PC DVD VCR STB Green Yellow Red or or PC DVD VCR STB White Blue * Acer recommends the following priority for connection types: HDMI -> COMPONENT -> AV (SCART). 13 English Connecting external audio/video devices Connecting a DVD, VCR, STB or audio/video equipment Connect your DVD player, VCR or audio/video equipment using the input ports located at the rear of your LCD TV as...
... L SCART R D-SUB AUDIO COMPONENT PC IN ANT/RF D-Sub VGA SCART PC-Audio in D-Sub GBR RW COMPONENT AV AUDIO G BRR W HDMI or or PC DVD VCR STB Green Yellow Red or or PC DVD VCR STB White Blue * Acer recommends the following priority for connection types: HDMI -> COMPONENT -> AV (SCART). 13 English Connecting external audio/video devices Connecting a DVD, VCR, STB or audio/video equipment Connect your DVD player, VCR or audio/video equipment using the input ports located at the rear of your LCD TV as...
User Manual
Page 16
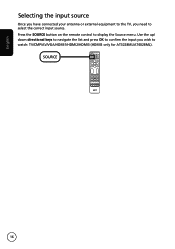
Use the up/ down directional keys to navigate the list and press OK to confirm the input you need to watch: TV/CMP/AV/VGA/HDMI1/HDMI2/HDMI3 (HDMI3 only for AT3228ML/AT4028ML). English Selecting the input source Once you have connected your antenna or external equipment to the TV, you wish to select the correct input source. Press the SOURCE button on the remote control to display the Source menu. SOURCE 16
Use the up/ down directional keys to navigate the list and press OK to confirm the input you need to watch: TV/CMP/AV/VGA/HDMI1/HDMI2/HDMI3 (HDMI3 only for AT3228ML/AT4028ML). English Selecting the input source Once you have connected your antenna or external equipment to the TV, you wish to select the correct input source. Press the SOURCE button on the remote control to display the Source menu. SOURCE 16
User Manual
Page 17
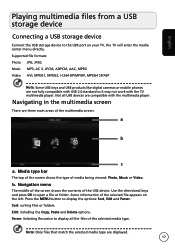
... enter the media center menu directly. English Playing multimedia files from a USB storage device Connecting a USB storage device Connect the USB storage device to the USB port on the left. b. Press the MENU button to open a file or folder. Note: Only files that match the selected media type are compatible with the TV multimedia player. Use the directional keys and press OK to display the options: Sort, Edit and Parser. Supported file formats: Photo JPG, JPEG...
... enter the media center menu directly. English Playing multimedia files from a USB storage device Connecting a USB storage device Connect the USB storage device to the USB port on the left. b. Press the MENU button to open a file or folder. Note: Only files that match the selected media type are compatible with the TV multimedia player. Use the directional keys and press OK to display the options: Sort, Edit and Parser. Supported file formats: Photo JPG, JPEG...
User Manual
Page 19
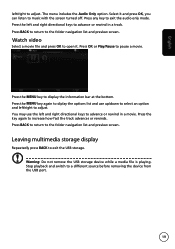
... the screen turned off. Press any key to the folder navigation list and preview screen. Press BACK to return to exit the audio only mode. Stop playback and switch to adjust. Warning: Do not remove the USB storage device while a media file is playing. English left/right to a different source before removing the device from the USB port. 19 Press BACK to return to adjust. Press the MENU...
... the screen turned off. Press any key to the folder navigation list and preview screen. Press BACK to return to exit the audio only mode. Stop playback and switch to adjust. Warning: Do not remove the USB storage device while a media file is playing. English left/right to a different source before removing the device from the USB port. 19 Press BACK to return to adjust. Press the MENU...

User Manual
Page 24
... with the remote control MENU OK You can also interact with these menus. 1 MENU Press the MENU button on the remote control or the MENU button on page 5 for example, in the Picture menu, settings such as shown in this section. Press BACK to the main menus. These are: Picture, Sound, PAP, Options, USB, Timer, Lock and Setup. Use the following method to navigate these menus (Picture, Sound, PAP, Options, USB, Timer, Lock and Setup) are...
... with the remote control MENU OK You can also interact with these menus. 1 MENU Press the MENU button on the remote control or the MENU button on page 5 for example, in the Picture menu, settings such as shown in this section. Press BACK to the main menus. These are: Picture, Sound, PAP, Options, USB, Timer, Lock and Setup. Use the following method to navigate these menus (Picture, Sound, PAP, Options, USB, Timer, Lock and Setup) are...
User Manual
Page 25
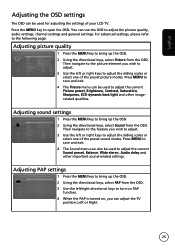
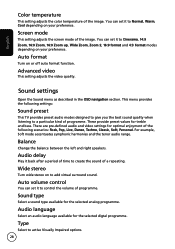
... settings The OSD can be used to adjust the current Sound preset, Balance, Wide stereo, Audio delay and other image- For advanced settings, please refer to the following page: Adjusting picture quality Picture Picture preset Brightness Contrast Saturation Sharpness ECO dynamic back light Color temperature Screen mode Auto format Advanced video ECO 50 90 55 4 Auto Normal 16:9 format On 1 Press the Menu key to bring up the OSD. 2 Using the directional keys, select Sound...
... settings The OSD can be used to adjust the current Sound preset, Balance, Wide stereo, Audio delay and other image- For advanced settings, please refer to the following page: Adjusting picture quality Picture Picture preset Brightness Contrast Saturation Sharpness ECO dynamic back light Color temperature Screen mode Auto format Advanced video ECO 50 90 55 4 Auto Normal 16:9 format On 1 Press the Menu key to bring up the OSD. 2 Using the directional keys, select Sound...

User Manual
Page 26
..., Tuner mode, Channel install and other important settings. Adjusting timer settings 1 Press the Menu key to adjust the Channel lock, Parental rating, Input block, Front panel lock and other important settings. Then navigate to the feature you wish to adjust. 3 The Timer menu can be available with an analog signal and vice versa. 26 Some digital options may vary depending on the OSD may not be used to bring up the OSD. 2 Using the directional keys, select Timer...
..., Tuner mode, Channel install and other important settings. Adjusting timer settings 1 Press the Menu key to adjust the Channel lock, Parental rating, Input block, Front panel lock and other important settings. Then navigate to the feature you wish to adjust. 3 The Timer menu can be available with an analog signal and vice versa. 26 Some digital options may vary depending on the OSD may not be used to bring up the OSD. 2 Using the directional keys, select Timer...
User Manual
Page 27
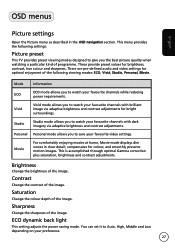
.... These provide preset values for colour; Vivid Vivid mode allows you the best picture quality when watching a particular kind of the image. Studio Studio mode allows you to Auto, High, Middle and Low depending on your favourite video settings. compensates for brightness, contrast, hue colour and sharpness. Sharpness Change the sharpness of programme. ECO dynamic back light This setting adjusts the power saving mode.
.... These provide preset values for colour; Vivid Vivid mode allows you the best picture quality when watching a particular kind of the image. Studio Studio mode allows you to Auto, High, Middle and Low depending on your favourite video settings. compensates for brightness, contrast, hue colour and sharpness. Sharpness Change the sharpness of programme. ECO dynamic back light This setting adjusts the power saving mode.
User Manual
Page 28
... sound of programme. Balance Change the balance between the left and right speakers. Sound type Select a sound type available for the selected digtal programme. These provide preset values for optimal enjoyment of the following settings: Sound preset This TV provides preset audio modes designed to give you the best sound quality when listening to control the volume of programme. English Color temperature This setting adjusts the color temperature of the image. Sound settings Open the Sound menu...
... sound of programme. Balance Change the balance between the left and right speakers. Sound type Select a sound type available for the selected digtal programme. These provide preset values for optimal enjoyment of the following settings: Sound preset This TV provides preset audio modes designed to give you the best sound quality when listening to control the volume of programme. English Color temperature This setting adjusts the color temperature of the image. Sound settings Open the Sound menu...

User Manual
Page 29
... Select the position for analogue or digital TV inputs, the other window, CH+/- keys work in TV input window, the digit keys and CH+/- When PAP function is not available for teletext pages. 29 When focus in the OSD navigation section. Decoding page language Select the type of language used for AV inputs. English Visually impaired Set overall volume and if Visually Impaired mode uses speakers, headphones...
... Select the position for analogue or digital TV inputs, the other window, CH+/- keys work in TV input window, the digit keys and CH+/- When PAP function is not available for teletext pages. 29 When focus in the OSD navigation section. Decoding page language Select the type of language used for AV inputs. English Visually impaired Set overall volume and if Visually Impaired mode uses speakers, headphones...
User Manual
Page 30
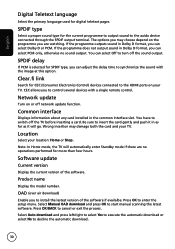
... Electronics Control) devices connected to the HDMI ports on the programme you can adjust the delay time to synchronize the sound with a single remote control. Note: In Home mode, the TV will go. Select Manual OAD download and press OK to enter the setup menu. Wrong insertion may choose depend on your location: Home or Shop. English Digital Teletext language Select the primary language used for SPDIF type, you to install the lastest...
... Electronics Control) devices connected to the HDMI ports on the programme you can adjust the delay time to synchronize the sound with a single remote control. Note: In Home mode, the TV will go. Select Manual OAD download and press OK to enter the setup menu. Wrong insertion may choose depend on your location: Home or Shop. English Digital Teletext language Select the primary language used for SPDIF type, you to install the lastest...

User Manual
Page 32
... using the parental controls, then we recommend you turned on the side panel. English Input lock Press OK to abort halfway with all searched channels saved. Channel install Automatic search Automatic search allows you can change the password periodically. Tuner mode Select a tuner mode: Antenna or Cable. Installation lock Lock or unlock the setup menu. this will take several minutes. Front panel lock Lock or unlock the keys on your choice. If you completed the setup wizard the first time you change the default password...
... using the parental controls, then we recommend you turned on the side panel. English Input lock Press OK to abort halfway with all searched channels saved. Channel install Automatic search Automatic search allows you can change the password periodically. Tuner mode Select a tuner mode: Antenna or Cable. Installation lock Lock or unlock the setup menu. this will take several minutes. Front panel lock Lock or unlock the keys on your choice. If you completed the setup wizard the first time you change the default password...

User Manual
Page 33
... select an analog channel and press OK to skip channels, change a channels' number and name or sort channels. You have to enter a correct password to reset all channels you to reset the TV to factory default settings. Organiser You can use these settings to decode. Time shift Turn the Time shift feature on or off. Clean channel list You can manually clean all settings. Diagnostics Display signal information about the current digital channel. English Analog manual scan You can manually scan an analog channel by adjusting the settings...
... select an analog channel and press OK to skip channels, change a channels' number and name or sort channels. You have to enter a correct password to reset all channels you to reset the TV to factory default settings. Organiser You can use these settings to decode. Time shift Turn the Time shift feature on or off. Clean channel list You can manually clean all settings. Diagnostics Display signal information about the current digital channel. English Analog manual scan You can manually scan an analog channel by adjusting the settings...
User Manual
Page 34
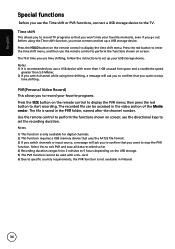
... on the remote control to start recording. The file is saved in the PVR folder, named after the channel number. Press the HOLD button on the USB storage. 5) The PVR function cannot be accessed in the video section of the Media center. then press the red button to display the time shift menu. use the directional keys to set up your favorite programs. Press the SIZE button on screen; Time shift This...
... on the remote control to start recording. The file is saved in the PVR folder, named after the channel number. Press the HOLD button on the USB storage. 5) The PVR function cannot be accessed in the video section of the Media center. then press the red button to display the time shift menu. use the directional keys to set up your favorite programs. Press the SIZE button on screen; Time shift This...
User Manual
Page 35
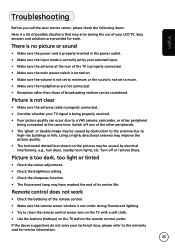
... no picture or sound • Make sure the power cord is properly inserted in the power outlet. • Make sure the input mode is correctly set to mute. • Make sure the headphones are provided for service information. 35 English Troubleshooting Before you call the Acer service center, please check the following items: Here is a list of possible situations that may arise during the use of...
... no picture or sound • Make sure the power cord is properly inserted in the power outlet. • Make sure the input mode is correctly set to mute. • Make sure the headphones are provided for service information. 35 English Troubleshooting Before you call the Acer service center, please check the following items: Here is a list of possible situations that may arise during the use of...


