User Manual
Page 5
... controls may expose you come into the product • the product was exposed to rain or water • the product has been dropped or the case has been damaged • the product exhibits a distinct change in performance, indicating a need to temperatures over 60°C (140°F). Do not pierce, open or...
... controls may expose you come into the product • the product was exposed to rain or water • the product has been dropped or the case has been damaged • the product exhibits a distinct change in performance, indicating a need to temperatures over 60°C (140°F). Do not pierce, open or...

User Manual
Page 7
... the device, and persons with hearing aids should position the device the above separation distance instructions are not limited to external RF transmissions.. In some cases, transmission of small children. Ensure that could be erased. Do not place credit cards or other magnetic storage media near the device, because information stored...
... the device, and persons with hearing aids should position the device the above separation distance instructions are not limited to external RF transmissions.. In some cases, transmission of small children. Ensure that could be erased. Do not place credit cards or other magnetic storage media near the device, because information stored...

User Manual
Page 63
...with your problems efficiently. This passport contains all you security and peace of mind when traveling. Read this handy booklet. Please consult http://global.acer.com. Before you call takes and help solve your computer. An ITW passport comes with our offices worldwide. Place your computer when you ... service centers is backed by your ITW passport on the screen (or the number and sequence in the case of purchase Always have an Acer-authorized ITW service site, you call Acer for online service, and please be at your proof-of-purchase in the flap located inside the front ...
...with your problems efficiently. This passport contains all you security and peace of mind when traveling. Read this handy booklet. Please consult http://global.acer.com. Before you call takes and help solve your computer. An ITW passport comes with our offices worldwide. Place your computer when you ... service centers is backed by your ITW passport on the screen (or the number and sequence in the case of purchase Always have an Acer-authorized ITW service site, you call Acer for online service, and please be at your proof-of-purchase in the flap located inside the front ...

User Manual
Page 86
... not have some items at home, take with you Unless you have an electrical outlet, reduce the drain on . If your meeting room. In both cases, press and release the power button to turn the computer back on the battery by putting the computer in a protective... case that the computer may want to bring the AC adapter with you to plug in the meeting will be longer, or if your desktop, follow ...
... not have some items at home, take with you Unless you have an electrical outlet, reduce the drain on . If your meeting room. In both cases, press and release the power button to turn the computer back on the battery by putting the computer in a protective... case that the computer may want to bring the AC adapter with you to plug in the meeting will be longer, or if your desktop, follow ...

User Manual
Page 88
... computer home, follow these tips are useful when traveling internationally: • When traveling in another printer • Proof of the country you are traveling in case you need to show it for traveling. Airport security X-ray machines are moving from country to power the computer. • If you are using the...
... computer home, follow these tips are useful when traveling internationally: • When traveling in another printer • Proof of the country you are traveling in case you need to show it for traveling. Airport security X-ray machines are moving from country to power the computer. • If you are using the...

Service Guide
Page 5
...the responsible personnel/channel to -date information available on card, modem, or extra memory capability). If, for Acer's "global" product offering. In such cases, please contact your Acer office may have decided to the BASIC CONFIGURATION decided for whatever reason, a part number change is made, ... to extend the functionality of a machine (e.g. To better fit local market requirements and enhance product competitiveness, your regional Acer office to those given in this printed Service Guide. These LOCALIZED FEATURES will not be covered in the FRU list of customer...
...the responsible personnel/channel to -date information available on card, modem, or extra memory capability). If, for Acer's "global" product offering. In such cases, please contact your Acer office may have decided to the BASIC CONFIGURATION decided for whatever reason, a part number change is made, ... to extend the functionality of a machine (e.g. To better fit local market requirements and enhance product competitiveness, your regional Acer office to those given in this printed Service Guide. These LOCALIZED FEATURES will not be covered in the FRU list of customer...
Service Guide
Page 17
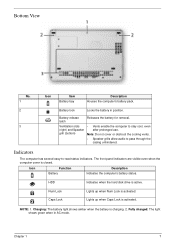
... cover or obstruct the cooling vents. • Speaker grills allow audio to -read status indicators. Indicators The computer has several easy-to pass through the casing unhindered. Icon Function Battery Description Indicates the computer's battery status. NOTE: 1. Fully charged: The light shows green when in position. Battery release latch Releases the...
... cover or obstruct the cooling vents. • Speaker grills allow audio to -read status indicators. Indicators The computer has several easy-to pass through the casing unhindered. Icon Function Battery Description Indicates the computer's battery status. NOTE: 1. Fully charged: The light shows green when in position. Battery release latch Releases the...
Service Guide
Page 33
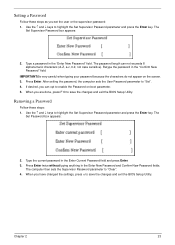
Type a password in the Enter New Password and Confirm New Password fields. Removing a Password Follow these steps as you can not exceeds 8 alphanumeric characters (A-Z, a-z, 0-9, not case sensitive). Chapter 2 23 The password length can opt to "Clear". 4. Press Enter twice without typing anything in the "Enter New Password" field. The Set Supervisor ...
Type a password in the Enter New Password and Confirm New Password fields. Removing a Password Follow these steps as you can not exceeds 8 alphanumeric characters (A-Z, a-z, 0-9, not case sensitive). Chapter 2 23 The password length can opt to "Clear". 4. Press Enter twice without typing anything in the "Enter New Password" field. The Set Supervisor ...
Service Guide
Page 39
See the image below. Select one upper-case string from the list. 4. Press 2. 3. Chapter 2 29 Remove HDD/BIOS Utility This section provide you with removing HDD/BIOS method: Remove HDD Password: • If you key in the selected string (0KJFN42 or UVEIQ96) on the HDD User Password screen. Reboot system and key in wrong HDD password three times, Hdd password error code displays. Key in hdd_pw 15494 0 2. To reset the HDD password, run HDD_PW.EXE as follows: 1.
See the image below. Select one upper-case string from the list. 4. Press 2. 3. Chapter 2 29 Remove HDD/BIOS Utility This section provide you with removing HDD/BIOS method: Remove HDD Password: • If you key in the selected string (0KJFN42 or UVEIQ96) on the HDD User Password screen. Reboot system and key in wrong HDD password three times, Hdd password error code displays. Key in hdd_pw 15494 0 2. To reset the HDD password, run HDD_PW.EXE as follows: 1.

Service Guide
Page 74
Replace the left hinge as shown. 2. Place the LCD Panel in to the panel • Check that the cables are tucked under the hinge brackets and run on the outside of the hinges 1. Replace the five securing screws as shown. 64 Chapter 3 Replacing the LCD Panel IMPORTANT:Before installing, take care of the following items: • All cabling must be tucked tightly and close to the case as shown. 3.
Replace the left hinge as shown. 2. Place the LCD Panel in to the panel • Check that the cables are tucked under the hinge brackets and run on the outside of the hinges 1. Replace the five securing screws as shown. 64 Chapter 3 Replacing the LCD Panel IMPORTANT:Before installing, take care of the following items: • All cabling must be tucked tightly and close to the case as shown. 3.

Service Guide
Page 75
Connect the camera cable as shown. Replace the camera board in to the case. 2. Replace the Mic board in to the case. 2. Replacing the Camera Board 1. Replacing the Mic Board 1. Chapter 3 65 Connect the MIC cable as shown.
Connect the camera cable as shown. Replace the camera board in to the case. 2. Replace the Mic board in to the case. 2. Replacing the Camera Board 1. Replacing the Mic Board 1. Chapter 3 65 Connect the MIC cable as shown.
Service Guide
Page 81
Place the SDD in the lower case. 2. Connect the FFC cable to the module and close the cable latch. Replacing the SDD Module IMPORTANT:The SSD module is only available on the Aspire one SSD computer SKU. 1. Connect the FFC cable to the mainboard and close 4. the cable latch. Chapter 3 71 Replace the two screws to secure the module. 3.
Place the SDD in the lower case. 2. Connect the FFC cable to the module and close the cable latch. Replacing the SDD Module IMPORTANT:The SSD module is only available on the Aspire one SSD computer SKU. 1. Connect the FFC cable to the mainboard and close 4. the cable latch. Chapter 3 71 Replace the two screws to secure the module. 3.
Service Guide
Page 82
HDD SKU SSD SKU 4. the cable latch. 72 Chapter 3 Replace the three or four screws (depending on SKU) to the mainboard and close 5. Connect the FFC cable to secure the module. Replacing the USB/LED/Power/Card Reader Board IMPORTANT:Before installing the USB board, take care of the following items: • Check that LED isn`t broken • SLIDER work smoothly 1. Turn the board over and place it in the lower case. 3. Connect the FFC cable to the board. 2. Connect the cable to the module and close the cable latch.
HDD SKU SSD SKU 4. the cable latch. 72 Chapter 3 Replace the three or four screws (depending on SKU) to the mainboard and close 5. Connect the FFC cable to secure the module. Replacing the USB/LED/Power/Card Reader Board IMPORTANT:Before installing the USB board, take care of the following items: • Check that LED isn`t broken • SLIDER work smoothly 1. Turn the board over and place it in the lower case. 3. Connect the FFC cable to the board. 2. Connect the cable to the module and close the cable latch.

Service Guide
Page 107
... applications online? Enable the state Shared, to download and install the applications. Click Install to share the local printer on Windows NT platforms. In this case, the Linux user's account number and the password must be unable to log in to the remote machine to access the network printer. Why doesn...
... applications online? Enable the state Shared, to download and install the applications. Click Install to share the local printer on Windows NT platforms. In this case, the Linux user's account number and the password must be unable to log in to the remote machine to access the network printer. Why doesn...
Service Guide
Page 126
Aspire one Exploded Diagram Item 1 Description Mainboard 2 Power Board 3 Upper Case 4 Lower Case 116 Part Number MB.S0306.001 (SDD SKU) MB.S0506.001 (HDD SKU) 55.S0207.001 60.S0207.001 60.S0607.001 60.S0307.001 60.S0707.001 60.S0207.002 60.S0407.001 60.S0607.002 60.S0807.001 60.S0307.002 60.S0507.001 60.S0707.002 60.S0907.001 Item 15 Description Left Hinge 16 LCD Bezel 17 LCD Panel 18 Camera Module Part Number 33.S0207.001 60.S0207.004 LK.08905.002 LK.0890D.001 57.S0207.001 57.S0207.002 Chapter 6
Aspire one Exploded Diagram Item 1 Description Mainboard 2 Power Board 3 Upper Case 4 Lower Case 116 Part Number MB.S0306.001 (SDD SKU) MB.S0506.001 (HDD SKU) 55.S0207.001 60.S0207.001 60.S0607.001 60.S0307.001 60.S0707.001 60.S0207.002 60.S0407.001 60.S0607.002 60.S0807.001 60.S0307.002 60.S0507.001 60.S0707.002 60.S0907.001 Item 15 Description Left Hinge 16 LCD Bezel 17 LCD Panel 18 Camera Module Part Number 33.S0207.001 60.S0207.004 LK.08905.002 LK.0890D.001 57.S0207.001 57.S0207.002 Chapter 6

Service Guide
Page 129
... JAPAN POWER CORD AF-S (INDIA) POWER CORD SWISS 3 PIN POWER CORD (UK) POWER CORD US-110V (BSMI) CABLE - SSD TO MB LCD CABLE Case/Cover/Bracket/Assembly UPPER CASE ASSY WHITE COLOR W/TP FFC Part No. 27.TAXV7.001 27.TATV7.004 27.T48V7.001 27.S0207.001 27.A50V7.003 27... 50.S0207.003 60.S0207.001 Chapter 6 LOWER CASE ASSY WHITE COLOR W/SPEAKER FOR WLAN 60.S0207.002 LOWER CASE ASSY WHITE COLOR HDD W/SPEAKER FOR WLAN UPPER CASE ASSY WHITE COLOR W/TP FFC FOR 3G LOWER CASE ASSY WHITE COLOR W/SPEAKER FOR WLAN 3G LOWER CASE ASSY WHITE COLOR HDD W/SPEAKER FOR WLAN 3G...
... JAPAN POWER CORD AF-S (INDIA) POWER CORD SWISS 3 PIN POWER CORD (UK) POWER CORD US-110V (BSMI) CABLE - SSD TO MB LCD CABLE Case/Cover/Bracket/Assembly UPPER CASE ASSY WHITE COLOR W/TP FFC Part No. 27.TAXV7.001 27.TATV7.004 27.T48V7.001 27.S0207.001 27.A50V7.003 27... 50.S0207.003 60.S0207.001 Chapter 6 LOWER CASE ASSY WHITE COLOR W/SPEAKER FOR WLAN 60.S0207.002 LOWER CASE ASSY WHITE COLOR HDD W/SPEAKER FOR WLAN UPPER CASE ASSY WHITE COLOR W/TP FFC FOR 3G LOWER CASE ASSY WHITE COLOR W/SPEAKER FOR WLAN 3G LOWER CASE ASSY WHITE COLOR HDD W/SPEAKER FOR WLAN 3G...

Service Guide
Page 130
... BLUE COLOR HDD W/SPEAKER FOR WLAN UPPER CASE ASSY BLUE COLOR W/TP FFC FOR 3G LOWER CASE ASSY BLUE COLOR W/SPEAKER FOR WLAN 3G LOWER CASE ASSY BLUE COLOR HDD W/SPEAKER FOR WLAN 3G 3G COVER WHITE COLOR 3G COVER BLUE COLOR 3G COVER WHITE COLOR FOR HDD SKU 3G COVER ...
... BLUE COLOR HDD W/SPEAKER FOR WLAN UPPER CASE ASSY BLUE COLOR W/TP FFC FOR 3G LOWER CASE ASSY BLUE COLOR W/SPEAKER FOR WLAN 3G LOWER CASE ASSY BLUE COLOR HDD W/SPEAKER FOR WLAN 3G 3G COVER WHITE COLOR 3G COVER BLUE COLOR 3G COVER WHITE COLOR FOR HDD SKU 3G COVER ...
