
AL1716e Service Guide
Page 6
...electrician install the correct outlet, or use a mounting kit approved by the manufacture or sold with a third (grounding) pin. Use only a trolley or stand recommended by the manufacture and follow the kit instructions. If you are not blocked or covered. Do not place the monitor on an unstable trolley..., stand, or table. Never spill liquids on a wall or shelf, use an adapter to qualified service personnel. z Do not overload power strips and ...
...electrician install the correct outlet, or use a mounting kit approved by the manufacture or sold with a third (grounding) pin. Use only a trolley or stand recommended by the manufacture and follow the kit instructions. If you are not blocked or covered. Do not place the monitor on an unstable trolley..., stand, or table. Never spill liquids on a wall or shelf, use an adapter to qualified service personnel. z Do not overload power strips and ...
AL1716e Service Guide
Page 31
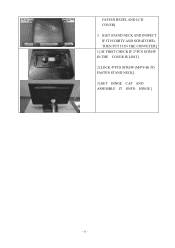
FASTEN BEZEL AND LCD COVER] 3. [GET STAND NECK AND INSPECT IF IT IS DIRTY AND SCRATCHED, THEN PUT IT IN THE CONVEYER] 1 [AT FIRST CHECK IF 2*PCS SCREW IN THE COVER IS LOST] 2 [LOCK 4*PCS SCREW (M4*8-B) TO FASTEN STAND NECK] 3 [GET HINGE CAP AND ASSEMBLE IT ONTO HINGE ] - 31 -
FASTEN BEZEL AND LCD COVER] 3. [GET STAND NECK AND INSPECT IF IT IS DIRTY AND SCRATCHED, THEN PUT IT IN THE CONVEYER] 1 [AT FIRST CHECK IF 2*PCS SCREW IN THE COVER IS LOST] 2 [LOCK 4*PCS SCREW (M4*8-B) TO FASTEN STAND NECK] 3 [GET HINGE CAP AND ASSEMBLE IT ONTO HINGE ] - 31 -
AL1716v Service Guide
Page 5
Do not place the monitor on a bed, sofa, rug, or similar surface. Do not place the monitor on an unstable trolley, stand, or table. If you use. Do not defeat the safety purpose of 99.99% or more. Do not attempt to protect it will protect the ... from damage due to the appliance. near or over a radiator or heat register. The wall socket shall be installed near water, e.g. Use only a trolley or stand recommended by changing the image or turning off the Power Switch and then turn it can injure a person and cause serious damage to power surges...
Do not place the monitor on a bed, sofa, rug, or similar surface. Do not place the monitor on an unstable trolley, stand, or table. If you use. Do not defeat the safety purpose of 99.99% or more. Do not attempt to protect it will protect the ... from damage due to the appliance. near or over a radiator or heat register. The wall socket shall be installed near water, e.g. Use only a trolley or stand recommended by changing the image or turning off the Power Switch and then turn it can injure a person and cause serious damage to power surges...
AL1716v Service Guide
Page 26
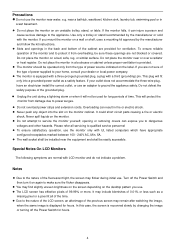
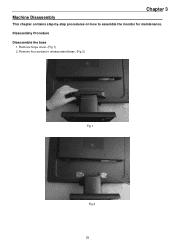
Remove four screws to assemble the monitor for maintenance. Chapter 3 Machine Disassembly This chapter contains step-by-step procedures on how to release stand base. (Fig 2) Fig 1 Fig 2 25 Remove hinge cover. (Fig 1) 2. Disassembly Procedure Disassemble the base 1.
Remove four screws to assemble the monitor for maintenance. Chapter 3 Machine Disassembly This chapter contains step-by-step procedures on how to release stand base. (Fig 2) Fig 1 Fig 2 25 Remove hinge cover. (Fig 1) 2. Disassembly Procedure Disassemble the base 1.
AL1716v Service Guide
Page 41
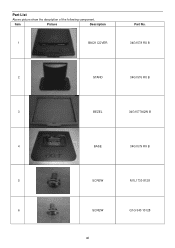
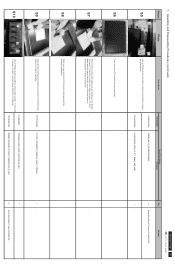
Part List Above picture show the description of the following component. Item Picture Description 1 BACK COVER Part No. 34G1578 RX B 2 STAND 34G1576 RX B 3 BEZEL 34G1577AQW B 4 BASE 34G1579 RX B 5 SCREW M1L1730 8128 6 SCREW Q1G 340 10128 40
Part List Above picture show the description of the following component. Item Picture Description 1 BACK COVER Part No. 34G1578 RX B 2 STAND 34G1576 RX B 3 BEZEL 34G1577AQW B 4 BASE 34G1579 RX B 5 SCREW M1L1730 8128 6 SCREW Q1G 340 10128 40
AL1716W Service Guide
Page 45
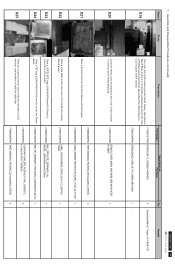
...one is held the right side. 7749106560P0A CUSHION FOAM_EPS_ACER-AL1716W_2160SETS_ L&R_472x117x398(H) 7749600200P0A TAPE_MASKING_PACKING_25mm(w)x45m_LITEON 24- S20 2 Lock the stand cover according to cover page Q'ty Remark 4 Screw Size=M4x12; Line 1 Stick a Vista label on the ...Front Bezel with 4 screws. 7115240121P0A SCREW_M4*12_DOUBLE WASHIER 7740412200P0A STAND_BASE_ACER_AL1717_#6800_ABS 94HB ACER AL1716W 44 Go to the order of Front Bezel (nearby Stand Base). 7735431685P0A LABEL_VISTA(WORKS)_CMYK_25.4x11.2_LENOVO T15AN 1- Take a LDPE+EPE bag (...
...one is held the right side. 7749106560P0A CUSHION FOAM_EPS_ACER-AL1716W_2160SETS_ L&R_472x117x398(H) 7749600200P0A TAPE_MASKING_PACKING_25mm(w)x45m_LITEON 24- S20 2 Lock the stand cover according to cover page Q'ty Remark 4 Screw Size=M4x12; Line 1 Stick a Vista label on the ...Front Bezel with 4 screws. 7115240121P0A SCREW_M4*12_DOUBLE WASHIER 7740412200P0A STAND_BASE_ACER_AL1717_#6800_ABS 94HB ACER AL1716W 44 Go to the order of Front Bezel (nearby Stand Base). 7735431685P0A LABEL_VISTA(WORKS)_CMYK_25.4x11.2_LENOVO T15AN 1- Take a LDPE+EPE bag (...
AL1716W Service Guide
Page 46
... S28 S29 Vista Labels Packing Labels Move previous assembled parts into the carton and stick Vista tables on the specific positions and fix the Stand Base and User's Manuals with two tapes as photo left. 6716004833P Power cable 1- 6715009019P00 DVI cable 1- Then 7749206234P0A CARTON_ACER_T17AN_AL1716W_2160SETS 7735431081P0A Packinglabel ... sides of carton. Assembly and Disassembly Procedures (continued) Steps S26 Photo Procedures Part Number SparePartsList Part Name 7730303323P0A MANUALASSY_ACER_T17AN_AL1716W_EMEA_27L Q'ty 1- ACER AL1716W 45 Go to cover page Remark
... S28 S29 Vista Labels Packing Labels Move previous assembled parts into the carton and stick Vista tables on the specific positions and fix the Stand Base and User's Manuals with two tapes as photo left. 6716004833P Power cable 1- 6715009019P00 DVI cable 1- Then 7749206234P0A CARTON_ACER_T17AN_AL1716W_2160SETS 7735431081P0A Packinglabel ... sides of carton. Assembly and Disassembly Procedures (continued) Steps S26 Photo Procedures Part Number SparePartsList Part Name 7730303323P0A MANUALASSY_ACER_T17AN_AL1716W_EMEA_27L Q'ty 1- ACER AL1716W 45 Go to cover page Remark
AL1716W Service Guide
Page 47
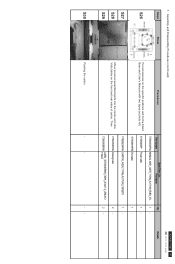
... STAND_BASE_ACER_AL1717_#6800_ABS 94HB 7730303323P0A MANUAL ASSY_ACER_T17AN_AL1716W_EMEA_27L Take out all accessories and returned product with a proper tool. 7735431081P0A Packing label 2 - ACER AL1716W 46 Go to remove the screen protector card. S4 2 Disassemble the stand cover. 1 7742612091P0A STAND_COVER_#6800_ABS 94HB_ABS 94HB_ACER R17BNW 7738001840P0A HINGE_STAND_WHT_SUS430 T=2.0mm_ACER_T17AN/BNHW 1 - 1 - S3 Move the returned LCD monitor to a working...
... STAND_BASE_ACER_AL1717_#6800_ABS 94HB 7730303323P0A MANUAL ASSY_ACER_T17AN_AL1716W_EMEA_27L Take out all accessories and returned product with a proper tool. 7735431081P0A Packing label 2 - ACER AL1716W 46 Go to remove the screen protector card. S4 2 Disassemble the stand cover. 1 7742612091P0A STAND_COVER_#6800_ABS 94HB_ABS 94HB_ACER R17BNW 7738001840P0A HINGE_STAND_WHT_SUS430 T=2.0mm_ACER_T17AN/BNHW 1 - 1 - S3 Move the returned LCD monitor to a working...
AL1716W Service Guide
Page 48
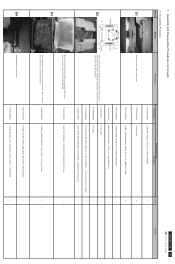
... Steps Photo Procedures Part Number Spare Parts Usage Part Name S5 Use a Phillips-head screwdriver unscrew 4 screws to release the stand base. 7115240121P0A 7740412200P0A SCREW_M4*12_DOUBLE WASHIER STAND_BASE_ACER_AL1717_#6800_ABS 94HB S6 Turn over the LCD monitor (screen faced up on the panel ...where you are release from the Front Bezel. 7140130061P0A T17BNHW-G1(99)_ACER_FUNCTION KEY BD SCREW_MACHINE_WITHOUT_NINDING_M3_6L_BLA ACER AL1716W 47 Go to - - S7 S8 Place cloth on the front bezel to cover page Q'ty Remark 4 Screw Size=M4x12...
... Steps Photo Procedures Part Number Spare Parts Usage Part Name S5 Use a Phillips-head screwdriver unscrew 4 screws to release the stand base. 7115240121P0A 7740412200P0A SCREW_M4*12_DOUBLE WASHIER STAND_BASE_ACER_AL1717_#6800_ABS 94HB S6 Turn over the LCD monitor (screen faced up on the panel ...where you are release from the Front Bezel. 7140130061P0A T17BNHW-G1(99)_ACER_FUNCTION KEY BD SCREW_MACHINE_WITHOUT_NINDING_M3_6L_BLA ACER AL1716W 47 Go to - - S7 S8 Place cloth on the front bezel to cover page Q'ty Remark 4 Screw Size=M4x12...
AL1716x Service Guide
Page 7
.... PRECAUTIONS Do not use . near or over a radiator or heat register. Do not place the monitor on the monitor. User only a trolley or stand recommended by the manufacturer and following symptoms are provide for long periods of the fluorescent light, the screen may find slightly uneven brightness on the... to dangerous voltages and other hazards. It could short circuit parts causing a fire or electric shock. Never spill liquids on an unstable trolley, stand, or table. SPECIAL NOTES ON LCD MONITORS The following the kit instructions. Due to service the monitor yourself;
.... PRECAUTIONS Do not use . near or over a radiator or heat register. Do not place the monitor on the monitor. User only a trolley or stand recommended by the manufacturer and following symptoms are provide for long periods of the fluorescent light, the screen may find slightly uneven brightness on the... to dangerous voltages and other hazards. It could short circuit parts causing a fire or electric shock. Never spill liquids on an unstable trolley, stand, or table. SPECIAL NOTES ON LCD MONITORS The following the kit instructions. Due to service the monitor yourself;
AL1716x Service Guide
Page 27
...)*4 FFC(30pin)*1 TAPE,ACE#LP1701(40x20mm)*1 INSULATOR PC#LE1710 Insert B/L jack*4 PCBA Control Board *1 SCREW (PW 3*4,M,ZN) *2 EMI shield Tape*2 Back cover*1 Arm Stand*1 (M4x10,ZN)*4 Bracket Finger *1 Stand plate*1 Rubber*4 Hinge cover*1 Front bezel*1 Button*1 Indicator*1 27 MACHINE ASSEMBLY Chapter 3 This chapter contains step-by-step procedures on a soft surface when...
...)*4 FFC(30pin)*1 TAPE,ACE#LP1701(40x20mm)*1 INSULATOR PC#LE1710 Insert B/L jack*4 PCBA Control Board *1 SCREW (PW 3*4,M,ZN) *2 EMI shield Tape*2 Back cover*1 Arm Stand*1 (M4x10,ZN)*4 Bracket Finger *1 Stand plate*1 Rubber*4 Hinge cover*1 Front bezel*1 Button*1 Indicator*1 27 MACHINE ASSEMBLY Chapter 3 This chapter contains step-by-step procedures on a soft surface when...
AL1716x Service Guide
Page 31
... input timing mode is an abnormal color that means the problem happen in the analog circuit part, if only some scale appears abnormal color that stand the problem happen in the digital circuit part. Press ">" and " If you check the H/V position, please use the crosshatch pattern. This LCM is normal or...
... input timing mode is an abnormal color that means the problem happen in the analog circuit part, if only some scale appears abnormal color that stand the problem happen in the digital circuit part. Press ">" and " If you check the H/V position, please use the crosshatch pattern. This LCM is normal or...
AL1716x Service Guide
Page 41
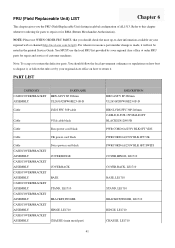
...defective parts. FRU (Field Replaceable Unit) LIST Chapter 6 This chapter gives you should follow the local government ordinance or regulations on your regional Acer office ot order FRU parts for repair and service of AL1513. NOTE: Please not WHEN ORDER FRU PARTS, that you the FRU (Field...CASE/COVER/BRACKET ASSEMBLY CASE/COVER/BRACKET ASSEMBLY CASE/COVER/BRACKET ASSEMBLY CASE/COVER/BRACKET ASSEMBLY Swiss power cord black COVER,HINGE COVER,BACK BASE STAND, LE1710 BRACKET,FINGER HINGE, LE1710 CHASSIS (main metal part) 41 DESCRIPTION HRN ASS'Y 8P 280mm UL2651#28FW08E23-0F-D HRN LVDS FFC ...
...defective parts. FRU (Field Replaceable Unit) LIST Chapter 6 This chapter gives you should follow the local government ordinance or regulations on your regional Acer office ot order FRU parts for repair and service of AL1513. NOTE: Please not WHEN ORDER FRU PARTS, that you the FRU (Field...CASE/COVER/BRACKET ASSEMBLY CASE/COVER/BRACKET ASSEMBLY CASE/COVER/BRACKET ASSEMBLY CASE/COVER/BRACKET ASSEMBLY Swiss power cord black COVER,HINGE COVER,BACK BASE STAND, LE1710 BRACKET,FINGER HINGE, LE1710 CHASSIS (main metal part) 41 DESCRIPTION HRN ASS'Y 8P 280mm UL2651#28FW08E23-0F-D HRN LVDS FFC ...


