User Guide
Page 3
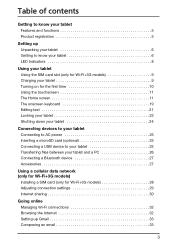
...+3G models 9 Charging your tablet 9 Turning on for the first time 10 Using the touchscreen 11 The Home screen 11 The onscreen keyboard 19 Editing text 21 Locking your tablet 23 Shutting down your tablet 24 Connecting devices to your tablet Connecting to AC power 25 Inserting a microSD card (optional 25 Connecting a USB device to your tablet 25 Transferring files between your tablet and a PC 26 Connecting a Bluetooth device 27 Accessories 27 Using a cellular data network (only for Wi-Fi+3G models) Installing a SIM card...
...+3G models 9 Charging your tablet 9 Turning on for the first time 10 Using the touchscreen 11 The Home screen 11 The onscreen keyboard 19 Editing text 21 Locking your tablet 23 Shutting down your tablet 24 Connecting devices to your tablet Connecting to AC power 25 Inserting a microSD card (optional 25 Connecting a USB device to your tablet 25 Transferring files between your tablet and a PC 26 Connecting a Bluetooth device 27 Accessories 27 Using a cellular data network (only for Wi-Fi+3G models) Installing a SIM card...
User Guide
Page 6
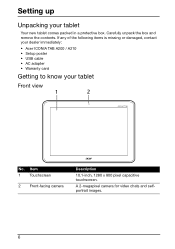
Carefully unpack the box and remove the contents. A 2-megapixel camera for video chats and selfportrait images. 6 Item 1 Touchscreen 2 Front-facing camera Description 10.1-inch, 1280 x 800 pixel capacitive touchscreen. Setting up Unpacking your tablet Front view 1 2 No. If any of the following items is missing or damaged, contact your dealer immediately: • Acer ICONIA TAB A200 / A210 • Setup poster • USB cable • AC adapter • Warranty card Getting to know your tablet Your new tablet comes packed in a protective box.
Carefully unpack the box and remove the contents. A 2-megapixel camera for video chats and selfportrait images. 6 Item 1 Touchscreen 2 Front-facing camera Description 10.1-inch, 1280 x 800 pixel capacitive touchscreen. Setting up Unpacking your tablet Front view 1 2 No. If any of the following items is missing or damaged, contact your dealer immediately: • Acer ICONIA TAB A200 / A210 • Setup poster • USB cable • AC adapter • Warranty card Getting to know your tablet Your new tablet comes packed in a protective box.

User Guide
Page 7
... data subscription. Getting to turn the tablet off or enter sleep mode; A SIM card slot (only for Wi-Fi+3G models)" on page 28. Item Description 1 Power button Long press to turn the tablet on, press briefly to know your tablet. 5 Card slot cover Insert a microSD card into the slot under this cover. See "Inserting a microSD card (optional)" on /off . 2 3.5 mm headphone jack Connects to stereo headphones. 3 Micro USB port (Slave) Connects to a computer via a USB cable. 4 USB port (Host) Connects USB devices...
... data subscription. Getting to turn the tablet off or enter sleep mode; A SIM card slot (only for Wi-Fi+3G models)" on page 28. Item Description 1 Power button Long press to turn the tablet on, press briefly to know your tablet. 5 Card slot cover Insert a microSD card into the slot under this cover. See "Inserting a microSD card (optional)" on /off . 2 3.5 mm headphone jack Connects to stereo headphones. 3 Micro USB port (Slave) Connects to a computer via a USB cable. 4 USB port (Host) Connects USB devices...

User Guide
Page 10
..., Google Calendar, and other Google Apps; to synchronize information with Android 2.0 (or 10 If you to back up your device. To start -up . During the start , tap to Google servers; If you can use the bundled power adapter to charge your settings to select your tablet, press and hold the power button until the tablet vibrates. Turning on for the first time To turn on page 23 Sign in to a Google Account...
..., Google Calendar, and other Google Apps; to synchronize information with Android 2.0 (or 10 If you to back up your device. To start -up . During the start , tap to Google servers; If you can use the bundled power adapter to charge your settings to select your tablet, press and hold the power button until the tablet vibrates. Turning on for the first time To turn on page 23 Sign in to a Google Account...
User Guide
Page 11
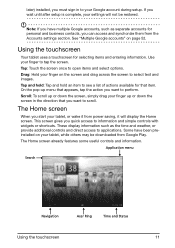
... items and entering information. See "Multiple Google accounts" on page 52. Tap and hold: Tap and hold an item to perform. Use your Google account during setup. Tap: Touch the screen once to tap the screen. The Home screen already features some useful controls and information. If you start your settings will display the Home screen. The Home screen When you wait until after setup is complete, your tablet, or wake it from Google Play.
... items and entering information. See "Multiple Google accounts" on page 52. Tap and hold: Tap and hold an item to perform. Use your Google account during setup. Tap: Touch the screen once to tap the screen. The Home screen already features some useful controls and information. If you start your settings will display the Home screen. The Home screen When you wait until after setup is complete, your tablet, or wake it from Google Play.
User Guide
Page 12
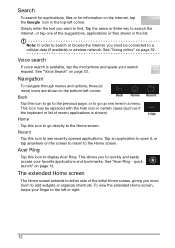
... this icon to go directly to a cellular data (if available) or wireless network. To view the extended Home screen, swipe your search request. quick launch" on the screen to return to find. See "Going online" on the Internet, tap the Google icon in the list. This icon may be connected to the Home screen. See "Acer Ring - Simply enter the text you more ) icons are...
... this icon to go directly to a cellular data (if available) or wireless network. To view the extended Home screen, swipe your search request. quick launch" on the screen to return to find. See "Going online" on the Internet, tap the Google icon in the list. This icon may be connected to the Home screen. See "Acer Ring - Simply enter the text you more ) icons are...
User Guide
Page 18
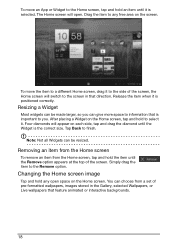
...Home screen To remove an item from a set of the screen, the Home screen will open space on the screen. Drag the item to any open . After placing a Widget on the Home screen, tap and hold to select it is positioned correctly. To move the item to a different Home screen, drag it is selected. The Home screen will switch to the screen...Simply drag the item to finish. Tap Back to the Remove option. Note: Not all Widgets can be made larger, so you . Changing the Home screen image Tap and hold any free area on the Home screen. Four diamonds will appear on each side, tap and ...
...Home screen To remove an item from a set of the screen, the Home screen will open space on the screen. Drag the item to any open . After placing a Widget on the Home screen, tap and hold to select it is positioned correctly. To move the item to a different Home screen, drag it is selected. The Home screen will switch to the screen...Simply drag the item to finish. Tap Back to the Remove option. Note: Not all Widgets can be made larger, so you . Changing the Home screen image Tap and hold any free area on the Home screen. Four diamonds will appear on each side, tap and ...

User Guide
Page 19
... characters (if available for errors. Changing Android keyboard settings To use a different keyboard language or change settings, tap the Input options key, then select either Input languages or Android keyboard settings. If the word you can provide predictive text input. Tap Auto correction or Show correction suggestions and select one of the options. The onscreen keyboard 19 As you tap a text box to enter text, an onscreen keyboard will appear. Simply tap...
... characters (if available for errors. Changing Android keyboard settings To use a different keyboard language or change settings, tap the Input options key, then select either Input languages or Android keyboard settings. If the word you can provide predictive text input. Tap Auto correction or Show correction suggestions and select one of the options. The onscreen keyboard 19 As you tap a text box to enter text, an onscreen keyboard will appear. Simply tap...
User Guide
Page 20
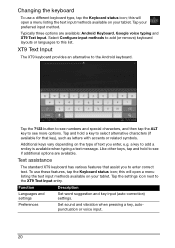
... Android keyboard. Function Description Languages and settings Set word suggestion and key input (auto-correction) settings. Typically three options are available. XT9 Text Input The XT9 keyboard provides an alternative to the XT9 Text Input entry. Additional keys vary depending on your tablet. Tap the ?123 button to see numbers and special characters, and then tap the ALT key to add a smiley is available when typing a text message. Changing the keyboard To use...
... Android keyboard. Function Description Languages and settings Set word suggestion and key input (auto-correction) settings. Typically three options are available. XT9 Text Input The XT9 keyboard provides an alternative to the XT9 Text Input entry. Additional keys vary depending on your tablet. Tap the ?123 button to see numbers and special characters, and then tap the ALT key to add a smiley is available when typing a text message. Changing the keyboard To use...
User Guide
Page 23
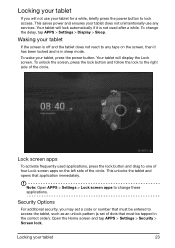
... power button. To change these applications. Open the Home screen and tap APPS > Settings > Security > Screen lock. Your tablet will display the Lock screen. This unlocks the tablet and opens that must be entered to the right side of the circle. To unlock the screen, press the lock button and follow the lock to access the tablet, such as an unlock pattern (a set of dots that application immediately. Locking your tablet If you may set a code or number that must be tapped in sleep mode...
... power button. To change these applications. Open the Home screen and tap APPS > Settings > Security > Screen lock. Your tablet will display the Lock screen. This unlocks the tablet and opens that must be entered to the right side of the circle. To unlock the screen, press the lock button and follow the lock to access the tablet, such as an unlock pattern (a set of dots that application immediately. Locking your tablet If you may set a code or number that must be tapped in sleep mode...
User Guide
Page 25
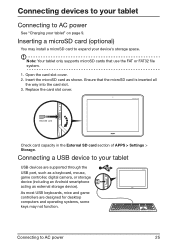
Connecting devices to your tablet Connecting to AC power See "Charging your device's storage space. Insert the microSD card as external storage device). Ensure that use the FAT or FAT32 file system. 1. Open the card slot cover. 2. Connecting to your tablet USB devices are designed for desktop computers and operating systems, some keys may install a microSD card to expand your tablet" on page 9. Note: Your tablet only supports microSD cards that the microSD card is inserted all the way into the card slot. 3. As...
Connecting devices to your tablet Connecting to AC power See "Charging your device's storage space. Insert the microSD card as external storage device). Ensure that use the FAT or FAT32 file system. 1. Open the card slot cover. 2. Connecting to your tablet USB devices are designed for desktop computers and operating systems, some keys may install a microSD card to expand your tablet" on page 9. Note: Your tablet only supports microSD cards that the microSD card is inserted all the way into the card slot. 3. As...

User Guide
Page 26
..., using data on page 53. Caution: Before removing USB storage, make sure your tablet's multimedia apps. Visit www.acer.com for updates to or from a PC with your device is not using your tablet's operating system" on the USB storage device. Select your tablet to the computer. Plug the micro USB connector to see your tablet's internal memory and any connected storage devices can access media files (photos, music and video) on your tablet, and plug the other end of the USB cable...
..., using data on page 53. Caution: Before removing USB storage, make sure your tablet's multimedia apps. Visit www.acer.com for updates to or from a PC with your device is not using your tablet's operating system" on the USB storage device. Select your tablet to the computer. Plug the micro USB connector to see your tablet's internal memory and any connected storage devices can access media files (photos, music and video) on your tablet, and plug the other end of the USB cable...
User Guide
Page 28
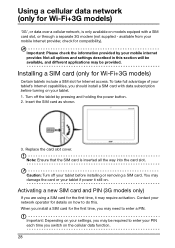
...: Turn off the tablet by your network operator for details on models equiped with data subscription before installing or removing a SIM card. Activating a new SIM card and PIN (3G models only) If you may be required to enter your settings, you are using a SIM card for the first time, it still on. Not all the way into the card slot. Contact your mobile internet provider. available from your tablet before turning on the cellular data function. 28 Using a cellular data network...
...: Turn off the tablet by your network operator for details on models equiped with data subscription before installing or removing a SIM card. Activating a new SIM card and PIN (3G models only) If you may be required to enter your settings, you are using a SIM card for the first time, it still on. Not all the way into the card slot. Contact your mobile internet provider. available from your tablet before turning on the cellular data function. 28 Using a cellular data network...
User Guide
Page 29
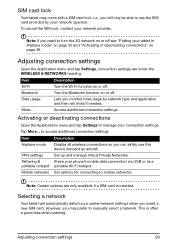
... the WIRELESS & NETWORKS heading. SIM card lock Your tablet may prefer to manually select a network. However, you may come with a SIM card lock, i.e., you will automatically detect your carrier/network settings when you monitor total usage by your network operator. Item Airplane mode VPN settings Tethering & portable hotspot Mobile networks Description Disable all wireless connections so you need to turn the 3G network on or off . Note: If you can safely use the SIM card provided by network type and...
... the WIRELESS & NETWORKS heading. SIM card lock Your tablet may prefer to manually select a network. However, you may come with a SIM card lock, i.e., you will automatically detect your carrier/network settings when you monitor total usage by your network operator. Item Airplane mode VPN settings Tethering & portable hotspot Mobile networks Description Disable all wireless connections so you need to turn the 3G network on or off . Note: If you can safely use the SIM card provided by network type and...
User Guide
Page 30
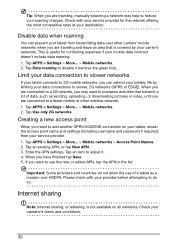
..., manually selecting a network may want to use of a tablet as sending, uploading, or downloading pictures or video, until you are connected to a faster mobile or other carriers' mobile networks when you are traveling and leave an area that transmit a lot of data, such as a modem over other wireless network. 1. Tap APPS > Settings > More... > Mobile networks > Access Point Names. 2. Please check with your service provider for controlling expenses...
..., manually selecting a network may want to use of a tablet as sending, uploading, or downloading pictures or video, until you are connected to a faster mobile or other carriers' mobile networks when you are traveling and leave an area that transmit a lot of data, such as a modem over other wireless network. 1. Tap APPS > Settings > More... > Mobile networks > Access Point Names. 2. Please check with your service provider for controlling expenses...
User Guide
Page 45
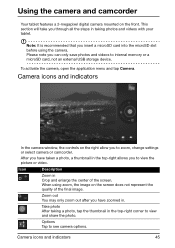
... to view and share the photo. Take photo After taking photos and videos with your tablet. Please note you insert a microSD card into the microSD slot before using zoom, the image on the screen does not represent the quality of the screen. Note: It is recommended that you can only save photos and videos to internal memory or a microSD card, not an external USB storage device.
... to view and share the photo. Take photo After taking photos and videos with your tablet. Please note you insert a microSD card into the microSD slot before using zoom, the image on the screen does not represent the quality of the screen. Note: It is recommended that you can only save photos and videos to internal memory or a microSD card, not an external USB storage device.
User Guide
Page 46
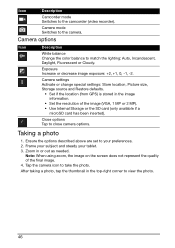
... image exposure: +2, +1, 0, -1, -2. Camera settings Activate or change special settings: Store location, Picture size, Storage source and Restore defaults. • Set if the location (from GPS) is stored in or out as needed. Camera mode Switches to take the photo. Note: When using zoom, the image on the screen does not represent the quality of the image (VGA, 1 MP or 2 MP). • Use Internal Storage or the SD card (only available...
... image exposure: +2, +1, 0, -1, -2. Camera settings Activate or change special settings: Store location, Picture size, Storage source and Restore defaults. • Set if the location (from GPS) is stored in or out as needed. Camera mode Switches to take the photo. Note: When using zoom, the image on the screen does not represent the quality of the image (VGA, 1 MP or 2 MP). • Use Internal Storage or the SD card (only available...
User Guide
Page 48
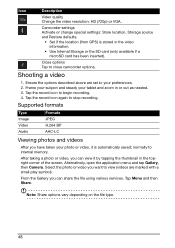
... or video, you can view it is stored in the video information. • Use Internal Storage or the SD card (only available if a microSD card has been inserted). Alternatively, open the application menu and tap Gallery, then Camera. Icon Description Video quality Change the video resolution: HD (720p) or VGA. Note: Share options vary depending on the file type. 48 Tap Menu and then Share. Supported formats Type Image Video...
... or video, you can view it is stored in the video information. • Use Internal Storage or the SD card (only available if a microSD card has been inserted). Alternatively, open the application menu and tap Gallery, then Camera. Icon Description Video quality Change the video resolution: HD (720p) or VGA. Note: Share options vary depending on the file type. 48 Tap Menu and then Share. Supported formats Type Image Video...
User Guide
Page 53
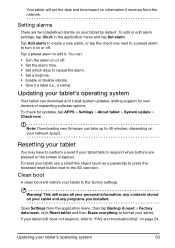
... from the application menu, then tap Backup & reset > Factory data reset; Clean boot A clean boot will restore your tablet to "FAQ and troubleshooting" on your tablet by default. Open Settings from the network. Note: Downloading new firmware can take up to format your tablet. click Reset tablet and then Erase everything to 40 minutes, depending on or off . Updating your tablet's operating system Your tablet can : • Turn the alarm on your network speed. Warning! This...
... from the application menu, then tap Backup & reset > Factory data reset; Clean boot A clean boot will restore your tablet to "FAQ and troubleshooting" on your tablet by default. Open Settings from the network. Note: Downloading new firmware can take up to format your tablet. click Reset tablet and then Erase everything to 40 minutes, depending on or off . Updating your tablet's operating system Your tablet can : • Turn the alarm on your network speed. Warning! This...
User Guide
Page 59
... damage, disable, overburden, or impair the services provided by Gracenote®. Furthermore, you for the Software and supersedes all devices on which can be enforced to comply with any other rights, Acer may not use and enjoyment of the Third Party Services, or the services and products of the Software; in ... OTHER LOSS WHATSOEVER) ARISING OUT OF OR IN ANY WAY RELATED TO THE USE OF OR INABILITY TO USE THE SOFTWARE, THE PROVISION OF OR FAILURE TO PROVIDE SUPPORT SERVICES, OR OTHERWISE UNDER OR IN CONNECTION WITH ANY PROVISION OF THIS AGREEMENT, EVEN IN THE EVENT OF THE FAULT,...
... damage, disable, overburden, or impair the services provided by Gracenote®. Furthermore, you for the Software and supersedes all devices on which can be enforced to comply with any other rights, Acer may not use and enjoyment of the Third Party Services, or the services and products of the Software; in ... OTHER LOSS WHATSOEVER) ARISING OUT OF OR IN ANY WAY RELATED TO THE USE OF OR INABILITY TO USE THE SOFTWARE, THE PROVISION OF OR FAILURE TO PROVIDE SUPPORT SERVICES, OR OTHERWISE UNDER OR IN CONNECTION WITH ANY PROVISION OF THIS AGREEMENT, EVEN IN THE EVENT OF THE FAULT,...


