User Guide
Page 3
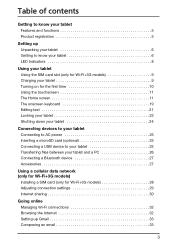
...+3G models 9 Charging your tablet 9 Turning on for the first time 10 Using the touchscreen 11 The Home screen 11 The onscreen keyboard 19 Editing text 21 Locking your tablet 23 Shutting down your tablet 24 Connecting devices to your tablet Connecting to AC power 25 Inserting a microSD card (optional 25 Connecting a USB device to your tablet 25 Transferring files between your tablet and a PC 26 Connecting a Bluetooth device 27 Accessories 27 Using a cellular data network (only for Wi-Fi+3G models) Installing a SIM card...
...+3G models 9 Charging your tablet 9 Turning on for the first time 10 Using the touchscreen 11 The Home screen 11 The onscreen keyboard 19 Editing text 21 Locking your tablet 23 Shutting down your tablet 24 Connecting devices to your tablet Connecting to AC power 25 Inserting a microSD card (optional 25 Connecting a USB device to your tablet 25 Transferring files between your tablet and a PC 26 Connecting a Bluetooth device 27 Accessories 27 Using a cellular data network (only for Wi-Fi+3G models) Installing a SIM card...
User Guide
Page 6
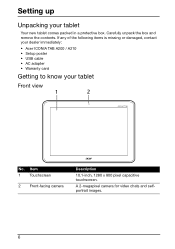
If any of the following items is missing or damaged, contact your dealer immediately: • Acer ICONIA TAB A200 / A210 • Setup poster • USB cable • AC adapter • Warranty card Getting to know your tablet Your new tablet comes packed in a protective box. Setting up Unpacking your tablet Front view 1 2 No. Item 1 Touchscreen 2 Front-facing camera Description 10.1-inch, 1280 x 800 pixel capacitive touchscreen. A 2-megapixel camera for video chats and selfportrait images. 6 Carefully unpack the box and remove the contents.
If any of the following items is missing or damaged, contact your dealer immediately: • Acer ICONIA TAB A200 / A210 • Setup poster • USB cable • AC adapter • Warranty card Getting to know your tablet Your new tablet comes packed in a protective box. Setting up Unpacking your tablet Front view 1 2 No. Item 1 Touchscreen 2 Front-facing camera Description 10.1-inch, 1280 x 800 pixel capacitive touchscreen. A 2-megapixel camera for video chats and selfportrait images. 6 Carefully unpack the box and remove the contents.

User Guide
Page 7
... USB port (Slave) Connects to a computer via a USB cable. 4 USB port (Host) Connects USB devices to turn the tablet on page 28. See "Installing a SIM card (only for Wi-Fi+3G models) allows you to know your tablet. 5 Card slot cover Insert a microSD card into the slot under this cover. A SIM card slot (only for Wi-Fi+3G models)" on , press briefly to turn the tablet off or enter sleep mode; The underside of the slot cover contains the tablet's serial ID number, which is necessary when servicing. 6 Reset button...
... USB port (Slave) Connects to a computer via a USB cable. 4 USB port (Host) Connects USB devices to turn the tablet on page 28. See "Installing a SIM card (only for Wi-Fi+3G models) allows you to know your tablet. 5 Card slot cover Insert a microSD card into the slot under this cover. A SIM card slot (only for Wi-Fi+3G models)" on , press briefly to turn the tablet off or enter sleep mode; The underside of the slot cover contains the tablet's serial ID number, which is necessary when servicing. 6 Reset button...

User Guide
Page 10
... power adapter to charge your settings to Google servers; and to take advantage of other information. Wait a moment for your tablet. Follow the rest of use your tablet. You will be asked some questions before you have Internet access, your contact list, email, calendar and other Google services on page 23 Sign in to a Google Account to download applications or media from another device with a Google account. Note: If the tablet's screen turns...
... power adapter to charge your settings to Google servers; and to take advantage of other information. Wait a moment for your tablet. Follow the rest of use your tablet. You will be asked some questions before you have Internet access, your contact list, email, calendar and other Google services on page 23 Sign in to a Google Account to download applications or media from another device with a Google account. Note: If the tablet's screen turns...
User Guide
Page 11
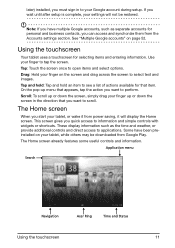
... and entering information. The Home screen already features some useful controls and information. Drag: Hold your finger up menu that item. Scroll: To scroll up or down the screen in to applications. Application menu Search Navigation Acer Ring Time and Status Using the touchscreen 11 Tap: Touch the screen once to select text and images. The Home screen When you start your tablet, while others may be restored. later) installed...
... and entering information. The Home screen already features some useful controls and information. Drag: Hold your finger up menu that item. Scroll: To scroll up or down the screen in to applications. Application menu Search Navigation Acer Ring Time and Status Using the touchscreen 11 Tap: Touch the screen once to select text and images. The Home screen When you start your tablet, while others may be restored. later) installed...
User Guide
Page 12
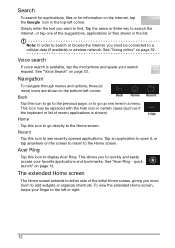
... easily access your search request. Simply enter the text you to display Acer Ring. This allows you want to see recently opened applications. Acer Ring Tap this icon to find. See "Going online" on page 33. Navigation To navigate through menus and options, three (or more room to the Home screen. Voice search If voice search is shown). To view the extended Home screen...
... easily access your search request. Simply enter the text you to display Acer Ring. This allows you want to see recently opened applications. Acer Ring Tap this icon to find. See "Going online" on page 33. Navigation To navigate through menus and options, three (or more room to the Home screen. Voice search If voice search is shown). To view the extended Home screen...
User Guide
Page 18
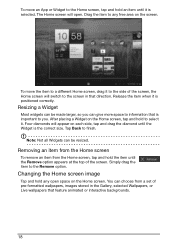
... Home screen will appear on the screen. To move an App or Widget to the Home screen, tap and hold an item until it is positioned correctly. Changing the Home screen image Tap and hold any free area...Home screen To remove an item from a set of the screen. To move the item to a different Home screen, drag it to the side of the screen, the Home screen will switch to the screen in the Gallery, selected Wallpapers, or Live wallpapers that feature animated or interactive backgrounds. 18 After placing a Widget on the Home screen. Four diamonds will open space on the Home screen...
... Home screen will appear on the screen. To move an App or Widget to the Home screen, tap and hold an item until it is positioned correctly. Changing the Home screen image Tap and hold any free area...Home screen To remove an item from a set of the screen. To move the item to a different Home screen, drag it to the side of the screen, the Home screen will switch to the screen in the Gallery, selected Wallpapers, or Live wallpapers that feature animated or interactive backgrounds. 18 After placing a Widget on the Home screen. Four diamonds will open space on the Home screen...

User Guide
Page 19
... you can provide predictive text input. Changing Android keyboard settings To use a different keyboard language or change settings, tap the Input options key, then select either Input languages or Android keyboard settings. Tap Auto correction or Show correction suggestions and select one of letters tapped, or are displayed that is displayed, you tap a text box to enter text, an onscreen keyboard will appear. Simply tap on the application and information that continue...
... you can provide predictive text input. Changing Android keyboard settings To use a different keyboard language or change settings, tap the Input options key, then select either Input languages or Android keyboard settings. Tap Auto correction or Show correction suggestions and select one of letters tapped, or are displayed that is displayed, you tap a text box to enter text, an onscreen keyboard will appear. Simply tap on the application and information that continue...
User Guide
Page 20
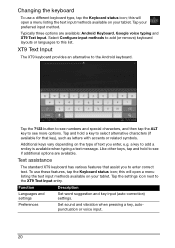
... additional options are available: Android Keyboard, Google voice typing and XT9 Text Input. Function Description Languages and settings Set word suggestion and key input (auto-correction) settings. Preferences Set sound and vibration when pressing a key, autopunctuation or voice input. 20 a key to this will open a menu listing the text input methods available on your tablet. To use a different keyboard type, tap the Keyboard status icon; this list. Select Configure input methods to add (or remove) keyboard layouts or languages to add a smiley is available...
... additional options are available: Android Keyboard, Google voice typing and XT9 Text Input. Function Description Languages and settings Set word suggestion and key input (auto-correction) settings. Preferences Set sound and vibration when pressing a key, autopunctuation or voice input. 20 a key to this will open a menu listing the text input methods available on your tablet. To use a different keyboard type, tap the Keyboard status icon; this list. Select Configure input methods to add (or remove) keyboard layouts or languages to add a smiley is available...
User Guide
Page 23
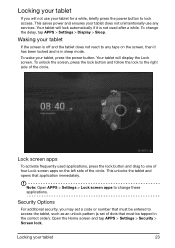
... power button. To unlock the screen, press the lock button and follow the lock to change the delay, tap APPS > Settings > Display > Sleep. This unlocks the tablet and opens that must be tapped in sleep mode. Your tablet will display the Lock screen. Waking your tablet If the screen is off and the tablet does not react to one of four Lock screen apps on the screen, then it is in the correct order). Open the Home screen and tap APPS > Settings > Security > Screen lock. Your tablet...
... power button. To unlock the screen, press the lock button and follow the lock to change the delay, tap APPS > Settings > Display > Sleep. This unlocks the tablet and opens that must be tapped in sleep mode. Your tablet will display the Lock screen. Waking your tablet If the screen is off and the tablet does not react to one of four Lock screen apps on the screen, then it is in the correct order). Open the Home screen and tap APPS > Settings > Security > Screen lock. Your tablet...
User Guide
Page 25
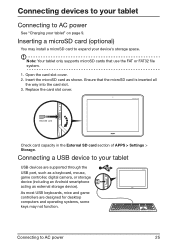
... function. Open the card slot cover. 2. Ensure that use the FAT or FAT32 file system. 1. As most USB keyboards, mice and game controllers are supported through the USB port, such as a keyboard, mouse, game controller, digital camera, or storage device (including an Android smartphone acting as shown. Connecting a USB device to your tablet USB devices are designed for desktop computers and operating systems, some keys may install a microSD card to expand your tablet" on page 9. Connecting devices to your tablet Connecting to AC power See "Charging...
... function. Open the card slot cover. 2. Ensure that use the FAT or FAT32 file system. 1. As most USB keyboards, mice and game controllers are supported through the USB port, such as a keyboard, mouse, game controller, digital camera, or storage device (including an Android smartphone acting as shown. Connecting a USB device to your tablet USB devices are designed for desktop computers and operating systems, some keys may install a microSD card to expand your tablet" on page 9. Connecting devices to your tablet Connecting to AC power See "Charging...

User Guide
Page 26
... storage, make sure your device is not using your tablet model, and then the Driver tab, select USB and accept the download. This allows you to transfer your personal data to your PC's file explorer. Select the Acer Iconia Tab icon to see your tablet's internal memory and any connected storage devices can access media files (photos, music and video) on USB storage devices with a USB connection. Accessing files on a USB storage device Note: Your tablet supports USB storage devices that may add support for additional USB devices. After a short delay, your tablet's internal memory...
... storage, make sure your device is not using your tablet model, and then the Driver tab, select USB and accept the download. This allows you to transfer your personal data to your PC's file explorer. Select the Acer Iconia Tab icon to see your tablet's internal memory and any connected storage devices can access media files (photos, music and video) on USB storage devices with a USB connection. Accessing files on a USB storage device Note: Your tablet supports USB storage devices that may add support for additional USB devices. After a short delay, your tablet's internal memory...
User Guide
Page 28
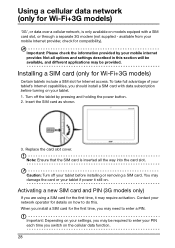
... your network operator for details on how to enter a PIN. To take full advantage of your tablet. 1. Replace the card slot cover. Installing a SIM card (only for Wi-Fi+3G models) Certain tablets include a SIM slot for compatibility). Caution: Turn off the tablet by your mobile Internet provider, check for Internet access. You may be required to enter your settings, you may be provided. Using a cellular data network (only for Wi-Fi+3G models) '3G', or data over a cellular network...
... your network operator for details on how to enter a PIN. To take full advantage of your tablet. 1. Replace the card slot cover. Installing a SIM card (only for Wi-Fi+3G models) Certain tablets include a SIM slot for compatibility). Caution: Turn off the tablet by your mobile Internet provider, check for Internet access. You may be required to enter your settings, you may be provided. Using a cellular data network (only for Wi-Fi+3G models) '3G', or data over a cellular network...
User Guide
Page 29
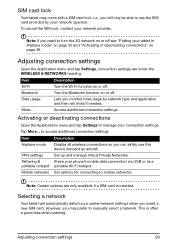
... connections Open the Applications menu and tap Settings to use this device onboard an aircraft. Lets you can safely use the SIM card provided by network type and application and then set limits if needed. Access additional connection settings. To cancel the SIM lock, contact your tablet in Airplane mode" on page 50 and "Activating or deactivating connections" on or off . Selecting a network Your tablet will only be able to manage your phone's mobile data connection via USB...
... connections Open the Applications menu and tap Settings to use this device onboard an aircraft. Lets you can safely use the SIM card provided by network type and application and then set limits if needed. Access additional connection settings. To cancel the SIM lock, contact your tablet in Airplane mode" on page 50 and "Activating or deactivating connections" on or off . Selecting a network Your tablet will only be able to manage your phone's mobile data connection via USB...
User Guide
Page 30
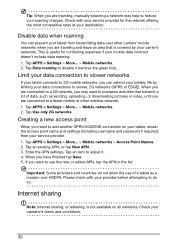
... you need to add another GPRS/3G/EDGE connection on all networks. Please check with your service provider for controlling expenses if your service provider. 1. Tap APPS > Settings > More... > Mobile networks. 2. Tap APPS > Settings > More... > Mobile networks > Access Point Names. 2. If you want to postpone activities that is covered by limiting your data connections to 3G mobile networks, you may help to do not allow the use the new or...
... you need to add another GPRS/3G/EDGE connection on all networks. Please check with your service provider for controlling expenses if your service provider. 1. Tap APPS > Settings > More... > Mobile networks. 2. Tap APPS > Settings > More... > Mobile networks > Access Point Names. 2. If you want to postpone activities that is covered by limiting your data connections to 3G mobile networks, you may help to do not allow the use the new or...
User Guide
Page 45
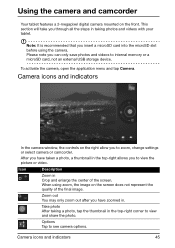
To activate the camera, open the application menu and tap Camera. Icon Description Zoom in . Camera icons and indicators 45 Using the camera and camcorder Your tablet features a 2-megapixel digital camera mounted on the screen does not represent the quality of the screen. Please note you to internal memory or a microSD card, not an external USB storage device. Camera icons and indicators In the camera window, the controls on the right allow you can...
To activate the camera, open the application menu and tap Camera. Icon Description Zoom in . Camera icons and indicators 45 Using the camera and camcorder Your tablet features a 2-megapixel digital camera mounted on the screen does not represent the quality of the screen. Please note you to internal memory or a microSD card, not an external USB storage device. Camera icons and indicators In the camera window, the controls on the right allow you can...
User Guide
Page 46
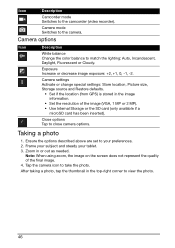
...; Use Internal Storage or the SD card (only available if a microSD card has been inserted). Camera options Icon Description White balance Change the color balance to take the photo. Tap the camera icon to match the lighting: Auto, Incandescent, Daylight, Fluorescent or Cloudy. Close options Tap to the camera. Taking a photo 1. Camera settings Activate or change special settings: Store location, Picture size, Storage source and Restore defaults. • Set if the location...
...; Use Internal Storage or the SD card (only available if a microSD card has been inserted). Camera options Icon Description White balance Change the color balance to take the photo. Tap the camera icon to match the lighting: Auto, Incandescent, Daylight, Fluorescent or Cloudy. Close options Tap to the camera. Taking a photo 1. Camera settings Activate or change special settings: Store location, Picture size, Storage source and Restore defaults. • Set if the location...
User Guide
Page 48
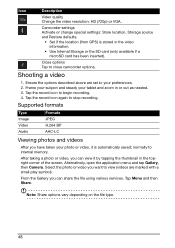
... screen. Alternatively, open the application menu and tap Gallery, then Camera. Tap Menu and then Share. Ensure the options described above are marked with a small play symbol). Note: Share options vary depending on the file type. 48 Close options Tap to your preferences. 2. normally to begin recording. 4. Tap the record icon to internal memory. Camcorder settings Activate or change special settings: Store location, Storage source and Restore defaults...
... screen. Alternatively, open the application menu and tap Gallery, then Camera. Tap Menu and then Share. Ensure the options described above are marked with a small play symbol). Note: Share options vary depending on the file type. 48 Close options Tap to your preferences. 2. normally to begin recording. 4. Tap the record icon to internal memory. Camcorder settings Activate or change special settings: Store location, Storage source and Restore defaults...
User Guide
Page 53
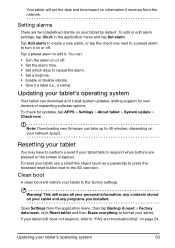
... 54. Clean boot A clean boot will erase all your tablet by default. To add or edit alarm settings, tap Clock in the application menu and tap Set alarm. Resetting your tablet You may have to perform a reset if your tablet fails to the SD card slot. Open Settings from the network. Warning! You can download and install system updates, adding support for updates, tap APPS > Settings > About tablet > System update > Check now. click Reset tablet and then Erase...
... 54. Clean boot A clean boot will erase all your tablet by default. To add or edit alarm settings, tap Clock in the application menu and tap Set alarm. Resetting your tablet You may have to perform a reset if your tablet fails to the SD card slot. Open Settings from the network. Warning! You can download and install system updates, adding support for updates, tap APPS > Settings > About tablet > System update > Check now. click Reset tablet and then Erase...
User Guide
Page 59
... WHATSOEVER) ARISING OUT OF OR IN ANY WAY RELATED TO THE USE OF OR INABILITY TO USE THE SOFTWARE, THE PROVISION OF OR FAILURE TO PROVIDE SUPPORT SERVICES, OR OTHERWISE UNDER OR IN CONNECTION WITH ANY PROVISION OF THIS AGREEMENT, EVEN IN THE EVENT OF ...Software and supersedes all use the Third Party Software in this Agreement shall survive termination of liability set forth in any manner that could damage, disable, overburden, or impair the services provided by Acer's licensors or suppliers hereunder ("Third Party Services"). Gracenote®, Gracenote logo and logotype, and the "Powered...
... WHATSOEVER) ARISING OUT OF OR IN ANY WAY RELATED TO THE USE OF OR INABILITY TO USE THE SOFTWARE, THE PROVISION OF OR FAILURE TO PROVIDE SUPPORT SERVICES, OR OTHERWISE UNDER OR IN CONNECTION WITH ANY PROVISION OF THIS AGREEMENT, EVEN IN THE EVENT OF ...Software and supersedes all use the Third Party Software in this Agreement shall survive termination of liability set forth in any manner that could damage, disable, overburden, or impair the services provided by Acer's licensors or suppliers hereunder ("Third Party Services"). Gracenote®, Gracenote logo and logotype, and the "Powered...


