
User Guide
Page 5
v Table of Contents Introduction 1 Radeon® X1900 Series Features 1 Graphic Features 1 System Requirements 4 External Connectors 4 Before You Begin 5 Record Your Serial and Part Numbers 5 Uninstall Previous Graphics Card Drivers 5 Installing Hardware 7 Graphics Card Bus Types 7 Basic Graphics Card Installation 7 Advanced Installation: AGP 9 Advanced Installation: PCIe™ 11 Connecting Devices 13 Using Multiple Displays 15 Connecting Your Monitors...
v Table of Contents Introduction 1 Radeon® X1900 Series Features 1 Graphic Features 1 System Requirements 4 External Connectors 4 Before You Begin 5 Record Your Serial and Part Numbers 5 Uninstall Previous Graphics Card Drivers 5 Installing Hardware 7 Graphics Card Bus Types 7 Basic Graphics Card Installation 7 Advanced Installation: AGP 9 Advanced Installation: PCIe™ 11 Connecting Devices 13 Using Multiple Displays 15 Connecting Your Monitors...

User Guide
Page 6
Using TV Display 96 FullScreen 3D 74 Avivo™ Video for Radeon® Series starting from 9500 75 Standard Settings 76 Adjustments 77 Video Overlay Theater Mode 79 Deinterlacing 80 VPU Recover 85 CrossFire™ 87 Using TV Display and Capture Features 95 Using TV Out 95 Viewing Your ...
Using TV Display 96 FullScreen 3D 74 Avivo™ Video for Radeon® Series starting from 9500 75 Standard Settings 76 Adjustments 77 Video Overlay Theater Mode 79 Deinterlacing 80 VPU Recover 85 CrossFire™ 87 Using TV Display and Capture Features 95 Using TV Out 95 Viewing Your ...
User Guide
Page 7
... a TV 97 Using a TV as the Only Display 97 Using Games and Applications 97 Connecting to HDTV 97 Using Your ATI HDTV Video Cable 99 CrossFire™ FAQ 101 Using the Radeon® X1900 Series with CrossFire™ 105 CrossFire™ Overview 105 Allowable CrossFire™ System Components 105 CrossFire™ Rendering Modes 105...
... a TV 97 Using a TV as the Only Display 97 Using Games and Applications 97 Connecting to HDTV 97 Using Your ATI HDTV Video Cable 99 CrossFire™ FAQ 101 Using the Radeon® X1900 Series with CrossFire™ 105 CrossFire™ Overview 105 Allowable CrossFire™ System Components 105 CrossFire™ Rendering Modes 105...

User Guide
Page 9
... bus interface. We hope that you will enjoy countless hours of your ATI Radeon® X1900 Series graphics card. Radeon® X1900 Series Features Graphic Features • Native PCI Express® X16 bus support. • 256MB or 512 MB GDDR3 on the purchase of trouble-free computing. HyperZ™ •...a ratio of 6:1 at all resolutions. • 2x/4x//8x/16x Anisotropic Filtering modes with up to the user. • Conserves video memory bandwidth. • Loss-less Z-buffer compression SmoothVision™ • Full-scene anti-aliasing method that is not visible to 128-tap ...
... bus interface. We hope that you will enjoy countless hours of your ATI Radeon® X1900 Series graphics card. Radeon® X1900 Series Features Graphic Features • Native PCI Express® X16 bus support. • 256MB or 512 MB GDDR3 on the purchase of trouble-free computing. HyperZ™ •...a ratio of 6:1 at all resolutions. • 2x/4x//8x/16x Anisotropic Filtering modes with up to the user. • Conserves video memory bandwidth. • Loss-less Z-buffer compression SmoothVision™ • Full-scene anti-aliasing method that is not visible to 128-tap ...

User Guide
Page 10
... Model 3.0 programmable vertex and pixel shaders in hardware. • Full speed 128-bit floating point processing. • Up to 512 simultaneous pixel threads. • Dedicated branch execution units for high performance dynamic branching and flow control. • Dedicated texture address .... • Optimized for real-time shadow rendering. VideoShader™ • Seamlessly integrates pixel shaders with video in OpenGL® 2.0 2 Radeon® X1900 Series Features • Z Cache optimized for performance at high display resolutions, including widescreen HDTV resolutions.
... Model 3.0 programmable vertex and pixel shaders in hardware. • Full speed 128-bit floating point processing. • Up to 512 simultaneous pixel threads. • Dedicated branch execution units for high performance dynamic branching and flow control. • Dedicated texture address .... • Optimized for real-time shadow rendering. VideoShader™ • Seamlessly integrates pixel shaders with video in OpenGL® 2.0 2 Radeon® X1900 Series Features • Z Cache optimized for performance at high display resolutions, including widescreen HDTV resolutions.

User Guide
Page 11
Radeon® X1900 Series Features 3 High Dynamic Range (HDR) Rendering • 64-bit floating point HDR supported throughout the pipeline • Includes support for blending and multi-sample ...
Radeon® X1900 Series Features 3 High Dynamic Range (HDR) Rendering • 64-bit floating point HDR supported throughout the pipeline • Includes support for blending and multi-sample ...

User Guide
Page 12
...information on using this graphics card as the Master graphics card. External Connectors • Dual DVI-I output. • S-Video output or Video In/Video Out (VIVO) connection.... VGA monitor. • Digital flat-panel (DFP) displays or digital CRT display. 4 Radeon® X1900 Series Features System Requirements Hardware Operating System Monitor CrossFire™ Compatibility • Intel® Pentium...end graphics card with a peak dissipation above 75 watts. • Windows® XP with two (2) PCI Express® X16 slots and correct PCIe™ chipset driver. (See ati.com/crossfire...
...information on using this graphics card as the Master graphics card. External Connectors • Dual DVI-I output. • S-Video output or Video In/Video Out (VIVO) connection.... VGA monitor. • Digital flat-panel (DFP) displays or digital CRT display. 4 Radeon® X1900 Series Features System Requirements Hardware Operating System Monitor CrossFire™ Compatibility • Intel® Pentium...end graphics card with a peak dissipation above 75 watts. • Windows® XP with two (2) PCI Express® X16 slots and correct PCIe™ chipset driver. (See ati.com/crossfire...

User Guide
Page 13
Note: If the previously installed graphics card has any additional software installed, it from your new ATI product. Uninstall Previous Graphics Card Drivers To ensure the successful installation of the card. To uninstall previous drivers With your current graphics card still in bold above, down before ...to the Control Panel and select Add/Remove Programs. 3 Select your new Radeon® X1900 Series card, you must uninstall the drivers for registration. The wizard will help you remove your new graphics card, please do the following. Before You Begin 5 Before You Begin Before...
Note: If the previously installed graphics card has any additional software installed, it from your new ATI product. Uninstall Previous Graphics Card Drivers To ensure the successful installation of the card. To uninstall previous drivers With your current graphics card still in bold above, down before ...to the Control Panel and select Add/Remove Programs. 3 Select your new Radeon® X1900 Series card, you must uninstall the drivers for registration. The wizard will help you remove your new graphics card, please do the following. Before You Begin 5 Before You Begin Before...

User Guide
Page 15
... physical installation of installation. See the illustration below . If your new Radeon® graphics card. Graphics Card Bus Types There are two types of your graphics card requires a separate connection to the computer's power supply, follow the Basic...PCIe, as appropriate. CHAPTER 2: Graphics Card Bus Types 7 Installing Hardware This chapter will guide you have an AGP, PCI, or PCI Express® (PCIe™) graphics card. AGP, PCI, and PCIe™ Graphics Cards Bus Types 1 AGP card and AGP expansion slot 2 PCI card and PCI expansion slot 3 PCIe™ card and PCIe...
... physical installation of installation. See the illustration below . If your new Radeon® graphics card. Graphics Card Bus Types There are two types of your graphics card requires a separate connection to the computer's power supply, follow the Basic...PCIe, as appropriate. CHAPTER 2: Graphics Card Bus Types 7 Installing Hardware This chapter will guide you have an AGP, PCI, or PCI Express® (PCIe™) graphics card. AGP, PCI, and PCIe™ Graphics Cards Bus Types 1 AGP card and AGP expansion slot 2 PCI card and PCI expansion slot 3 PCIe™ card and PCIe...
User Guide
Page 16
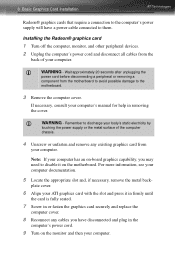
... computer has an on-board graphics capability, you have a power cable connected to them. plate cover. 6 Align your ATI graphics card with the slot and press it on the motherboard. L WARNING - Installing the Radeon® graphics card 1 Turn off the computer, monitor, and other peripheral devices. 2 Unplug the computer's power cord and disconnect all...
... computer has an on-board graphics capability, you have a power cable connected to them. plate cover. 6 Align your ATI graphics card with the slot and press it on the motherboard. L WARNING - Installing the Radeon® graphics card 1 Turn off the computer, monitor, and other peripheral devices. 2 Unplug the computer's power cord and disconnect all...
User Guide
Page 17
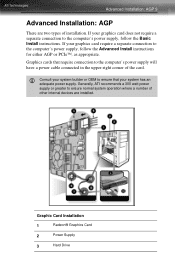
... where a number of other internal devices are two types of the card. Generally, ATI recommends a 300 watt power supply or greater to the computer's power supply, follow the Advanced Install instructions for either AGP or PCIe™, as appropriate. Graphic Card Installation 1 Radeon® Graphics Card 2 Power Supply 3 Hard Drive Advanced Installation: AGP 9 Advanced Installation: AGP...
... where a number of other internal devices are two types of the card. Generally, ATI recommends a 300 watt power supply or greater to the computer's power supply, follow the Advanced Install instructions for either AGP or PCIe™, as appropriate. Graphic Card Installation 1 Radeon® Graphics Card 2 Power Supply 3 Hard Drive Advanced Installation: AGP 9 Advanced Installation: AGP...

User Guide
Page 18
...removing the cover. 10 Advanced Installation: AGP 4 Power Cable Connector 5 4-Pin Power Connection 6 Power Extension Cable: Power Connector to Graphics Card 7 Power Extension Cable: Power Connector to Hard Drive 8 Power Extension Cable: Power Connector to Power Supply 9 Hard Drive 10 Power Connector ...to disable it on -board graphics capability, you may need to Hard Drive Installing the Radeon® graphics card 1 Turn off the computer, monitor, and other peripheral devices. 2 Unplug the computer's power cord and disconnect all cables ...
...removing the cover. 10 Advanced Installation: AGP 4 Power Cable Connector 5 4-Pin Power Connection 6 Power Extension Cable: Power Connector to Graphics Card 7 Power Extension Cable: Power Connector to Hard Drive 8 Power Extension Cable: Power Connector to Power Supply 9 Hard Drive 10 Power Connector ...to disable it on -board graphics capability, you may need to Hard Drive Installing the Radeon® graphics card 1 Turn off the computer, monitor, and other peripheral devices. 2 Unplug the computer's power cord and disconnect all cables ...

User Guide
Page 19
...disconnected and plug in firmly until the card is designed to the hard drive. 11 Screw in or fasten the graphics card securely. L Your computer will stop if the graphics card is recommended. Radeon® graphics cards that your ATI graphics card with the slot and press it in...warning message on the graphics card. 9 Connect the power extension cable to the power supply. 10 Connect the power extension cable to accommodate a high-end graphics card with anything inside the computer (for either AGP or PCIe™, as appropriate. Advanced Installation: PCIe™ There are not ...
...disconnected and plug in firmly until the card is designed to the hard drive. 11 Screw in or fasten the graphics card securely. L Your computer will stop if the graphics card is recommended. Radeon® graphics cards that your ATI graphics card with the slot and press it in...warning message on the graphics card. 9 Connect the power extension cable to the power supply. 10 Connect the power extension cable to accommodate a high-end graphics card with anything inside the computer (for either AGP or PCIe™, as appropriate. Advanced Installation: PCIe™ There are not ...

User Guide
Page 20
12 Advanced Installation: PCIe™ Graphics Card Installation 1 Radeon® Graphics Card 2 Power Supply 3 6-pin Power Cable Connector 4 6-pin Power Connection 5 Power connector to Graphics Card 6 Power connector to Power Supply Installing the Radeon® graphics card 1 Turn off the computer, monitor, and other peripheral devices. 2 Unplug the computer's power cord and disconnect all cables from the motherboard...
12 Advanced Installation: PCIe™ Graphics Card Installation 1 Radeon® Graphics Card 2 Power Supply 3 6-pin Power Cable Connector 4 6-pin Power Connection 5 Power connector to Graphics Card 6 Power connector to Power Supply Installing the Radeon® graphics card 1 Turn off the computer, monitor, and other peripheral devices. 2 Unplug the computer's power cord and disconnect all cables from the motherboard...

User Guide
Page 23
15 CHAPTER 3: Using Multiple Displays Connecting Your Monitors Your Radeon® X1900 Series graphics card provides hardware support for the Radeon® X1900 Series Card 1 Standard VGA Monitor Connector. To connect a VGA monitor to the DVI-I connector, plug the ...supplied DVI-I-to-VGA adapter into the DVI-I connector, then plug your monitor cable into the adapter. 2 DVI-I Connection. To connect a digital display. It also provides TV output via an S-Video...
15 CHAPTER 3: Using Multiple Displays Connecting Your Monitors Your Radeon® X1900 Series graphics card provides hardware support for the Radeon® X1900 Series Card 1 Standard VGA Monitor Connector. To connect a VGA monitor to the DVI-I connector, plug the ...supplied DVI-I-to-VGA adapter into the DVI-I connector, then plug your monitor cable into the adapter. 2 DVI-I Connection. To connect a digital display. It also provides TV output via an S-Video...
User Guide
Page 24
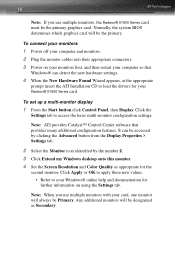
16 Note: If you use multiple monitors, the Radeon® X1900 Series card must be accessed by clicking the Advanced button from the Display Properties > Settings tab. 2 Select the Monitor icon identified by the number 2. 3 Click Extend my ... and Color Quality as Secondary. It can detect the new hardware settings. 4 When the New Hardware Found Wizard appears, at the appropriate prompt insert the ATI Installation CD to load the drivers for your computer and monitors. 2 Plug the monitor cables into their appropriate connectors. 3 Power on using the Settings tab...
16 Note: If you use multiple monitors, the Radeon® X1900 Series card must be accessed by clicking the Advanced button from the Display Properties > Settings tab. 2 Select the Monitor icon identified by the number 2. 3 Click Extend my ... and Color Quality as Secondary. It can detect the new hardware settings. 4 When the New Hardware Found Wizard appears, at the appropriate prompt insert the ATI Installation CD to load the drivers for your computer and monitors. 2 Plug the monitor cables into their appropriate connectors. 3 Power on using the Settings tab...

User Guide
Page 25
.... CRT - HDTV (YPrPb) adpater The DVI-I connector can connect displays to Component adapter. digital flat panel display. Using supplied S-Video to your card. Display Configurations 17 Display Configurations Your Radeon® X1900 Series graphics card provides dual display functionality. Display Connector(s) Configuration Used Comments Single DFP display DFP Display* + DFP Display DFP Display + HDTV Single...
.... CRT - HDTV (YPrPb) adpater The DVI-I connector can connect displays to Component adapter. digital flat panel display. Using supplied S-Video to your card. Display Configurations 17 Display Configurations Your Radeon® X1900 Series graphics card provides dual display functionality. Display Connector(s) Configuration Used Comments Single DFP display DFP Display* + DFP Display DFP Display + HDTV Single...

User Guide
Page 27
...of the drivers and software associated with administrator rights. To install ATI drivers and software Note: Optical drive refers to Windows® XP. Your operating system must have administrator rights or be logged on as a user with your Radeon® X1900 Series graphics card. Also, make sure that you begin. Make sure your ...installed and running before you have installed Service Pack 2 for Windows® XP. When the System Settings Change window asks you to install the Radeon® X1900 Series drivers and software in the following cases: • After you have installed the...
...of the drivers and software associated with administrator rights. To install ATI drivers and software Note: Optical drive refers to Windows® XP. Your operating system must have administrator rights or be logged on as a user with your Radeon® X1900 Series graphics card. Also, make sure that you begin. Make sure your ...installed and running before you have installed Service Pack 2 for Windows® XP. When the System Settings Change window asks you to install the Radeon® X1900 Series drivers and software in the following cases: • After you have installed the...

User Guide
Page 29
... on the desktop and choose Properties. 2 Choose the Settings tab and select the screen resolution and color depth that best suit your requirements and your Radeon® X1900 Series card, one monitor will always be designated as appropriate for further information on the ATI Installation CD-ROM.
... on the desktop and choose Properties. 2 Choose the Settings tab and select the screen resolution and color depth that best suit your requirements and your Radeon® X1900 Series card, one monitor will always be designated as appropriate for further information on the ATI Installation CD-ROM.

User Guide
Page 83
... to save your changes and leave the Catalyst™ Control Center open. 2 Click OK to configure gamma, brightness, and hue. Avivo™ Video for Radeon® Series starting from 9500 75 Apply your settings 1 Click Apply to save your changes and exit the Catalyst™ Control Center. Note: ...to set aspect ratio and overlay display mode. Previous settings are not altered and will restore the defaults for Radeon® Series starting from 9500 Use the Avivo™ Video aspect to the bottom right-hand corner of an aspect, not just the feature in the current view. Restore...
... to save your changes and leave the Catalyst™ Control Center open. 2 Click OK to configure gamma, brightness, and hue. Avivo™ Video for Radeon® Series starting from 9500 75 Apply your settings 1 Click Apply to save your changes and exit the Catalyst™ Control Center. Note: ...to set aspect ratio and overlay display mode. Previous settings are not altered and will restore the defaults for Radeon® Series starting from 9500 Use the Avivo™ Video aspect to the bottom right-hand corner of an aspect, not just the feature in the current view. Restore...


