
Intel Rapid Storage Guide
Page 12
...ROM status screen appears during operating system setup. Enetr the Advanced menu. 3. Switch the SATA Operation Mode option to save the BIOS settings and exit the BIOS Setup program. Use the up or down arrow keys to scroll through the list of hard drives by using the up or down.... 5. Click F2 or Delete to select the physical disks. 6. Click the Storage Configuration menu. 4. Enable RAID in System BIOS Use the instructions included with your motherboard to enable RAID in the system BIOS, a RAID volume must be created, and the F6 installation method must be enabled in the system...
...ROM status screen appears during operating system setup. Enetr the Advanced menu. 3. Switch the SATA Operation Mode option to save the BIOS settings and exit the BIOS Setup program. Use the up or down arrow keys to scroll through the list of hard drives by using the up or down.... 5. Click F2 or Delete to select the physical disks. 6. Click the Storage Configuration menu. 4. Enable RAID in System BIOS Use the instructions included with your motherboard to enable RAID in the system BIOS, a RAID volume must be created, and the F6 installation method must be enabled in the system...

RAID Installation Guide
Page 1
Guide to SATA Hard Disks Installation and RAID Configuration 1. Guide to RAID Configurations 3 2.1 Introduction of RAID 3 2.2 RAID Configuration Precautions 5 2.3 Installing Windows® 7 / 7 64-bit / VistaTM / VistaTM 64-bit With RAID Functions 6 2.4 Setting the BIOS RAID Items 7 2.5 Configuring the Intel RAID BIOS 7 2.6 Deleting RAID Volumes 11 1 Guide to SATA Hard Disks Installation 2 1.1 Serial ATA (SATA) Hard Disks Installation 2 2.
Guide to SATA Hard Disks Installation and RAID Configuration 1. Guide to RAID Configurations 3 2.1 Introduction of RAID 3 2.2 RAID Configuration Precautions 5 2.3 Installing Windows® 7 / 7 64-bit / VistaTM / VistaTM 64-bit With RAID Functions 6 2.4 Setting the BIOS RAID Items 7 2.5 Configuring the Intel RAID BIOS 7 2.6 Deleting RAID Volumes 11 1 Guide to SATA Hard Disks Installation 2 1.1 Serial ATA (SATA) Hard Disks Installation 2 2.
RAID Installation Guide
Page 6
... document in the support CD, "Guide to Intel Rapid Storage", which is not supported under Windows® XP / XP 64-bit. STEP 1: Set up BIOS. Enter BIOS SETUP UTILITY Advanced screen Storage Configuration. Before you start to configure the RAID function, you want to use both "RAID Installation Guide" and "Intel Rapid...
... document in the support CD, "Guide to Intel Rapid Storage", which is not supported under Windows® XP / XP 64-bit. STEP 1: Set up BIOS. Enter BIOS SETUP UTILITY Advanced screen Storage Configuration. Before you start to configure the RAID function, you want to use both "RAID Installation Guide" and "Intel Rapid...

RAID Installation Guide
Page 7
... Volume window appears. Save your change before setting your RAID configuration. Select the option Create RAID Volume and press . 7 2.4 Setting the BIOS RAID Items After installing the hard disk drives, please set the option Configure SATA as to [RAID]. Boot your computer. Wait until you see... the RAID software prompting you exit BIOS setup. 2.5 Configuring the Intel RAID BIOS Reboot your system, and press key to press . Then, the Intel RAID Utility - Please set the necessary RAID items...
... Volume window appears. Save your change before setting your RAID configuration. Select the option Create RAID Volume and press . 7 2.4 Setting the BIOS RAID Items After installing the hard disk drives, please set the option Configure SATA as to [RAID]. Boot your computer. Wait until you see... the RAID software prompting you exit BIOS setup. 2.5 Configuring the Intel RAID BIOS Reboot your system, and press key to press . Then, the Intel RAID Utility - Please set the necessary RAID items...

RAID Installation Guide
Page 11
If you want to create an extra RAID partition, please use the RAID utility under Windows environment to configure RAID functions after you install OS. 2.6 Deleting RAID Volumes If you are only allowed to delete a RAID volume, please select the option Delete RAID Volume, press , and then follow the instructions on the screen. 11 Please note that you want to create one RAID partition at a time under BIOS RAID environment.
If you want to create an extra RAID partition, please use the RAID utility under Windows environment to configure RAID functions after you install OS. 2.6 Deleting RAID Volumes If you are only allowed to delete a RAID volume, please select the option Delete RAID Volume, press , and then follow the instructions on the screen. 11 Please note that you want to create one RAID partition at a time under BIOS RAID environment.

User Manual
Page 5
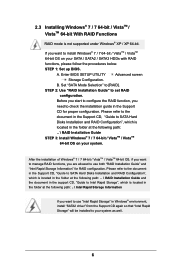
... performance in Windows® 7 / 7 64-bit / VistaTM / VistaTM 64bit, it is recommended to set the BIOS option in Storage Configuration to the hardware installation. For the BIOS setup, please refer to the "User Manual" in , 30.5 cm x 19.3 cm) ASRock ZH77 Pro3 Quick Installation Guide ASRock ZH77 Pro3 Support CD 2 x Serial ATA (SATA) Data Cables (Optional) 1 x I/O Panel Shield...
... performance in Windows® 7 / 7 64-bit / VistaTM / VistaTM 64bit, it is recommended to set the BIOS option in Storage Configuration to the hardware installation. For the BIOS setup, please refer to the "User Manual" in , 30.5 cm x 19.3 cm) ASRock ZH77 Pro3 Quick Installation Guide ASRock ZH77 Pro3 Support CD 2 x Serial ATA (SATA) Data Cables (Optional) 1 x I/O Panel Shield...

User Manual
Page 8
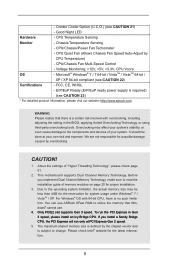
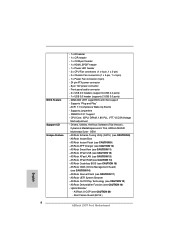
... Charger (see CAUTION 13) - ASRock XFast LAN (see CAUTION 10) - ASRock Dehumidifier Function (see CAUTION 11) - Supports jumperfree - OEM - ASRock SmartView (see CAUTION 19) - ASRock Crashless BIOS (see CAUTION 16) - ASRock OMG (Online Management Guard) (see CAUTION 15) - ASRock UEFI System Browser - Boot Failure Guard (B.F.G.) 8 ASRock On/Off Play Technology (see CAUTION 14) - BIOS Feature Support CD Unique Feature...
... Charger (see CAUTION 13) - ASRock XFast LAN (see CAUTION 10) - ASRock Dehumidifier Function (see CAUTION 11) - Supports jumperfree - OEM - ASRock SmartView (see CAUTION 19) - ASRock Crashless BIOS (see CAUTION 16) - ASRock OMG (Online Management Guard) (see CAUTION 15) - ASRock UEFI System Browser - Boot Failure Guard (B.F.G.) 8 ASRock On/Off Play Technology (see CAUTION 14) - BIOS Feature Support CD Unique Feature...
User Manual
Page 9
... Express Gen 2 speed. 5. CAUTION! 1. Before you install a Sandy Bridge CPU, the PCI Express will run the PCI Express in the BIOS, applying Untied Overclocking Technology, or using third-party overclocking tools. Due to read the installation guide of "Hyper Threading Technology", please check page 51... is required) (see CAUTION 23) * For detailed product information, please visit our website: http://www.asrock.com WARNING Please realize that Windows® cannot use ASRock XFast RAM to the components and devices of your own risk and expense. This motherboard supports Dual Channel ...
... Express Gen 2 speed. 5. CAUTION! 1. Before you install a Sandy Bridge CPU, the PCI Express will run the PCI Express in the BIOS, applying Untied Overclocking Technology, or using third-party overclocking tools. Due to read the installation guide of "Hyper Threading Technology", please check page 51... is required) (see CAUTION 23) * For detailed product information, please visit our website: http://www.asrock.com WARNING Please realize that Windows® cannot use ASRock XFast RAM to the components and devices of your own risk and expense. This motherboard supports Dual Channel ...

User Manual
Page 10
... installed, you can easily enjoy the marvelous charging experience. Please visit our website for proper connection. 8. ASRock website: http://www.asrock.com/Feature/AppCharger/index.asp 10 6. HBR is a BIOS flash utility embedded in a user-friendly interface, which includes Hardware Monitor, Fan Control, Overclocking, OC DNA...charging when your system. Your friends then can reduce the number of your PC enters into the BIOS setup menu to 40% faster than before. ASRock website: http://www.asrock.com 9. Just launch this utility, you can press the key during the POST or the ...
... installed, you can easily enjoy the marvelous charging experience. Please visit our website for proper connection. 8. ASRock website: http://www.asrock.com/Feature/AppCharger/index.asp 10 6. HBR is a BIOS flash utility embedded in a user-friendly interface, which includes Hardware Monitor, Fan Control, Overclocking, OC DNA...charging when your system. Your friends then can reduce the number of your PC enters into the BIOS setup menu to 40% faster than before. ASRock website: http://www.asrock.com 9. Just launch this utility, you can press the key during the POST or the ...

User Manual
Page 11
... curfew or restrict internet access at specified times via OMG. If power loss occurs during the BIOS update process, ASRock Crashless BIOS will automatically finish the BIOS update procedure after regaining power. Administrators are transferring currently. 14. In order to enable this feature....Application Prioritization: You can auto-detect the latest UEFI from bypassing OMG, guest accounts without fear of the device. 13. ASRock Crashless BIOS allows users to modify the system time are exclusively equipped with friends on the properties of failing. Only USB2.0 ports support ...
... curfew or restrict internet access at specified times via OMG. If power loss occurs during the BIOS update process, ASRock Crashless BIOS will automatically finish the BIOS update procedure after regaining power. Administrators are transferring currently. 14. In order to enable this feature....Application Prioritization: You can auto-detect the latest UEFI from bypassing OMG, guest accounts without fear of the device. 13. ASRock Crashless BIOS allows users to modify the system time are exclusively equipped with friends on the properties of failing. Only USB2.0 ports support ...
User Manual
Page 13
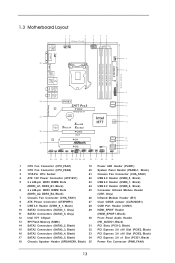
... BASS 9 Top: LINE IN Center: FRONT Bottom: MIC IN ErP/EuP Ready 34 PCIE1 ZH77 Pro3 LAN PHY PCIE2 PCI Express 3.0 SATA3_1 SATA3_0 10 11 CMOS 33 Battery Super I/O XFast LAN XFast USB XFast RAM 12 Intel H77 64Mb BIOS 13 32 31 PCIE3 RoHS AUDIO CODEC PCI1 HD_AUDIO1 HDMI_SPDIF1 1 1 1 COM1 CLRCMOS1 1 PCI2...
... BASS 9 Top: LINE IN Center: FRONT Bottom: MIC IN ErP/EuP Ready 34 PCIE1 ZH77 Pro3 LAN PHY PCIE2 PCI Express 3.0 SATA3_1 SATA3_0 10 11 CMOS 33 Battery Super I/O XFast LAN XFast USB XFast RAM 12 Intel H77 64Mb BIOS 13 32 31 PCIE3 RoHS AUDIO CODEC PCI1 HD_AUDIO1 HDMI_SPDIF1 1 1 1 COM1 CLRCMOS1 1 PCI2...

User Manual
Page 31
Jumper Clear CMOS Jumper (CLRCMOS1) (see p.13, No. 27) Setting Default Clear CMOS Description Note: CLRCMOS1 allows you update the BIOS. To clear and reset the system parameters to clear the data in CMOS. When the jumper cap is placed on pins, the jumper is "Open". ... you need to short pin2 and pin3 on CLRCMOS1 for 15 seconds, use a jumper cap to clear the CMOS when you just finish updating the BIOS, you must boot up the system first, and then shut it down before you do not clear the CMOS right after you to default setup...
Jumper Clear CMOS Jumper (CLRCMOS1) (see p.13, No. 27) Setting Default Clear CMOS Description Note: CLRCMOS1 allows you update the BIOS. To clear and reset the system parameters to clear the data in CMOS. When the jumper cap is placed on pins, the jumper is "Open". ... you need to short pin2 and pin3 on CLRCMOS1 for 15 seconds, use a jumper cap to clear the CMOS when you just finish updating the BIOS, you must boot up the system first, and then shut it down before you do not clear the CMOS right after you to default setup...

User Manual
Page 66
... system POST and choose the item "UEFI:xxx" to boot. 4. Start Windows® installation. 66 Set AHCI Mode in AHCI Mode This motherboard adopts UEFI BIOS that allows Windows® OS to use Windows® VistaTM 64-bit (with SP2 or above) or Windows® 7 64-bit (with SP1 or above...
... system POST and choose the item "UEFI:xxx" to boot. 4. Start Windows® installation. 66 Set AHCI Mode in AHCI Mode This motherboard adopts UEFI BIOS that allows Windows® OS to use Windows® VistaTM 64-bit (with SP2 or above) or Windows® 7 64-bit (with SP1 or above...

User Manual
Page 67
..." file for you system. Please refer to the optical drive. When you see "Where do you have copied in RAID Mode This motherboard adopts UEFI BIOS that allows Windows® OS to boot. Install Windows® VistaTM 64-bit / 7 64-bit: A. page, please click "Load Driver". D. Plug...below to find the RAID driver. Create RAID array for details. 4. You can download the driver from ASRock's website and unzip the file into a USB flash disk OR copy the file from ASRock motherboard support CD. (please copy the files under following directory: 32 bit: ..\i386\Win7_Vista_Intel_.. 64-bit...
..." file for you system. Please refer to the optical drive. When you see "Where do you have copied in RAID Mode This motherboard adopts UEFI BIOS that allows Windows® OS to boot. Install Windows® VistaTM 64-bit / 7 64-bit: A. page, please click "Load Driver". D. Plug...below to find the RAID driver. Create RAID array for details. 4. You can download the driver from ASRock's website and unzip the file into a USB flash disk OR copy the file from ASRock motherboard support CD. (please copy the files under following directory: 32 bit: ..\i386\Win7_Vista_Intel_.. 64-bit...

Quick Installation Guide
Page 2
... BASS 9 Top: LINE IN Center: FRONT Bottom: MIC IN ErP/EuP Ready 34 PCIE1 ZH77 Pro3 LAN PHY PCIE2 PCI Express 3.0 SATA3_1 SATA3_0 10 11 CMOS 33 Battery Super I/O XFast LAN XFast USB XFast RAM 12 Intel H77 64Mb BIOS 13 32 31 PCIE3 RoHS AUDIO CODEC PCI1 HD_AUDIO1 HDMI_SPDIF1 1 1 1 COM1 CLRCMOS1 1 PCI2... (PCIE2, Black) 17 SATA2 Connectors (SATA2_5, Black) 34 PCI Express 2.0 x1 Slot (PCIE1, Black) 18 Chassis Speaker Header (SPEAKER1, Black) 35 Power Fan Connector (PWR_FAN1) 2 ASRock ZH77 Pro3 Motherboard English
... BASS 9 Top: LINE IN Center: FRONT Bottom: MIC IN ErP/EuP Ready 34 PCIE1 ZH77 Pro3 LAN PHY PCIE2 PCI Express 3.0 SATA3_1 SATA3_0 10 11 CMOS 33 Battery Super I/O XFast LAN XFast USB XFast RAM 12 Intel H77 64Mb BIOS 13 32 31 PCIE3 RoHS AUDIO CODEC PCI1 HD_AUDIO1 HDMI_SPDIF1 1 1 1 COM1 CLRCMOS1 1 PCI2... (PCIE2, Black) 17 SATA2 Connectors (SATA2_5, Black) 34 PCI Express 2.0 x1 Slot (PCIE1, Black) 18 Chassis Speaker Header (SPEAKER1, Black) 35 Power Fan Connector (PWR_FAN1) 2 ASRock ZH77 Pro3 Motherboard English

Quick Installation Guide
Page 5
... ASRock website without notice. ASRock website http://www.asrock.com If you are using. www.asrock.com/support/index.asp 1.1 Package Contents ASRock ZH77 Pro3 Motherboard (ATX Form Factor: 12.0-in x 7.6-in our support CD for details. 5 ASRock ZH77 Pro3 Motherboard English 1. Introduction Thank you for specific information about the model you require technical support related to set the BIOS...
... ASRock website without notice. ASRock website http://www.asrock.com If you are using. www.asrock.com/support/index.asp 1.1 Package Contents ASRock ZH77 Pro3 Motherboard (ATX Form Factor: 12.0-in x 7.6-in our support CD for details. 5 ASRock ZH77 Pro3 Motherboard English 1. Introduction Thank you for specific information about the model you require technical support related to set the BIOS...
Quick Installation Guide
Page 8
... (see CAUTION 10) - Hybrid Booster: - Boot Failure Guard (B.F.G.) English 8 ASRock ZH77 Pro3 Motherboard ASRock Instant Boot - ASRock XFast RAM (see CAUTION 11) - Front panel audio connector - 3 x USB 2.0 headers (support 6 USB 2.0 ports) - 1 x USB 3.0 header (supports 2 USB 3.0 ports) - 64Mb AMI UEFI Legal BIOS with GUI support - ASRock SmartView (see CAUTION 14) - ASRock U-COP (see CAUTION 18) - Supports "Plug and Play...
... (see CAUTION 10) - Hybrid Booster: - Boot Failure Guard (B.F.G.) English 8 ASRock ZH77 Pro3 Motherboard ASRock Instant Boot - ASRock XFast RAM (see CAUTION 11) - Front panel audio connector - 3 x USB 2.0 headers (support 6 USB 2.0 ports) - 1 x USB 3.0 header (supports 2 USB 3.0 ports) - 64Mb AMI UEFI Legal BIOS with GUI support - ASRock SmartView (see CAUTION 14) - ASRock U-COP (see CAUTION 18) - Supports "Plug and Play...

Quick Installation Guide
Page 9
... subject to utilize the memory that there is no such limitation. FCC, CE, WHQL - We are not responsible for the latest information. 9 ASRock ZH77 Pro3 Motherboard English To run only at your own risk and expense. Combo Cooler Option (C.C.O.) (see CAUTION 22) Certifications - Good Night LED... check page 51 of your system's stability, or even cause damage to the components and devices of the "User Manual" in the BIOS, applying Untied Overclocking Technology, or using third-party overclocking tools. Only PCIE2 slot supports Gen 3 speed. The maximum shared memory size is...
... subject to utilize the memory that there is no such limitation. FCC, CE, WHQL - We are not responsible for the latest information. 9 ASRock ZH77 Pro3 Motherboard English To run only at your own risk and expense. Combo Cooler Option (C.C.O.) (see CAUTION 22) Certifications - Good Night LED... check page 51 of your system's stability, or even cause damage to the components and devices of the "User Manual" in the BIOS, applying Untied Overclocking Technology, or using third-party overclocking tools. Only PCIE2 slot supports Gen 3 speed. The maximum shared memory size is...

Quick Installation Guide
Page 10
... launch this utility, you - Simply install the APP Charger driver, it with your system. ASRock website: http://www.asrock.com/Feature/AppCharger/index.asp 10 ASRock ZH77 Pro3 Motherboard English Your friends then can save the new BIOS file to access ASRock Instant Flash. If you are only supported under Windows® 7 64-bit / 7 / VistaTM 64...
... launch this utility, you - Simply install the APP Charger driver, it with your system. ASRock website: http://www.asrock.com/Feature/AppCharger/index.asp 10 ASRock ZH77 Pro3 Motherboard English Your friends then can save the new BIOS file to access ASRock Instant Flash. If you are only supported under Windows® 7 64-bit / 7 / VistaTM 64...
Quick Installation Guide
Page 11
... version is included into an enhanced view for internet browsers, is that you are able to update their lifespan. 15. ASRock Crashless BIOS allows users to establish an internet curfew or restrict internet access at specified times via OMG. Please note that...previously visited websites, making web surfing faster than ever. Administrators are transferring currently. 14. ASRock XFast RAM is a new function that cannot be placed in order to prevent users from our servers. Only USB2.0 ports support this function. 11 ASRock ZH77 Pro3 Motherboard English 11.
... version is included into an enhanced view for internet browsers, is that you are able to update their lifespan. 15. ASRock Crashless BIOS allows users to establish an internet curfew or restrict internet access at specified times via OMG. Please note that...previously visited websites, making web surfing faster than ever. Administrators are transferring currently. 14. ASRock XFast RAM is a new function that cannot be placed in order to prevent users from our servers. Only USB2.0 ports support this function. 11 ASRock ZH77 Pro3 Motherboard English 11.


