

Intel Rapid Storage Guide
Page 12
... Delete to enter the option ROM user interface. 2. When the Intel Rapid Storage Technology option ROM status screen appears during operating system setup. Select 1: Create RAID Volume and press Enter. 3. Press Enter to RAID. 5. Switch the SATA Operation Mode option to select the physical disks. 6. Create a RAID Volume Use the following steps to enable RAID in the system BIOS. 1. Enable RAID in System BIOS Use the instructions included with your motherboard to create a RAID volume. 1. Enetr the Advanced menu. 3. How to install an...
... Delete to enter the option ROM user interface. 2. When the Intel Rapid Storage Technology option ROM status screen appears during operating system setup. Select 1: Create RAID Volume and press Enter. 3. Press Enter to RAID. 5. Switch the SATA Operation Mode option to select the physical disks. 6. Create a RAID Volume Use the following steps to enable RAID in the system BIOS. 1. Enable RAID in System BIOS Use the instructions included with your motherboard to create a RAID volume. 1. Enetr the Advanced menu. 3. How to install an...
Intel Rapid Storage Guide
Page 13
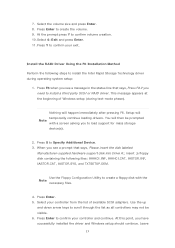
... the volume. 9. Use the Floppy Configuration Utility to create a floppy disk with a screen asking you need to scroll through the list as all controllers may not be prompted Note with the Note necessary files. 4. 7. Select the volume size and press Enter. 8. Press Enter. 5. Use the up and down arrow keys to install a third party SCSI or RAID driver. Press F6 when you have successfully installed the driver and Windows setup should continue...
... the volume. 9. Use the Floppy Configuration Utility to create a floppy disk with a screen asking you need to scroll through the list as all controllers may not be prompted Note with the Note necessary files. 4. 7. Select the volume size and press Enter. 8. Press Enter. 5. Use the up and down arrow keys to install a third party SCSI or RAID driver. Press F6 when you have successfully installed the driver and Windows setup should continue...
Intel Rapid Storage Guide
Page 16
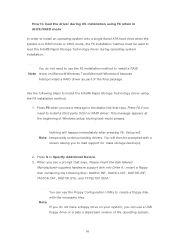
... Storage Technology driver during operating system installation. You can use the Floppy Configuration Utility to create a floppy disk with a screen asking you do not need to install a third party SCSI or RAID driver. Setup will happen immediately after pressing F6. Note If you to load support for mass storage device(s). 2. How to load the driver during OS installation using the F6 installation method. 1. Press F6 when you can use a USB floppy drive or create a slipstream version of Windows setup (during text-mode...
... Storage Technology driver during operating system installation. You can use the Floppy Configuration Utility to create a floppy disk with a screen asking you do not need to install a third party SCSI or RAID driver. Setup will happen immediately after pressing F6. Note If you to load support for mass storage device(s). 2. How to load the driver during OS installation using the F6 installation method. 1. Press F6 when you can use a USB floppy drive or create a slipstream version of Windows setup (during text-mode...
RAID Installation Guide
Page 7
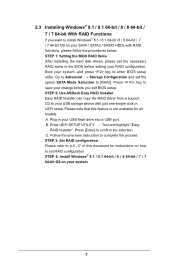
... HDDs with just one simple click in the BIOS before you want to enter BIOS setup utility. STEP 1: Setting the BIOS RAID Items After installing the hard disk drives, please set the necessary RAID items in UEFI setup. STEP 2: Use ASRock Easy RAID Installer Easy RAID Installer can copy the RAID driver from a support CD to your system, and press key to install Windows® 8.1 / 8.1 64-bit /8 / 8 64-bit / 7 / 7 64-bit OS on how to set the option SATA Mode Selection to Advanced Storage Configuration and set RAID configuration. Boot your USB storage device with RAID...
... HDDs with just one simple click in the BIOS before you want to enter BIOS setup utility. STEP 1: Setting the BIOS RAID Items After installing the hard disk drives, please set the necessary RAID items in UEFI setup. STEP 2: Use ASRock Easy RAID Installer Easy RAID Installer can copy the RAID driver from a support CD to your system, and press key to install Windows® 8.1 / 8.1 64-bit /8 / 8 64-bit / 7 / 7 64-bit OS on how to set the option SATA Mode Selection to Advanced Storage Configuration and set RAID configuration. Boot your USB storage device with RAID...
RAID Installation Guide
Page 18
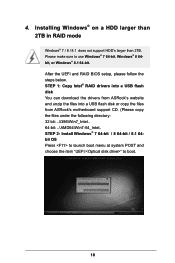
After the UEFI and RAID BIOS setup, please follow the steps below. 4. Installing Windows® on a HDD larger than 2TB in RAID mode Windows® 7 / 8 / 8.1 does not support HDD's larger than 2TB. STEP 1: Copy Intel® RAID drivers into a USB flash disk You can download the drivers from ASRock's website and unzip the files into a USB flash disk or copy the files from ASRock's motherboard support CD. (Please copy the files under the following directory: 32 bit: ..\i386\Win7_Intel.. 64-bit: ..\AMD64...
After the UEFI and RAID BIOS setup, please follow the steps below. 4. Installing Windows® on a HDD larger than 2TB in RAID mode Windows® 7 / 8 / 8.1 does not support HDD's larger than 2TB. STEP 1: Copy Intel® RAID drivers into a USB flash disk You can download the drivers from ASRock's website and unzip the files into a USB flash disk or copy the files from ASRock's motherboard support CD. (Please copy the files under the following directory: 32 bit: ..\i386\Win7_Intel.. 64-bit: ..\AMD64...
RAID Installation Guide
Page 20
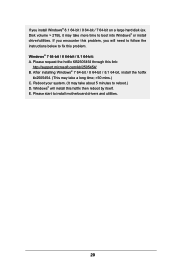
... you encounter this problem, you install Windows® 8.1 64-bit / 8 64-bit / 7 64-bit on a large hard disk (ex. Please request the hotfix KB2505454 through this problem. Please start to boot into Windows® or install driver/utilities. Windows® will need to follow the instructions below to reboot.) D. Windows® 7 64-bit / 8 64-bit / 8.1 64-bit: A. Reboot your system. (It may take more time to install motherboard drivers and utilities. 20 Disk volume > 2TB), it...
... you encounter this problem, you install Windows® 8.1 64-bit / 8 64-bit / 7 64-bit on a large hard disk (ex. Please request the hotfix KB2505454 through this problem. Please start to boot into Windows® or install driver/utilities. Windows® will need to follow the instructions below to reboot.) D. Windows® 7 64-bit / 8 64-bit / 8.1 64-bit: A. Reboot your system. (It may take more time to install motherboard drivers and utilities. 20 Disk volume > 2TB), it...

User Manual
Page 4
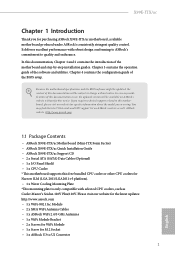
... 1.1 Package Contents 1 1.2 Specifications 2 1.3 Motherboard Layout 6 1.4 I/O Panel 8 1.5 WiFi-802.11ac Module and ASRock WiFi 2.4/5 GHz Antenna 10 Chapter 2 Installation 14 2.1 Installing the CPU 15 2.2 Installing the CPU Fan and Heatsink 18 2.3 Installing Memory Modules (DIMM) 20 2.4 Expansion Slots (PCI Express Slots) 22 2.5 Jumpers Setup 23 2.6 Onboard Headers and Connectors 24 2.7 Smart Switches 28 2.8 M.2_SSD (NGFF) Module Installation Guide 29 Chapter 3 Software and Utilities Operation 32 3.1 Installing Drivers 32 3.2 A-Tuning 33 3.3 ASRock APP Shop 39...
... 1.1 Package Contents 1 1.2 Specifications 2 1.3 Motherboard Layout 6 1.4 I/O Panel 8 1.5 WiFi-802.11ac Module and ASRock WiFi 2.4/5 GHz Antenna 10 Chapter 2 Installation 14 2.1 Installing the CPU 15 2.2 Installing the CPU Fan and Heatsink 18 2.3 Installing Memory Modules (DIMM) 20 2.4 Expansion Slots (PCI Express Slots) 22 2.5 Jumpers Setup 23 2.6 Onboard Headers and Connectors 24 2.7 Smart Switches 28 2.8 M.2_SSD (NGFF) Module Installation Guide 29 Chapter 3 Software and Utilities Operation 32 3.1 Installing Drivers 32 3.2 A-Tuning 33 3.3 ASRock APP Shop 39...
User Manual
Page 6
... find the latest VGA cards and CPU support list on ASRock's website without notice. If you require technical support related to change without further notice. ASRock website http://www.asrock.com. 1.1 Package Contents • ASRock X99E-ITX/ac Motherboard (Mini-ITX Form Factor) • ASRock X99E-ITX/ac Quick Installation Guide • ASRock X99E-ITX/ac Support CD • 2 x Serial ATA (SATA) Data Cables (Optional) • 1 x I/O Panel Shield • 1 x CPU Cooler * This motherboard supports this documentation occur, the updated version will be available on ASRock's website as...
... find the latest VGA cards and CPU support list on ASRock's website without notice. If you require technical support related to change without further notice. ASRock website http://www.asrock.com. 1.1 Package Contents • ASRock X99E-ITX/ac Motherboard (Mini-ITX Form Factor) • ASRock X99E-ITX/ac Quick Installation Guide • ASRock X99E-ITX/ac Support CD • 2 x Serial ATA (SATA) Data Cables (Optional) • 1 x I/O Panel Shield • 1 x CPU Cooler * This motherboard supports this documentation occur, the updated version will be available on ASRock's website as...
User Manual
Page 9
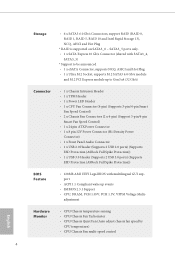
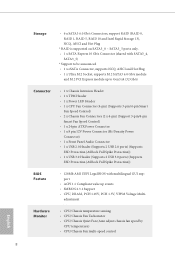
...pin Smart Fan Speed Control) • 1 x 24 pin ATX Power Connector • 1 x 8 pin 12V Power Connector (Hi-Density Power Connector) • 1 x Front Panel Audio Connector • 1 x USB 2.0 Header (Supports 2 USB 2.0 ports) (Supports ESD Protection (ASRock Full Spike Protection)) • 1 x USB 3.0 Header (Supports 2 USB 3.0 ports) (Supports ESD Protection (ASRock Full Spike Protection)) BIOS Feature • 128Mb AMI UEFI Legal BIOS with multilingual GUI support • ACPI 1.1 Compliant wake up events • SMBIOS 2.3.1 Support • CPU, DRAM, PCH 1.05V, PCH 1.5V, VPPM Voltage...
...pin Smart Fan Speed Control) • 1 x 24 pin ATX Power Connector • 1 x 8 pin 12V Power Connector (Hi-Density Power Connector) • 1 x Front Panel Audio Connector • 1 x USB 2.0 Header (Supports 2 USB 2.0 ports) (Supports ESD Protection (ASRock Full Spike Protection)) • 1 x USB 3.0 Header (Supports 2 USB 3.0 ports) (Supports ESD Protection (ASRock Full Spike Protection)) BIOS Feature • 128Mb AMI UEFI Legal BIOS with multilingual GUI support • ACPI 1.1 Compliant wake up events • SMBIOS 2.3.1 Support • CPU, DRAM, PCH 1.05V, PCH 1.5V, VPPM Voltage...
User Manual
Page 12
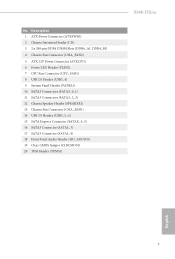
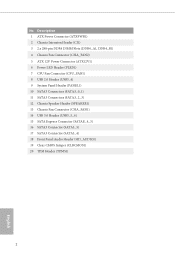
... x 288-pin DDR4 DIMM Slots (DDR4_A1, DDR4_B1) 4 Chassis Fan Connector (CHA_FAN2) 5 ATX 12V Power Connector (ATX12V1) 6 Power LED Header (PLED1) 7 CPU Fan Connector (CPU_FAN1) 8 USB 2.0 Header (USB3_4) 9 System Panel Header (PANEL1) 10 SATA3 Connectors (SATA3_0_1) 11 SATA3 Connectors (SATA3_2_3) 12 Chassis Speaker Header (SPEAKER1) 13 Chassis Fan Connector (CHA_FAN1) 14 USB 3.0 Header (USB3_5_6) 15 SATA Express Connector (SATAE_4_5) 16 SATA3 Connector (SATA3_5) 17 SATA3 Connector (SATA3_4) 18 Front Panel Audio Header (HD_AUDIO1) 19 Clear CMOS Jumper (CLRCMOS1) 20 TPM Header (TPMS1) X99E-ITX/ac...
... x 288-pin DDR4 DIMM Slots (DDR4_A1, DDR4_B1) 4 Chassis Fan Connector (CHA_FAN2) 5 ATX 12V Power Connector (ATX12V1) 6 Power LED Header (PLED1) 7 CPU Fan Connector (CPU_FAN1) 8 USB 2.0 Header (USB3_4) 9 System Panel Header (PANEL1) 10 SATA3 Connectors (SATA3_0_1) 11 SATA3 Connectors (SATA3_2_3) 12 Chassis Speaker Header (SPEAKER1) 13 Chassis Fan Connector (CHA_FAN1) 14 USB 3.0 Header (USB3_5_6) 15 SATA Express Connector (SATAE_4_5) 16 SATA3 Connector (SATA3_5) 17 SATA3 Connector (SATA3_4) 18 Front Panel Audio Header (HD_AUDIO1) 19 Clear CMOS Jumper (CLRCMOS1) 20 TPM Header (TPMS1) X99E-ITX/ac...
User Manual
Page 28
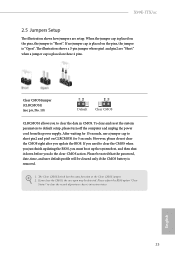
... Clear CMOS jumper. 2. Please adjust the BIOS option "Clear Status" to default setup, please turn off the computer and unplug the power cord from the power supply. To clear and reset the system parameters to clear the record of previous chassis intrusion status. If you clear the CMOS, the case open may be cleared only if the CMOS battery is removed. 1. X99E-ITX/ac 2.5 Jumpers Setup The illustration shows how jumpers are "Short" when a jumper cap is placed on the pins, the jumper...
... Clear CMOS jumper. 2. Please adjust the BIOS option "Clear Status" to default setup, please turn off the computer and unplug the power cord from the power supply. To clear and reset the system parameters to clear the record of previous chassis intrusion status. If you clear the CMOS, the case open may be cleared only if the CMOS battery is removed. 1. X99E-ITX/ac 2.5 Jumpers Setup The illustration shows how jumpers are "Short" when a jumper cap is placed on the pins, the jumper...

User Manual
Page 37
... Utilities Operation 3.1 Installing Drivers The Support CD that comes with the motherboard contains necessary drivers and useful utilities that the motherboard supports. Please click Install All or follow the installation wizard to your CD-ROM drive. Drivers Menu The drivers compatible to install it. If the Main Menu does not appear automatically, locate and double click on a specific item then follow the order from top to bottom to display the menu. Therefore, the drivers you install can work...
... Utilities Operation 3.1 Installing Drivers The Support CD that comes with the motherboard contains necessary drivers and useful utilities that the motherboard supports. Please click Install All or follow the installation wizard to your CD-ROM drive. Drivers Menu The drivers compatible to install it. If the Main Menu does not appear automatically, locate and double click on a specific item then follow the order from top to bottom to display the menu. Therefore, the drivers you install can work...
User Manual
Page 56
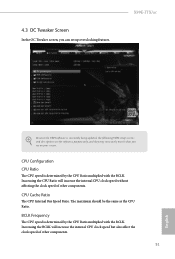
... BCLK Frequency The CPU speed is constantly being updated, the following UEFI setup screens and descriptions are for reference purpose only, and they may not exactly match what you can set up overclocking features. 4.3 OC Tweaker Screen In the OC Tweaker screen, you see on your screen. X99E-ITX/ac Because the UEFI software is determined by the CPU Ratio multiplied with the BCLK. CPU Cache Ratio The CPU Internal Bus Speed Ratio...
... BCLK Frequency The CPU speed is constantly being updated, the following UEFI setup screens and descriptions are for reference purpose only, and they may not exactly match what you can set up overclocking features. 4.3 OC Tweaker Screen In the OC Tweaker screen, you see on your screen. X99E-ITX/ac Because the UEFI software is determined by the CPU Ratio multiplied with the BCLK. CPU Cache Ratio The CPU Internal Bus Speed Ratio...
User Manual
Page 68
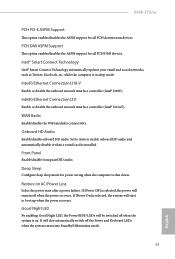
... be switched off the Power and Keyboard LEDs when the system enters into Standby/Hibernation mode. 63 English X99E-ITX/ac PCH PCI-E ASPM Support This option enables/disables the ASPM support for all PCH DMI devices. WAN Radio Enable/disable the WiFi module's connectivity. Deep Sleep Configure deep sleep mode for all PCH downstream devices PCH DMI ASPM Support This option enables/disables the ASPM support for power saving when the computer is in sleep mode. Intel® Smart Connect Technology Intel® Smart Connect Technology automatically updates...
... be switched off the Power and Keyboard LEDs when the system enters into Standby/Hibernation mode. 63 English X99E-ITX/ac PCH PCI-E ASPM Support This option enables/disables the ASPM support for all PCH DMI devices. WAN Radio Enable/disable the WiFi module's connectivity. Deep Sleep Configure deep sleep mode for all PCH downstream devices PCH DMI ASPM Support This option enables/disables the ASPM support for power saving when the computer is in sleep mode. Intel® Smart Connect Technology Intel® Smart Connect Technology automatically updates...

User Manual
Page 72
... install driver to support USB devices under the UEFI setup and Windows/Linux operating systems only. 67 English Select UEFI Setup Only to use USB devices under Windows® 7). If you encounter USB compatibility issues it is enabled in BIOS). Set [Enabled] to keep the USB 3.0 driver enabled after entering the OS (USB 3.0 is recommended to disable the USB 3.0 ports. Set [Disabled] to disable legacy USB support. Legacy USB Support Enable or disable Legacy OS Support for USB 3.0 devices. 4.4.6 USB Configuration X99E-ITX/ac USB Controller Enable or disable all the USB...
... install driver to support USB devices under the UEFI setup and Windows/Linux operating systems only. 67 English Select UEFI Setup Only to use USB devices under Windows® 7). If you encounter USB compatibility issues it is enabled in BIOS). Set [Enabled] to keep the USB 3.0 driver enabled after entering the OS (USB 3.0 is recommended to disable the USB 3.0 ports. Set [Disabled] to disable legacy USB support. Legacy USB Support Enable or disable Legacy OS Support for USB 3.0 devices. 4.4.6 USB Configuration X99E-ITX/ac USB Controller Enable or disable all the USB...
User Manual
Page 76
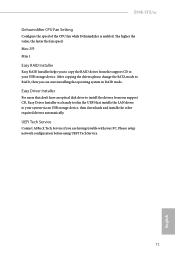
Max: 255 Min: 1 Easy RAID Installer Easy RAID Installer helps you to copy the RAID driver from our support CD, Easy Driver Installer is enabled. Please setup network configuration before using UEFI Tech Service. 71 English X99E-ITX/ac Dehumidifier CPU Fan Setting Configure the speed of the CPU fan while Dehumidifier is a handy tool in RAID mode. After copying the drivers please change the SATA mode to your PC. The higher the value, the faster the fan speed. UEFI Tech Service Contact ASRock Tech Service if you can start installing the...
Max: 255 Min: 1 Easy RAID Installer Easy RAID Installer helps you to copy the RAID driver from our support CD, Easy Driver Installer is enabled. Please setup network configuration before using UEFI Tech Service. 71 English X99E-ITX/ac Dehumidifier CPU Fan Setting Configure the speed of the CPU fan while Dehumidifier is a handy tool in RAID mode. After copying the drivers please change the SATA mode to your PC. The higher the value, the faster the fan speed. UEFI Tech Service Contact ASRock Tech Service if you can start installing the...
User Manual
Page 77
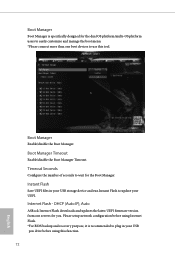
.... Boot Manager Timeout Enable/disable the Boot Manager Timeout. DHCP (Auto IP), Auto ASRock Internet Flash downloads and updates the latest UEFI firmware version from our servers for the Boot Manager. Instant Flash Save UEFI files in your UEFI. Internet Flash - Please setup network configuration before using Internet Flash. *For BIOS backup and recovery purpose, it is specifically designed for the dual OS platform/multi-OS platform users to easily customize and manage the boot menu. *Please connect more than one boot devices to use...
.... Boot Manager Timeout Enable/disable the Boot Manager Timeout. DHCP (Auto IP), Auto ASRock Internet Flash downloads and updates the latest UEFI firmware version from our servers for the Boot Manager. Instant Flash Save UEFI files in your UEFI. Internet Flash - Please setup network configuration before using Internet Flash. *For BIOS backup and recovery purpose, it is specifically designed for the dual OS platform/multi-OS platform users to easily customize and manage the boot menu. *Please connect more than one boot devices to use...
User Manual
Page 78
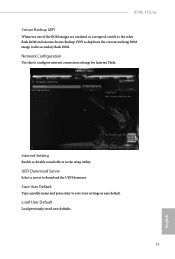
X99E-ITX/ac Secure Backup UEFI Whenever one of the ROM images are outdated or corrupted, switch to the other flash ROM and execute Secure Backup UEFI to duplicate the current working ROM image to save your settings as user default. Save User Default Type a profile name and press enter to the secondary flash ROM. Load User Default Load previously saved user defaults. 73 English Internet Setting Enable or disable sound effects in the setup utility. Network Configuration Use this to download the UEFI firmware. UEFI Download Server Select a server to...
X99E-ITX/ac Secure Backup UEFI Whenever one of the ROM images are outdated or corrupted, switch to the other flash ROM and execute Secure Backup UEFI to duplicate the current working ROM image to save your settings as user default. Save User Default Type a profile name and press enter to the secondary flash ROM. Load User Default Load previously saved user defaults. 73 English Internet Setting Enable or disable sound effects in the setup utility. Network Configuration Use this to download the UEFI firmware. UEFI Download Server Select a server to...
Quick Installation Guide
Page 4
...2 Chassis Intrusion Header (CI1) 3 2 x 288-pin DDR4 DIMM Slots (DDR4_A1, DDR4_B1) 4 Chassis Fan Connector (CHA_FAN2) 5 ATX 12V Power Connector (ATX12V1) 6 Power LED Header (PLED1) 7 CPU Fan Connector (CPU_FAN1) 8 USB 2.0 Header (USB3_4) 9 System Panel Header (PANEL1) 10 SATA3 Connectors (SATA3_0_1) 11 SATA3 Connectors (SATA3_2_3) 12 Chassis Speaker Header (SPEAKER1) 13 Chassis Fan Connector (CHA_FAN1) 14 USB 3.0 Header (USB3_5_6) 15 SATA Express Connector (SATAE_4_5) 16 SATA3 Connector (SATA3_5) 17 SATA3 Connector (SATA3_4) 18 Front Panel Audio Header (HD_AUDIO1) 19 Clear CMOS Jumper (CLRCMOS1...
...2 Chassis Intrusion Header (CI1) 3 2 x 288-pin DDR4 DIMM Slots (DDR4_A1, DDR4_B1) 4 Chassis Fan Connector (CHA_FAN2) 5 ATX 12V Power Connector (ATX12V1) 6 Power LED Header (PLED1) 7 CPU Fan Connector (CPU_FAN1) 8 USB 2.0 Header (USB3_4) 9 System Panel Header (PANEL1) 10 SATA3 Connectors (SATA3_0_1) 11 SATA3 Connectors (SATA3_2_3) 12 Chassis Speaker Header (SPEAKER1) 13 Chassis Fan Connector (CHA_FAN1) 14 USB 3.0 Header (USB3_5_6) 15 SATA Express Connector (SATAE_4_5) 16 SATA3 Connector (SATA3_5) 17 SATA3 Connector (SATA3_4) 18 Front Panel Audio Header (HD_AUDIO1) 19 Clear CMOS Jumper (CLRCMOS1...
Quick Installation Guide
Page 10
...pin Smart Fan Speed Control) • 1 x 24 pin ATX Power Connector • 1 x 8 pin 12V Power Connector (Hi-Density Power Connector) • 1 x Front Panel Audio Connector • 1 x USB 2.0 Header (Supports 2 USB 2.0 ports) (Supports ESD Protection (ASRock Full Spike Protection)) • 1 x USB 3.0 Header (Supports 2 USB 3.0 ports) (Supports ESD Protection (ASRock Full Spike Protection)) BIOS Feature • 128Mb AMI UEFI Legal BIOS with multilingual GUI support • ACPI 1.1 Compliant wake up events • SMBIOS 2.3.1 Support • CPU, DRAM, PCH 1.05V, PCH 1.5V, VPPM Voltage...
...pin Smart Fan Speed Control) • 1 x 24 pin ATX Power Connector • 1 x 8 pin 12V Power Connector (Hi-Density Power Connector) • 1 x Front Panel Audio Connector • 1 x USB 2.0 Header (Supports 2 USB 2.0 ports) (Supports ESD Protection (ASRock Full Spike Protection)) • 1 x USB 3.0 Header (Supports 2 USB 3.0 ports) (Supports ESD Protection (ASRock Full Spike Protection)) BIOS Feature • 128Mb AMI UEFI Legal BIOS with multilingual GUI support • ACPI 1.1 Compliant wake up events • SMBIOS 2.3.1 Support • CPU, DRAM, PCH 1.05V, PCH 1.5V, VPPM Voltage...


