
User Manual
Page 4
... RAID Functions 53 2.21.2 Installing Windows® 7 / 7 64-bit / VistaTM / VistaTM 64-bit Without RAID Functions 54 2.22 Untied Overclocking Technology 54 3 BIOS SETUP UTILITY 55 3.1 Introduction 55 3.1.1 BIOS Menu Bar 55 3.1.2 Navigation Keys 56 3.2 Main Screen 56 3.3 OC Tweaker Screen 57 3.4 Advanced Screen 61 3.4.1 CPU Configuration 62 3.4.2 Chipset Configuration 64 3.4.3 ACPI...
... RAID Functions 53 2.21.2 Installing Windows® 7 / 7 64-bit / VistaTM / VistaTM 64-bit Without RAID Functions 54 2.22 Untied Overclocking Technology 54 3 BIOS SETUP UTILITY 55 3.1 Introduction 55 3.1.1 BIOS Menu Bar 55 3.1.2 Navigation Keys 56 3.2 Main Screen 56 3.3 OC Tweaker Screen 57 3.4 Advanced Screen 61 3.4.1 CPU Configuration 62 3.4.2 Chipset Configuration 64 3.4.3 ACPI...
User Manual
Page 5
... of the Support CD. It delivers excellent performance with robust design conforming to ASRock's commitment to BIOS setup and information of the motherboard and step-by-step guide to change without further notice. www.asrock.com/support/index.asp 1.1 Package Contents ASRock X58 Extreme6 Motherboard (ATX Form Factor: 12.0-in x 9.6-in Floppy Drive 6 x Serial ATA (SATA...
... of the Support CD. It delivers excellent performance with robust design conforming to ASRock's commitment to BIOS setup and information of the motherboard and step-by-step guide to change without further notice. www.asrock.com/support/index.asp 1.1 Package Contents ASRock X58 Extreme6 Motherboard (ATX Form Factor: 12.0-in x 9.6-in Floppy Drive 6 x Serial ATA (SATA...
User Manual
Page 8
... 12) - CPU Frequency Stepless Control (see CAUTION 9) - Intelligent Energy Saver (see CAUTION 13) - ASRock U-COP (see CAUTION 7) - Chassis Temperature Sensing - AMI Legal BIOS - OEM and Trial) Unique Feature - ASRock APP Charger (see CAUTION 14) - Drivers, Utilities, AntiVirus Software (Trial Version), ASRock Software Suite (CyberLink DVD Suite - Good Night LED Hardware - FCC, CE, WHQL - O. Supports...
... 12) - CPU Frequency Stepless Control (see CAUTION 9) - Intelligent Energy Saver (see CAUTION 13) - ASRock U-COP (see CAUTION 7) - Chassis Temperature Sensing - AMI Legal BIOS - OEM and Trial) Unique Feature - ASRock APP Charger (see CAUTION 14) - Drivers, Utilities, AntiVirus Software (Trial Version), ASRock Software Suite (CyberLink DVD Suite - Good Night LED Hardware - FCC, CE, WHQL - O. Supports...

User Manual
Page 9
.... Please be done at your own risk and expense. Please read the installation guide of ASRock OC Tuner. In other complicated flash utility. Just launch this utility, you can update your BIOS only in Flash ROM. Overclocking may be less than 4GB for the reservation for possible damage...to your USB flash drive, floppy disk or hard drive, then you can press key during the POST or press key to BIOS setup menu to access ASRock Instant Flash. Please check the table on page 54 for proper connection. 6. Due to the operating system limitation, the actual memory...
.... Please be done at your own risk and expense. Please read the installation guide of ASRock OC Tuner. In other complicated flash utility. Just launch this utility, you can update your BIOS only in Flash ROM. Overclocking may be less than 4GB for the reservation for possible damage...to your USB flash drive, floppy disk or hard drive, then you can press key during the POST or press key to BIOS setup menu to access ASRock Instant Flash. Please check the table on page 54 for proper connection. 6. Due to the operating system limitation, the actual memory...
User Manual
Page 12
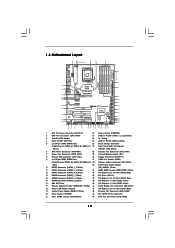
...USB 3.0 T: USB2 B: USB3 Top: RJ-45 ATX12V1 PWR_FAN1 USB 2.0 T: USB4 B: USB5 QPI 6.4GT/s USB 3.0 T: USB6 B: USB7 Intel X58 Top: SIDE SPK Center: REAR SPK Chipset Top: LINE IN Center: FRONT SLI/XFIRE_PWR1 CPU_FAN2 CHA_FAN2 NB_FAN1 PCI Express 2.0 PCIE1 IDE1 SATA3 6Gb/s SATAII_5_6 ... COM1 1 1 PCI1 RoHS PCI2 1394a NEC USB 3.0 Front USB 3.0 PCIE5 FLOPPY1 IR1 1 CHA_FAN1 FRONT_1394 1 X58 Extreme6 Intel ICH10R CMOS Battery Debug LED USB8_9 1 USB3_1_2 CLRCMOS1 1 SPEAKER1 1 8Mb BIOS PWRBTN PLED1 1 PLED PWRBTN PANEL1 RSTBTN 1 HDLED RESET 7 8 9 10 11 12 13 14 15 16...
...USB 3.0 T: USB2 B: USB3 Top: RJ-45 ATX12V1 PWR_FAN1 USB 2.0 T: USB4 B: USB5 QPI 6.4GT/s USB 3.0 T: USB6 B: USB7 Intel X58 Top: SIDE SPK Center: REAR SPK Chipset Top: LINE IN Center: FRONT SLI/XFIRE_PWR1 CPU_FAN2 CHA_FAN2 NB_FAN1 PCI Express 2.0 PCIE1 IDE1 SATA3 6Gb/s SATAII_5_6 ... COM1 1 1 PCI1 RoHS PCI2 1394a NEC USB 3.0 Front USB 3.0 PCIE5 FLOPPY1 IR1 1 CHA_FAN1 FRONT_1394 1 X58 Extreme6 Intel ICH10R CMOS Battery Debug LED USB8_9 1 USB3_1_2 CLRCMOS1 1 SPEAKER1 1 8Mb BIOS PWRBTN PLED1 1 PLED PWRBTN PANEL1 RSTBTN 1 HDLED RESET 7 8 9 10 11 12 13 14 15 16...

User Manual
Page 34
...". To clear and reset the system parameters to clear the CMOS when you just finish updating the BIOS, you must boot up the system first, and then shut it down before you update the BIOS. However, please do not clear the CMOS right after you do the clear-CMOS action. 34 With...
...". To clear and reset the system parameters to clear the CMOS when you just finish updating the BIOS, you must boot up the system first, and then shut it down before you update the BIOS. However, please do not clear the CMOS right after you do the clear-CMOS action. 34 With...

User Manual
Page 42
... and keyboard controller. Perform keyboard controller BAT test. Verify the bootblock checksum. Disable CACHE before system memory is available. BIOS now executes out of the BIOS: Checkpoint Before D1 D1 D0 D2 D3 D4 D5 D6 D7 D8 D9 DA Description Early chipset initialization is stored in...F000 shadow areas but closing SMRAM. Both key sequence and OEM specific method is checked to determine if BIOS recovery is enabled. Restore CPUID value back into register. If BIOS recovery is used to provide code information, which makes troubleshooting even easier. Check if waking up the...
... and keyboard controller. Perform keyboard controller BAT test. Verify the bootblock checksum. Disable CACHE before system memory is available. BIOS now executes out of the BIOS: Checkpoint Before D1 D1 D0 D2 D3 D4 D5 D6 D7 D8 D9 DA Description Early chipset initialization is stored in...F000 shadow areas but closing SMRAM. Both key sequence and OEM specific method is checked to determine if BIOS recovery is enabled. Restore CPUID value back into register. If BIOS recovery is used to provide code information, which makes troubleshooting even easier. Check if waking up the...

User Manual
Page 43
...- Initialize System Management Interrupt. The following table describes the type of document for ADM module and uncompress it. Also initialize BIOS modules on POST entry and GPNV area. Early CPU Init Start - Also, update the Kernel Variables. See DIM Code Checkpoints... manually by reading storage area. Initialize status register A. Uncompress all the output devices. Uncompress and initialize any platform specific BIOS modules. Early POST initialization of different Input Devices. Init Local APIC Set up boot strap proccessor Information Set up boot ...
...- Initialize System Management Interrupt. The following table describes the type of document for ADM module and uncompress it. Also initialize BIOS modules on POST entry and GPNV area. Early CPU Init Start - Also, update the Kernel Variables. See DIM Code Checkpoints... manually by reading storage area. Initialize status register A. Uncompress all the output devices. Uncompress and initialize any platform specific BIOS modules. Early POST initialization of different Input Devices. Init Local APIC Set up boot strap proccessor Information Set up boot ...
User Manual
Page 44
...if enabled. Disables the system configuration display if needed . AA Uninstall POST INT1Ch vector and INT09h vector. Allocates memory for Extended BIOS Data Area from memory found in F000h segment with 0FFh. Initialize the CPU's before booting to OS Loader (typically INT19h). .... 38 Initializes different devices through DIM. 39 Initializes DMAC-1 & DMAC-2. 3A Initialize RTC date/time. 3B Test for different BIOS modules. AC End of POST initialization of runtime image preparation for total memory installed in NVRam. 84 Log errors encountered during POST...
...if enabled. Disables the system configuration display if needed . AA Uninstall POST INT1Ch vector and INT09h vector. Allocates memory for Extended BIOS Data Area from memory found in F000h segment with 0FFh. Initialize the CPU's before booting to OS Loader (typically INT19h). .... 38 Initializes different devices through DIM. 39 Initializes DMAC-1 & DMAC-2. 3A Initialize RTC date/time. 3B Test for different BIOS modules. AC End of POST initialization of runtime image preparation for total memory installed in NVRam. 84 Log errors encountered during POST...
User Manual
Page 49
Please follow the order from up BIOS. STEP 1: Set up to bottom side to install those required drivers. A. STEP 2: Make a SATA / SATAII Driver Diskette. WARNING! E. A. B. Formatting the floppy diskette will see the ... key, and then a window for proper configuration. Therefore, the drivers you install can be auto-detected and listed on the support CD driver page. Enter BIOS SETUP UTILITY Advanced screen Storage Configuration. Start to SATA Hard Disks Installation and RAID Configuration", which is located in it! Insert the Support CD into...
Please follow the order from up BIOS. STEP 1: Set up to bottom side to install those required drivers. A. STEP 2: Make a SATA / SATAII Driver Diskette. WARNING! E. A. B. Formatting the floppy diskette will see the ... key, and then a window for proper configuration. Therefore, the drivers you install can be auto-detected and listed on the support CD driver page. Enter BIOS SETUP UTILITY Advanced screen Storage Configuration. Start to SATA Hard Disks Installation and RAID Configuration", which is located in it! Insert the Support CD into...
User Manual
Page 50
... 1 or RAID 5 at the following steps outline how to your system as well. 2.20.2 Setting Up a "RAID Ready" System You can also set up system BIOS as step 2 of page 49. Assemble the system and attach a single SATA / SATAII hard drive. 2. STEP 4: Install Windows® XP / XP 64-bit OS on...
... 1 or RAID 5 at the following steps outline how to your system as well. 2.20.2 Setting Up a "RAID Ready" System You can also set up system BIOS as step 2 of page 49. Assemble the system and attach a single SATA / SATAII hard drive. 2. STEP 4: Install Windows® XP / XP 64-bit OS on...
User Manual
Page 52
...be installed to your system as ", please set RAID configuration. A. Set "SATAII Configuration" to [Enhanced], and then in the Support CD for RAID configuration. Enter BIOS SETUP UTILITY Advanced screen Storage Configuration. After the installation of Windows® 7 / 7 64-bit / VistaTM / VistaTM 64-bit OS, if you need to [..., you want to set the option to check the installation guide in the option "Configure SATAII as well. 52 STEP 1: Set up BIOS. STEP 2: Use "RAID Installation Guide" to install Windows® 7 / 7 64-bit / VistaTM / VistaTM 64-bit on your system.
...be installed to your system as ", please set RAID configuration. A. Set "SATAII Configuration" to [Enhanced], and then in the Support CD for RAID configuration. Enter BIOS SETUP UTILITY Advanced screen Storage Configuration. After the installation of Windows® 7 / 7 64-bit / VistaTM / VistaTM 64-bit OS, if you need to [..., you want to set the option to check the installation guide in the option "Configure SATAII as well. 52 STEP 1: Set up BIOS. STEP 2: Use "RAID Installation Guide" to install Windows® 7 / 7 64-bit / VistaTM / VistaTM 64-bit on your system.
User Manual
Page 53
...64-bit OS on your SATA / SATAII HDDs without RAID functions, please follow below steps. STEP 2: Make a SATA / SATAII driver diskette. A. Enter BIOS SETUP UTILITY Advanced screen Storage Configuration. A. Please make a SATA / SATAII driver diskette by following section 2.20.1 step 2 on page 49. After making a...; setup, press F6 to [AHCI]. B. Using SATA / SATAII HDDs with NCQ function STEP 1: Set Up BIOS. Using SATA / SATAII HDDs without NCQ function STEP 1: Set up BIOS. STEP 2: Install Windows® XP / XP 64-bit OS on your system. Set "SATAII Configuration" to...
...64-bit OS on your SATA / SATAII HDDs without RAID functions, please follow below steps. STEP 2: Make a SATA / SATAII driver diskette. A. Enter BIOS SETUP UTILITY Advanced screen Storage Configuration. A. Please make a SATA / SATAII driver diskette by following section 2.20.1 step 2 on page 49. After making a...; setup, press F6 to [AHCI]. B. Using SATA / SATAII HDDs with NCQ function STEP 1: Set Up BIOS. Using SATA / SATAII HDDs without NCQ function STEP 1: Set up BIOS. STEP 2: Install Windows® XP / XP 64-bit OS on your system. Set "SATAII Configuration" to...

User Manual
Page 54
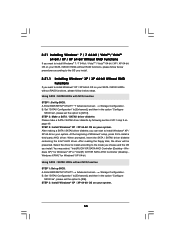
... 7 64-bit / VistaTM / VistaTM 64-bit OS on your SATA / SATAII HDDs without NCQ function STEP 1: Set up BIOS. Before you enable Untied Overclocking function, please enter "Overclock Mode" option of BIOS setup to set the option to [AHCI]. 2.21.2 Installing Windows® 7 / 7 64-bit / VistaTM / VistaTM 64... and then in the option "Configure SATAII as ", please set the option to [Manual]. Using SATA / SATAII HDDs with NCQ function STEP 1: Set Up BIOS. STEP 2: Install Windows® 7 / 7 64-bit / VistaTM / VistaTM 64-bit OS on page 9 for the possible overclocking risk before you apply...
... 7 64-bit / VistaTM / VistaTM 64-bit OS on your SATA / SATAII HDDs without NCQ function STEP 1: Set up BIOS. Before you enable Untied Overclocking function, please enter "Overclock Mode" option of BIOS setup to set the option to [AHCI]. 2.21.2 Installing Windows® 7 / 7 64-bit / VistaTM / VistaTM 64... and then in the option "Configure SATAII as ", please set the option to [Manual]. Using SATA / SATAII HDDs with NCQ function STEP 1: Set Up BIOS. STEP 2: Install Windows® 7 / 7 64-bit / VistaTM / VistaTM 64-bit OS on page 9 for the possible overclocking risk before you apply...
User Manual
Page 55
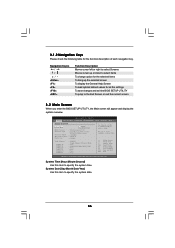
..., the following selections: Main To set up the system time/date information OC Tweaker To set up overclocking features Advanced To set up the advanced BIOS features H/W Monitor To display current hardware status Boot To set up the default system device to locate and load the Operating System Security To set... up the computer. The BIOS FWH chip on the menu bar, and then press to get into the sub screen. 55 Please press or during the Power-On-Self-Test...
..., the following selections: Main To set up the system time/date information OC Tweaker To set up overclocking features Advanced To set up the advanced BIOS features H/W Monitor To display current hardware status Boot To set up the default system device to locate and load the Operating System Security To set... up the computer. The BIOS FWH chip on the menu bar, and then press to get into the sub screen. 55 Please press or during the Power-On-Self-Test...
User Manual
Page 56
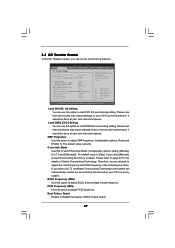
... Main OC Tweaker Advanced H/W Monitor Boot Security Exit System Overview System Time System Date [14:00:09] [Tue 08/03/2010] BIOS Version : X58 Extreme6 P1.00 Processor Type : Intel (R) Core (TM) i7 CPU 975 @ 3.33GHz (64bit) Processor Speed : 3333MHz Microcode Update : 106A5/11 Cache Size : 8192KB Total Memory DDR3_A2 ... this item to specify the system date. 56 3.1.2 Navigation Keys Please check the following table for all the settings To save changes and exit the BIOS SETUP UTILITY To jump to the Exit Screen or exit the current screen 3.2 Main Screen When you enter the...
... Main OC Tweaker Advanced H/W Monitor Boot Security Exit System Overview System Time System Date [14:00:09] [Tue 08/03/2010] BIOS Version : X58 Extreme6 P1.00 Processor Type : Intel (R) Core (TM) i7 CPU 975 @ 3.33GHz (64bit) Processor Speed : 3333MHz Microcode Update : 106A5/11 Cache Size : 8192KB Total Memory DDR3_A2 ... this item to specify the system date. 56 3.1.2 Navigation Keys Please check the following table for all the settings To save changes and exit the BIOS SETUP UTILITY To jump to the Exit Screen or exit the current screen 3.2 Main Screen When you enter the...
User Manual
Page 57
BIOS SETUP UTILITY Main OC Tweaker Advanced H/W Monitor Boot Security Exit OC Tweaker Settings Load CPU EZ OC Setting [Press Enter] Load DDR3 EZ OC Setting [...
BIOS SETUP UTILITY Main OC Tweaker Advanced H/W Monitor Boot Security Exit OC Tweaker Settings Load CPU EZ OC Setting [Press Enter] Load DDR3 EZ OC Setting [...
User Manual
Page 58
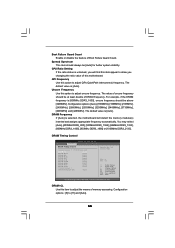
Boot Failure Guard Count Enable or disable the feature of memory accessing. Spread Spectrum This item should be above [3200MHz]. DRAM Timing Control BIOS SETUP UTILITY Advanced DRAM Timing Control Current Setting : 7-7-7-20-59-8-4-4-4-20 DRAM tCL [Auto] DRAM tRCD [Auto] DRAM tRP [Auto] DRAM tRAS [Auto] DRAM tRFC [...
Boot Failure Guard Count Enable or disable the feature of memory accessing. Spread Spectrum This item should be above [3200MHz]. DRAM Timing Control BIOS SETUP UTILITY Advanced DRAM Timing Control Current Setting : 7-7-7-20-59-8-4-4-4-20 DRAM tCL [Auto] DRAM tRCD [Auto] DRAM tRP [Auto] DRAM tRAS [Auto] DRAM tRFC [...
User Manual
Page 59
... [Auto], [2] to [10]. If you can also choose our Intelligent Energy Saver utility to [63]. ASRock VDroop Control Use this item to enable or disable ASRock VDroop control. Configuration options: Configuration options: [Auto], [15] to adjust DRAM Command Rate. DRAM tRTP ... the number of DRAM clocks for TRTP. Configuration options: Configuration options: [Auto], [1] to enable this item to [255]. Besides the BIOS option, you want to enable this function, please set this to [Enabled]. Configuration options: [With VDroop] and [Without VDroop]. Configuration options...
... [Auto], [2] to [10]. If you can also choose our Intelligent Energy Saver utility to [63]. ASRock VDroop Control Use this item to enable or disable ASRock VDroop control. Configuration options: Configuration options: [Auto], [15] to adjust DRAM Command Rate. DRAM tRTP ... the number of DRAM clocks for TRTP. Configuration options: Configuration options: [Auto], [1] to enable this item to [255]. Besides the BIOS option, you want to enable this function, please set this to [Enabled]. Configuration options: [With VDroop] and [Without VDroop]. Configuration options...

User Manual
Page 61
.... CPU Configuration Chipset Configuration ACPI Configuration Storage Configuration PCIPnP Configuration Floppy Configuration SuperIO Configuration USB Configuration BIOS Update Utility ASRock Instant Flash Select Screen Select Item Enter Go to your system after BIOS update process completes. 61 ASRock Instant Flash ASRock Instant Flash is a BIOS flash utility embedded in below sections may cause system to malfunction...
.... CPU Configuration Chipset Configuration ACPI Configuration Storage Configuration PCIPnP Configuration Floppy Configuration SuperIO Configuration USB Configuration BIOS Update Utility ASRock Instant Flash Select Screen Select Item Enter Go to your system after BIOS update process completes. 61 ASRock Instant Flash ASRock Instant Flash is a BIOS flash utility embedded in below sections may cause system to malfunction...


