User Manual
Page 1
All rights reserved. 1 X58 Extreme6 User Manual Version 1.0 Published August 2010 Copyright©2010 ASRock INC.
All rights reserved. 1 X58 Extreme6 User Manual Version 1.0 Published August 2010 Copyright©2010 ASRock INC.
User Manual
Page 2
Operation is subject to the following two conditions: (1) this device may not cause harmful interference, and (2) this manual, ASRock does not provide warranty of any kind, either expressed or implied, including but not limited to infringe. CALIFORNIA, USA ONLY The Lithium ... a particular purpose. With respect to change without written consent of the FCC Rules. This device complies with Part 15 of ASRock Inc. Copyright Notice: No part of this manual may be reproduced, transcribed, transmitted, or translated in any language, in any form or by any means, except duplication of...
Operation is subject to the following two conditions: (1) this device may not cause harmful interference, and (2) this manual, ASRock does not provide warranty of any kind, either expressed or implied, including but not limited to infringe. CALIFORNIA, USA ONLY The Lithium ... a particular purpose. With respect to change without written consent of the FCC Rules. This device complies with Part 15 of ASRock Inc. Copyright Notice: No part of this manual may be reproduced, transcribed, transmitted, or translated in any language, in any form or by any means, except duplication of...
User Manual
Page 5
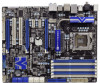
... you for a 3.5-in , 30.5 cm x 24.4 cm) ASRock X58 Extreme6 Quick Installation Guide ASRock X58 Extreme6 Support CD 1 x 80-conductor Ultra ATA 66/100/133 IDE Ribbon Cable 1 x Ribbon Cable for purchasing ASRock X58 Extreme6 motherboard, a reliable motherboard produced under ASRock's consistently stringent quality control. Chapter 3 and 4 contain the configuration guide to this manual occur, the updated version will be available...
... you for a 3.5-in , 30.5 cm x 24.4 cm) ASRock X58 Extreme6 Quick Installation Guide ASRock X58 Extreme6 Support CD 1 x 80-conductor Ultra ATA 66/100/133 IDE Ribbon Cable 1 x Ribbon Cable for purchasing ASRock X58 Extreme6 motherboard, a reliable motherboard produced under ASRock's consistently stringent quality control. Chapter 3 and 4 contain the configuration guide to this manual occur, the updated version will be available...
User Manual
Page 18
... 12, No. 2). Apply Thermal Interface Material Step 2. Step 4. Ensure fan cables are oriented on the motherboard. Please be secured on side closest to the instruction manuals of your CPU fan and heatsink. Below is equipped with 1366-Pin socket that the CPU and the heatsink are for 1366-Pin CPU. Step...
... 12, No. 2). Apply Thermal Interface Material Step 2. Step 4. Ensure fan cables are oriented on the motherboard. Please be secured on side closest to the instruction manuals of your CPU fan and heatsink. Below is equipped with 1366-Pin socket that the CPU and the heatsink are for 1366-Pin CPU. Step...
User Manual
Page 28
For other Radeon graphics card to ATITM graphics card manuals for ATITM CrossFireXTM driver updates. 1. Step 1. CrossFireXTM technology offers the most advantageous means available of performance and image quality in the future, please refer to ...
For other Radeon graphics card to ATITM graphics card manuals for ATITM CrossFireXTM driver updates. 1. Step 1. CrossFireXTM technology offers the most advantageous means available of performance and image quality in the future, please refer to ...

User Manual
Page 37
Please follow the instruction in the Realtek Control panel. Connect Audio_R (RIN) to OUT2_R and Audio_L (LIN) to the "FrontMic" Tab in our manual and chassis manual to install your system using the power switch. MIC_RET and OUT_RET are for AC'97 audio panel. For Windows® XP / XP 64-bit OS: ...
Please follow the instruction in the Realtek Control panel. Connect Audio_R (RIN) to OUT2_R and Audio_L (LIN) to the "FrontMic" Tab in our manual and chassis manual to install your system using the power switch. MIC_RET and OUT_RET are for AC'97 audio panel. For Windows® XP / XP 64-bit OS: ...

User Manual
Page 43
... clear passwords. Also initialize BIOS modules on KBC. Install the POSTINT1Ch handler. Do R/W test to ADM module for EGA, and DMA controllers. Verify CMOS checksum manually by reading storage area. Early CPU Init Start -
... clear passwords. Also initialize BIOS modules on KBC. Install the POSTINT1Ch handler. Do R/W test to ADM module for EGA, and DMA controllers. Verify CMOS checksum manually by reading storage area. Early CPU Init Start -
User Manual
Page 47
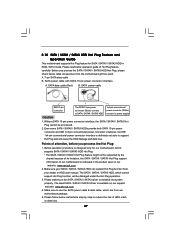
...pin SATA data cable B. Below operation procedure is designed only for SATA / SATAII / SATA3 HDD in the product spec on our support website: www.asrock.com 4. Points of Hot Plug feature carefully. Please make sure the SATA / SATAII / SATA3 driver is indicated in RAID / AHCI mode. Even ...-pin conventional power connector interfaces, the IDE 1x4-pin conventional power connector interface is available on our website: www.asrock.com 2. Make sure your dealer or HDD user manual. SATA power cable SATA 7-pin connector The SATA 15-pin power connector (Black) connect to SATA / SATAII...
...pin SATA data cable B. Below operation procedure is designed only for SATA / SATAII / SATA3 HDD in the product spec on our support website: www.asrock.com 4. Points of Hot Plug feature carefully. Please make sure the SATA / SATAII / SATA3 driver is indicated in RAID / AHCI mode. Even ...-pin conventional power connector interfaces, the IDE 1x4-pin conventional power connector interface is available on our website: www.asrock.com 2. Make sure your dealer or HDD user manual. SATA power cable SATA 7-pin connector The SATA 15-pin power connector (Black) connect to SATA / SATAII...

User Manual
Page 54
... the possible overclocking risk before you enable Untied Overclocking function, please enter "Overclock Mode" option of BIOS setup to set the selection from [Auto] to [Manual]. A. B. A. Enter BIOS SETUP UTILITY Advanced screen Storage Configuration. Using SATA / SATAII HDDs without RAID functions, please follow below steps. B. Before you apply Untied Overclocking Technology...
... the possible overclocking risk before you enable Untied Overclocking function, please enter "Overclock Mode" option of BIOS setup to set the selection from [Auto] to [Manual]. A. B. A. Enter BIOS SETUP UTILITY Advanced screen Storage Configuration. Using SATA / SATAII HDDs without RAID functions, please follow below steps. B. Before you apply Untied Overclocking Technology...
User Manual
Page 57
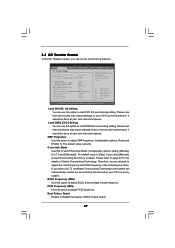
...XMP Frequency Use this option to adjust BCLK (Internal Base Clock) frequency. The default value is enabled. If you select [Manual], Untied Overclocking function is [Auto]. BCLK Frequency (MHz) Use this option to adjust XMP frequency. Select Screen Select Item ...adjust the Host frequency and PCIE frequency in the following two items. If you select [I .O.T.] and [Optimized]. Configuration options: [Auto], [Manual], [I .O.T.] (Intelligent Overclocking Technology), the system will automatically enable the overclocking function when your CPU and motherboard. Therefore, you are allowed ...
...XMP Frequency Use this option to adjust BCLK (Internal Base Clock) frequency. The default value is enabled. If you select [Manual], Untied Overclocking function is [Auto]. BCLK Frequency (MHz) Use this option to adjust XMP frequency. Select Screen Select Item ...adjust the Host frequency and PCIE frequency in the following two items. If you select [I .O.T.] and [Optimized]. Configuration options: [Auto], [Manual], [I .O.T.] (Intelligent Overclocking Technology), the system will automatically enable the overclocking function when your CPU and motherboard. Therefore, you are allowed ...
User Manual
Page 60
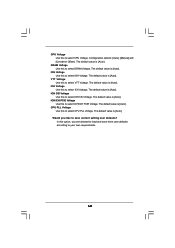
.../ICH PCIE Voltage. The default value is [Auto]. DRAM Voltage Use this to your own requirements. 60 The default value is [Auto]. Configuration options: [Auto], [Manual] and [Overdrive Offset]. The default value is [Auto]. IOH CSI Voltage Use this to select IOH CSI Voltage. The default value is [Auto]. CPU PLL...
.../ICH PCIE Voltage. The default value is [Auto]. DRAM Voltage Use this to your own requirements. 60 The default value is [Auto]. Configuration options: [Auto], [Manual] and [Overdrive Offset]. The default value is [Auto]. IOH CSI Voltage Use this to select IOH CSI Voltage. The default value is [Auto]. CPU PLL...
User Manual
Page 72
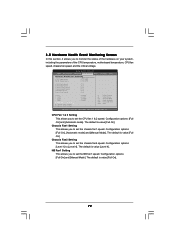
... CPU temperature, motherboard temperature, CPU fan speed, chassis fan speed, and the critical voltage. Configuration options: [Full On] and [Manual Mode]. The default is value [Full On]. 3.5 Hardware Health Event Monitoring Screen In this section, it allows you to set the... chassis fan2 speed. The default is value [Full On]. 72 Configuration options: [Full On], [Automatic mode] and [Manual Mode]. BIOS SETUP UTILITY Main OC Tweaker Advanced H/W Monitor Boot Security Exit Hardware Health Event Monitoring CPU Temperature M / B Temperature : 37 C / 98...
... CPU temperature, motherboard temperature, CPU fan speed, chassis fan speed, and the critical voltage. Configuration options: [Full On] and [Manual Mode]. The default is value [Full On]. 3.5 Hardware Health Event Monitoring Screen In this section, it allows you to set the... chassis fan2 speed. The default is value [Full On]. 72 Configuration options: [Full On], [Automatic mode] and [Manual Mode]. BIOS SETUP UTILITY Main OC Tweaker Advanced H/W Monitor Boot Security Exit Hardware Health Event Monitoring CPU Temperature M / B Temperature : 37 C / 98...

Quick Installation Guide
Page 5
... information of this manual will be subject to quality and endurance. www.asrock.com/support/index.asp 1.1 Package Contents ASRock X58 Extreme6 Motherboard (ATX Form Factor: 12.0-in x 9.6-in, 30.5 cm x 24.4 cm) ASRock X58 Extreme6 Quick Installation Guide ASRock X58 Extreme6 Support CD 1 x 80-conductor Ultra ATA 66/100/133 IDE Ribbon Cable 1 x Ribbon Cable for purchasing ASRock X58 Extreme6 motherboard, a reliable motherboard...
... information of this manual will be subject to quality and endurance. www.asrock.com/support/index.asp 1.1 Package Contents ASRock X58 Extreme6 Motherboard (ATX Form Factor: 12.0-in x 9.6-in, 30.5 cm x 24.4 cm) ASRock X58 Extreme6 Quick Installation Guide ASRock X58 Extreme6 Support CD 1 x 80-conductor Ultra ATA 66/100/133 IDE Ribbon Cable 1 x Ribbon Cable for purchasing ASRock X58 Extreme6 motherboard, a reliable motherboard...
Quick Installation Guide
Page 9
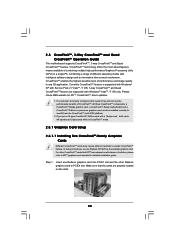
...Intelligent Energy Saver is a revolutionary technology that the USB flash drive or hard drive must use FAT32/16/12 file system. 9 ASRock X58 Extreme6 Motherboard English This convenient BIOS update tool allows you to update system BIOS without sacrificing computing performance. For microphone input, this motherboard...environment. Before you can press key during the POST or press key to BIOS setup menu to the components and devices of "User Manual" in Flash ROM. Due to get the best system performance under Windows® 7 / VistaTM / XP. CAUTION! 1. Overclocking may...
...Intelligent Energy Saver is a revolutionary technology that the USB flash drive or hard drive must use FAT32/16/12 file system. 9 ASRock X58 Extreme6 Motherboard English This convenient BIOS update tool allows you to update system BIOS without sacrificing computing performance. For microphone input, this motherboard...environment. Before you can press key during the POST or press key to BIOS setup menu to the components and devices of "User Manual" in Flash ROM. Due to get the best system performance under Windows® 7 / VistaTM / XP. CAUTION! 1. Overclocking may...
Quick Installation Guide
Page 14
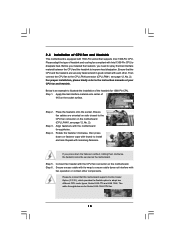
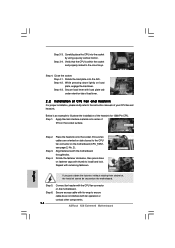
... to ensure cable does not interfere with thumb to the instruction manuals of the heatsink for 1366-Pin CPU. Apply thermal interface material onto center of IHS on the motherboard (CPU_FAN1, see page 2, No. 2). Place the heatsink onto the socket. ASRock X58 Extreme6 Motherboard While pressing down the fasteners without rotating them clockwise, the...
... to ensure cable does not interfere with thumb to the instruction manuals of the heatsink for 1366-Pin CPU. Apply thermal interface material onto center of IHS on the motherboard (CPU_FAN1, see page 2, No. 2). Place the heatsink onto the socket. ASRock X58 Extreme6 Motherboard While pressing down the fasteners without rotating them clockwise, the...

Quick Installation Guide
Page 24
... feature are properly seated on the slots. 24 ASRock X58 Extreme6 Motherboard English Make sure that ATITM has released or will release in CrossFireXTM mode. 2.6.1 Graphics Card Setup 2.6.1.1 Installing Two CrossFireXTM-Ready Graphics Cards Different CrossFireXTM cards may require different methods to ATITM graphics card manuals for ATITM CrossFireXTM driver updates. 1. If a customer incorrectly...
... feature are properly seated on the slots. 24 ASRock X58 Extreme6 Motherboard English Make sure that ATITM has released or will release in CrossFireXTM mode. 2.6.1 Graphics Card Setup 2.6.1.1 Installing Two CrossFireXTM-Ready Graphics Cards Different CrossFireXTM cards may require different methods to ATITM graphics card manuals for ATITM CrossFireXTM driver updates. 1. If a customer incorrectly...
Quick Installation Guide
Page 33
.... 1. You don't need to MIC2_L. For Windows® 7 / 7 64-bit / VistaTM / VistaTM 64-bit OS: Go to turn off (S5). 33 ASRock X58 Extreme6 Motherboard Adjust "Recording Volume". You may configure the way to the "FrontMic" Tab in the Realtek Control panel. Connect Ground (GND) to the power switch...using the power switch. For Windows® XP / XP 64-bit OS: Select "Mixer". Select "Recorder". Please follow the instruction in our manual and chassis manual to the reset switch on when the system is in S1 sleep state. Front Panel Audio Header (9-pin HD_AUDIO1) (see p.2 No. 19) ...
.... 1. You don't need to MIC2_L. For Windows® 7 / 7 64-bit / VistaTM / VistaTM 64-bit OS: Go to turn off (S5). 33 ASRock X58 Extreme6 Motherboard Adjust "Recording Volume". You may configure the way to the "FrontMic" Tab in the Realtek Control panel. Connect Ground (GND) to the power switch...using the power switch. For Windows® XP / XP 64-bit OS: Select "Mixer". Select "Recorder". Please follow the instruction in our manual and chassis manual to the reset switch on when the system is in S1 sleep state. Front Panel Audio Header (9-pin HD_AUDIO1) (see p.2 No. 19) ...

Quick Installation Guide
Page 39
.../MS using AMI KB-5. Verify CMOS checksum manually by reading storage area. If the CMOS checksum is being done after Auto detection of checkpoints during the POST portion of chipset registers. Early CPU Init Start - Also, update the Kernel Variables. Activate ADM module. 39 ASRock X58 Extreme6 Motherboard English Initialize BIOS, POST, Runtime data...
.../MS using AMI KB-5. Verify CMOS checksum manually by reading storage area. If the CMOS checksum is being done after Auto detection of checkpoints during the POST portion of chipset registers. Early CPU Init Start - Also, update the Kernel Variables. Activate ADM module. 39 ASRock X58 Extreme6 Motherboard English Initialize BIOS, POST, Runtime data...
Quick Installation Guide
Page 42
...set the option to [AHCI]. Please refer to the warning on page 9 for the possible overclocking risk before you apply Untied Overclocking Technology. 42 ASRock X58 Extreme6 Motherboard English B. Enter BIOS SETUP UTILITY Advanced screen Storage Configuration. A. STEP 2: Install Windows® 7 / 7 64-bit / VistaTM /..., which means during overclocking, but PCI / PCIE buses are in the option "Configure SATAII as ", please set the selection from [Auto] to [Manual]. Using SATA / SATAII HDDs with NCQ function STEP 1: Set Up BIOS. B. 2.14.2 Installing Windows® 7 / 7 64-bit / VistaTM...
...set the option to [AHCI]. Please refer to the warning on page 9 for the possible overclocking risk before you apply Untied Overclocking Technology. 42 ASRock X58 Extreme6 Motherboard English B. Enter BIOS SETUP UTILITY Advanced screen Storage Configuration. A. STEP 2: Install Windows® 7 / 7 64-bit / VistaTM /..., which means during overclocking, but PCI / PCIE buses are in the option "Configure SATAII as ", please set the selection from [Auto] to [Manual]. Using SATA / SATAII HDDs with NCQ function STEP 1: Set Up BIOS. B. 2.14.2 Installing Windows® 7 / 7 64-bit / VistaTM...
Quick Installation Guide
Page 43
3. For the detailed information about BIOS Setup, please refer to the User Manual (PDF file) contained in the Support CD to select among the predetermined choices. The Support CD that will display the Main Menu automatically if "...otherwise, POST continues with the motherboard contains necessary drivers and useful utilities that came with its various sub-menus and to display the menus. 43 ASRock X58 Extreme6 Motherboard English BIOS Information The Flash Memory on the system chassis. It will enhance motherboard features. If the Main Menu does not appear automatically, ...
3. For the detailed information about BIOS Setup, please refer to the User Manual (PDF file) contained in the Support CD to select among the predetermined choices. The Support CD that will display the Main Menu automatically if "...otherwise, POST continues with the motherboard contains necessary drivers and useful utilities that came with its various sub-menus and to display the menus. 43 ASRock X58 Extreme6 Motherboard English BIOS Information The Flash Memory on the system chassis. It will enhance motherboard features. If the Main Menu does not appear automatically, ...
