Quick Installation Guide
Page 7
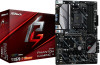
ASRock website http://www.asrock.com. 1.1 Package Contents • ASRock X570 Phantom Gaming 4 Motherboard (ATX Form Factor) • ASRock X570 Phantom Gaming 4 Quick Installation Guide • ASRock X570 Phantom Gaming 4 Support CD • 2 x Serial ATA (SATA) Data Cables (Optional) • 3 x Screws for specific information about the model you are using. Because the motherboard specifications and the BIOS software might be updated, the content of this documentation...
ASRock website http://www.asrock.com. 1.1 Package Contents • ASRock X570 Phantom Gaming 4 Motherboard (ATX Form Factor) • ASRock X570 Phantom Gaming 4 Quick Installation Guide • ASRock X570 Phantom Gaming 4 Support CD • 2 x Serial ATA (SATA) Data Cables (Optional) • 3 x Screws for specific information about the model you are using. Because the motherboard specifications and the BIOS software might be updated, the content of this documentation...
Quick Installation Guide
Page 11
X570 Phantom Gaming 4 Connector • 1 x COM Port Header • 1 x TPM ...1 x Front Panel Audio Connector • 1 x AMD LED Fan USB Header • 1 x Thunderbolt AIC Connector (5-pin) (Supports ASRock Thunderbolt AIC Card only) • 1 x USB 2.0 Header (Supports 2 USB 2.0 ports) (Supports ESD Protection) • 2 x USB... 3.2 Gen1 Headers (Support 4 USB 3.2 Gen1 ports) (Supports ESD Protection) BIOS Feature • AMI UEFI Legal BIOS with GUI support • Supports "Plug and Play" • ACPI 5.1 compliance wake up events • Supports...
X570 Phantom Gaming 4 Connector • 1 x COM Port Header • 1 x TPM ...1 x Front Panel Audio Connector • 1 x AMD LED Fan USB Header • 1 x Thunderbolt AIC Connector (5-pin) (Supports ASRock Thunderbolt AIC Card only) • 1 x USB 2.0 Header (Supports 2 USB 2.0 ports) (Supports ESD Protection) • 2 x USB... 3.2 Gen1 Headers (Support 4 USB 3.2 Gen1 ports) (Supports ESD Protection) BIOS Feature • AMI UEFI Legal BIOS with GUI support • Supports "Plug and Play" • ACPI 5.1 compliance wake up events • Supports...

Quick Installation Guide
Page 12
.../EuP ready power supply is required) * For detailed product information, please visit our website: http://www.asrock.com Please realize that there is a certain risk involved with overclocking, including adjusting the setting in the BIOS, applying Untied Overclocking Technology, or using third-party overclocking tools. It should be done at your system...
.../EuP ready power supply is required) * For detailed product information, please visit our website: http://www.asrock.com Please realize that there is a certain risk involved with overclocking, including adjusting the setting in the BIOS, applying Untied Overclocking Technology, or using third-party overclocking tools. It should be done at your system...

Quick Installation Guide
Page 28
... Setup The illustration shows how jumpers are setup. The data in CMOS. If you need to clear the CMOS when you just finish updating the BIOS, you must boot up the system first, and then shut it down before you to clear the data in CMOS includes system setup information such...
... Setup The illustration shows how jumpers are setup. The data in CMOS. If you need to clear the CMOS when you just finish updating the BIOS, you must boot up the system first, and then shut it down before you to clear the data in CMOS includes system setup information such...

Quick Installation Guide
Page 142
한 국 어 커넥터 BIOS 기능 • COM 1 개 • TPM 헤더 1 개 • SPI TPM 헤더 1 LED 1 개 • RGB LED 헤&#... 1 개 • 8 핀 12V 1 1 개 • AMD LED 팬 USB 헤더 1 개 • Thunderbolt AIC 커넥터 1 개 (5 핀 )(ASRock Thunderbolt AIC USB 2.0 헤더 1 개 (USB 2.0 포트 2 ESD USB 3.2 Gen1 헤더 2 개 (USB 3.2 Gen1 포트 4 (ESD • GUI AMI UEFI ...
한 국 어 커넥터 BIOS 기능 • COM 1 개 • TPM 헤더 1 개 • SPI TPM 헤더 1 LED 1 개 • RGB LED 헤&#... 1 개 • 8 핀 12V 1 1 개 • AMD LED 팬 USB 헤더 1 개 • Thunderbolt AIC 커넥터 1 개 (5 핀 )(ASRock Thunderbolt AIC USB 2.0 헤더 1 개 (USB 2.0 포트 2 ESD USB 3.2 Gen1 헤더 2 개 (USB 3.2 Gen1 포트 4 (ESD • GUI AMI UEFI ...

Quick Installation Guide
Page 143
X570 Phantom Gaming 4 OS 인증 CPU, CPU CPU, CPU CPU CPU, CPU CPU, CPU 12V, +5V, +3.3V, CPU Vcore, CPU VDDCR_ SOC, DRAM, PREM VDDCR_SOC, +1.8V, VDDP • Microsoft® Windows® 10 64- 비트 • FCC, CE • ErP/EuP ErP/EuP http://www.asrock.com BIOS Untied Overclocking Technology 한국어 141
X570 Phantom Gaming 4 OS 인증 CPU, CPU CPU, CPU CPU CPU, CPU CPU, CPU 12V, +5V, +3.3V, CPU Vcore, CPU VDDCR_ SOC, DRAM, PREM VDDCR_SOC, +1.8V, VDDP • Microsoft® Windows® 10 64- 비트 • FCC, CE • ErP/EuP ErP/EuP http://www.asrock.com BIOS Untied Overclocking Technology 한국어 141

Quick Installation Guide
Page 155
Line CalibrationʢCPU VDDCR_SOC ѹઃఆ 153 X570 Phantom Gaming 4 日本語 ίωΫλ BIOS ػೳ • 1 x COM 1 x TPM 1 x SPI TPM 1 x LED 2 x RGB LED 12V/3Aɺ36W ·Ͱͷ LED 1 x...674;2 ͭͷ USB 2.0 ESD 2 x USB 3.2 Gen1 ϔομʔʢ4 ͭͷ USB 3.2 Gen1 ESD • AMI UEFI Legal BIOSɺGUI • ACPI 5.1 • SMBIOS 2.3 αϙʔτ • CPUɺCPU VDDCR_SOCɺDRAMɺVPPMɺPREM VDD_CLDOɺ PERM ...
Line CalibrationʢCPU VDDCR_SOC ѹઃఆ 153 X570 Phantom Gaming 4 日本語 ίωΫλ BIOS ػೳ • 1 x COM 1 x TPM 1 x SPI TPM 1 x LED 2 x RGB LED 12V/3Aɺ36W ·Ͱͷ LED 1 x...674;2 ͭͷ USB 2.0 ESD 2 x USB 3.2 Gen1 ϔομʔʢ4 ͭͷ USB 3.2 Gen1 ESD • AMI UEFI Legal BIOSɺGUI • ACPI 5.1 • SMBIOS 2.3 αϙʔτ • CPUɺCPU VDDCR_SOCɺDRAMɺVPPMɺPREM VDD_CLDOɺ PERM ...

Quick Installation Guide
Page 180
繁體中文 BIOS • AMI UEFI Legal BIOS 含 GUI ACPI 5.1 SMBIOS 2.3 • CPU、CPU VDDCR_SOC、DRAM、VPPM、PREM VDD_ CLDO、PERM VDDCR_SOC、+1.8V、VDDP、...、VDDP • Microsoft® Windows® 10 64-bit 認證 • FCC、CE • ErP/EuP ready ErP/EuP ready http://www.asrock.com BIOS 178
繁體中文 BIOS • AMI UEFI Legal BIOS 含 GUI ACPI 5.1 SMBIOS 2.3 • CPU、CPU VDDCR_SOC、DRAM、VPPM、PREM VDD_ CLDO、PERM VDDCR_SOC、+1.8V、VDDP、...、VDDP • Microsoft® Windows® 10 64-bit 認證 • FCC、CE • ErP/EuP ready ErP/EuP ready http://www.asrock.com BIOS 178

User Manual
Page 5
... & APP Shop 49 3.3.1 UI Overview 49 3.3.2 Apps 50 3.3.3 BIOS & Drivers 53 3.3.4 Setting 54 3.4 ASRock Polychrome SYNC 55 Chapter 4 UEFI SETUP UTILITY 58 4.1 Introduction 58 4.1.1 UEFI Menu Bar 58 4.1.2 Navigation Keys 59 4.2 Main Screen 60 4.3 OC Tweaker Screen 61 4.4 Advanced ...
... & APP Shop 49 3.3.1 UI Overview 49 3.3.2 Apps 50 3.3.3 BIOS & Drivers 53 3.3.4 Setting 54 3.4 ASRock Polychrome SYNC 55 Chapter 4 UEFI SETUP UTILITY 58 4.1 Introduction 58 4.1.1 UEFI Menu Bar 58 4.1.2 Navigation Keys 59 4.2 Main Screen 60 4.3 OC Tweaker Screen 61 4.4 Advanced ...
User Manual
Page 7
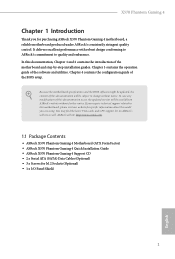
... and CPU support list on ASRock's website without notice. Chapter 4 contains the configuration guide of the software and utilities. It delivers excellent performance with robust design conforming to ASRock's commitment to change without further notice. X570 Phantom Gaming 4 Chapter 1 Introduction Thank you are using. Because the motherboard specifications and the BIOS software might be available on...
... and CPU support list on ASRock's website without notice. Chapter 4 contains the configuration guide of the software and utilities. It delivers excellent performance with robust design conforming to ASRock's commitment to change without further notice. X570 Phantom Gaming 4 Chapter 1 Introduction Thank you are using. Because the motherboard specifications and the BIOS software might be available on...

User Manual
Page 11
X570 Phantom Gaming 4 Connector • 1 x COM Port Header • 1 x TPM ...1 x Front Panel Audio Connector • 1 x AMD LED Fan USB Header • 1 x Thunderbolt AIC Connector (5-pin) (Supports ASRock Thunderbolt AIC Card only) • 1 x USB 2.0 Header (Supports 2 USB 2.0 ports) (Supports ESD Protection) • 2 x USB... 3.2 Gen1 Headers (Support 4 USB 3.2 Gen1 ports) (Supports ESD Protection) BIOS Feature • AMI UEFI Legal BIOS with GUI support • Supports "Plug and Play" • ACPI 5.1 compliance wake up events • Supports...
X570 Phantom Gaming 4 Connector • 1 x COM Port Header • 1 x TPM ...1 x Front Panel Audio Connector • 1 x AMD LED Fan USB Header • 1 x Thunderbolt AIC Connector (5-pin) (Supports ASRock Thunderbolt AIC Card only) • 1 x USB 2.0 Header (Supports 2 USB 2.0 ports) (Supports ESD Protection) • 2 x USB... 3.2 Gen1 Headers (Support 4 USB 3.2 Gen1 ports) (Supports ESD Protection) BIOS Feature • AMI UEFI Legal BIOS with GUI support • Supports "Plug and Play" • ACPI 5.1 compliance wake up events • Supports...

User Manual
Page 12
.../EuP ready power supply is required) * For detailed product information, please visit our website: http://www.asrock.com Please realize that there is a certain risk involved with overclocking, including adjusting the setting in the BIOS, applying Untied Overclocking Technology, or using third-party overclocking tools. Overclocking may affect your system's stability, or...
.../EuP ready power supply is required) * For detailed product information, please visit our website: http://www.asrock.com Please realize that there is a certain risk involved with overclocking, including adjusting the setting in the BIOS, applying Untied Overclocking Technology, or using third-party overclocking tools. Overclocking may affect your system's stability, or...

User Manual
Page 32
... cap to short the pins on the pins, the jumper is "Short". If you need to clear the CMOS when you just finish updating the BIOS, you must boot up the system first, and then shut it down before you to remove the jumper cap after clearing the CMOS. English 26...
... cap to short the pins on the pins, the jumper is "Short". If you need to clear the CMOS when you just finish updating the BIOS, you must boot up the system first, and then shut it down before you to remove the jumper cap after clearing the CMOS. English 26...

User Manual
Page 59
Step 1 Please check the item information before update. Click to select one or more details. Click on Step 2 to see more items you will see a list of recommended or critical updates for the BIOS or drivers. Step 3 Click Update to start the update process. 53 English X570 Phantom Gaming 4 3.3.3 BIOS & Drivers Installing BIOS or Drivers When the "BIOS & Drivers" tab is selected, you want to update. Please update them all soon.
Step 1 Please check the item information before update. Click to select one or more details. Click on Step 2 to see more items you will see a list of recommended or critical updates for the BIOS or drivers. Step 3 Click Update to start the update process. 53 English X570 Phantom Gaming 4 3.3.3 BIOS & Drivers Installing BIOS or Drivers When the "BIOS & Drivers" tab is selected, you want to update. Please update them all soon.
RAID Installation Guide
Page 1
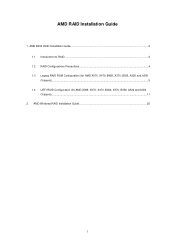
AMD RAID Installation Guide 1. AMD Windows RAID Installation Guide 20 1 AMD BIOS RAID Installation Guide ...2 1.1 Introduction to RAID...2 1.2 RAID Configurations Precautions 4 1.3 Legacy RAID ROM Configuration (for AMD X570, X470, B450, X370, B350, A320 and A300 Chipsets)...5 1.4 UEFI RAID Configuration (for AMD X399, X570, X470, B450, X370, B350, A320 and A300 Chipsets)...11 2.
AMD RAID Installation Guide 1. AMD Windows RAID Installation Guide 20 1 AMD BIOS RAID Installation Guide ...2 1.1 Introduction to RAID...2 1.2 RAID Configurations Precautions 4 1.3 Legacy RAID ROM Configuration (for AMD X570, X470, B450, X370, B350, A320 and A300 Chipsets)...5 1.4 UEFI RAID Configuration (for AMD X399, X570, X470, B450, X370, B350, A320 and A300 Chipsets)...11 2.
RAID Installation Guide
Page 2
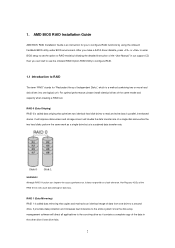
...onboard RAID Option ROM Utility to configure RAID. 1.1 Introduction to read and write data in parallel, interleaved stacks. AMD BIOS RAID Installation Guide AMD BIOS RAID Installation Guide is an instruction for "Redundant Array of Independent Disks", which is called data striping that optimizes two ...data transfer rate of the same model and capacity when creating a RAID set the option to RAID mode by using the onboard FastBuild BIOS utility under BIOS environment. RAID 0 (Data Striping) RAID 0 is called data mirroring that copies and maintains an identical image of data from one...
...onboard RAID Option ROM Utility to configure RAID. 1.1 Introduction to read and write data in parallel, interleaved stacks. AMD BIOS RAID Installation Guide AMD BIOS RAID Installation Guide is an instruction for "Redundant Array of Independent Disks", which is called data striping that optimizes two ...data transfer rate of the same model and capacity when creating a RAID set the option to RAID mode by using the onboard FastBuild BIOS utility under BIOS environment. RAID 0 (Data Striping) RAID 0 is called data mirroring that copies and maintains an identical image of data from one...
RAID Installation Guide
Page 5
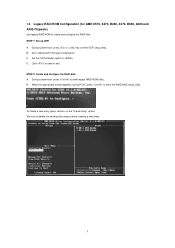
... arrays before creating a new array. 5 To create a new array, press on the "Create Array" option. *Be sure to enter the RAID BIOS setup utility. C. 1.3 Legacy RAID ROM Configuration (for AMD X570, X470, B450, X370, B350, A320 and A300 Chipsets) Use legacy RAID ROM to enter UEFI setup utility. During system boot, press...
... arrays before creating a new array. 5 To create a new array, press on the "Create Array" option. *Be sure to enter the RAID BIOS setup utility. C. 1.3 Legacy RAID ROM Configuration (for AMD X570, X470, B450, X370, B350, A320 and A300 Chipsets) Use legacy RAID ROM to enter UEFI setup utility. During system boot, press...
RAID Installation Guide
Page 7
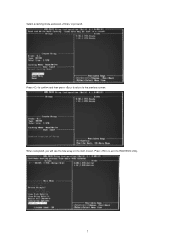
When completed, you will see the new array on the main screen. Press to the previous screen. Press to confirm and then press to return to exit the RAID BIOS utility. 7 Select a caching mode and press to proceed.
When completed, you will see the new array on the main screen. Press to the previous screen. Press to confirm and then press to return to exit the RAID BIOS utility. 7 Select a caching mode and press to proceed.
RAID Installation Guide
Page 12
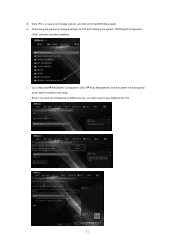
After saving the previously changed settings via F10 and rebooting the system, "RAIDXpert2 Configuration Utility" submenu becomes available. H. Go to use "Delete Array" first. 12 I. Even if you have not configured any RAID array yet, you might have to AdvancedRAIDXpert2 Configuration Utility Array Management, and then delete the existing disk arrays before creating a new array. G. Click to save your changes and exit, and then enter the BIOS Setup again.
After saving the previously changed settings via F10 and rebooting the system, "RAIDXpert2 Configuration Utility" submenu becomes available. H. Go to use "Delete Array" first. 12 I. Even if you have not configured any RAID array yet, you might have to AdvancedRAIDXpert2 Configuration Utility Array Management, and then delete the existing disk arrays before creating a new array. G. Click to save your changes and exit, and then enter the BIOS Setup again.


