User Manual
Page 5
Chapter 3 Software and Utilities Operation 48 3.1 Installing Drivers 48 3.2 A-Tuning 49 3.2.1 Installing A-Tuning 49 3.2.2 Using A-Tuning 49 3.3 ASRock Live Update & APP Shop 52 3.3.1 UI Overview 52 3.3.2 Apps 53 3.3.3 BIOS & Drivers 56 3.3.4 Setting 57 Chapter 4 UEFI SETUP UTILITY 60 4.1 Introduction 60 4.1.1 UEFI Menu Bar 60 4.1.2 Navigation Keys 61 4.2 Main Screen 62 4.3 OC Tweaker Screen...
Chapter 3 Software and Utilities Operation 48 3.1 Installing Drivers 48 3.2 A-Tuning 49 3.2.1 Installing A-Tuning 49 3.2.2 Using A-Tuning 49 3.3 ASRock Live Update & APP Shop 52 3.3.1 UI Overview 52 3.3.2 Apps 53 3.3.3 BIOS & Drivers 56 3.3.4 Setting 57 Chapter 4 UEFI SETUP UTILITY 60 4.1 Introduction 60 4.1.1 UEFI Menu Bar 60 4.1.2 Navigation Keys 61 4.2 Main Screen 62 4.3 OC Tweaker Screen...
User Manual
Page 7
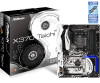
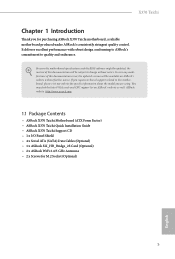
... the operation guide of the BIOS setup. ASRock website http://www.asrock.com. 1.1 Package Contents • ASRock X370 Taichi Motherboard (ATX Form Factor) • ASRock X370 Taichi Quick Installation Guide • ASRock X370 Taichi Support CD • 1 x I/O Panel Shield • 4 x Serial ATA (SATA) Data Cables (Optional) • 1 x ASRock SLI_HB_Bridge_2S Card (Optional) • 2 x ASRock WiFi 2.4/5 GHz Antennas • 2 x Screws for purchasing ASRock X370 Taichi motherboard, a reliable motherboard produced...
... the operation guide of the BIOS setup. ASRock website http://www.asrock.com. 1.1 Package Contents • ASRock X370 Taichi Motherboard (ATX Form Factor) • ASRock X370 Taichi Quick Installation Guide • ASRock X370 Taichi Support CD • 1 x I/O Panel Shield • 4 x Serial ATA (SATA) Data Cables (Optional) • 1 x ASRock SLI_HB_Bridge_2S Card (Optional) • 2 x ASRock WiFi 2.4/5 GHz Antennas • 2 x Screws for purchasing ASRock X370 Taichi motherboard, a reliable motherboard produced...
User Manual
Page 11
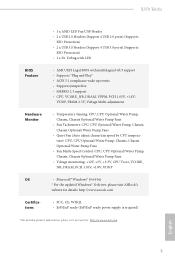
X370 Taichi • 1 x AMD LED Fan USB Header • 2 x USB 2.0 Headers (Support 4 USB 2.0 ports) (Supports ESD Protection) • 2 x USB 3.0 Headers (Support 4 USB 3.0 ports) (Supports ESD Protection) • 1 x Dr. Debug with LED BIOS Feature • AMI UEFI Legal BIOS with multilingual GUI support • Supports "Plug...OS • Microsoft® Windows® 10 64-bit * For the updated Windows® 10 driver, please visit ASRock's website for details: http://www.asrock.com Certifications • FCC, CE, WHQL • ErP/EuP ready (ErP/EuP ready power supply is required) *...
X370 Taichi • 1 x AMD LED Fan USB Header • 2 x USB 2.0 Headers (Support 4 USB 2.0 ports) (Supports ESD Protection) • 2 x USB 3.0 Headers (Support 4 USB 3.0 ports) (Supports ESD Protection) • 1 x Dr. Debug with LED BIOS Feature • AMI UEFI Legal BIOS with multilingual GUI support • Supports "Plug...OS • Microsoft® Windows® 10 64-bit * For the updated Windows® 10 driver, please visit ASRock's website for details: http://www.asrock.com Certifications • FCC, CE, WHQL • ErP/EuP ready (ErP/EuP ready power supply is required) *...

User Manual
Page 12
Overclocking may affect your system's stability, or even cause damage to the components and devices of your own risk and expense. We are not responsible for possible damage caused by overclocking. 6 English Please realize that there is a certain risk involved with overclocking, including adjusting the setting in the BIOS, applying Untied Overclocking Technology, or using third-party overclocking tools. It should be done at your system.
Overclocking may affect your system's stability, or even cause damage to the components and devices of your own risk and expense. We are not responsible for possible damage caused by overclocking. 6 English Please realize that there is a certain risk involved with overclocking, including adjusting the setting in the BIOS, applying Untied Overclocking Technology, or using third-party overclocking tools. It should be done at your system.
User Manual
Page 13
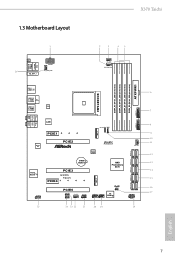
1.3 Motherboard Layout X370 Taichi 1 26 PS2 Keyboard /Mouse USB 3.0 T: USB1 B: USB2 CLRC BTN1 M2_WIFI_1 ATX12V1 CHA_FAN3/W_PUMP 2 3 45 CPU_FAN1 CPU_OPT/W_PUMP ATXPWR1 DDR4_A1 (64 bit, ... Center: FRONT LAN Super I/O PCIE1 PCIE2 AMD_FAN_LED1 USB_5 1 1 M2_1 BIOS ROM Ultra M.2 PCIe Gen3 x4 1 8 USB3_7_8 1 9 10 CHA_FAN1 11 12 SATA3_1_2 SATA3_3_4 Purity SoundTM 4 HD_AUDIO1 1 CMOS Battery PCIE3 PCIE4 X370 Ta i c h i PCIE5 RGB_LED2 1 RGB_LED1 1 CHA_FAN2 SPK_PLED1 1 AMD Promontory X370 M2_2 USB_3_4 USB_1_2 1 1 RoHS CLRMOS1 1 Dr. Debug SATA3_A1_A2 SATA3_7_8 ...
1.3 Motherboard Layout X370 Taichi 1 26 PS2 Keyboard /Mouse USB 3.0 T: USB1 B: USB2 CLRC BTN1 M2_WIFI_1 ATX12V1 CHA_FAN3/W_PUMP 2 3 45 CPU_FAN1 CPU_OPT/W_PUMP ATXPWR1 DDR4_A1 (64 bit, ... Center: FRONT LAN Super I/O PCIE1 PCIE2 AMD_FAN_LED1 USB_5 1 1 M2_1 BIOS ROM Ultra M.2 PCIe Gen3 x4 1 8 USB3_7_8 1 9 10 CHA_FAN1 11 12 SATA3_1_2 SATA3_3_4 Purity SoundTM 4 HD_AUDIO1 1 CMOS Battery PCIE3 PCIE4 X370 Ta i c h i PCIE5 RGB_LED2 1 RGB_LED1 1 CHA_FAN2 SPK_PLED1 1 AMD Promontory X370 M2_2 USB_3_4 USB_1_2 1 1 RoHS CLRMOS1 1 Dr. Debug SATA3_A1_A2 SATA3_7_8 ...
User Manual
Page 32
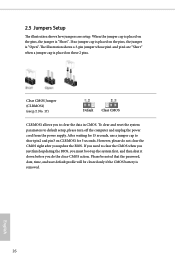
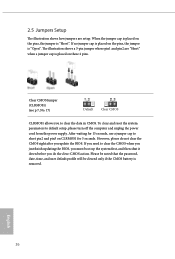
... the jumper cap is placed on these 2 pins. English 26 Clear CMOS Jumper (CLRMOS1) (see p.7, No. 17) Default Clear CMOS CLRMOS1 allows you update the BIOS. The illustration shows a 3-pin jumper whose pin1 and pin2 are setup. However, please do the clear-CMOS action. If you need to clear the CMOS... when you just finish updating the BIOS, you must boot up the system first, and then shut it down before you do not clear the CMOS right after you to clear the...
... the jumper cap is placed on these 2 pins. English 26 Clear CMOS Jumper (CLRMOS1) (see p.7, No. 17) Default Clear CMOS CLRMOS1 allows you update the BIOS. The illustration shows a 3-pin jumper whose pin1 and pin2 are setup. However, please do the clear-CMOS action. If you need to clear the CMOS... when you just finish updating the BIOS, you must boot up the system first, and then shut it down before you do not clear the CMOS right after you to clear the...

User Manual
Page 62
Click on Step 2 to see a list of recommended or critical updates for the BIOS or drivers. Step 3 Click Update to update. Please update them all soon. Step 1 Please check the item information before update. 3.3.3 BIOS & Drivers Installing BIOS or Drivers When the "BIOS & Drivers" tab is selected, you will see more items you want to start the update process. 56 English Click to select one or more details.
Click on Step 2 to see a list of recommended or critical updates for the BIOS or drivers. Step 3 Click Update to update. Please update them all soon. Step 1 Please check the item information before update. 3.3.3 BIOS & Drivers Installing BIOS or Drivers When the "BIOS & Drivers" tab is selected, you will see more items you want to start the update process. 56 English Click to select one or more details.
User Manual
Page 79
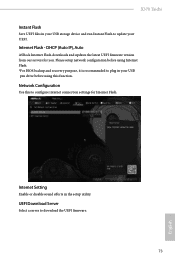
... Flash. *For BIOS backup and recovery purpose, it is recommended to plug in the setup utility. UEFI Download Server Select a server to download the UEFI firmware. 73 English DHCP (Auto IP), Auto ASRock Internet Flash downloads and updates the latest UEFI firmware version from our servers for Internet Flash. X370 Taichi Instant Flash Save...
... Flash. *For BIOS backup and recovery purpose, it is recommended to plug in the setup utility. UEFI Download Server Select a server to download the UEFI firmware. 73 English DHCP (Auto IP), Auto ASRock Internet Flash downloads and updates the latest UEFI firmware version from our servers for Internet Flash. X370 Taichi Instant Flash Save...
Quick Installation Guide
Page 3
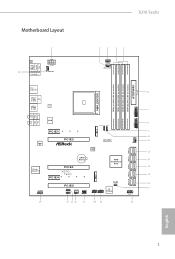
Motherboard Layout X370 Taichi 1 26 PS2 Keyboard /Mouse USB 3.0 T: USB1 B: USB2 CLRC BTN1 M2_WIFI_1 ATX12V1 CHA_FAN3/W_PUMP 2 3 45 CPU_FAN1 CPU_OPT/W_PUMP ATXPWR1 DDR4_A1 (64 bit, 288... Center: FRONT LAN Super I/O PCIE1 PCIE2 AMD_FAN_LED1 USB_5 1 1 M2_1 BIOS ROM Ultra M.2 PCIe Gen3 x4 1 8 USB3_7_8 1 9 10 CHA_FAN1 11 12 SATA3_1_2 SATA3_3_4 Purity SoundTM 4 HD_AUDIO1 1 CMOS Battery PCIE3 PCIE4 X370 Ta i c h i PCIE5 RGB_LED2 1 RGB_LED1 1 CHA_FAN2 SPK_PLED1 1 AMD Promontory X370 M2_2 USB_3_4 USB_1_2 1 1 RoHS CLRMOS1 1 Dr. Debug SATA3_A1_A2 SATA3_7_8 ...
Motherboard Layout X370 Taichi 1 26 PS2 Keyboard /Mouse USB 3.0 T: USB1 B: USB2 CLRC BTN1 M2_WIFI_1 ATX12V1 CHA_FAN3/W_PUMP 2 3 45 CPU_FAN1 CPU_OPT/W_PUMP ATXPWR1 DDR4_A1 (64 bit, 288... Center: FRONT LAN Super I/O PCIE1 PCIE2 AMD_FAN_LED1 USB_5 1 1 M2_1 BIOS ROM Ultra M.2 PCIe Gen3 x4 1 8 USB3_7_8 1 9 10 CHA_FAN1 11 12 SATA3_1_2 SATA3_3_4 Purity SoundTM 4 HD_AUDIO1 1 CMOS Battery PCIE3 PCIE4 X370 Ta i c h i PCIE5 RGB_LED2 1 RGB_LED1 1 CHA_FAN2 SPK_PLED1 1 AMD Promontory X370 M2_2 USB_3_4 USB_1_2 1 1 RoHS CLRMOS1 1 Dr. Debug SATA3_A1_A2 SATA3_7_8 ...
Quick Installation Guide
Page 7
....asrock.com. 1.1 Package Contents • ASRock X370 Taichi Motherboard (ATX Form Factor) • ASRock X370 Taichi Quick Installation Guide • ASRock X370 Taichi Support CD • 1 x I/O Panel Shield • 4 x Serial ATA (SATA) Data Cables (Optional) • 1 x ASRock SLI_HB_Bridge_2S Card (Optional) • 2 x ASRock WiFi 2.4/5 GHz Antennas • 2 x Screws for specific information about the model you are using. Because the motherboard specifications and the BIOS...
....asrock.com. 1.1 Package Contents • ASRock X370 Taichi Motherboard (ATX Form Factor) • ASRock X370 Taichi Quick Installation Guide • ASRock X370 Taichi Support CD • 1 x I/O Panel Shield • 4 x Serial ATA (SATA) Data Cables (Optional) • 1 x ASRock SLI_HB_Bridge_2S Card (Optional) • 2 x ASRock WiFi 2.4/5 GHz Antennas • 2 x Screws for specific information about the model you are using. Because the motherboard specifications and the BIOS...
Quick Installation Guide
Page 11
X370 Taichi • 1 x AMD LED Fan USB Header • 2 x USB 2.0 Headers (Support 4 USB 2.0 ports) (Supports ESD Protection) • 2 x USB 3.0 Headers (Support 4 USB 3.0 ports) (Supports ESD Protection) • 1 x Dr. Debug with LED BIOS Feature • AMI UEFI Legal BIOS with multilingual GUI support • Supports "Plug...OS • Microsoft® Windows® 10 64-bit * For the updated Windows® 10 driver, please visit ASRock's website for details: http://www.asrock.com Certifications • FCC, CE, WHQL • ErP/EuP ready (ErP/EuP ready power supply is required) *...
X370 Taichi • 1 x AMD LED Fan USB Header • 2 x USB 2.0 Headers (Support 4 USB 2.0 ports) (Supports ESD Protection) • 2 x USB 3.0 Headers (Support 4 USB 3.0 ports) (Supports ESD Protection) • 1 x Dr. Debug with LED BIOS Feature • AMI UEFI Legal BIOS with multilingual GUI support • Supports "Plug...OS • Microsoft® Windows® 10 64-bit * For the updated Windows® 10 driver, please visit ASRock's website for details: http://www.asrock.com Certifications • FCC, CE, WHQL • ErP/EuP ready (ErP/EuP ready power supply is required) *...

Quick Installation Guide
Page 12
It should be done at your system. We are not responsible for possible damage caused by overclocking. 10 English Overclocking may affect your system's stability, or even cause damage to the components and devices of your own risk and expense. Please realize that there is a certain risk involved with overclocking, including adjusting the setting in the BIOS, applying Untied Overclocking Technology, or using third-party overclocking tools.
It should be done at your system. We are not responsible for possible damage caused by overclocking. 10 English Overclocking may affect your system's stability, or even cause damage to the components and devices of your own risk and expense. Please realize that there is a certain risk involved with overclocking, including adjusting the setting in the BIOS, applying Untied Overclocking Technology, or using third-party overclocking tools.
Quick Installation Guide
Page 28
... is "Open". Clear CMOS Jumper (CLRMOS1) (see p.7, No. 17) Default Clear CMOS CLRMOS1 allows you to clear the CMOS when you just finish updating the BIOS, you must boot up the system first, and then shut it down before you do not clear the CMOS right after you need to clear... the data in CMOS. If you update the BIOS. If no jumper cap is placed on the pins, the jumper is placed on these 2 pins. The illustration shows a 3-pin jumper whose pin1 and pin2...
... is "Open". Clear CMOS Jumper (CLRMOS1) (see p.7, No. 17) Default Clear CMOS CLRMOS1 allows you to clear the CMOS when you just finish updating the BIOS, you must boot up the system first, and then shut it down before you do not clear the CMOS right after you need to clear... the data in CMOS. If you update the BIOS. If no jumper cap is placed on the pins, the jumper is placed on these 2 pins. The illustration shows a 3-pin jumper whose pin1 and pin2...
Quick Installation Guide
Page 135
한국어 X370 Taichi BIOS 기능 OS 인증 GUI AMI UEFI 적합형 BIOS ACPI 5.1 SMBIOS 2.3 지원 • CPU, VCORE_NB, DRAM, VPPM, PCH 1.05V, +1.8V, VDDP, PROM 2.5V CPU, CPU CPU, CPU CPU CPU, CPU CPU, CPU 12V, +5V, +3.3V, CPU Vcore, VCORE_NB, DRAM, PCH 1.05V, +1.8V, VDDP • Microsoft® Windows® 10 64 Windows® 10 ASRock http://www.asrock.com • FCC, CE, WHQL • ErP/EuP ErP/EuP http://www.asrock.com BIOS Untied Overclocking Technology 133
한국어 X370 Taichi BIOS 기능 OS 인증 GUI AMI UEFI 적합형 BIOS ACPI 5.1 SMBIOS 2.3 지원 • CPU, VCORE_NB, DRAM, VPPM, PCH 1.05V, +1.8V, VDDP, PROM 2.5V CPU, CPU CPU, CPU CPU CPU, CPU CPU, CPU 12V, +5V, +3.3V, CPU Vcore, VCORE_NB, DRAM, PCH 1.05V, +1.8V, VDDP • Microsoft® Windows® 10 64 Windows® 10 ASRock http://www.asrock.com • FCC, CE, WHQL • ErP/EuP ErP/EuP http://www.asrock.com BIOS Untied Overclocking Technology 133

Quick Installation Guide
Page 158
接口 BIOS • 1 x M.2 接口(M2_1 2230/2242/2260/2280 M.2 PCI Express Gen2 x4,20 Gb/s)* * 如果 M2_2 PCIE5 NVMe SSD U.2 套件 &#...; 12V 1 x 15 1 x AMD LED 风扇 USB 接脚 • 2 x USB 2.0 4 个 USB 2.0 ESD 2 x USB 3.0 4 个 USB 3.0 ESD 1 x Dr. Debug LED • AMI UEFI Legal BIOS GUI ACPI 5.1 jumperfree) • SMBIOS 2.3 支持 • CPU、VCORE_NB、DRAM、VPPM、PCH 1.05V、+1.8V、 VDDP、PROM...
接口 BIOS • 1 x M.2 接口(M2_1 2230/2242/2260/2280 M.2 PCI Express Gen2 x4,20 Gb/s)* * 如果 M2_2 PCIE5 NVMe SSD U.2 套件 &#...; 12V 1 x 15 1 x AMD LED 风扇 USB 接脚 • 2 x USB 2.0 4 个 USB 2.0 ESD 2 x USB 3.0 4 个 USB 3.0 ESD 1 x Dr. Debug LED • AMI UEFI Legal BIOS GUI ACPI 5.1 jumperfree) • SMBIOS 2.3 支持 • CPU、VCORE_NB、DRAM、VPPM、PCH 1.05V、+1.8V、 VDDP、PROM...
Quick Installation Guide
Page 159
X370 Taichi CPU CPU、CPU CPU、CPU 12V、+5V、+3.3V、CPU Vcore、VCORE_ NB、DRAM、PCH 1.05V、+1.8V、VDDP • Microsoft® Windows® 10 64-bit Windows® 10 http://www.asrock.com • FCC、CE、WHQL • ErP/EuP ErP/EuP http://www.asrock.com BIOS 157
X370 Taichi CPU CPU、CPU CPU、CPU 12V、+5V、+3.3V、CPU Vcore、VCORE_ NB、DRAM、PCH 1.05V、+1.8V、VDDP • Microsoft® Windows® 10 64-bit Windows® 10 http://www.asrock.com • FCC、CE、WHQL • ErP/EuP ErP/EuP http://www.asrock.com BIOS 157
RAID Installation Guide
Page 1
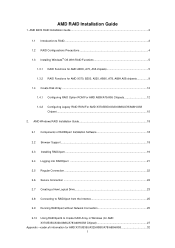
AMD BIOS RAID Installation Guide ...2 1.1 Introduction to Create RAID Array in Windows (for AMD X370/B350/A320/A88X/A78/A68H/A58 Chipset 27 Appendix -rcadm.efi information for AMD X370, B350, A320, A88X, A78, A68H,A58 chipsets 9 1.4 Create Disk Array...12 1.4.1 Configuring RAID Option ROM ...For AMD A85X/A75/A55 Chipsets 12 1.4.2 Configuring Legacy RAID ROM For AMD X370/B350/A320/A88X/A78/A68H/A58 Chipset ...15 2. AMD RAID Installation Guide 1. AMD Windows RAID Installation Guide 18 2.1 Components of RAIDXpert ...
AMD BIOS RAID Installation Guide ...2 1.1 Introduction to Create RAID Array in Windows (for AMD X370/B350/A320/A88X/A78/A68H/A58 Chipset 27 Appendix -rcadm.efi information for AMD X370, B350, A320, A88X, A78, A68H,A58 chipsets 9 1.4 Create Disk Array...12 1.4.1 Configuring RAID Option ROM ...For AMD A85X/A75/A55 Chipsets 12 1.4.2 Configuring Legacy RAID ROM For AMD X370/B350/A320/A88X/A78/A68H/A58 Chipset ...15 2. AMD RAID Installation Guide 1. AMD Windows RAID Installation Guide 18 2.1 Components of RAIDXpert ...
RAID Installation Guide
Page 2
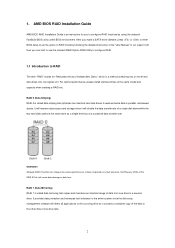
... Installation Guide AMD BIOS RAID Installation Guide is called data mirroring that optimizes two identical hard disk drives to configure RAID functions by ... a complete copy of the same model and capacity when creating a RAID set the option to RAID mode by using the onboard FastBuild BIOS utility under BIOS environment. Hot-Plug any fault tolerance. RAID 0 (Data Striping) RAID 0 is an instruction for "Redundant Array of Independent Disks", ...as a single drive but at a sustained data transfer rate. After you make a SATA driver diskette, press or to enter BIOS setup to set .
... Installation Guide AMD BIOS RAID Installation Guide is called data mirroring that optimizes two identical hard disk drives to configure RAID functions by ... a complete copy of the same model and capacity when creating a RAID set the option to RAID mode by using the onboard FastBuild BIOS utility under BIOS environment. Hot-Plug any fault tolerance. RAID 0 (Data Striping) RAID 0 is an instruction for "Redundant Array of Independent Disks", ...as a single drive but at a sustained data transfer rate. After you make a SATA driver diskette, press or to enter BIOS setup to set .
RAID Installation Guide
Page 9
... installation instruction to . B. B. C. Click to find the driver inside the RAID ROM utility to create the target RAID disk. (Please refer to Section 1.4 in BIOS setup. D. STEP 4: Windows installation A. 1.3.2 RAID Functions for more details) STEP 3: Copy RAID driver to a USB flash drive A. Click to save to support...SATA ports 5 ~ 8 which the size of the SATA ports 1 ~ 4 and set the "SATA Mode" option back to in this guide for AMD X370, B350, A320, A88X, A78, A68H, A58 chipsets Way 1: Use legacy RAID ROM to create and configure the RAID disk. For 32bit OS, the driver...
... installation instruction to . B. B. C. Click to find the driver inside the RAID ROM utility to create the target RAID disk. (Please refer to Section 1.4 in BIOS setup. D. STEP 4: Windows installation A. 1.3.2 RAID Functions for more details) STEP 3: Copy RAID driver to a USB flash drive A. Click to save to support...SATA ports 5 ~ 8 which the size of the SATA ports 1 ~ 4 and set the "SATA Mode" option back to in this guide for AMD X370, B350, A320, A88X, A78, A68H, A58 chipsets Way 1: Use legacy RAID ROM to create and configure the RAID disk. For 32bit OS, the driver...
RAID Installation Guide
Page 15
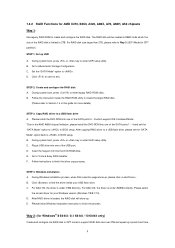
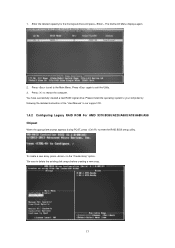
.... 3. Press again to restart the computer. To create a new array, press on the "Create Array" option. *Be sure to enter the RAID BIOS setup utility. Enter the desired capacity for the first logical drive and press . Please install the operating system to your computer by following the detailed... instruction of the "User Manual" in our support CD. 1.4.2 Configuring Legacy RAID ROM For AMD X370/B350/A320/A88X/A78/A68H/A58 Chipset When the appropriate prompt appears during POST, press to delete the existing disk arrays before creating a new...
.... 3. Press again to restart the computer. To create a new array, press on the "Create Array" option. *Be sure to enter the RAID BIOS setup utility. Enter the desired capacity for the first logical drive and press . Please install the operating system to your computer by following the detailed... instruction of the "User Manual" in our support CD. 1.4.2 Configuring Legacy RAID ROM For AMD X370/B350/A320/A88X/A78/A68H/A58 Chipset When the appropriate prompt appears during POST, press to delete the existing disk arrays before creating a new...


