User Manual
Page 35
C. X370 Taichi USB 3.0 Header (19-pin USB3_7_8) (see p.7, No. 8) (19-pin USB3_9_10) (see p.7, No. 7) Vbus IntA_PA_SSRXIntA_PA_SSRX+ GND IntA_PA_SSTXIntA_PA_SSTX+ GND IntA_PA_DIntA_PA_D+ Vbus IntA_PB_SSRXIntA_PB_SSRX+ GND IntA_PB_SSTXIntA_PB_SSTX+ GND IntA_PB_DIntA_PB_D+ Dummy... support HDA to the front audio panel. 1. If you use an AC'97 audio panel, please install it to the "FrontMic" Tab in our manual and chassis manual to Ground (GND). To activate the front mic, go to the front panel audio header by the steps below: A. GND FAN_VOLTAGE FAN_SPEED FAN_SPEED_CONTROL 1...
C. X370 Taichi USB 3.0 Header (19-pin USB3_7_8) (see p.7, No. 8) (19-pin USB3_9_10) (see p.7, No. 7) Vbus IntA_PA_SSRXIntA_PA_SSRX+ GND IntA_PA_SSTXIntA_PA_SSTX+ GND IntA_PA_DIntA_PA_D+ Vbus IntA_PB_SSRXIntA_PB_SSRX+ GND IntA_PB_SSTXIntA_PB_SSTX+ GND IntA_PB_DIntA_PB_D+ Dummy... support HDA to the front audio panel. 1. If you use an AC'97 audio panel, please install it to the "FrontMic" Tab in our manual and chassis manual to Ground (GND). To activate the front mic, go to the front panel audio header by the steps below: A. GND FAN_VOLTAGE FAN_SPEED FAN_SPEED_CONTROL 1...
User Manual
Page 44
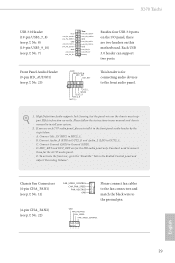
Please refer to your system requires. Make sure that the cards are AMD certified. 2. Please refer to AMD graphics card manuals for details. 4. Please refer to the AMD's website for detailed installation guide. 2.10.1 Installing Two CrossFireXTM-Ready Graphics Cards Step 1 Insert one graphics card into ...
Please refer to your system requires. Make sure that the cards are AMD certified. 2. Please refer to AMD graphics card manuals for details. 4. Please refer to the AMD's website for detailed installation guide. 2.10.1 Installing Two CrossFireXTM-Ready Graphics Cards Step 1 Insert one graphics card into ...
Quick Installation Guide
Page 31
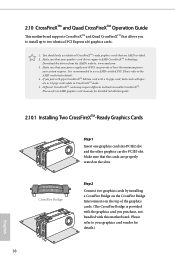
...USB 3.0 header can support two ports. B. Connect Audio_R (RIN) to OUT2_R and Audio_L (LIN) to the "FrontMic" Tab in our manual and chassis manual to function correctly. C. D. Front Panel Audio Header (9-pin HD_AUDIO1) (see p.7, No. 25) GND PRESENCE# MIC_RET OUT_RET 1 OUT2_L ... CHA_FAN_SPEED FAN_VOLTAGE GND Please connect fan cables to the fan connectors and match the black wire to MIC2_L. Connect Ground (GND) to Ground (GND). X370 Taichi USB 3.0 Header (19-pin USB3_7_8) (see p.7, No. 8) (19-pin USB3_9_10) (see p.7, No. 7) Vbus IntA_PA_SSRXIntA_PA_SSRX+ GND IntA_PA_SSTXIntA_PA_SSTX+ GND...
...USB 3.0 header can support two ports. B. Connect Audio_R (RIN) to OUT2_R and Audio_L (LIN) to the "FrontMic" Tab in our manual and chassis manual to function correctly. C. D. Front Panel Audio Header (9-pin HD_AUDIO1) (see p.7, No. 25) GND PRESENCE# MIC_RET OUT_RET 1 OUT2_L ... CHA_FAN_SPEED FAN_VOLTAGE GND Please connect fan cables to the fan connectors and match the black wire to MIC2_L. Connect Ground (GND) to Ground (GND). X370 Taichi USB 3.0 Header (19-pin USB3_7_8) (see p.7, No. 8) (19-pin USB3_9_10) (see p.7, No. 7) Vbus IntA_PA_SSRXIntA_PA_SSRX+ GND IntA_PA_SSTXIntA_PA_SSTX+ GND...
RAID Installation Guide
Page 2
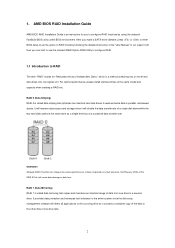
After you make a SATA driver diskette, press or to enter BIOS setup to configure RAID functions by following the detailed instruction of the "User Manual" in our support CD, then you to set . For optimal performance, please install identical drives of the same model and capacity when creating a RAID set ...
After you make a SATA driver diskette, press or to enter BIOS setup to configure RAID functions by following the detailed instruction of the "User Manual" in our support CD, then you to set . For optimal performance, please install identical drives of the same model and capacity when creating a RAID set ...
RAID Installation Guide
Page 14
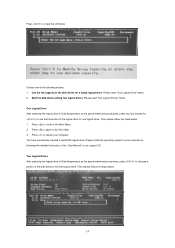
... drives for one of the following the detailed instruction of the disk drives to your computer. Press to exit to allocate a portion of the "User Manual" in Disk Assignments as the above -mentioned procedures, press to the Main Menu. 2. You have successfully created a new RAID logical drive. Two Logical Drives After...
... drives for one of the following the detailed instruction of the disk drives to your computer. Press to exit to allocate a portion of the "User Manual" in Disk Assignments as the above -mentioned procedures, press to the Main Menu. 2. You have successfully created a new RAID logical drive. Two Logical Drives After...
RAID Installation Guide
Page 15
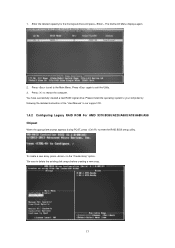
... logical drive and press . Please install the operating system to your computer by following the detailed instruction of the "User Manual" in our support CD. 1.4.2 Configuring Legacy RAID ROM For AMD X370/B350/A320/A88X/A78/A68H/A58 Chipset When the appropriate prompt appears during POST, press to delete the existing disk...
... logical drive and press . Please install the operating system to your computer by following the detailed instruction of the "User Manual" in our support CD. 1.4.2 Configuring Legacy RAID ROM For AMD X370/B350/A320/A88X/A78/A68H/A58 Chipset When the appropriate prompt appears during POST, press to delete the existing disk...
RAID Installation Guide
Page 21
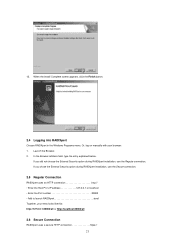
Or, log on manually with your entry looks like this: http://127.0.0.1:25902/ati or http://localhost:25902/ati 2.6 Secure Connection RAIDXpert uses a secure HTTP connection https:// 21 If ...
Or, log on manually with your entry looks like this: http://127.0.0.1:25902/ati or http://localhost:25902/ati 2.6 Secure Connection RAIDXpert uses a secure HTTP connection https:// 21 If ...
