
User Manual
Page 23
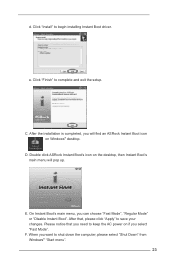
... shut down the computer, please select "Shut Down" from Windows® "Start menu". 23 F. C. E. When you select "Fast Mode". After that you need to keep the AC power on Windows® desktop. Double click ASRock Instant Boot's icon on the desktop, then Instant Boot's main menu will find an ASRock Instant Boot icon...
... shut down the computer, please select "Shut Down" from Windows® "Start menu". 23 F. C. E. When you select "Fast Mode". After that you need to keep the AC power on Windows® desktop. Double click ASRock Instant Boot's icon on the desktop, then Instant Boot's main menu will find an ASRock Instant Boot icon...

User Manual
Page 31
... Charger driver makes your iPhone charge much quicker from your Apple devices, such as iPhone/iPod/iPad Touch, ASRock has prepared a wonderful solution for you desire a faster, less restricted way of charging your computer and up to RAM(S3), hibernation mode (S4) or power off (S5)**. With App Charger driver installed, you...
... Charger driver makes your iPhone charge much quicker from your Apple devices, such as iPhone/iPod/iPad Touch, ASRock has prepared a wonderful solution for you desire a faster, less restricted way of charging your computer and up to RAM(S3), hibernation mode (S4) or power off (S5)**. With App Charger driver installed, you...
User Manual
Page 33
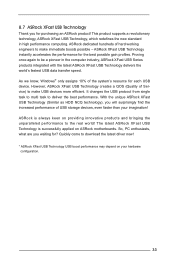
..., even faster than your hardware configuration. 33 The latest ASRock XFast USB Technology is always keen on ASRock motherboards. Quickly come to be a pioneer in high performance computing. 8.7 ASRock XFast USB Technology Thank you for ? Proving once again to download the latest driver now! * ASRock XFast USB Technology USB boost performance may depend on your...
..., even faster than your hardware configuration. 33 The latest ASRock XFast USB Technology is always keen on ASRock motherboards. Quickly come to be a pioneer in high performance computing. 8.7 ASRock XFast USB Technology Thank you for ? Proving once again to download the latest driver now! * ASRock XFast USB Technology USB boost performance may depend on your...

User Manual
Page 34
... USB driver from ASRock's support CD, ASRock XFast USB driver will not appear next time you plug an USB device to the USB port again. When you use this USB device. 34 A. You will find it to your computer for the first time. C. You will see the message below carefully before ...you install the all-in-one driver to your system from ASRock's support CD. This message will be auto-installed as well. You can find ...
... USB driver from ASRock's support CD, ASRock XFast USB driver will not appear next time you plug an USB device to the USB port again. When you use this USB device. 34 A. You will find it to your computer for the first time. C. You will see the message below carefully before ...you install the all-in-one driver to your system from ASRock's support CD. This message will be auto-installed as well. You can find ...
User Manual
Page 37
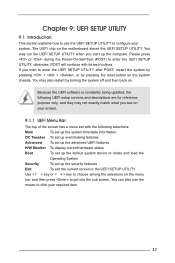
... To display current hardware status Boot To set up the default system device to locate and load the Operating System Security To set up the computer. You can also use the UEFI SETUP UTILITY to configure your required item. 37 If you wish to enter the UEFI SETUP UTILITY after POST...
... To display current hardware status Boot To set up the default system device to locate and load the Operating System Security To set up the computer. You can also use the UEFI SETUP UTILITY to configure your required item. 37 If you wish to enter the UEFI SETUP UTILITY after POST...

User Manual
Page 42
... Configuration, Intel(R) Rapid Start Technology, Intel(R) Smart Connect Technology, Storage Configuration, Super IO Configuration, ACPI Configuration and USB Configuration. Please be running on a DHCP configured computer in this tool and save the new UEFI file to your system after UEFI update process completes. Setting wrong values in order to update system...
... Configuration, Intel(R) Rapid Start Technology, Intel(R) Smart Connect Technology, Storage Configuration, Super IO Configuration, ACPI Configuration and USB Configuration. Please be running on a DHCP configured computer in this tool and save the new UEFI file to your system after UEFI update process completes. Setting wrong values in order to update system...

User Manual
Page 43
... control mechanism to keep the CPU from the chipset. Configuration options: [All] and [1]. 9.4.1 CPU Configuration Intel Hyper Threading Technology To enable this feature, it requires a computer system with an Intel processor that supports Hyper-Threading technology and an operating system that includes optimization for this to enable or disable CPU C6...
... control mechanism to keep the CPU from the chipset. Configuration options: [All] and [1]. 9.4.1 CPU Configuration Intel Hyper Threading Technology To enable this feature, it requires a computer system with an Intel processor that supports Hyper-Threading technology and an operating system that includes optimization for this to enable or disable CPU C6...

User Manual
Page 49
Intel(R) Smart Connect Technology keeps your e-mail and social networks, such as Twitter, Facebook, etc. updated automatically while the computer is [Enabled]. 49 9.4.6 Intel(R) Smart Connect Technology Intel(R) Smart Connect Technology Use this item to enable or disable Intel(R) Smart Connect Technology. The default is in sleep mode.
Intel(R) Smart Connect Technology keeps your e-mail and social networks, such as Twitter, Facebook, etc. updated automatically while the computer is [Enabled]. 49 9.4.6 Intel(R) Smart Connect Technology Intel(R) Smart Connect Technology Use this item to enable or disable Intel(R) Smart Connect Technology. The default is in sleep mode.

User Manual
Page 53
... Setting This allows you to dampness by enabling "Dehumidifier Function". Configuration options: [Full On], [SMART FAN Manual] and [Automatic mode]. When enabling Dehumidifier Function, the computer will power on your system, including the parameters of the hardware on automatically to set the CPU fan speed. 9.5 Hardware Health Event Monitoring Screen In...
... Setting This allows you to dampness by enabling "Dehumidifier Function". Configuration options: [Full On], [SMART FAN Manual] and [Automatic mode]. When enabling Dehumidifier Function, the computer will power on your system, including the parameters of the hardware on automatically to set the CPU fan speed. 9.5 Hardware Health Event Monitoring Screen In...
User Manual
Page 57
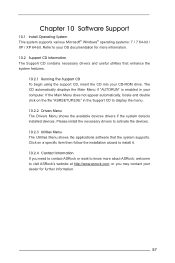
... display the menu. 10.2.2 Drivers Menu The Drivers Menu shows the available devices drivers if the system detects installed devices. or you need to contact ASRock or want to know more information. 10.2 Support CD Information The Support CD contains necessary drivers and useful utilities that the system supports. Click on... shows the applications software that enhance the system features. 10.2.1 Running The Support CD To begin using the support CD, insert the CD into your computer.
... display the menu. 10.2.2 Drivers Menu The Drivers Menu shows the available devices drivers if the system detects installed devices. or you need to contact ASRock or want to know more information. 10.2 Support CD Information The Support CD contains necessary drivers and useful utilities that the system supports. Click on... shows the applications software that enhance the system features. 10.2.1 Running The Support CD To begin using the support CD, insert the CD into your computer.

RAID Installation Guide
Page 7
..., and press key to enter BIOS setup utility. Highlight Advanced and press , then the main interface of BIOS setup utility will appear. Press . Save your computer. Boot your RAID configuration.
..., and press key to enter BIOS setup utility. Highlight Advanced and press , then the main interface of BIOS setup utility will appear. Press . Save your computer. Boot your RAID configuration.

Intel Rapid Storage Guide
Page 2
Locate the file on your hard drive and double-click it. 3. Click Next. 2 Save the file to launch the installation program. 4. Click Continue (if needed) to a known location on your computer's hard drive. 2. Click Next at the Welcome screen. 5. Installation Instructions 1. Download the Intel Rapid Storage Technology software from Intel website.
Locate the file on your hard drive and double-click it. 3. Click Next. 2 Save the file to launch the installation program. 4. Click Continue (if needed) to a known location on your computer's hard drive. 2. Click Next at the Welcome screen. 5. Installation Instructions 1. Download the Intel Rapid Storage Technology software from Intel website.

Intel Rapid Storage Guide
Page 4
Click Yes to the restart option and then click Finish to restart your computer. 4 Click Next. 9. 8.
Click Yes to the restart option and then click Finish to restart your computer. 4 Click Next. 9. 8.