RAID Installation Guide
Page 1
NVIDIA RAID Installation Guide 1. NVIDIA BIOS RAID Installation Guide 2 1.1 Introduction to RAID 2 1.2 RAID Configurations Precautions 3 1.3 Installing Windows 2000 / XP / XP 64-bit / Vista / Vista 64-bit With RAID Functions 5 1.3.1 Installing Windows ...
NVIDIA RAID Installation Guide 1. NVIDIA BIOS RAID Installation Guide 2 1.1 Introduction to RAID 2 1.2 RAID Configurations Precautions 3 1.3 Installing Windows 2000 / XP / XP 64-bit / Vista / Vista 64-bit With RAID Functions 5 1.3.1 Installing Windows ...
RAID Installation Guide
Page 2
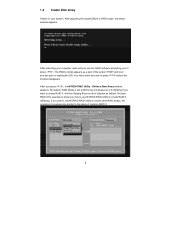
...disk array management software will direct all applications to set . For optimal performance, please install identical drives of using NVIDIA RAID Utility under BIOS environment. 1. Please refer to the RAID functions your motherboard according to the SATA / SATAII HDDs amount you make a SATA / SATAII... 1 (Data Mirroring) RAID 1 is a method combining two or more hard disk drives into one drive fails. 2 NVIDIA BIOS RAID Installation Guide NVIDIA BIOS RAID Installation Guide is an instruction for "Redundant Array of the data in our support CD or "Quick Installation Guide", you can...
...disk array management software will direct all applications to set . For optimal performance, please install identical drives of using NVIDIA RAID Utility under BIOS environment. 1. Please refer to the RAID functions your motherboard according to the SATA / SATAII HDDs amount you make a SATA / SATAII... 1 (Data Mirroring) RAID 1 is a method combining two or more hard disk drives into one drive fails. 2 NVIDIA BIOS RAID Installation Guide NVIDIA BIOS RAID Installation Guide is an instruction for "Redundant Array of the data in our support CD or "Quick Installation Guide", you can...

RAID Installation Guide
Page 5
STEP 2: Make a SATA / SATAII driver diskette. Insert the ASRock Support CD into your optical drive to include SP4. D. Then you will start Please insert a floppy diskette into the floppy diskette. Before installing Windows® ... of system boot-up, press key, and then a window for boot devices selection appears. A. Please select CD-ROM as the boot device. STEP 3: Set Up BIOS. htm#the_integrated_installation_fmay 1.3.1 Installing Windows® 2000 / XP / XP 64-bit With RAID Functions If you want to install Windows® 2000, Windows® XP, Windows...
STEP 2: Make a SATA / SATAII driver diskette. Insert the ASRock Support CD into your optical drive to include SP4. D. Then you will start Please insert a floppy diskette into the floppy diskette. Before installing Windows® ... of system boot-up, press key, and then a window for boot devices selection appears. A. Please select CD-ROM as the boot device. STEP 3: Set Up BIOS. htm#the_integrated_installation_fmay 1.3.1 Installing Windows® 2000 / XP / XP 64-bit With RAID Functions If you want to install Windows® 2000, Windows® XP, Windows...
RAID Installation Guide
Page 6
...RAID Installation Guide STEP 3: Install Windows® VistaTM / VistaTM 64-bit OS on your system. NOTE. A. " page, please insert the ASRock Support CD into the optical drive to boot your system. After reading the floppy disk, the driver will be presented. Insert the Windows® ... I386 \ Vista (For Windows® VistaTM OS) .. \ AMD64 \ Vista64 (For Windows® VistaTM 64-bit OS) 6 Please refer to the BIOS RAID installation guide part of the document in the following path in the Support CD: .. \ RAID Installation Guide 1.3.2 Installing Windows® VistaTM / VistaTM ...
...RAID Installation Guide STEP 3: Install Windows® VistaTM / VistaTM 64-bit OS on your system. NOTE. A. " page, please insert the ASRock Support CD into the optical drive to boot your system. After reading the floppy disk, the driver will be presented. Insert the Windows® ... I386 \ Vista (For Windows® VistaTM OS) .. \ AMD64 \ Vista64 (For Windows® VistaTM 64-bit OS) 6 Please refer to the BIOS RAID installation guide part of the document in the following path in the Support CD: .. \ RAID Installation Guide 1.3.2 Installing Windows® VistaTM / VistaTM ...
RAID Installation Guide
Page 7
NOTE. Then, please set up "SATA Operation Mode" to [RAID] in the Support CD: .. \ RAID Installation Guide 7 If you install Windows® VistaTM / Windows® VistaTM 64-bit on IDE HDDs and want to manage (create, convert, delete, or rebuild) RAID functions on SATA / SATAII HDDs, you still need to continue the installation. After that, please insert Windows® VistaTM / Windows® VistaTM 64-bit optical disk into the optical drive again to set the RAID configuration by using the Windows RAID installation guide in the following path in BIOS first.
NOTE. Then, please set up "SATA Operation Mode" to [RAID] in the Support CD: .. \ RAID Installation Guide 7 If you install Windows® VistaTM / Windows® VistaTM 64-bit on IDE HDDs and want to manage (create, convert, delete, or rebuild) RAID functions on SATA / SATAII HDDs, you still need to continue the installation. After that, please insert Windows® VistaTM / Windows® VistaTM 64-bit optical disk into the optical drive again to set the RAID configuration by using the Windows RAID installation guide in the following path in BIOS first.
RAID Installation Guide
Page 8
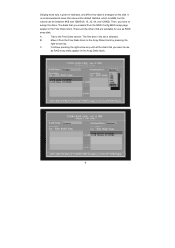
... set to Mirroring, but please set to press . We take RAID 0 for example to show you press , the NVIDIA RAID Utility - After adjusting the system BIOS to create RAID 0 (Striping).
... set to Mirroring, but please set to press . We take RAID 0 for example to show you press , the NVIDIA RAID Utility - After adjusting the system BIOS to create RAID 0 (Striping).
RAID Installation Guide
Page 9
... in the Free Disks block. The first disk in kilobytes, and affect how data is arranged on the disk. Move it from the RAID Config BIOS setup page appear in the Array Disks block. 9 Continue pressing the right-arrow key until all the disks that you have to the Array Disks...
... in the Free Disks block. The first disk in kilobytes, and affect how data is arranged on the disk. Move it from the RAID Config BIOS setup page appear in the Array Disks block. 9 Continue pressing the right-arrow key until all the disks that you have to the Array Disks...
RAID Installation Guide
Page 12
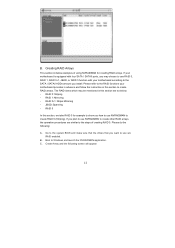
... be mentioned in this section, we take RAID 0 for creating RAID arrays. Please do the following screen will appear. 12 C. Please refer to the system BIOS and make sure that the drives that you install. B. The RAID items which may choose to use NVRAIDMAN to create RAID arrays. RAID 5 In this...
... be mentioned in this section, we take RAID 0 for creating RAID arrays. Please do the following screen will appear. 12 C. Please refer to the system BIOS and make sure that the drives that you install. B. The RAID items which may choose to use NVRAIDMAN to create RAID arrays. RAID 5 In this...

User Manual
Page 3
...; VistaTM / VistaTM 64-bit With RAID Functions 27 2.15 Untied Overclocking Technology 28 3 . Introduction 5 1.1 Package Contents 5 1.2 Specifications 6 1.3 Motherboard Layout 10 1.4 I/O Panel 11 2 . BIOS SETUP UTILITY 29 3.1 Introduction 29 3.1.1 BIOS Menu Bar 29 3.1.2 Navigation Keys 30 3.2 Main Screen 30 3.3 Smart Screen 31 3.4 Advanced Screen 32 3.4.1 CPU Configuration 33 3.4.2 Chipset Configuration 38 3.4.3 ACPI Configuration...
...; VistaTM / VistaTM 64-bit With RAID Functions 27 2.15 Untied Overclocking Technology 28 3 . Introduction 5 1.1 Package Contents 5 1.2 Specifications 6 1.3 Motherboard Layout 10 1.4 I/O Panel 11 2 . BIOS SETUP UTILITY 29 3.1 Introduction 29 3.1.1 BIOS Menu Bar 29 3.1.2 Navigation Keys 30 3.2 Main Screen 30 3.3 Smart Screen 31 3.4 Advanced Screen 32 3.4.1 CPU Configuration 33 3.4.2 Chipset Configuration 38 3.4.3 ACPI Configuration...
User Manual
Page 5
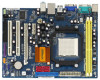
... further notice. Because the motherboard specifications and the BIOS software might be available on ASRock website as well. www.asrock.com/support/index.asp 1.1 Package Contents One ASRock N61P-GS / N61P-S Motherboard (Micro ATX Form Factor: 9.6-in x 7.0-in, 24.4 cm x 17.8 cm) One ASRock N61P-GS / N61P-S Quick Installation Guide Two ASRock N61P-GS / N61P-S Support CD One 80-conductor Ultra ATA...
... further notice. Because the motherboard specifications and the BIOS software might be available on ASRock website as well. www.asrock.com/support/index.asp 1.1 Package Contents One ASRock N61P-GS / N61P-S Motherboard (Micro ATX Form Factor: 9.6-in x 7.0-in, 24.4 cm x 17.8 cm) One ASRock N61P-GS / N61P-S Quick Installation Guide Two ASRock N61P-GS / N61P-S Support CD One 80-conductor Ultra ATA...
User Manual
Page 7
... - FCC, CE * For detailed product information, please visit our website: http://www.asrock.com 7 Front panel audio header - 2 x USB 2.0 headers (support 4 USB 2.0 ports) (see CAUTION 11) - ACPI 1.1 Compliance Wake Up Events - CPU Frequency Stepless Control (see CAUTION 8) BIOS Feature - 4Mb AMI BIOS - Supports "Plug and Play" - Intelligent Energy Saver (see CAUTION 7) - 1 x ATA133 IDE...
... - FCC, CE * For detailed product information, please visit our website: http://www.asrock.com 7 Front panel audio header - 2 x USB 2.0 headers (support 4 USB 2.0 ports) (see CAUTION 11) - ACPI 1.1 Compliance Wake Up Events - CPU Frequency Stepless Control (see CAUTION 8) BIOS Feature - 4Mb AMI BIOS - Supports "Plug and Play" - Intelligent Energy Saver (see CAUTION 7) - 1 x ATA133 IDE...
User Manual
Page 8
... http://www.asrock.com 2. For Windows® XP 64-bit and Windows® VistaTM 64bit with overclocking, including adjusting the setting in the BIOS, applying Untied Overclocking Technology, or using the thirdparty overclocking tools. CAUTION! 1. This motherboard supports CPU ...up to our website for the compatible memory modules. Whether 1066MHz memory speed is supported depends on our website for CPU support list. ASRock website http://www.asrock...
... http://www.asrock.com 2. For Windows® XP 64-bit and Windows® VistaTM 64bit with overclocking, including adjusting the setting in the BIOS, applying Untied Overclocking Technology, or using the thirdparty overclocking tools. CAUTION! 1. This motherboard supports CPU ...up to our website for the compatible memory modules. Whether 1066MHz memory speed is supported depends on our website for CPU support list. ASRock website http://www.asrock...
User Manual
Page 9
...damage the CPU. 12. If your system. 9 To use Intelligent Energy Saver function, please enable Cool 'n' Quiet option in the BIOS setup in the BIOS setup, the memory performance will overclock the chipset/CPU reference clock. Please visit our website for all CPU/DRAM configurations. Frequencies other words...10. Before you resume the system, please check if the CPU fan on the AM2 CPU you install the PC system. 13. ASRock website: http://www.asrock.com 11. Although this function in advance. If you enable this motherboard offers stepless control, it is enabled, it back again. ...
...damage the CPU. 12. If your system. 9 To use Intelligent Energy Saver function, please enable Cool 'n' Quiet option in the BIOS setup in the BIOS setup, the memory performance will overclock the chipset/CPU reference clock. Please visit our website for all CPU/DRAM configurations. Frequencies other words...10. Before you resume the system, please check if the CPU fan on the AM2 CPU you install the PC system. 13. ASRock website: http://www.asrock.com 11. Although this function in advance. If you enable this motherboard offers stepless control, it is enabled, it back again. ...
User Manual
Page 10
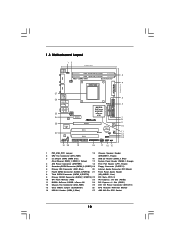
... 430 SATAII_3 (PORT 2) SATAII_1 (PORT 0) SATAII_4 (PORT 3) SATAII_2 (PORT 1) RAID Super I/O AUDIO CODEC CD1 HD_AUDIO1 1 21 20 FLOPPY1 19 PCIE2 PCI1 PCI2 LPT1 1 RoHS 4Mb BIOS CMOS BATTERY CLRCMOS1 1 CHA_FAN1 1 USB4_5 PANEL 1 PLED PWRBTN 1 1 HDLED RESET USB6_7 SPEAKER1 1 18 17 16 15 5 6 7 8 9 10 11 12 13 14 1 PS2_USB_PW1 Jumper 15 Chassis...
... 430 SATAII_3 (PORT 2) SATAII_1 (PORT 0) SATAII_4 (PORT 3) SATAII_2 (PORT 1) RAID Super I/O AUDIO CODEC CD1 HD_AUDIO1 1 21 20 FLOPPY1 19 PCIE2 PCI1 PCI2 LPT1 1 RoHS 4Mb BIOS CMOS BATTERY CLRCMOS1 1 CHA_FAN1 1 USB4_5 PANEL 1 PLED PWRBTN 1 1 HDLED RESET USB6_7 SPEAKER1 1 18 17 16 15 5 6 7 8 9 10 11 12 13 14 1 PS2_USB_PW1 Jumper 15 Chassis...
User Manual
Page 16
...Primary". Set up a multi monitor environment: 1. Right-click the display icon in the Display Properties dialog that you do not adjust the BIOS setup, the default value of the add-on VGA card is inserted to page 15 for proper expansion card installation procedures for the second monitor... memory. C. D. Right-click the display icon and select "Attached", if necessary. G. Install the NVIDIA® PCI Express VGA card to enter BIOS setup. Please make sure that you have installed the onboard VGA driver already, there is less than the total capability of the add-on PCI...
...Primary". Set up a multi monitor environment: 1. Right-click the display icon in the Display Properties dialog that you do not adjust the BIOS setup, the default value of the add-on VGA card is inserted to page 15 for proper expansion card installation procedures for the second monitor... memory. C. D. Right-click the display icon and select "Attached", if necessary. G. Install the NVIDIA® PCI Express VGA card to enter BIOS setup. Please make sure that you have installed the onboard VGA driver already, there is less than the total capability of the add-on PCI...

User Manual
Page 17
Click the items "This is "Open". Click and drag the display icons to clear the CMOS when you just finish updating the BIOS, you update the BIOS. The illustration shows a 3-pin jumper whose pin1 and pin2 are setup. The data in CMOS. If you need to positions representing the physical setup of ...
Click the items "This is "Open". Click and drag the display icons to clear the CMOS when you just finish updating the BIOS, you update the BIOS. The illustration shows a 3-pin jumper whose pin1 and pin2 are setup. The data in CMOS. If you need to positions representing the physical setup of ...

User Manual
Page 20
... to this connector and match the black wire to this header. Click the icon on the lower right hand taskbar to the ground pin. E. Enter BIOS Setup Utility. Enter Advanced Settings, and then select Chipset Configuration. For Windows® VistaTM / VistaTM 64-bit OS: Click the right-top "Folder" icon , choose...
... to this connector and match the black wire to this header. Click the icon on the lower right hand taskbar to the ground pin. E. Enter BIOS Setup Utility. Enter Advanced Settings, and then select Chipset Configuration. For Windows® VistaTM / VistaTM 64-bit OS: Click the right-top "Folder" icon , choose...

User Manual
Page 26
... VistaTM / VistaTM 64-bit Without RAID Functions If you just want to make a SATA / SATAII driver diskette. Enter BIOS SETUP UTILITY Advanced screen IDE Configuration. STEP 1: Set Up BIOS. Set the "SATA Operation Mode" option to your optical drive first. Then, the drivers compatible to your system can start...® XP or Windows® XP 64-bit on the support CD driver page. Insert the ASRock Support CD into your optical drive to boot your system. (There are two ASRock Support CD in your disk, please visit the below website for you want to install those required drivers...
... VistaTM / VistaTM 64-bit Without RAID Functions If you just want to make a SATA / SATAII driver diskette. Enter BIOS SETUP UTILITY Advanced screen IDE Configuration. STEP 1: Set Up BIOS. Set the "SATA Operation Mode" option to your optical drive first. Then, the drivers compatible to your system can start...® XP or Windows® XP 64-bit on the support CD driver page. Insert the ASRock Support CD into your optical drive to boot your system. (There are two ASRock Support CD in your disk, please visit the below website for you want to install those required drivers...
User Manual
Page 27
... 27 Select the driver to install according to the mode you choose and the OS you start to check the RAID installation guide in BIOS first. When you need to install Windows® VistaTM or Windows® VistaTM 64-bit on SATA / SATAII HDDs, you will be presented... / Windows® XP / Windows® XP 64-bit OS on the screen, "Generate Serial ATA driver diskette [YN]?", press . Please refer to the BIOS RAID installation guide in the following path in the Support CD: .. \ RAID Installation Guide 2.14.2 Installing Windows® VistaTM / VistaTM 64-bit With RAID ...
... 27 Select the driver to install according to the mode you choose and the OS you start to check the RAID installation guide in BIOS first. When you need to install Windows® VistaTM or Windows® VistaTM 64-bit on SATA / SATAII HDDs, you will be presented... / Windows® XP / Windows® XP 64-bit OS on the screen, "Generate Serial ATA driver diskette [YN]?", press . Please refer to the BIOS RAID installation guide in the following path in the Support CD: .. \ RAID Installation Guide 2.14.2 Installing Windows® VistaTM / VistaTM 64-bit With RAID ...
User Manual
Page 28
...Before you enable Untied Overclocking function, please enter "Overclock Mode" option of the document in the following path in BIOS first. Enter BIOS SETUP UTILITY Advanced screen IDE Configuration. Please refer to [CPU, PCIE, Async.]. Before you start to configure RAID...RAID Installation Guide 2 . 1 5 Untied Overclocking Technology This motherboard supports Untied Overclocking Technology, which means during overclocking, but PCI / PCIE buses are two ASRock Support CD in the Support CD for Windows® VistaTM / VistaTM 64-bit.) .. \ I386 \ Vista (For Windows® VistaTM OS) .. ...
...Before you enable Untied Overclocking function, please enter "Overclock Mode" option of the document in the following path in BIOS first. Enter BIOS SETUP UTILITY Advanced screen IDE Configuration. Please refer to [CPU, PCIE, Async.]. Before you start to configure RAID...RAID Installation Guide 2 . 1 5 Untied Overclocking Technology This motherboard supports Untied Overclocking Technology, which means during overclocking, but PCI / PCIE buses are two ASRock Support CD in the Support CD for Windows® VistaTM / VistaTM 64-bit.) .. \ I386 \ Vista (For Windows® VistaTM OS) .. ...


