
User Manual
Page 12
After restarting your change . Please follow below instructions according to the OS you will be disabled. For Windows® VistaTM / VistaTM 64-bit OS: Please click "VIA ...
After restarting your change . Please follow below instructions according to the OS you will be disabled. For Windows® VistaTM / VistaTM 64-bit OS: Please click "VIA ...

User Manual
Page 20
... to D-Sub adapter to convert the DVI connector to D-Sub interface, and then connect the D-Sub monitor cable to the DVI to your system, and restart your computer and boot into OS. Power on your computer. Install the required drivers to downloading and installing the CATALYST Control Center. Then you have... B. ATI Catalyst Control Center 20 Please check AMD website for details. For Windows® XP OS: A. The Catalyst Uninstaller is no need to installation. Step 8. Restart your system, there is an optional download.
... to D-Sub adapter to convert the DVI connector to D-Sub interface, and then connect the D-Sub monitor cable to the DVI to your system, and restart your computer and boot into OS. Power on your computer. Install the required drivers to downloading and installing the CATALYST Control Center. Then you have... B. ATI Catalyst Control Center 20 Please check AMD website for details. For Windows® XP OS: A. The Catalyst Uninstaller is no need to installation. Step 8. Restart your system, there is an optional download.

User Manual
Page 21
You can easily enjoy the benefits of ATITM Technologies Inc., and is selected or not; Your computer will automatically reboot. Step 10. Step 11. After restarting your computer, please confirm whether the option "Enable CrossFireTM" in the Support CD: ..\ Surround Display Information 21 View CrossFireTM Enable CrossFireTM Although you can freely ...
You can easily enjoy the benefits of ATITM Technologies Inc., and is selected or not; Your computer will automatically reboot. Step 10. Step 11. After restarting your computer, please confirm whether the option "Enable CrossFireTM" in the Support CD: ..\ Surround Display Information 21 View CrossFireTM Enable CrossFireTM Although you can freely ...

User Manual
Page 37
...features Exit To exit the current screen or the BIOS SETUP UTILITY Use < > key or < > key to enter the BIOS SETUP UTILITY after POST, restart the system by pressing + + , or by turning the system off and then back on the system chassis. Please press or during the Power-On-...the BIOS SETUP UTILITY, otherwise, POST will continue with the following BIOS setup screens and descriptions are for reference purpose only, and they may also restart by pressing the reset button on . 3. BIOS SETUP UTILITY 3.1 Introduction This section explains how to use the BIOS SETUP UTILITY to get into ...
...features Exit To exit the current screen or the BIOS SETUP UTILITY Use < > key or < > key to enter the BIOS SETUP UTILITY after POST, restart the system by pressing + + , or by turning the system off and then back on the system chassis. Please press or during the Power-On-...the BIOS SETUP UTILITY, otherwise, POST will continue with the following BIOS setup screens and descriptions are for reference purpose only, and they may also restart by pressing the reset button on . 3. BIOS SETUP UTILITY 3.1 Introduction This section explains how to use the BIOS SETUP UTILITY to get into ...
Quick Installation Guide
Page 4
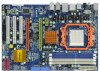
... to save your system. In "Advanced Options" screen, select "Independent Headphone", and click "OK" to enable either Multi-Streaming function or Side Speaker function. English 4 ASRock M3A770DE Motherboard Click "Power" to the front panel audio header. After restarting your change .
... to save your system. In "Advanced Options" screen, select "Independent Headphone", and click "OK" to enable either Multi-Streaming function or Side Speaker function. English 4 ASRock M3A770DE Motherboard Click "Power" to the front panel audio header. After restarting your change .
Quick Installation Guide
Page 17
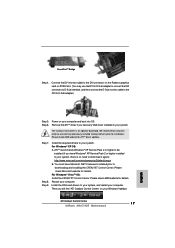
... 2 or higher to uninstall any VGA driver installed in your computer. Power on your computer and boot into OS. ATI Catalyst Control Center 17 ASRock M3A770DE Motherboard English Step 7. For Windows® XP OS: A. We recommend using this utility to be installed (If you will find "ATI Catalyst ...Control Center" on your Windows® taskbar. Install the required drivers to D-Sub adapter.) Step 5. Restart your system. Connect the DVI monitor cable to the DVI connector on the Radeon graphics card on PCIE2 slot. (You may use the DVI ...
... 2 or higher to uninstall any VGA driver installed in your computer. Power on your computer and boot into OS. ATI Catalyst Control Center 17 ASRock M3A770DE Motherboard English Step 7. For Windows® XP OS: A. We recommend using this utility to be installed (If you will find "ATI Catalyst ...Control Center" on your Windows® taskbar. Install the required drivers to D-Sub adapter.) Step 5. Restart your system. Connect the DVI monitor cable to the DVI connector on the Radeon graphics card on PCIE2 slot. (You may use the DVI ...

Quick Installation Guide
Page 18
... AMD website for updates and details. 2.6 Surround Display Feature This motherboard supports Surround Display upgrade. After restarting your computer, please confirm whether the option "Enable CrossFireTM" in the Support CD: ..\ Surround Display Information 18 ASRock M3A770DE Motherboard English For the detailed instruction, please refer to the document at the following path in "ATI...
... AMD website for updates and details. 2.6 Surround Display Feature This motherboard supports Surround Display upgrade. After restarting your computer, please confirm whether the option "Enable CrossFireTM" in the Support CD: ..\ Surround Display Information 18 ASRock M3A770DE Motherboard English For the detailed instruction, please refer to the document at the following path in "ATI...

Quick Installation Guide
Page 27
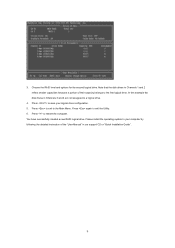
... computer, please press during the Power-On-Self-Test (POST) to be user-friendly. If you to enter BIOS Setup after POST, please restart the system by pressing + + , or pressing the reset button on the motherboard stores BIOS Setup Utility. It is a menu-driven program,...POST continues with the motherboard contains necessary drivers and useful utilities that came with its various sub-menus and to display the menus. 27 ASRock M3A770DE Motherboard English 3. If the Main Menu does not appear automatically, locate and double-click on the file "ASSETUP. Software Support CD ...
... computer, please press during the Power-On-Self-Test (POST) to be user-friendly. If you to enter BIOS Setup after POST, please restart the system by pressing + + , or pressing the reset button on the motherboard stores BIOS Setup Utility. It is a menu-driven program,...POST continues with the motherboard contains necessary drivers and useful utilities that came with its various sub-menus and to display the menus. 27 ASRock M3A770DE Motherboard English 3. If the Main Menu does not appear automatically, locate and double-click on the file "ASSETUP. Software Support CD ...

RAID Installation Guide
Page 7
... key (except for ) to use the full portion of the logical drive for one of the disk drive capacity for each available drive. Press to restart your computer by 7 Choose the RAID level you are allowed to use any available RAID level for your bootable logical drive, it is recommended to...
... key (except for ) to use the full portion of the logical drive for one of the disk drive capacity for each available drive. Press to restart your computer by 7 Choose the RAID level you are allowed to use any available RAID level for your bootable logical drive, it is recommended to...
RAID Installation Guide
Page 9
... logical drive. Press to save your computer by following the detailed instruction of their capacity belongs to a logical drive. 4. 3. Please install the operating system to restart the computer.
... logical drive. Press to save your computer by following the detailed instruction of their capacity belongs to a logical drive. 4. 3. Please install the operating system to restart the computer.