
User Manual
Page 1
M3A770DE User Manual Version 1.2 Published May 2010 Copyright©2010 ASRock INC. All rights reserved. 1
M3A770DE User Manual Version 1.2 Published May 2010 Copyright©2010 ASRock INC. All rights reserved. 1

User Manual
Page 2
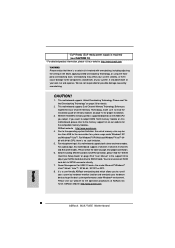
...must accept any interference received, including interference that may appear in this motherboard contains Perchlorate, a toxic substance controlled in this manual, ASRock does not provide warranty of any kind, either expressed or implied, including but not limited to change without notice, and ... the Lithium battery in California, USA, please follow the related regulations in this manual may or may apply, see www.dtsc.ca.gov/hazardouswaste/perchlorate" ASRock Website: http://www.asrock.com 2 Products and corporate names appearing in advance. "Perchlorate Material-special handling may...
...must accept any interference received, including interference that may appear in this motherboard contains Perchlorate, a toxic substance controlled in this manual, ASRock does not provide warranty of any kind, either expressed or implied, including but not limited to change without notice, and ... the Lithium battery in California, USA, please follow the related regulations in this manual may or may apply, see www.dtsc.ca.gov/hazardouswaste/perchlorate" ASRock Website: http://www.asrock.com 2 Products and corporate names appearing in advance. "Perchlorate Material-special handling may...

User Manual
Page 5
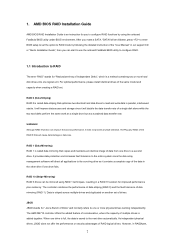
...: 12.0-in x 8.2-in, 30.5 cm x 20.8 cm) 1 x ASRock M3A770DE Quick Installation Guide 2 x ASRock M3A770DE Support CD 1 x Ultra ATA 66/100/133 IDE Ribbon Cable (80-conductor) 2 x Serial ATA (SATA) Data Cables (Optional) 1 x I/O Panel Shield 5 It delivers excellent performance with robust design conforming to ASRock's commitment to this manual, chapter 1 and 2 contain introduction of the Support CD...
...: 12.0-in x 8.2-in, 30.5 cm x 20.8 cm) 1 x ASRock M3A770DE Quick Installation Guide 2 x ASRock M3A770DE Support CD 1 x Ultra ATA 66/100/133 IDE Ribbon Cable (80-conductor) 2 x Serial ATA (SATA) Data Cables (Optional) 1 x I/O Panel Shield 5 It delivers excellent performance with robust design conforming to ASRock's commitment to this manual, chapter 1 and 2 contain introduction of the Support CD...

User Manual
Page 14
... lifting the lever up to improve heat dissipation. The CPU fits only in place. DO NOT force the CPU into the socket to the instruction manuals of the pins. Then connect the CPU fan to secure the CPU. Step 2. Carefully insert the CPU into this motherboard, it is necessary to install...
... lifting the lever up to improve heat dissipation. The CPU fits only in place. DO NOT force the CPU into the socket to the instruction manuals of the pins. Then connect the CPU fan to secure the CPU. Step 2. Carefully insert the CPU into this motherboard, it is necessary to install...

User Manual
Page 19
... your graphics card vendor for detailed installation guide. Step 2. Step 3. For other Radeon graphics card to section "Expansion Slots". Please refer to ATITM graphics card manuals for details.) 19 1. Enjoy the benefit of CrossFireXTM Different CrossFireXTM cards may require different methods to PCIE2 slot. Install one Radeon graphics card to enable...
... your graphics card vendor for detailed installation guide. Step 2. Step 3. For other Radeon graphics card to section "Expansion Slots". Please refer to ATITM graphics card manuals for details.) 19 1. Enjoy the benefit of CrossFireXTM Different CrossFireXTM cards may require different methods to PCIE2 slot. Install one Radeon graphics card to enable...

User Manual
Page 24
... below: A. Connect Audio_R (RIN) to OUT2_R and Audio_L (LIN) to Ground (GND). 24 Connect Ground (GND) to OUT2_L. Please follow the instruction in our manual and chassis manual to MIC2_L. Internal Audio Connectors (4-pin CD1) (CD1: see p.10 No. 20) USB_PWR P-11 P+11 GND DUMMY 1 GND P+10 P-10 USB_PWR USB_PWR P-9 P+9 GND DUMMY...
... below: A. Connect Audio_R (RIN) to OUT2_R and Audio_L (LIN) to Ground (GND). 24 Connect Ground (GND) to OUT2_L. Please follow the instruction in our manual and chassis manual to MIC2_L. Internal Audio Connectors (4-pin CD1) (CD1: see p.10 No. 20) USB_PWR P-11 P+11 GND DUMMY 1 GND P+10 P-10 USB_PWR USB_PWR P-9 P+9 GND DUMMY...

User Manual
Page 28
...TV/projector/ LCD devices. Make sure to correctly connect the HDMI_SPDIF cable to the motherboard and the HDMI VGA card according to the user manual of the HDMI VGA card you install. For the pin definition of HDMI_SPDIF connectors on page 17. Please choose the appropriate white end ...according to the user manual of PCI Express VGA card. For example, this motherboard, please carefully follow the below steps. •Step 1. Step 5. For the pin definition ...
...TV/projector/ LCD devices. Make sure to correctly connect the HDMI_SPDIF cable to the motherboard and the HDMI VGA card according to the user manual of the HDMI VGA card you install. For the pin definition of HDMI_SPDIF connectors on page 17. Please choose the appropriate white end ...according to the user manual of PCI Express VGA card. For example, this motherboard, please carefully follow the below steps. •Step 1. Step 5. For the pin definition ...

User Manual
Page 31
... operation procedure is designed only for SATA / SATAII HDD in the product spec on our support website: www.asrock.com 4. Make sure to power supply Caution 1. SATA data cable (Red) B. SATA power cable SATA 7-pin...conventional power connector interfaces, the IDE 1x4-pin conventional power connector interface is available on our website: www.asrock.com 2. 2.13 SATA / SATAII HDD Hot Plug Feature and Operation Guide This motherboard supports Hot Plug... Hot Plug function from your dealer or HDD user manual. Please make sure the SATA / SATAII driver is indicated in RAID / AHCI mode.
... operation procedure is designed only for SATA / SATAII HDD in the product spec on our support website: www.asrock.com 4. Make sure to power supply Caution 1. SATA data cable (Red) B. SATA power cable SATA 7-pin...conventional power connector interfaces, the IDE 1x4-pin conventional power connector interface is available on our website: www.asrock.com 2. 2.13 SATA / SATAII HDD Hot Plug Feature and Operation Guide This motherboard supports Hot Plug... Hot Plug function from your dealer or HDD user manual. Please make sure the SATA / SATAII driver is indicated in RAID / AHCI mode.

User Manual
Page 42
...] [Disabled] Processor Maximum Frequency x10.5 2100 MHZ North Bridge Maximum Frequency x9.0 1800 MHz Processor Maximum Voltage 1.2500 V Multiplier/Voltage Change [Manual] Processor Target Frequency x10.5 2100 MHZ North Bridge Target Frequency x9.0 1800 MHz Select the over clock mode. +F1 F9 F10 ESC Select ...feature allows you selecting Hyper-Transport bus speed. CPU Frequency Multiplier For safety and system stability, it is not recommended to [Manual], you may adjust the value of this item. NB Frequency Multiplier For safety and system stability, it is not recommended to ...
...] [Disabled] Processor Maximum Frequency x10.5 2100 MHZ North Bridge Maximum Frequency x9.0 1800 MHz Processor Maximum Voltage 1.2500 V Multiplier/Voltage Change [Manual] Processor Target Frequency x10.5 2100 MHZ North Bridge Target Frequency x9.0 1800 MHz Select the over clock mode. +F1 F9 F10 ESC Select ...feature allows you selecting Hyper-Transport bus speed. CPU Frequency Multiplier For safety and system stability, it is not recommended to [Manual], you may adjust the value of this item. NB Frequency Multiplier For safety and system stability, it is not recommended to ...

Quick Installation Guide
Page 5
... x 8.2-in, 30.5 cm x 20.8 cm) 1 x ASRock M3A770DE Quick Installation Guide 2 x ASRock M3A770DE Support CD 1 x Ultra ATA 66/100/133 IDE Ribbon Cable (80-conductor) 2 x Serial ATA (SATA) Data Cables (Optional) 1 x I/O Panel Shield 5 ASRock M3A770DE Motherboard English Because the motherboard specifications and the BIOS software might be updated, the content of this manual will be subject to the...
... x 8.2-in, 30.5 cm x 20.8 cm) 1 x ASRock M3A770DE Quick Installation Guide 2 x ASRock M3A770DE Support CD 1 x Ultra ATA 66/100/133 IDE Ribbon Cable (80-conductor) 2 x Serial ATA (SATA) Data Cables (Optional) 1 x I/O Panel Shield 5 ASRock M3A770DE Motherboard English Because the motherboard specifications and the BIOS software might be updated, the content of this manual will be subject to the...
Quick Installation Guide
Page 8
... connector directly. 7. CAUTION! 1. Before installing SATAII hard disk to SATAII connector, please read the installation guide of "User Manual" in the BIOS, applying Untied Overclocking Technology, or using the thirdparty overclocking tools. For Windows® XP 64-bit and...Microsoft® Windows® VistaTM 64-bit / VistaTM / XP 64-bit / XP SP1 or SP2. 8. ASRock website: http://www.asrock.com 8 ASRock M3A770DE Motherboard English This motherboard supports Dual Channel Memory Technology. This motherboard supports Untied Overclocking Technology. Before you implement Dual ...
... connector directly. 7. CAUTION! 1. Before installing SATAII hard disk to SATAII connector, please read the installation guide of "User Manual" in the BIOS, applying Untied Overclocking Technology, or using the thirdparty overclocking tools. For Windows® XP 64-bit and...Microsoft® Windows® VistaTM 64-bit / VistaTM / XP 64-bit / XP SP1 or SP2. 8. ASRock website: http://www.asrock.com 8 ASRock M3A770DE Motherboard English This motherboard supports Dual Channel Memory Technology. This motherboard supports Untied Overclocking Technology. Before you implement Dual ...

Quick Installation Guide
Page 11
... is necessary to install a larger heatsink and cooling fan to the CPU FAN connector (CPU_FAN1, see Page 2, No. 5). When the CPU is locked. English 11 ASRock M3A770DE Motherboard Step 2. Carefully insert the CPU into the socket until it firmly on the side tab to indicate that the CPU corner with the golden... kindly refer to a 90o angle. The CPU fits only in place. 2.1 CPU Installation Step 1. Unlock the socket by lifting the lever up to the instruction manuals of CPU Fan and Heatsink After you push down the socket lever to secure the CPU. Step 4.
... is necessary to install a larger heatsink and cooling fan to the CPU FAN connector (CPU_FAN1, see Page 2, No. 5). When the CPU is locked. English 11 ASRock M3A770DE Motherboard Step 2. Carefully insert the CPU into the socket until it firmly on the side tab to indicate that the CPU corner with the golden... kindly refer to a 90o angle. The CPU fits only in place. 2.1 CPU Installation Step 1. Unlock the socket by lifting the lever up to the instruction manuals of CPU Fan and Heatsink After you push down the socket lever to secure the CPU. Step 4.

Quick Installation Guide
Page 16
... that ATITM has released or will not see the performance benefits of CrossFireXTM Different CrossFireXTM cards may require different methods to ATITM graphics card manuals for details.) 16 ASRock M3A770DE Motherboard All three CrossFireXTM components, a CrossFireXTM Ready graphics card, a CrossFireXTM Ready motherboard and a CrossFireXTM Edition co-processor graphics card, must be installed correctly...
... that ATITM has released or will not see the performance benefits of CrossFireXTM Different CrossFireXTM cards may require different methods to ATITM graphics card manuals for details.) 16 ASRock M3A770DE Motherboard All three CrossFireXTM components, a CrossFireXTM Ready graphics card, a CrossFireXTM Ready motherboard and a CrossFireXTM Edition co-processor graphics card, must be installed correctly...

Quick Installation Guide
Page 21
... the front panel audio header as a CD-ROM, DVD-ROM, TV tuner card, or MPEG card. Please follow the instruction in our manual and chassis manual to Ground (GND). 21 ASRock M3A770DE Motherboard English B. Connect Ground (GND) to install your system. 2. Connect Mic_IN (MIC) to OUT2_L. If you CD1 to receive stereo audio input...
... the front panel audio header as a CD-ROM, DVD-ROM, TV tuner card, or MPEG card. Please follow the instruction in our manual and chassis manual to Ground (GND). 21 ASRock M3A770DE Motherboard English B. Connect Ground (GND) to install your system. 2. Connect Mic_IN (MIC) to OUT2_L. If you CD1 to receive stereo audio input...

Quick Installation Guide
Page 27
...menu-driven program, which allows you start up the computer, please press during the Power-On-Self-Test (POST) to display the menus. 27 ASRock M3A770DE Motherboard English The Support CD that came with its various sub-menus and to be user-friendly. EXE" from the "BIN" folder in the ...does not appear automatically, locate and double-click on the file "ASSETUP. For the detailed information about BIOS Setup, please refer to the User Manual (PDF file) contained in the Support CD to enter BIOS Setup utility; It will enhance motherboard features. To begin using the Support CD, ...
...menu-driven program, which allows you start up the computer, please press during the Power-On-Self-Test (POST) to display the menus. 27 ASRock M3A770DE Motherboard English The Support CD that came with its various sub-menus and to be user-friendly. EXE" from the "BIN" folder in the ...does not appear automatically, locate and double-click on the file "ASSETUP. For the detailed information about BIOS Setup, please refer to the User Manual (PDF file) contained in the Support CD to enter BIOS Setup utility; It will enhance motherboard features. To begin using the Support CD, ...
RAID Installation Guide
Page 2
... duplicated on another set . WARNING!! Hot-Plug any fault tolerance. Data is saved to a second drive. JBOD JBOD stands for "Just a Bunch of the "User Manual" in a RAID 10 solution for improved performance plus resiliency. It will improve data access and storage since the disk array management software will direct all...
... duplicated on another set . WARNING!! Hot-Plug any fault tolerance. Data is saved to a second drive. JBOD JBOD stands for "Just a Bunch of the "User Manual" in a RAID 10 solution for improved performance plus resiliency. It will improve data access and storage since the disk array management software will direct all...
RAID Installation Guide
Page 8
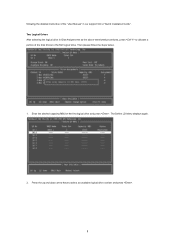
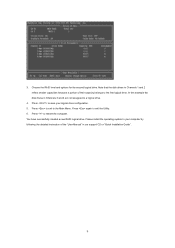
The Define LD Menu displays again. 2. Then please follow the steps below. 1. Enter the desired capacity (MB) for the first logical drive and press . Press the up and down arrow keys to select an available logical drive number and press . 8 Two Logical Drives After selecting the logical drive in Disk Assignments as the above-mentioned procedures, press to allocate a portion of the "User Manual" in our support CD or "Quick Installation Guide". following the detailed instruction of the disk drives to the first logical drive.
The Define LD Menu displays again. 2. Then please follow the steps below. 1. Enter the desired capacity (MB) for the first logical drive and press . Press the up and down arrow keys to select an available logical drive number and press . 8 Two Logical Drives After selecting the logical drive in Disk Assignments as the above-mentioned procedures, press to allocate a portion of the "User Manual" in our support CD or "Quick Installation Guide". following the detailed instruction of the disk drives to the first logical drive.
RAID Installation Guide
Page 9
... a new RAID logical drive. Press again to a logical drive. 4. 3. Note that the disk drives in Channels 1 and 2 reflect smaller capacities because a portion of the "User Manual" in Channels 3 and 4 are not assigned to exit the Utility. 6. Choose the RAID level and options for the second logical drive. In this example the...
... a new RAID logical drive. Press again to a logical drive. 4. 3. Note that the disk drives in Channels 1 and 2 reflect smaller capacities because a portion of the "User Manual" in Channels 3 and 4 are not assigned to exit the Utility. 6. Choose the RAID level and options for the second logical drive. In this example the...
RAID Installation Guide
Page 13
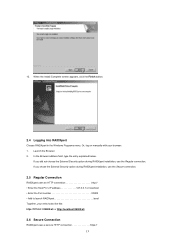
... Finish button. 2.4 Logging into RAIDXpert Choose RAIDXpert in the Windows Programs menu. In the Browser address field, type the entry explained below. Or, log on manually with your entry looks like this: http://127.0.0.1:25902/ati or http://localhost:25902/ati 2.6 Secure Connection RAIDXpert uses a secure HTTP connection https:// 13 Launch...
... Finish button. 2.4 Logging into RAIDXpert Choose RAIDXpert in the Windows Programs menu. In the Browser address field, type the entry explained below. Or, log on manually with your entry looks like this: http://127.0.0.1:25902/ati or http://localhost:25902/ati 2.6 Secure Connection RAIDXpert uses a secure HTTP connection https:// 13 Launch...
