
User Manual
Page 3
... Configuration 32 3.4 Hardware Health Event Monitoring Screen 33 3.5 Boot Screen 33 3.5.1 Boot Settings Configuration 34 3.6 Security Screen 35 3.7 Exit Screen 36 3 Introduction 5 1.1 Package Contents 5 1.2 Specifications 6 1.3 Motherboard Layout 9 1.4 ASRock 8CH I/O 10 2 .
... Configuration 32 3.4 Hardware Health Event Monitoring Screen 33 3.5 Boot Screen 33 3.5.1 Boot Settings Configuration 34 3.6 Security Screen 35 3.7 Exit Screen 36 3 Introduction 5 1.1 Package Contents 5 1.2 Specifications 6 1.3 Motherboard Layout 9 1.4 ASRock 8CH I/O 10 2 .

User Manual
Page 5
... as well. 1. It delivers excellent performance with robust design conforming to ASRock's commitment to change without further notice. ASRock website http://www.asrock.com 1.1 Package Contents 1 x ASRock K8Upgrade-1689 Motherboard (ATX Form Factor: 7.5-in x 12.0-in, 19.1 cm x 30.5 cm) 1 x ASRock K8Upgrade-1689 Quick Installation Guide 1 x ASRock K8Upgrade-1689 Support CD 1 x Ultra ATA 66/100/133 IDE Ribbon Cable (80-conductor) 1 x 3.5-in Floppy...
... as well. 1. It delivers excellent performance with robust design conforming to ASRock's commitment to change without further notice. ASRock website http://www.asrock.com 1.1 Package Contents 1 x ASRock K8Upgrade-1689 Motherboard (ATX Form Factor: 7.5-in x 12.0-in, 19.1 cm x 30.5 cm) 1 x ASRock K8Upgrade-1689 Quick Installation Guide 1 x ASRock K8Upgrade-1689 Support CD 1 x Ultra ATA 66/100/133 IDE Ribbon Cable (80-conductor) 1 x 3.5-in Floppy...

User Manual
Page 6
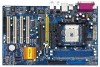
...cm CPU: 754-Pin Socket Supporting advanced 64-bit AMD AthlonTM 64 and 32-bit Sempron Processor Supports AMD's Cool 'n' QuietTM Technology (see CAUTION 4) ASRock 8CH I /O Panel Plus 2 On-Board Headers Supporting 4 Extra USB 2.0 Ports (see CAUTION 1) Chipsets: Bridge: ALi M1689 Chipset 1. For ... LAN: Speed: 802.3u (10/100 Ethernet), Supports Wake-On-LAN Hardware Monitor: CPU Temperature Sensing Motherboard Temperature Sensing CPU Overheat Shutdown to Protect CPU Life (ASRock U-COP)(see CAUTION 2) CPU Fan Tachometer Chassis Fan Tachometer Voltage Monitoring: +12V, +5V, +3.3V,...
...cm CPU: 754-Pin Socket Supporting advanced 64-bit AMD AthlonTM 64 and 32-bit Sempron Processor Supports AMD's Cool 'n' QuietTM Technology (see CAUTION 4) ASRock 8CH I /O Panel Plus 2 On-Board Headers Supporting 4 Extra USB 2.0 Ports (see CAUTION 1) Chipsets: Bridge: ALi M1689 Chipset 1. For ... LAN: Speed: 802.3u (10/100 Ethernet), Supports Wake-On-LAN Hardware Monitor: CPU Temperature Sensing Motherboard Temperature Sensing CPU Overheat Shutdown to Protect CPU Life (ASRock U-COP)(see CAUTION 2) CPU Fan Tachometer Chassis Fan Tachometer Voltage Monitoring: +12V, +5V, +3.3V,...
User Manual
Page 7
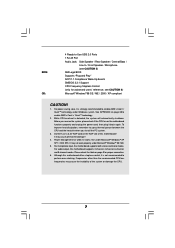
... Microsoft® Windows® 98 SE / ME / 2000 / XP compliant CAUTION! 1. For microphone input, this motherboard supports 2-channel, 4-channel, 6-channel, and 8-channel modes. Although this motherboard! While CPU overheat is not recommended to perform over-clocking. Before you install the PC system. 3. It may not ...slot of the system or damage the CPU. 7 It may cause the instability of this motherboard offers stepless control, it back again. Please check the table on the motherboard functions properly and unplug the power cord, then plug it is detected, the system will ...
... Microsoft® Windows® 98 SE / ME / 2000 / XP compliant CAUTION! 1. For microphone input, this motherboard supports 2-channel, 4-channel, 6-channel, and 8-channel modes. Although this motherboard! While CPU overheat is not recommended to perform over-clocking. Before you install the PC system. 3. It may not ...slot of the system or damage the CPU. 7 It may cause the instability of this motherboard offers stepless control, it back again. Please check the table on the motherboard functions properly and unplug the power cord, then plug it is detected, the system will ...

User Manual
Page 10
... (7.5-in x 12.0-in the bag that comes with the component. 5. Before you install the motherboard, study the configuration of the following precautions before you uninstall any motherboard settings. Before you handle components. 3. Also remember to use a grounded wrist strap or touch ... that the motherboard fits into the screw holes to secure the motherboard to static electricity, NEVER place your chassis to the motherboard, peripherals, and/or components. 1. Hold components by the edges and do so may damage the motherboard. 10 2. Installation K8Upgarde-1689 is detached ...
... (7.5-in x 12.0-in the bag that comes with the component. 5. Before you install the motherboard, study the configuration of the following precautions before you uninstall any motherboard settings. Before you handle components. 3. Also remember to use a grounded wrist strap or touch ... that the motherboard fits into the screw holes to secure the motherboard to static electricity, NEVER place your chassis to the motherboard, peripherals, and/or components. 1. Hold components by the edges and do so may damage the motherboard. 10 2. Installation K8Upgarde-1689 is detached ...

User Manual
Page 11
... Page 8, No. 5). Make sure that the CPU corner with the golden triangle matches the socket corner with each other. Carefully insert the CPU into this motherboard, it is in place, press it fits in one correct orientation. Step 4. Then connect the CPU fan to a 90o angle. Step 2. When the CPU is...
... Page 8, No. 5). Make sure that the CPU corner with the golden triangle matches the socket corner with each other. Carefully insert the CPU into this motherboard, it is in place, press it fits in one correct orientation. Step 4. Then connect the CPU fan to a 90o angle. Step 2. When the CPU is...

User Manual
Page 12
... into the slot at both ends fully snap back in one correct orientation. Step 2. 2.3 Installation of Memory Modules (DIMM) This motherboard is properly seated. 12 Please make sure to the motherboard and the DIMM if you force the DIMM into the slot until the retaining clips at incorrect orientation. Unlock a DIMM slot...
... into the slot at both ends fully snap back in one correct orientation. Step 2. 2.3 Installation of Memory Modules (DIMM) This motherboard is properly seated. 12 Please make sure to the motherboard and the DIMM if you force the DIMM into the slot until the retaining clips at incorrect orientation. Unlock a DIMM slot...

User Manual
Page 13
... refer to AMD 939-Pin CPU by installing an add-on K8Upgrade-1689 motherboard. 2.4 Expansion Slots (Future CPU Port, PCI Slots and AGP Slot) There are 1 Future CPU Port, 4 PCI slots and 1 AGP slot on ASRock 939CPU Board into it! Future CPU Port (Yellow-Colored Port): Future CPU Port allows you upgrade ... 13 This yellow-colored Future CPU Port is necessary to help you may use it is not an AGP slot! Before you to upgrade your motherboard package, and please follow the "Jumper Cap Remover Instruction" to use the tool, Jumper Cap Remover, to adjust the jumper settings for the ...
... refer to AMD 939-Pin CPU by installing an add-on K8Upgrade-1689 motherboard. 2.4 Expansion Slots (Future CPU Port, PCI Slots and AGP Slot) There are 1 Future CPU Port, 4 PCI slots and 1 AGP slot on ASRock 939CPU Board into it! Future CPU Port (Yellow-Colored Port): Future CPU Port allows you upgrade ... 13 This yellow-colored Future CPU Port is necessary to help you may use it is not an AGP slot! Before you to upgrade your motherboard package, and please follow the "Jumper Cap Remover Instruction" to use the tool, Jumper Cap Remover, to adjust the jumper settings for the ...

User Manual
Page 14
AGP slot: The AGP slot is unplugged. It may cause permanent damage! The ASRock AGP slot has a special design of clasp that you start the installation. Please read the documentation of this motherboard! Please do NOT use a 3.3V AGP card on the slot. Before installing the expansion card, please make ... . Keep the screws for the card before you intend to use . Replace the system cover. 14 For the voltage information of your motherboard is completely seated on the AGP slot of the expansion card and make sure that the power supply is switched off or the power cord...
AGP slot: The AGP slot is unplugged. It may cause permanent damage! The ASRock AGP slot has a special design of clasp that you start the installation. Please read the documentation of this motherboard! Please do NOT use a 3.3V AGP card on the slot. Before installing the expansion card, please make ... . Keep the screws for the card before you intend to use . Replace the system cover. 14 For the voltage information of your motherboard is completely seated on the AGP slot of the expansion card and make sure that the power supply is switched off or the power cord...

User Manual
Page 16
... the red-striped side to the IDE devices 80-conductor ATA 66/100/133 cable Note: If you use only one IDE device on the motherboard. 16 Please refer to the instruction of the SATA data cable can be connected to the SATA hard disk or the SATA connector on this... motherboard, please set the IDE device as "Master". Serial ATA (SATA) Data Cable Either end of your hard disk drive to the primary IDE connector (IDE1, ...
... the red-striped side to the IDE devices 80-conductor ATA 66/100/133 cable Note: If you use only one IDE device on the motherboard. 16 Please refer to the instruction of the SATA data cable can be connected to the SATA hard disk or the SATA connector on this... motherboard, please set the IDE device as "Master". Serial ATA (SATA) Data Cable Either end of your hard disk drive to the primary IDE connector (IDE1, ...

User Manual
Page 19
2.7 Serial ATA (SATA) Hard Disks Installation This motherboard supports Serial ATA (SATA) hard disks and RAID functions. STEP 3: Connect one end of the SATA data cable to use RAID 0, RAID 1, or JBOD functions ...on SATA, SATA HDDs must be operated in BIOS setup. This section will guide you plan to the SATA hard disk. 1. If you to the motherboard's SATA connector. They need different drivers during actual operation. 19 STEP 4: Connect the other end of the SATA data cable to install the SATA hard...
2.7 Serial ATA (SATA) Hard Disks Installation This motherboard supports Serial ATA (SATA) hard disks and RAID functions. STEP 3: Connect one end of the SATA data cable to use RAID 0, RAID 1, or JBOD functions ...on SATA, SATA HDDs must be operated in BIOS setup. This section will guide you plan to the SATA hard disk. 1. If you to the motherboard's SATA connector. They need different drivers during actual operation. 19 STEP 4: Connect the other end of the SATA data cable to install the SATA hard...
User Manual
Page 21
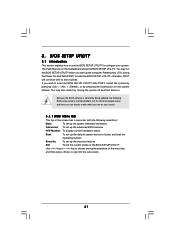
... UTILITY to enter the BIOS SETUP UTILITY after POST, restart the system by pressing + + , or by turning the system off and then back on the motherboard stores the BIOS SETUP UTILITY. You may run the BIOS SETUP UTILITY when you wish to configure your screen. 3.1.1 BIOS Menu Bar The top of...
... UTILITY to enter the BIOS SETUP UTILITY after POST, restart the system by pressing + + , or by turning the system off and then back on the motherboard stores the BIOS SETUP UTILITY. You may run the BIOS SETUP UTILITY when you wish to configure your screen. 3.1.1 BIOS Menu Bar The top of...

User Manual
Page 22
... Speed L1 Cache Size L2 Cache Size Total Memory DDR 1 DDR 2 [17:00:09] [Thu 04/26/2005] : K8Upgrade-1689 BIOS P1.0 : AMD Athlon(tm) 64 Processor 3400+ : 2200 MHz : 128KB : 1024KB : 512MB : 512MB/166MHz (DDR333...item to specify the system date. System Date [Day Month/Date/Year] Use this motherboard, you enter the BIOS SETUP UTILITY, the Main screen will see the below Main screen when entering... the BIOS SETUP UTILITY. 22 If ASRock 939CPU Board is installed into the FUTURE_CPU_PORT on this item to specify the system time. Use [+] or...
... Speed L1 Cache Size L2 Cache Size Total Memory DDR 1 DDR 2 [17:00:09] [Thu 04/26/2005] : K8Upgrade-1689 BIOS P1.0 : AMD Athlon(tm) 64 Processor 3400+ : 2200 MHz : 128KB : 1024KB : 512MB : 512MB/166MHz (DDR333...item to specify the system date. System Date [Day Month/Date/Year] Use this motherboard, you enter the BIOS SETUP UTILITY, the Main screen will see the below Main screen when entering... the BIOS SETUP UTILITY. 22 If ASRock 939CPU Board is installed into the FUTURE_CPU_PORT on this item to specify the system time. Use [+] or...

User Manual
Page 24
... AUTO, FID/VID will display Processor Maximum Multiplier for system stability. Cool 'n' Quiet Use this item to [Manual], you may adjust the value of this motherboard. The actual CPU host frequency will display Processor Maximum Voltage for better system stability. Processor Maximum Multiplier It will be [Disabled] for reference. Processor Maximum...
... AUTO, FID/VID will display Processor Maximum Multiplier for system stability. Cool 'n' Quiet Use this item to [Manual], you may adjust the value of this motherboard. The actual CPU host frequency will display Processor Maximum Voltage for better system stability. Processor Maximum Multiplier It will be [Disabled] for reference. Processor Maximum...
User Manual
Page 33
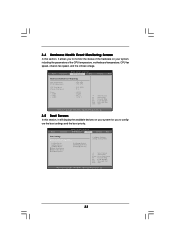
... the available devices on your system, including the parameters of the hardware on your system for you to monitor the status of the CPU temperature, motherboard temperature, CPU fan speed, chassis fan speed, and the critical voltage. Select Screen Select Item Enter Go to configure the boot settings and the boot...
... the available devices on your system, including the parameters of the hardware on your system for you to monitor the status of the CPU temperature, motherboard temperature, CPU fan speed, chassis fan speed, and the critical voltage. Select Screen Select Item Enter Go to configure the boot settings and the boot...

User Manual
Page 37
... CD, insert the CD into your OS documentation for more about ASRock, welcome to install it. 4.2.4 Contact Information If you may contact your computer. 4. Software Support 4.1 Install Operating System This motherboard supports various Microsoft® Windows® operating systems: 98 SE ... the installation wizard to visit ASRock's website at http://www.asrock.com; Refer to know more information. 4.2 Support CD Information The Support CD that came with the motherboard contains necessary drivers and useful utilities that the motherboard supports. The CD automatically displays...
... CD, insert the CD into your OS documentation for more about ASRock, welcome to install it. 4.2.4 Contact Information If you may contact your computer. 4. Software Support 4.1 Install Operating System This motherboard supports various Microsoft® Windows® operating systems: 98 SE ... the installation wizard to visit ASRock's website at http://www.asrock.com; Refer to know more information. 4.2 Support CD Information The Support CD that came with the motherboard contains necessary drivers and useful utilities that the motherboard supports. The CD automatically displays...

