
User Manual
Page 3
...Introduction 4 1.1 Package Contents 4 1.2 Specifications 5 1.3 Motherboard Layout (K7VT4-4X 7 1.4 Motherboard Layout (K7VT4-8X 8 1.5 ASRock I/OTM (K7VT4-4X / K7VT4-8X 9 2 Installation 10 2.1 Screw Holes 10 2.2 Pre-installation ...Precautions 10 2.3 CPU Installation 11 2.4 Installation of Heatsink and CPU fan 11 2.5 Installation of Memory Modules (DIMM 12 2.6 Expansion Slots 12 2.7 Jumpers Setup 13 2.8 Connectors 16 3 BIOS Setup 18 3.1 BIOS Setup Utility 18 3.1.1 BIOS...
...Introduction 4 1.1 Package Contents 4 1.2 Specifications 5 1.3 Motherboard Layout (K7VT4-4X 7 1.4 Motherboard Layout (K7VT4-8X 8 1.5 ASRock I/OTM (K7VT4-4X / K7VT4-8X 9 2 Installation 10 2.1 Screw Holes 10 2.2 Pre-installation ...Precautions 10 2.3 CPU Installation 11 2.4 Installation of Heatsink and CPU fan 11 2.5 Installation of Memory Modules (DIMM 12 2.6 Expansion Slots 12 2.7 Jumpers Setup 13 2.8 Connectors 16 3 BIOS Setup 18 3.1 BIOS Setup Utility 18 3.1.1 BIOS...

User Manual
Page 4
... on page 23 offers more advanced BIOS setup information. ASRock website http://www.asrock.com 1.1 Package Contents ASRock K7VT4-4X or K7VT4-8X motherboard (ATX form factor: 12.0" x 7.0", 30.5 x 17.8 cm) ASRock K7VT4-4X / K7VT4-8X Quick Installation Guide ASRock AMD-VIA Series Support CD 1 cable for IDE devices (1 x ATA 66 / 100 / 133) 1 cable for purchasing ASRock K7VT4-4X / K7VT4-8X motherboard, a reliable motherboard produced under...
... on page 23 offers more advanced BIOS setup information. ASRock website http://www.asrock.com 1.1 Package Contents ASRock K7VT4-4X or K7VT4-8X motherboard (ATX form factor: 12.0" x 7.0", 30.5 x 17.8 cm) ASRock K7VT4-4X / K7VT4-8X Quick Installation Guide ASRock AMD-VIA Series Support CD 1 cable for IDE devices (1 x ATA 66 / 100 / 133) 1 cable for purchasing ASRock K7VT4-4X / K7VT4-8X motherboard, a reliable motherboard produced under...

User Manual
Page 5
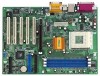
...-On-LAN Hardware Monitor:CPU temperature sensing (ASRock U-COP); CPU fan tachometer; Chassis fan tachometer PCI slots: 5 slots with PCI Specification 2.2 AGP slot: K7VT4-4X: 1 AGP slot, supports 1.5V, 4X AGP card; K7VT4-8X: 1 AGP slot, supports 1.5V, 8X/4X AGP card (see CAUTION 2) USB 2.0:...1; 1 parallel port: ECP/EPP support; Audio Jack: Line Out / Line In / Microphone + Game port BIOS: AMI legal BIOS; Supports "Plug and Play"; CPU frequency stepless control (only for two ASRock I/OTM: additional USB 2.0 ports upgrade (see CAUTION 4) OS: Microsoft® Windows® 98 SE / ...
...-On-LAN Hardware Monitor:CPU temperature sensing (ASRock U-COP); CPU fan tachometer; Chassis fan tachometer PCI slots: 5 slots with PCI Specification 2.2 AGP slot: K7VT4-4X: 1 AGP slot, supports 1.5V, 4X AGP card; K7VT4-8X: 1 AGP slot, supports 1.5V, 8X/4X AGP card (see CAUTION 2) USB 2.0:...1; 1 parallel port: ECP/EPP support; Audio Jack: Line Out / Line In / Microphone + Game port BIOS: AMI legal BIOS; Supports "Plug and Play"; CPU frequency stepless control (only for two ASRock I/OTM: additional USB 2.0 ports upgrade (see CAUTION 4) OS: Microsoft® Windows® 98 SE / ...

User Manual
Page 18
...Management features BOOT Configures the default system device that is used to locate and load the Operating System EXIT Exits the current menu or the BIOS Setup To access the menu bar items, press the right or left arrow key on the keyboard until the desired item is highlighted. ...At the bottom of the screen has a menu bar with their corresponding functions. 18 Because the BIOS software is a legend bar. The BIOS Setup Utility is a menu-driven program, which allows you wish to enter the BIOS Setup after POST, restart the system by pressing + + , or by turning the system ...
...Management features BOOT Configures the default system device that is used to locate and load the Operating System EXIT Exits the current menu or the BIOS Setup To access the menu bar items, press the right or left arrow key on the keyboard until the desired item is highlighted. ...At the bottom of the screen has a menu bar with their corresponding functions. 18 Because the BIOS software is a legend bar. The BIOS Setup Utility is a menu-driven program, which allows you wish to enter the BIOS Setup after POST, restart the system by pressing + + , or by turning the system ...

User Manual
Page 19
...the system to the time that you specify. Dec Day: 01 - 31 Year: 1980 - 2099 K7VT4 - 8X BIOS P1.00 AMD Athlon(tm) XP 2600+ 2133 MHz 128 KB 256 KB 512 MB 512 MB ...all the setup items to default value Saves changes and exits Setup 3.2 Main Menu When you enter the BIOS Setup Utility, the following screen appears. Floppy Drives Use this to configure IDE devices. 19 Use keys to...the Hour, Minute, and Second fields. Main Advanced System Date System Time Floppy Drives IDE Devices BIOS Version Processor Type Processor Speed L1 Cache Size L2 Cache Size Total Memory DDR1 DDR2 AMIBIOS SETUP ...
...the system to the time that you specify. Dec Day: 01 - 31 Year: 1980 - 2099 K7VT4 - 8X BIOS P1.00 AMD Athlon(tm) XP 2600+ 2133 MHz 128 KB 256 KB 512 MB 512 MB ...all the setup items to default value Saves changes and exits Setup 3.2 Main Menu When you enter the BIOS Setup Utility, the following screen appears. Floppy Drives Use this to configure IDE devices. 19 Use keys to...the Hour, Minute, and Second fields. Main Advanced System Date System Time Floppy Drives IDE Devices BIOS Version Processor Type Processor Speed L1 Cache Size L2 Cache Size Total Memory DDR1 DDR2 AMIBIOS SETUP ...

User Manual
Page 20
... or too new. TYPE To set the type of the IDE device, first, please select "IDE Devices" on Main menu and press to get into BIOS, use a disk utility, such as FDISK, to partition and format the new IDE hard disk drives. Then, select among "Primary IDE Master", "Primary IDE Slave... IDE Slave" to configure a hard disk drive, make configuration of cylinders, heads, and sectors per track for the remaining fields on an older system, the BIOS Setup may detect incorrect parameters. Before attempting to make sure you can write the data into or read the data from the installed hard disk...
... or too new. TYPE To set the type of the IDE device, first, please select "IDE Devices" on Main menu and press to get into BIOS, use a disk utility, such as FDISK, to partition and format the new IDE hard disk drives. Then, select among "Primary IDE Master", "Primary IDE Slave... IDE Slave" to configure a hard disk drive, make configuration of cylinders, heads, and sectors per track for the remaining fields on an older system, the BIOS Setup may detect incorrect parameters. Before attempting to make sure you can write the data into or read the data from the installed hard disk...

User Manual
Page 21
... disk > 512 MB under DOS and Windows; Fast Programmed I/O Modes This allows user to set the PIO mode to enhance hard disk performance by the BIOS based on the drive information you entered.
... disk > 512 MB under DOS and Windows; Fast Programmed I/O Modes This allows user to set the PIO mode to enhance hard disk performance by the BIOS based on the drive information you entered.

User Manual
Page 23
... [133MHz (DDR266)], [166MHz (DDR333)]. The memory frequency will detect the inserted memory module(s) and automatically assign appropriate frequency. Appendix: Advanced BIOS Setup This section will let the CPU host frequency of this motherboard determined by the jumper-setting. [Manual]: This allows user to set... pay attention to the specifications of spread spectrum. DRAM Frequency: If set equal or faster than the CPU frequency. 23 Advanced BIOS Setup Menu Main Advanced AMIBIOS SETUP UTILITY - CPU Host Frequency: [Auto]: It is not recommended unless user thoroughly knows the feature...
... [133MHz (DDR266)], [166MHz (DDR333)]. The memory frequency will detect the inserted memory module(s) and automatically assign appropriate frequency. Appendix: Advanced BIOS Setup This section will let the CPU host frequency of this motherboard determined by the jumper-setting. [Manual]: This allows user to set... pay attention to the specifications of spread spectrum. DRAM Frequency: If set equal or faster than the CPU frequency. 23 Advanced BIOS Setup Menu Main Advanced AMIBIOS SETUP UTILITY - CPU Host Frequency: [Auto]: It is not recommended unless user thoroughly knows the feature...

User Manual
Page 27
... combination. Password Check: Select the check point for "Password Check". If [Always] option is selected, the "Password Check" is performed before both boot-up and BIOS setup. 27 Security Setup Menu Main Advanced AMIBIOS SETUP UTILITY - 2. User Password: This field shows the status of the Supervisor Password. [Clear]: No password has... Password Set User Password Clear Clear [ Enter ] [ Enter ] [ Setup Help ] to 6 alphanumeric characters combination. If [Setup] option is selected, the "Password Check" is performed before BIOS setup.
... combination. Password Check: Select the check point for "Password Check". If [Always] option is selected, the "Password Check" is performed before both boot-up and BIOS setup. 27 Security Setup Menu Main Advanced AMIBIOS SETUP UTILITY - 2. User Password: This field shows the status of the Supervisor Password. [Clear]: No password has... Password Set User Password Clear Clear [ Enter ] [ Enter ] [ Setup Help ] to 6 alphanumeric characters combination. If [Setup] option is selected, the "Password Check" is performed before BIOS setup.

User Manual
Page 30
... F10:Save & Exit Exit Saving Changes: After you press , original values will appear. If you press , it will save the current settings and exit the BIOS SETUP Utility. If you press , it will load the default values for all changes are discarded. 30 If you press , you enter the submenu, the... message "Load default settings" will appear. Load Default Settings: After you will exit the BIOS Setup Utility without saving changes" will appear. Exit Menu Main Advanced AMIBIOS SETUP UTILITY - 5.
... F10:Save & Exit Exit Saving Changes: After you press , original values will appear. If you press , it will save the current settings and exit the BIOS SETUP Utility. If you press , it will load the default values for all changes are discarded. 30 If you press , you enter the submenu, the... message "Load default settings" will appear. Load Default Settings: After you will exit the BIOS Setup Utility without saving changes" will appear. Exit Menu Main Advanced AMIBIOS SETUP UTILITY - 5.


