RAID Installation Guide
Page 7
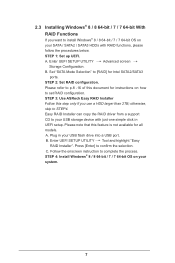
... [RAID] for instructions on your SATA / SATA2 / SATA3 HDDs with just one simple click in your system. 7 STEP 3: Use ASRock Easy RAID Installer Follow this feature is not available for all models A. otherwise, skip to confirm the selection C. Enter UEFI SETUP UTILITY ...Advanced screen Storage Configuration. Plug in UEFI setup. Press [Enter] to STEP4. Please note that this step only if you want to install Windows® 8 / 8 64-bit / 7 / ...
... [RAID] for instructions on your SATA / SATA2 / SATA3 HDDs with just one simple click in your system. 7 STEP 3: Use ASRock Easy RAID Installer Follow this feature is not available for all models A. otherwise, skip to confirm the selection C. Enter UEFI SETUP UTILITY ...Advanced screen Storage Configuration. Plug in UEFI setup. Press [Enter] to STEP4. Please note that this step only if you want to install Windows® 8 / 8 64-bit / 7 / ...

RAID Installation Guide
Page 8
... save your change before setting your system, and press key to [RAID]. or Go to UEFI SETUP UTILITY Boot to [Ultra Fast]. Go to Advanced Storage Configuration and set the option SATA Mode Selection ...
... save your change before setting your system, and press key to [RAID]. or Go to UEFI SETUP UTILITY Boot to [Ultra Fast]. Go to Advanced Storage Configuration and set the option SATA Mode Selection ...

RAID Installation Guide
Page 9
STEP 2: Enter Intel(R) Rapid Storage Technology in Advanced page. STEP 3: Select the option Create RAID Volume and press . 9
STEP 2: Enter Intel(R) Rapid Storage Technology in Advanced page. STEP 3: Select the option Create RAID Volume and press . 9

RAID Installation Guide
Page 10
STEP 4: Key-in a a volume name and press , or simply press to accept the default name. STEP 5: Select your desired RAID Level and press . 10
STEP 4: Key-in a a volume name and press , or simply press to accept the default name. STEP 5: Select your desired RAID Level and press . 10
RAID Installation Guide
Page 11
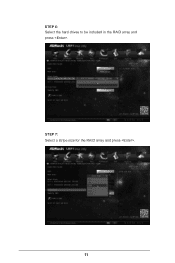
STEP 7: Select a stripe size for the RAID array and press . 11 STEP 6: Select the hard drives to be included in the RAID array and press .
STEP 7: Select a stripe size for the RAID array and press . 11 STEP 6: Select the hard drives to be included in the RAID array and press .
RAID Installation Guide
Page 12
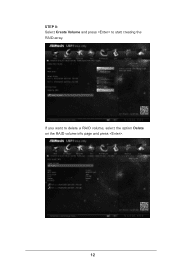
If you want to start creating the RAID array. STEP 8: Select Create Volume and press to delete a RAID volume, select the option Delete on the RAID volume info page and press . 12
If you want to start creating the RAID array. STEP 8: Select Create Volume and press to delete a RAID volume, select the option Delete on the RAID volume info page and press . 12
RAID Installation Guide
Page 13
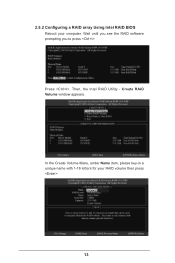
In the Create Volume Menu, under Name item, please key-in a unique name with 1-16 letters for your computer. Create RAID Volume window appears. 2.5.2 Configuring a RAID array Using Intel RAID BIOS Reboot your RAID volume then press . Press . Then, the Intel RAID Utility - Wait until you see the RAID software prompting you to press . Volume0 13
In the Create Volume Menu, under Name item, please key-in a unique name with 1-16 letters for your computer. Create RAID Volume window appears. 2.5.2 Configuring a RAID array Using Intel RAID BIOS Reboot your RAID volume then press . Press . Then, the Intel RAID Utility - Wait until you see the RAID software prompting you to press . Volume0 13
RAID Installation Guide
Page 14
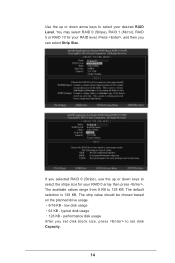
You may select RAID 0 (Stripe), RAID 1 (Mirror), RAID 5 or RAID 10 for your RAID 0 array then press . Use the up or down arrow keys to select your desired RAID Level. Press , and then you set disk block size, press to set disk Capacity. 14 Volume0 Volume0 If you selected RAID 0 (Stripe), use the up...
You may select RAID 0 (Stripe), RAID 1 (Mirror), RAID 5 or RAID 10 for your RAID 0 array then press . Use the up or down arrow keys to select your desired RAID Level. Press , and then you set disk block size, press to set disk Capacity. 14 Volume0 Volume0 If you selected RAID 0 (Stripe), use the up...

RAID Installation Guide
Page 15
Volume0 After setting up Capacity, please press . Volume0 15 The utility prompts a confirmation message as below. Volume0 Press under the Create Volume item.
Volume0 After setting up Capacity, please press . Volume0 15 The utility prompts a confirmation message as below. Volume0 Press under the Create Volume item.

RAID Installation Guide
Page 16
If you install OS. If you want to complete the setup of RAID. Please note that you are only allowed to create one RAID partition at a time under Windows environment to configure RAID functions after you want to create an extra RAID partition, please use the RAID utility under BIOS RAID environment. After the completion, you will see the detailed information about the RAID that you set up. Press to delete a RAID volume, please select the option Delete RAID Volume, press , and then follow the instructions on the screen. 16
If you install OS. If you want to complete the setup of RAID. Please note that you are only allowed to create one RAID partition at a time under Windows environment to configure RAID functions after you want to create an extra RAID partition, please use the RAID utility under BIOS RAID environment. After the completion, you will see the detailed information about the RAID that you set up. Press to delete a RAID volume, please select the option Delete RAID Volume, press , and then follow the instructions on the screen. 16
RAID Installation Guide
Page 18
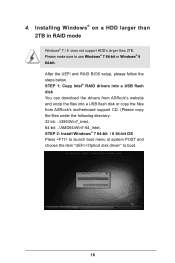
...'s larger than 2TB. After the UEFI and RAID BIOS setup, please follow the steps below. STEP 2: Install Windows® 7 64-bit / 8 64-bit OS Press to launch boot menu at system POST and choose the item "UEFI:" to use Windows® 7 64-bit or Windows® 8 64-bit. Please make... boot. 18 STEP 1: Copy Intel® RAID drivers into a USB flash disk You can download the drivers from ASRock's website and unzip the files into a USB flash disk or copy the files from ASRock's motherboard support CD. (Please copy the files under the following directory: 32 bit: ..\i386\Win7_Intel.. 64-bit: ...
...'s larger than 2TB. After the UEFI and RAID BIOS setup, please follow the steps below. STEP 2: Install Windows® 7 64-bit / 8 64-bit OS Press to launch boot menu at system POST and choose the item "UEFI:" to use Windows® 7 64-bit or Windows® 8 64-bit. Please make... boot. 18 STEP 1: Copy Intel® RAID drivers into a USB flash disk You can download the drivers from ASRock's website and unzip the files into a USB flash disk or copy the files from ASRock's motherboard support CD. (Please copy the files under the following directory: 32 bit: ..\i386\Win7_Intel.. 64-bit: ...

Intel Rapid Storage Guide
Page 12
... the up or down arrow keys to enable RAID in System BIOS Use the instructions included with your motherboard to select the RAID level and press Enter. 4. How to install an operating system onto a RAID volume (F6 install method) In order to install an operating system onto a RAID volume,... volume. 1. Create a RAID Volume Use the following steps to enter the BIOS Setup program after the Power-On-Self-Test (POST) memory test begins. 2. Press Enter to save the BIOS settings and exit the BIOS Setup program. The F6 installation method is not required for Microsoft Windows 7 or Note Microsoft...
... the up or down arrow keys to enable RAID in System BIOS Use the instructions included with your motherboard to select the RAID level and press Enter. 4. How to install an operating system onto a RAID volume (F6 install method) In order to install an operating system onto a RAID volume,... volume. 1. Create a RAID Volume Use the following steps to enter the BIOS Setup program after the Power-On-Self-Test (POST) memory test begins. 2. Press Enter to save the BIOS settings and exit the BIOS Setup program. The F6 installation method is not required for Microsoft Windows 7 or Note Microsoft...
Intel Rapid Storage Guide
Page 13
...controller from the list of Windows setup (during operating system setup: 1. Leave 13 Select the volume size and press Enter. 8. Select 4: Exit and press Enter. 11. Press Enter to scroll through the list as all controllers may not be prompted Note with the Note necessary files. ... SCSI adapters. Setup will happen immediately after pressing F6. Select your controller and continue. You will then be visible. 6. 7. Press F6 when you see a prompt that says, Press F6 if you to load support for mass storage device(s). 2. Press Enter to confirm volume creation. 10. When...
...controller from the list of Windows setup (during operating system setup: 1. Leave 13 Select the volume size and press Enter. 8. Select 4: Exit and press Enter. 11. Press Enter to scroll through the list as all controllers may not be prompted Note with the Note necessary files. ... SCSI adapters. Setup will happen immediately after pressing F6. Select your controller and continue. You will then be visible. 6. 7. Press F6 when you see a prompt that says, Press F6 if you to load support for mass storage device(s). 2. Press Enter to confirm volume creation. 10. When...
Intel Rapid Storage Guide
Page 16
.../RAID mode In order to install an operating system onto a single Serial ATA hard drive when the system is in the status line that says, Press F6 if you can use the F6 installation method to Specify Additional Device. 3. When you see a message in RAID mode or AHCI mode, the ... do not have a floppy drive on Microsoft Windows 7 and Microsoft Windows 8 because Intel provided a RAID driver as part of Windows setup (during text-mode phase). Press F6 when you to load support for mass storage device(s). 2. Note If you do not need to install a third party SCSI or RAID driver. How...
.../RAID mode In order to install an operating system onto a single Serial ATA hard drive when the system is in the status line that says, Press F6 if you can use the F6 installation method to Specify Additional Device. 3. When you see a message in RAID mode or AHCI mode, the ... do not have a floppy drive on Microsoft Windows 7 and Microsoft Windows 8 because Intel provided a RAID driver as part of Windows setup (during text-mode phase). Press F6 when you to load support for mass storage device(s). 2. Note If you do not need to install a third party SCSI or RAID driver. How...
Intel Rapid Storage Guide
Page 17
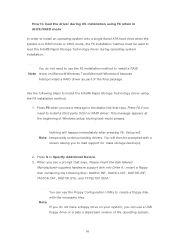
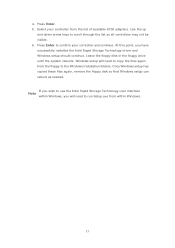
... to copy the files again from within Windows, you will need to run Setup.exe from the floppy to scroll through the list as needed. Press Enter to use the Intel Rapid Storage Technology user interface Note within Windows. 17 Leave the floppy disk in the floppy drive until the system... of available SCSI adapters. If you have successfully installed the Intel Rapid Storage Technology driver and Windows setup should continue. Select your controller and continue. Press Enter. 5. 4.
... to copy the files again from within Windows, you will need to run Setup.exe from the floppy to scroll through the list as needed. Press Enter to use the Intel Rapid Storage Technology user interface Note within Windows. 17 Leave the floppy disk in the floppy drive until the system... of available SCSI adapters. If you have successfully installed the Intel Rapid Storage Technology driver and Windows setup should continue. Select your controller and continue. Press Enter. 5. 4.

User Manual
Page 10
...and add new programs to RAM (S3), hibernation mode (S4) or power off (S5). RealTime Analysis of the device. ASRock APP Charger Simply by pressing or during POST to enter the BIOS setup menu to 40% faster than before on the properties of Your Data: With ...update tool allows you to quickly charge many Apple devices simultaneously and even supports continuous charging when your USB storage devices. ASRock Instant Flash ASRock Instant Flash is ASRock's multi purpose software suite with a new interface, more new features and improved utilities, including XFast RAM, Dehumidifier, Good...
...and add new programs to RAM (S3), hibernation mode (S4) or power off (S5). RealTime Analysis of the device. ASRock APP Charger Simply by pressing or during POST to enter the BIOS setup menu to 40% faster than before on the properties of Your Data: With ...update tool allows you to quickly charge many Apple devices simultaneously and even supports continuous charging when your USB storage devices. ASRock Instant Flash ASRock Instant Flash is ASRock's multi purpose software suite with a new interface, more new features and improved utilities, including XFast RAM, Dehumidifier, Good...

User Manual
Page 28
... the chassis to this header, make sure the wire assignments and the pin assignments are NOT jumpers. PWRBTN (Power Switch): Connect to perform a normal restart. Press the reset switch to restart the computer if the computer freezes and fails to the power switch on the chassis front panel. HDLED (Hard Drive...
... the chassis to this header, make sure the wire assignments and the pin assignments are NOT jumpers. PWRBTN (Power Switch): Connect to perform a normal restart. Press the reset switch to restart the computer if the computer freezes and fails to the power switch on the chassis front panel. HDLED (Hard Drive...

User Manual
Page 37
... your system is already installed under IDE mode, directly changing the SATA mode to AHCI may cause Windows 8/7 to crash while booting. Press Win + R simultaneously in Windows Registry Editor. H87E-ITX/ac 3.3 Intel® Rapid Start Technology Intel® Rapid Start Technology enables your system to avoid loss. 1. Enter into HKEY_LOCAL_MACHINE\SYSTEM\CurrentControlSet\services...
... your system is already installed under IDE mode, directly changing the SATA mode to AHCI may cause Windows 8/7 to crash while booting. Press Win + R simultaneously in Windows Registry Editor. H87E-ITX/ac 3.3 Intel® Rapid Start Technology Intel® Rapid Start Technology enables your system to avoid loss. 1. Enter into HKEY_LOCAL_MACHINE\SYSTEM\CurrentControlSet\services...

User Manual
Page 38
... enter BIOS, then go to Advanced ‐> Storage Configuration and change SATA Mode to save changes and exit. 5. Press F10 to AHCI. Windows will automatically create a hidden partition according to create the partition on Create. The system will discover... the new device and install AHCI drivers automatically. 3.3.2 Setup Guide Configuring Rapid Start Step 1 Run ASRock Rapid Start utility from Start -> All Programs -> ASRock Utility. Exit the Registry Editor window and restart the computer. 4. 3. Enter Windows 8/7. If there are SSD's installed into...
... enter BIOS, then go to Advanced ‐> Storage Configuration and change SATA Mode to save changes and exit. 5. Press F10 to AHCI. Windows will automatically create a hidden partition according to create the partition on Create. The system will discover... the new device and install AHCI drivers automatically. 3.3.2 Setup Guide Configuring Rapid Start Step 1 Run ASRock Rapid Start utility from Start -> All Programs -> ASRock Utility. Exit the Registry Editor window and restart the computer. 4. 3. Enter Windows 8/7. If there are SSD's installed into...

User Manual
Page 42
...® Smart Connect Technology Intel® Smart Connect Technology is a feature that periodically wakes your motherboard supports this feature. • Operating system: Microsoft Windows 8/7 (32- Press Win + R simultaneously in Windows 8/7, type "Regedit" into HKEY_LOCAL_MACHINE\SYSTEM\CurrentControlSet\services\ msahci in AHCI mode, please follow the instructions below. Click on the value Start...
...® Smart Connect Technology Intel® Smart Connect Technology is a feature that periodically wakes your motherboard supports this feature. • Operating system: Microsoft Windows 8/7 (32- Press Win + R simultaneously in Windows 8/7, type "Regedit" into HKEY_LOCAL_MACHINE\SYSTEM\CurrentControlSet\services\ msahci in AHCI mode, please follow the instructions below. Click on the value Start...
