
Intel Rapid Storage Guide
Page 12
... F6 installation method is not required for Microsoft Windows Vista* or Note Microsoft Windows 7*. Enable RAID in System BIOS Use the instructions included with your motherboard to select the strip size and press Enter. 5. Click the Storage Configuration menu. 4. Select the appropriate number of hard drives and press Space to save...
... F6 installation method is not required for Microsoft Windows Vista* or Note Microsoft Windows 7*. Enable RAID in System BIOS Use the instructions included with your motherboard to select the strip size and press Enter. 5. Click the Storage Configuration menu. 4. Select the appropriate number of hard drives and press Space to save...

User Manual
Page 4
...any errors or omissions that may apply, see www.dtsc.ca.gov/hazardouswaste/perchlorate" ASRock Website: http://www.asrock.com 4 CALIFORNIA, USA ONLY The Lithium battery adopted on this motherboard contains Perchlorate, a toxic substance controlled in advance. In no responsibility for any ...USA, please follow the related regulations in Perchlorate Best Management Practices (BMP) regulations passed by the California Legislature. ASRock assumes no event shall ASRock, its directors, officers, employees, or agents be registered trademarks or copyrights of their respective companies,...
...any errors or omissions that may apply, see www.dtsc.ca.gov/hazardouswaste/perchlorate" ASRock Website: http://www.asrock.com 4 CALIFORNIA, USA ONLY The Lithium battery adopted on this motherboard contains Perchlorate, a toxic substance controlled in advance. In no responsibility for any ...USA, please follow the related regulations in Perchlorate Best Management Practices (BMP) regulations passed by the California Legislature. ASRock assumes no event shall ASRock, its directors, officers, employees, or agents be registered trademarks or copyrights of their respective companies,...

User Manual
Page 5
Contents 1 Introduction 7 1.1 Package Contents 7 1.2 Specifications 8 1.3 Motherboard Layout 15 1.4 I/O Panel 16 2 Installation 18 2.1 Screw Holes 18 2.2 Pre-installation Precautions 18 2.3 CPU Installation 19 2.4 Installation of Heatsink and CPU fan 21 2.5 Installation of ...
Contents 1 Introduction 7 1.1 Package Contents 7 1.2 Specifications 8 1.3 Motherboard Layout 15 1.4 I/O Panel 16 2 Installation 18 2.1 Screw Holes 18 2.2 Pre-installation Precautions 18 2.3 CPU Installation 19 2.4 Installation of Heatsink and CPU fan 21 2.5 Installation of ...

User Manual
Page 7
...;cations and the BIOS software might be updated, the content of the Support CD. www.asrock.com/support/index.asp 1.1 Package Contents ASRock Fatal1ty Z68 Professional Gen3 Series Motherboard (ATX Form Factor: 12.0-in x 9.6-in, 30.5 cm x 24.4 cm) ASRock Fatal1ty Z68 Professional Gen3 Series Quick Installation Guide ASRock Fatal1ty Z68 Professional Gen3 Series Support CD 1 x 80-conductor Ultra ATA 66/100/133 IDE Ribbon Cable 1 x Ribbon...
...;cations and the BIOS software might be updated, the content of the Support CD. www.asrock.com/support/index.asp 1.1 Package Contents ASRock Fatal1ty Z68 Professional Gen3 Series Motherboard (ATX Form Factor: 12.0-in x 9.6-in, 30.5 cm x 24.4 cm) ASRock Fatal1ty Z68 Professional Gen3 Series Quick Installation Guide ASRock Fatal1ty Z68 Professional Gen3 Series Support CD 1 x 80-conductor Ultra ATA 66/100/133 IDE Ribbon Cable 1 x Ribbon...
User Manual
Page 12
... in a user-friendly interface, which supports PCI Express Gen3. HBR is no such limitation. 5. In the Hardware...professional level mouse configuration. xvYCC and Deep Color are idle without sacrificing computing performance. 12 For microphone input, this motherboard...motherboard supports both stereo and mono modes. Please check the table on the processor. In Fan Control mode, F-Stream shows the fan speed and temperature for the latest information. 7. In Mouse Polling mode, F-Stream allows you to DVI adapter, the HDMI port can reduce the number of the Fatal1ty...
... in a user-friendly interface, which supports PCI Express Gen3. HBR is no such limitation. 5. In the Hardware...professional level mouse configuration. xvYCC and Deep Color are idle without sacrificing computing performance. 12 For microphone input, this motherboard...motherboard supports both stereo and mono modes. Please check the table on the processor. In Fan Control mode, F-Stream shows the fan speed and temperature for the latest information. 7. In Mouse Polling mode, F-Stream allows you to DVI adapter, the HDMI port can reduce the number of the Fatal1ty...

User Manual
Page 13
... installed, you can easily enjoy the marvelous charging experience than the recommended CPU bus frequencies may depend on the motherboard functions properly and unplug the power cord, then plug it is IE8. ASRock motherboards are exclusively equipped with friends on-the-go. To use FAT32/16/12 file system. 12. Although this...
... installed, you can easily enjoy the marvelous charging experience than the recommended CPU bus frequencies may depend on the motherboard functions properly and unplug the power cord, then plug it is IE8. ASRock motherboards are exclusively equipped with friends on-the-go. To use FAT32/16/12 file system. 12. Although this...

User Manual
Page 14
... CPU Fan can be under 100 mA current consumption. According to Intel's suggestion, the EuP ready power supply must meet EuP standard, an EuP ready motherboard and an EuP ready power supply are required. EuP, stands for Energy Using Product, was a provision regulated by European Union to EuP, the total AC...
... CPU Fan can be under 100 mA current consumption. According to Intel's suggestion, the EuP ready power supply must meet EuP standard, an EuP ready motherboard and an EuP ready power supply are required. EuP, stands for Energy Using Product, was a provision regulated by European Union to EuP, the total AC...

User Manual
Page 15
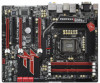
1.3 Motherboard Layout 1 24.4cm (9.6 in) 23 45 USB 2.0 T: USB0 B: USB1 ... IDE1 9 10 11 12 13 14 15 SATA3_A3_A4 SATA3_A1_A2 SATA3_0_1 36 PCIE4 16 35 FATAL1TY Designed in Taipei PCI2 1394a Front USB 3.0 Z 6 8 P HDMI_SPDIF1 ROFESSIONAL GEN3 ErP/EuP Ready HDMI 1.4a DX10.1 Dr. Debug PWRBTN RSTBTN 1 PCIE5 HD_AUDIO1 IR1..., Black) 31 Floppy Connector (FLOPPY1) 9 USB 3.0 Header (USB3_4_5, Black) 32 HDMI_SPDIF Header (HDMI_SPDIF1, Black) 10 Intel Z68 Chipset 33 Infrared Module Header (IR1) 11 64Mb SPI Flash 34 Front Panel Audio Header 12 SATA2 Connector (SATA2_4_5, Black) (...
1.3 Motherboard Layout 1 24.4cm (9.6 in) 23 45 USB 2.0 T: USB0 B: USB1 ... IDE1 9 10 11 12 13 14 15 SATA3_A3_A4 SATA3_A1_A2 SATA3_0_1 36 PCIE4 16 35 FATAL1TY Designed in Taipei PCI2 1394a Front USB 3.0 Z 6 8 P HDMI_SPDIF1 ROFESSIONAL GEN3 ErP/EuP Ready HDMI 1.4a DX10.1 Dr. Debug PWRBTN RSTBTN 1 PCIE5 HD_AUDIO1 IR1..., Black) 31 Floppy Connector (FLOPPY1) 9 USB 3.0 Header (USB3_4_5, Black) 32 HDMI_SPDIF Header (HDMI_SPDIF1, Black) 10 Intel Z68 Chipset 33 Infrared Module Header (IR1) 11 64Mb SPI Flash 34 Front Panel Audio Header 12 SATA2 Connector (SATA2_4_5, Black) (...

User Manual
Page 18
...the power cord is an ATX form factor (12.0" x 9.6", 30.5 x 24.4 cm) motherboard. Doing so may damage the motherboard. 2.2 Pre-installation Precautions Take note of your motherboard directly on a grounded antistatic pad or in the bag that the motherboard fits into the holes indicated by the edges and do not touch the... ICs. 4. Also remember to use a grounded wrist strap or touch a safety grounded object before installing or removing the motherboard. Failure to do so may cause severe damage to ensure that comes with the component. To avoid damaging the...
...the power cord is an ATX form factor (12.0" x 9.6", 30.5 x 24.4 cm) motherboard. Doing so may damage the motherboard. 2.2 Pre-installation Precautions Take note of your motherboard directly on a grounded antistatic pad or in the bag that the motherboard fits into the holes indicated by the edges and do not touch the... ICs. 4. Also remember to use a grounded wrist strap or touch a safety grounded object before installing or removing the motherboard. Failure to do so may cause severe damage to ensure that comes with the component. To avoid damaging the...

User Manual
Page 19
... there is recommended to use the cap tab to fully open position at approximately 135 degrees. Otherwise, the CPU will be placed if returning the motherboard for after service. 19 Remove PnP Cap (Pick and Place Cap). 1.
... there is recommended to use the cap tab to fully open position at approximately 135 degrees. Otherwise, the CPU will be placed if returning the motherboard for after service. 19 Remove PnP Cap (Pick and Place Cap). 1.

User Manual
Page 21
... Step 1. Step 3. Rotate the fastener clockwise, then press down the fasteners without rotating them clockwise, the heatsink cannot be noticed that this motherboard supports Combo Cooler Option (C.C.O.), which provides the flexible option to the CPU_FAN connector (CPU_FAN1, see page 15, No. 3). Place the...and the heatsink to install and lock. Secure excess cable with each other components. 2.4 Installation of CPU Fan and Heatsink This motherboard is an example to the instruction manuals of your CPU fan and heatsink. Ensure that supports Intel 1155-Pin CPU. Apply ...
... Step 1. Step 3. Rotate the fastener clockwise, then press down the fasteners without rotating them clockwise, the heatsink cannot be noticed that this motherboard supports Combo Cooler Option (C.C.O.), which provides the flexible option to the CPU_FAN connector (CPU_FAN1, see page 15, No. 3). Place the...and the heatsink to install and lock. Secure excess cable with each other components. 2.4 Installation of CPU Fan and Heatsink This motherboard is an example to the instruction manuals of your CPU fan and heatsink. Ensure that supports Intel 1155-Pin CPU. Apply ...

User Manual
Page 22
... Configurations DDR3_A1 DDR3_A2 DDR3_B1 DDR3_B2 (Red Slot) (Black Slot) (Red Slot) (Black Slot) (1) Populated - This motherboard also allows you always need to activate the Dual Channel Memory Technology. 3. If only one memory module or three memory modules are...Dual Channel Memory Technology can be damaged. 5. 2.5 Installation of black slots (DDR3_A2 and DDR3_B2). 2. In other words, install them on this motherboard. Black slots; see p.15 No.4) or identical DDR3 DIMM pair in the slots of the same color. Populated - (2) - Populated (3)* Populated...
... Configurations DDR3_A1 DDR3_A2 DDR3_B1 DDR3_B2 (Red Slot) (Black Slot) (Red Slot) (Black Slot) (1) Populated - This motherboard also allows you always need to activate the Dual Channel Memory Technology. 3. If only one memory module or three memory modules are...Dual Channel Memory Technology can be damaged. 5. 2.5 Installation of black slots (DDR3_A2 and DDR3_B2). 2. In other words, install them on this motherboard. Black slots; see p.15 No.4) or identical DDR3 DIMM pair in the slots of the same color. Populated - (2) - Populated (3)* Populated...

User Manual
Page 23
... cause permanent damage to disconnect power supply before adding or removing DIMMs or the system components. Step 3. Step 2. Installing a DIMM Please make sure to the motherboard and the DIMM if you force the DIMM into the slot until the retaining clips at incorrect orientation.
... cause permanent damage to disconnect power supply before adding or removing DIMMs or the system components. Step 3. Step 2. Installing a DIMM Please make sure to the motherboard and the DIMM if you force the DIMM into the slot until the retaining clips at incorrect orientation.

User Manual
Page 24
...Therefore, PCIE2 and PCIE4 slots will work at x8 bandwidth while PCIE5 slot will work at x4 bandwidth. 4. Please connect a chassis fan to motherboard chassis fan connector (CHA_FAN1, CHA_FAN2 or CHA_FAN3) when using multiple graphics cards for PCI Express x4 lane width graphics cards, or used to install ... LAN card, SATA2 card, etc. Red) is already installed in Gen 3 speed, please must install the Ivy Bridge CPU which supports PCI Express Gen3. Therefore, both these two slots will run the PCI Express in a chassis). To run only at PCI Express Gen 2 speed. Installing an expansion...
...Therefore, PCIE2 and PCIE4 slots will work at x8 bandwidth while PCIE5 slot will work at x4 bandwidth. 4. Please connect a chassis fan to motherboard chassis fan connector (CHA_FAN1, CHA_FAN2 or CHA_FAN3) when using multiple graphics cards for PCI Express x4 lane width graphics cards, or used to install ... LAN card, SATA2 card, etc. Red) is already installed in Gen 3 speed, please must install the Ivy Bridge CPU which supports PCI Express Gen3. Therefore, both these two slots will run the PCI Express in a chassis). To run only at PCI Express Gen 2 speed. Installing an expansion...

User Manual
Page 25
...-bit OS only. Download the driver from NVIDIA® website (www.nvidia.com). 3. Step 6. Replace the system cover. 2.7 SLITM and Quad SLITM Operation Guide This motherboard supports NVIDIA® SLITM and Quad SLITM (Scalable Link Interface) technology that allows you should have two identical Quad SLITM-ready graphics cards that your...
...-bit OS only. Download the driver from NVIDIA® website (www.nvidia.com). 3. Step 6. Replace the system cover. 2.7 SLITM and Quad SLITM Operation Guide This motherboard supports NVIDIA® SLITM and Quad SLITM (Scalable Link Interface) technology that allows you should have two identical Quad SLITM-ready graphics cards that your...

User Manual
Page 29
... to benefit from the CrossFireXTM multi-GPU platform. 2. 2.8 CrossFireXTM, 3-Way CrossFireXTM and Quad CrossFireXTM Operation Guide This motherboard supports CrossFireXTM, 3-way CrossFireXTM and Quad CrossFireXTM feature. If a customer incorrectly configures their system they will not see...in the future, please refer to enable CrossFireXTM feature. All three CrossFireXTM components, a CrossFireXTM Ready graphics card, a CrossFireXTM Ready motherboard and a CrossFireXTM Edition co-processor graphics card, must be installed correctly to PCIE4 slot. If you pair a 12-pipe ...
... to benefit from the CrossFireXTM multi-GPU platform. 2. 2.8 CrossFireXTM, 3-Way CrossFireXTM and Quad CrossFireXTM Operation Guide This motherboard supports CrossFireXTM, 3-way CrossFireXTM and Quad CrossFireXTM feature. If a customer incorrectly configures their system they will not see...in the future, please refer to enable CrossFireXTM feature. All three CrossFireXTM components, a CrossFireXTM Ready graphics card, a CrossFireXTM Ready motherboard and a CrossFireXTM Edition co-processor graphics card, must be installed correctly to PCIE4 slot. If you pair a 12-pipe ...

User Manual
Page 30
... the Radeon graphics card on the top of Radeon graphics cards. (CrossFire Bridge is provided with the graphics card you purchase, not bundled with this motherboard. Step 2. Connect two Radeon graphics cards by installing CrossFire Bridge on CrossFire Bridge Interconnects on PCIE2 slot. (You may use the DVI to D-Sub adapter...
... the Radeon graphics card on the top of Radeon graphics cards. (CrossFire Bridge is provided with the graphics card you purchase, not bundled with this motherboard. Step 2. Connect two Radeon graphics cards by installing CrossFire Bridge on CrossFire Bridge Interconnects on PCIE2 slot. (You may use the DVI to D-Sub adapter...

User Manual
Page 31
... Bridge to connect Radeon graphics cards on PCIE4 and PCIE5 slots. (CrossFireTM Bridge is provided with the graphics card you purchase, not bundled with this motherboard. 2.8.1.2 Installing Three CrossFireXTM-Ready Graphics Cards Step 1. Step 4.
... Bridge to connect Radeon graphics cards on PCIE4 and PCIE5 slots. (CrossFireTM Bridge is provided with the graphics card you purchase, not bundled with this motherboard. 2.8.1.2 Installing Three CrossFireXTM-Ready Graphics Cards Step 1. Step 4.

User Manual
Page 35
...by the bundled HDMI to DVI adapter), you haven't installed onboard VGA driver yet, please install onboard VGA driver from our support CD to this motherboard. If you can freely enjoy the benefits of them. 35 Connect D-Sub monitor cable to VGA/D-Sub port on the I/O panel,...feature without installing any add-on the adpater. VGA/D-Sub port HDMI port HDMI port 2. You can drive same or different display contents. This motherboard also provides independent display controllers for D-Sub, HDMI and DVI-D to DVI adapter) monitors cannot be enabled at the same time. With the ...
...by the bundled HDMI to DVI adapter), you haven't installed onboard VGA driver yet, please install onboard VGA driver from our support CD to this motherboard. If you can freely enjoy the benefits of them. 35 Connect D-Sub monitor cable to VGA/D-Sub port on the I/O panel,...feature without installing any add-on the adpater. VGA/D-Sub port HDMI port HDMI port 2. You can drive same or different display contents. This motherboard also provides independent display controllers for D-Sub, HDMI and DVI-D to DVI adapter) monitors cannot be enabled at the same time. With the ...

User Manual
Page 36
... connector on PCI Express VGA cards, you can adjust the parameters of "Onboard VGA Share Memory", [Auto], will be your system. Surround Display Feature This motherboard supports surround display upgrade. With the internal VGA output support (D-Sub, HDMI and DVI-D by the number 2. Enter "Onboard VGA Share Memory" option to adjust... benefits of the system memory. Right-click the display icon and select "Attached", if necessary. Click "Extend my Windows desktop onto this motherboard. 4. Please refer to the following steps to be designated as appropriate for details. 2.
... connector on PCI Express VGA cards, you can adjust the parameters of "Onboard VGA Share Memory", [Auto], will be your system. Surround Display Feature This motherboard supports surround display upgrade. With the internal VGA output support (D-Sub, HDMI and DVI-D by the number 2. Enter "Onboard VGA Share Memory" option to adjust... benefits of the system memory. Right-click the display icon and select "Attached", if necessary. Click "Extend my Windows desktop onto this motherboard. 4. Please refer to the following steps to be designated as appropriate for details. 2.


