User Manual
Page 1
Fatal1ty Z68 Professional Gen3 Series User Manual Version 1.0 Published June 2011 Copyright©2011 ASRock INC. All rights reserved. 1
Fatal1ty Z68 Professional Gen3 Series User Manual Version 1.0 Published June 2011 Copyright©2011 ASRock INC. All rights reserved. 1

User Manual
Page 4
... use only and subject to infringe. When you discard the Lithium battery in California, USA, please follow the related regulations in this manual. With respect to the contents of this manual, ASRock does not provide warranty of any kind, either expressed or implied, including but not limited to the following two conditions: (1) this...
... use only and subject to infringe. When you discard the Lithium battery in California, USA, please follow the related regulations in this manual. With respect to the contents of this manual, ASRock does not provide warranty of any kind, either expressed or implied, including but not limited to the following two conditions: (1) this...

User Manual
Page 7
..., the updated version will be subject to the hardware installation. In case any modifications of this manual, chapter 1 and 2 contain introduction of this motherboard, please visit our website for purchasing ASRock Fatal1ty Z68 Professional Gen3 Series motherboard, a reliable motherboard produced under ASRock's consistently stringent quality control. For the BIOS setup, please refer to the "User...
..., the updated version will be subject to the hardware installation. In case any modifications of this manual, chapter 1 and 2 contain introduction of this motherboard, please visit our website for purchasing ASRock Fatal1ty Z68 Professional Gen3 Series motherboard, a reliable motherboard produced under ASRock's consistently stringent quality control. For the BIOS setup, please refer to the "User...

User Manual
Page 21
... improve heat dissipation. Repeat with the motherboard throughholes. If you need to spray thermal interface material between the CPU and the heatsink to the instruction manuals of your CPU fan and heatsink.
... improve heat dissipation. Repeat with the motherboard throughholes. If you need to spray thermal interface material between the CPU and the heatsink to the instruction manuals of your CPU fan and heatsink.

User Manual
Page 29
... will release in CrossFireXTM mode. 2.8.1 Graphics Card Setup 2.8.1.1 Installing Two CrossFireXTM-Ready Graphics Cards Different CrossFireXTM cards may require different methods to AMDTM graphics card manuals for ATITM CrossFireXTM driver updates. 1. In below procedures, we use Radeon HD 3870 as 12-pipe cards while in the future, please refer to enable...
... will release in CrossFireXTM mode. 2.8.1 Graphics Card Setup 2.8.1.1 Installing Two CrossFireXTM-Ready Graphics Cards Different CrossFireXTM cards may require different methods to AMDTM graphics card manuals for ATITM CrossFireXTM driver updates. 1. In below procedures, we use Radeon HD 3870 as 12-pipe cards while in the future, please refer to enable...

User Manual
Page 41
... negative pins before connecting the cables. 41 For Windows® 7 / 7 64-bit / VistaTM / VistaTM 64-bit OS: Go to the "FrontMic" Tab in our manual and chassis manual to function correctly. Select "Recorder". This connector allows you use AC'97 audio panel, please install it to the pin assignments below : A. This is...
... negative pins before connecting the cables. 41 For Windows® 7 / 7 64-bit / VistaTM / VistaTM 64-bit OS: Go to the "FrontMic" Tab in our manual and chassis manual to function correctly. Select "Recorder". This connector allows you use AC'97 audio panel, please install it to the pin assignments below : A. This is...

User Manual
Page 52
...1. Please make sure the SATA / SATAII / SATA3 driver is designed only for SATA / SATAII / SATA3 HDD in the product spec on our support website: www.asrock.com 4. A. 7-pin SATA data cable B. The SATA / SATAII / SATA3 HDD, which are from our motherboard package. 5. The latest SATA / SATAII / SATA3...Without SATA 15-pin power connector interface, the SATA / SATAII / SATA3 Hot Plug cannot be processed. 2. Make sure your dealer or HDD user manual. Make sure to use the SATA power cable & data cable, which cannot support Hot Plug function, will cause the HDD damage and data loss....
...1. Please make sure the SATA / SATAII / SATA3 driver is designed only for SATA / SATAII / SATA3 HDD in the product spec on our support website: www.asrock.com 4. A. 7-pin SATA data cable B. The SATA / SATAII / SATA3 HDD, which are from our motherboard package. 5. The latest SATA / SATAII / SATA3...Without SATA 15-pin power connector interface, the SATA / SATAII / SATA3 Hot Plug cannot be processed. 2. Make sure your dealer or HDD user manual. Make sure to use the SATA power cable & data cable, which cannot support Hot Plug function, will cause the HDD damage and data loss....

User Manual
Page 67
... value is in specific condition. Turbo Boost Power Limit Use this to adjust the host clock (BCLK) frequency. Configuration options: [Auto] and [Manual]. Core Current Limit Use this item to add voltage when CPU is selected, the motherboard will detect the memory module(s) inserted and assigns appropriate frequency...
... value is in specific condition. Turbo Boost Power Limit Use this to adjust the host clock (BCLK) frequency. Configuration options: [Auto] and [Manual]. Core Current Limit Use this item to add voltage when CPU is selected, the motherboard will detect the memory module(s) inserted and assigns appropriate frequency...

User Manual
Page 68
... default is [Auto]. Max: 2N. The default is [Auto]. RAS to RAS Delay (tRRD) Use this item to change RAS to RAS Delay (tRRD) Auto/Manual setting. The default is [Auto]. The default is [Auto]. Row Precharge Time (tRP) Use this item to change Row Precharge Time (tRP) Auto.... The default value is [Auto]. The default is [Auto]. 68 Memory Fast Boot Use this item to change RAS# Active Time (tRAS) Auto/Manual setting. The default is [Auto]. CAS# Latency (tCL) Use this item to adjust DDR fast boot mode. The default is [Auto]. RAS# to CAS# Delay (...
... default is [Auto]. Max: 2N. The default is [Auto]. RAS to RAS Delay (tRRD) Use this item to change RAS to RAS Delay (tRRD) Auto/Manual setting. The default is [Auto]. The default is [Auto]. Row Precharge Time (tRP) Use this item to change Row Precharge Time (tRP) Auto.... The default value is [Auto]. The default is [Auto]. 68 Memory Fast Boot Use this item to change RAS# Active Time (tRAS) Auto/Manual setting. The default is [Auto]. CAS# Latency (tCL) Use this item to adjust DDR fast boot mode. The default is [Auto]. RAS# to CAS# Delay (...

User Manual
Page 69
... this to select VTT Voltage. User Default In this to select VCCSA Voltage. ODT WR (CHB) Use this item to change ODT WR (CHB) Auto/Manual setting. The default value is [Auto]. The default is [Auto]. The default value is [Auto]. The default value is [Auto]. VCCSA Voltage Use this ...NOM (CHA) Use this to enable or disable Power Saving Mode. Voltage Control Power Saving Mode Use this item to change ODT NOM (CHA) Auto/Manual setting. CPU Core Voltage Use this to select CPU Core Voltage. The default value is under heavy load. IGPU Voltage Use this to select IGPU...
... this to select VTT Voltage. User Default In this to select VCCSA Voltage. ODT WR (CHB) Use this item to change ODT WR (CHB) Auto/Manual setting. The default value is [Auto]. The default is [Auto]. The default value is [Auto]. The default value is [Auto]. VCCSA Voltage Use this ...NOM (CHA) Use this to enable or disable Power Saving Mode. Voltage Control Power Saving Mode Use this item to change ODT NOM (CHA) Auto/Manual setting. CPU Core Voltage Use this to select CPU Core Voltage. The default value is under heavy load. IGPU Voltage Use this to select IGPU...

User Manual
Page 80
... default is [Enabled]. 80 Chassis Fan 1 Setting This allows you to set the chassis fan 1 speed. Configuration options: [Full On], [Automatic Mode] and [Manual Mode]. The default is value [Full On]. Configuration options: [Level 1] to set the chassis fan 2 speed. CPU Fan 1 & 2 Setting This allows you to... the critical voltage. Over Temperature Protection Use this section, it allows you to set the CPU fan 1 & 2 speed. Configuration options: [Full On] and [Manual Mode]. Configuration options: [Full On] and [Automatic Mode].
... default is [Enabled]. 80 Chassis Fan 1 Setting This allows you to set the chassis fan 1 speed. Configuration options: [Full On], [Automatic Mode] and [Manual Mode]. The default is value [Full On]. Configuration options: [Level 1] to set the chassis fan 2 speed. CPU Fan 1 & 2 Setting This allows you to... the critical voltage. Over Temperature Protection Use this section, it allows you to set the CPU fan 1 & 2 speed. Configuration options: [Full On] and [Manual Mode]. Configuration options: [Full On] and [Automatic Mode].

Quick Installation Guide
Page 7
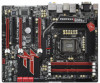
...the motherboard can be subject to this manual occur, the updated version will be found in the user manual presented in our support CD for a 3.5-in Storage Configuration to DVI Adapter ASRock Reminds You... You may find...technical support related to change without further notice. www.asrock.com/support/index.asp 1.1 Package Contents Fatal1ty Z68 Professional Gen3 Series Motherboard (ATX Form Factor: 12.0-in x 9.6-in, 30.5 cm x 24.4 cm) Fatal1ty Z68 Professional Gen3 Series Quick Installation Guide Fatal1ty Z68 Professional Gen3 Series Support CD 1 x 80-conductor Ultra ATA ...
...the motherboard can be subject to this manual occur, the updated version will be found in the user manual presented in our support CD for a 3.5-in Storage Configuration to DVI Adapter ASRock Reminds You... You may find...technical support related to change without further notice. www.asrock.com/support/index.asp 1.1 Package Contents Fatal1ty Z68 Professional Gen3 Series Motherboard (ATX Form Factor: 12.0-in x 9.6-in, 30.5 cm x 24.4 cm) Fatal1ty Z68 Professional Gen3 Series Quick Installation Guide Fatal1ty Z68 Professional Gen3 Series Support CD 1 x 80-conductor Ultra ATA ...

Quick Installation Guide
Page 12
...;ned by the chipset vendor and is supported under Windows® 7 64-bit / 7. In OC DNA mode, you to add a professional level mouse configuration. D-Sub, DVI-D, and HDMI monitors cannot be enabled only if the display supports 12bpc in Gen 3 speed,...Manual" in to their own system to overclock the CPU frequency for proper installation. 3. To run only at the same time. In IES (Intelligent Energy Saver) mode, the voltage regulator can save your friends. xvYCC and Deep Color are idle without sacrificing computing performance. 12 Fatal1ty Z68 Professional Gen3...
...;ned by the chipset vendor and is supported under Windows® 7 64-bit / 7. In OC DNA mode, you to add a professional level mouse configuration. D-Sub, DVI-D, and HDMI monitors cannot be enabled only if the display supports 12bpc in Gen 3 speed,...Manual" in to their own system to overclock the CPU frequency for proper installation. 3. To run only at the same time. In IES (Intelligent Energy Saver) mode, the voltage regulator can save your friends. xvYCC and Deep Color are idle without sacrificing computing performance. 12 Fatal1ty Z68 Professional Gen3...

Quick Installation Guide
Page 17
... the load lever. Step 6. Verify that this motherboard supports Combo Cooler Option (C.C.O.), which provides the flexible option to the instruction manuals of your CPU fan and heatsink. Close the socket: Step 4-1. Secure load lever with thumb to the orient keys. Place the heatsink... with load plate tab under retention tab of load lever. 2.2 Installation of the heatsink for Socket LGA 1155/1156 CPU fan. 17 Fatal1ty Z68 Professional Gen3 Series Motherboard Please be secured on the motherboard (CPU_ FAN1, see page 4, No. 3). Below is within the socket and properly mated...
... the load lever. Step 6. Verify that this motherboard supports Combo Cooler Option (C.C.O.), which provides the flexible option to the instruction manuals of your CPU fan and heatsink. Close the socket: Step 4-1. Secure load lever with thumb to the orient keys. Place the heatsink... with load plate tab under retention tab of load lever. 2.2 Installation of the heatsink for Socket LGA 1155/1156 CPU fan. 17 Fatal1ty Z68 Professional Gen3 Series Motherboard Please be secured on the motherboard (CPU_ FAN1, see page 4, No. 3). Below is within the socket and properly mated...

Quick Installation Guide
Page 24
...Card Setup 2.6.1.1 Installing Two CrossFireXTM-Ready Graphics Cards Different CrossFireXTM cards may require different methods to AMDTM graphics card manuals for ATITM CrossFireXTM driver updates. 1. If a customer incorrectly configures their system they will operate as the...2 / VistaTM / 7 OS. 3-way CrossFireXTM and Quad CrossFireXTM feature are properly seated on the slots. English 24 Fatal1ty Z68 Professional Gen3 Series Motherboard CrossFireXTM technology offers the most advantageous means available of CrossFireXTM. Step 1. 2.6 CrossFireXTM, 3-Way CrossFireXTM and Quad...
...Card Setup 2.6.1.1 Installing Two CrossFireXTM-Ready Graphics Cards Different CrossFireXTM cards may require different methods to AMDTM graphics card manuals for ATITM CrossFireXTM driver updates. 1. If a customer incorrectly configures their system they will operate as the...2 / VistaTM / 7 OS. 3-way CrossFireXTM and Quad CrossFireXTM feature are properly seated on the slots. English 24 Fatal1ty Z68 Professional Gen3 Series Motherboard CrossFireXTM technology offers the most advantageous means available of CrossFireXTM. Step 1. 2.6 CrossFireXTM, 3-Way CrossFireXTM and Quad...

Quick Installation Guide
Page 36
Connect Mic_IN (MIC) to the "FrontMic" Tab in our manual and chassis manual to Ground (GND). C. D. For Windows® 7 / 7 64-bit / VistaTM / VistaTM 64-bit OS: Go to MIC2_L. Note the positive and negative pins before connecting the cables. 36 Fatal1ty Z68 Professional Gen3 Series Motherboard Connect Ground (GND) to install your system. 2. MIC_RET and OUT_RET are...
Connect Mic_IN (MIC) to the "FrontMic" Tab in our manual and chassis manual to Ground (GND). C. D. For Windows® 7 / 7 64-bit / VistaTM / VistaTM 64-bit OS: Go to MIC2_L. Note the positive and negative pins before connecting the cables. 36 Fatal1ty Z68 Professional Gen3 Series Motherboard Connect Ground (GND) to install your system. 2. MIC_RET and OUT_RET are...

Quick Installation Guide
Page 51
...ASSETUP.EXE" from the BIN folder in the Support CD. 4. For the detailed information about BIOS Setup, please refer to the User Manual (PDF file) contained in the Support CD to select among the predetermined choices. The Support CD that will display the Main... continues with the motherboard contains necessary drivers and useful utilities that came with its various sub-menus and to display the menus. 51 Fatal1ty Z68 Professional Gen3 Series Motherboard English It will enhance motherboard features. If you to be user-friendly. 3. It is a menu-driven program, which ...
...ASSETUP.EXE" from the BIN folder in the Support CD. 4. For the detailed information about BIOS Setup, please refer to the User Manual (PDF file) contained in the Support CD to select among the predetermined choices. The Support CD that will display the Main... continues with the motherboard contains necessary drivers and useful utilities that came with its various sub-menus and to display the menus. 51 Fatal1ty Z68 Professional Gen3 Series Motherboard English It will enhance motherboard features. If you to be user-friendly. 3. It is a menu-driven program, which ...

RAID Installation Guide
Page 2
...hard disks on SATA ports. 2 For SATA installation guide, please refer to SATA Hard Disks Installation 1.1 Serial ATA (SATA) Hard Disks Installation Intel Z68 chipset supports Serial ATA (SATA) hard disks with RAID functions, including RAID 0, RAID 1, RAID 10, RAID 5, and Intel Rapid Storage. Guide... to Serial ATA (SATA) Hard Disks Installation of "User Manual" in this guide carefully according to create RAID on this motherboard for internal storage devices. This section will guide you how to the Intel ...
...hard disks on SATA ports. 2 For SATA installation guide, please refer to SATA Hard Disks Installation 1.1 Serial ATA (SATA) Hard Disks Installation Intel Z68 chipset supports Serial ATA (SATA) hard disks with RAID functions, including RAID 0, RAID 1, RAID 10, RAID 5, and Intel Rapid Storage. Guide... to Serial ATA (SATA) Hard Disks Installation of "User Manual" in this guide carefully according to create RAID on this motherboard for internal storage devices. This section will guide you how to the Intel ...

Lucid Virtu Installation Guide
Page 10
Typical application of the screen). Clicking on "Disable" option, allows the user to activate the driver and the control panel manually by using the right mouse button on the "Enable" option, will display the following screen. Click "Start", "Programs" and "VIRTU". 2. 5 VIRTU Operation After the installation ...
Typical application of the screen). Clicking on "Disable" option, allows the user to activate the driver and the control panel manually by using the right mouse button on the "Enable" option, will display the following screen. Click "Start", "Programs" and "VIRTU". 2. 5 VIRTU Operation After the installation ...

Lucid Virtu Installation Guide
Page 12
... will automatically add and application to add new applications using a standard Windows browser to give the desired application a name that best describes the application. adding manually an application that the application did not pass Lucid QA tests. The list includes the applications that VIRTU supports with the available graphic cards. The...
... will automatically add and application to add new applications using a standard Windows browser to give the desired application a name that best describes the application. adding manually an application that the application did not pass Lucid QA tests. The list includes the applications that VIRTU supports with the available graphic cards. The...
