
User Manual
Page 2
...device may not be constructed as a commitment by ASRock. Disclaimer: Specifications and information contained in this documentation. With respect to infringe. CALIFORNIA, USA ONLY The Lithium battery adopted on this motherboard contains Perchlorate, a toxic substance controlled in this documentation... or consequential damages (including damages for any means, except duplication of any defect or error in advance. ASRock assumes no event shall ASRock, its directors, officers, employees, or agents be reproduced, transcribed, transmitted, or translated in any interference received...
...device may not be constructed as a commitment by ASRock. Disclaimer: Specifications and information contained in this documentation. With respect to infringe. CALIFORNIA, USA ONLY The Lithium battery adopted on this motherboard contains Perchlorate, a toxic substance controlled in this documentation... or consequential damages (including damages for any means, except duplication of any defect or error in advance. ASRock assumes no event shall ASRock, its directors, officers, employees, or agents be reproduced, transcribed, transmitted, or translated in any interference received...
User Manual
Page 3
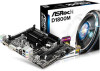
Contents Chapter 1 Introduction 1 1.1 Package Contents 1 1.2 Specifications 2 1.3 Motherboard Layout 5 1.4 I/O Panel 7 Chapter 2 Installation 8 2.1 Installing Memory Modules (DIMM) 9 2.2 Expansion Slots (PCI Express Slots) 11 2.3 Jumpers Setup 12 2.4 Onboard Headers and Connectors 13 Chapter 3 Software and Utilities Operation 17 3.1 Installing Drivers 17 3.2 A-Tuning 18 3.3 Intel® Smart Connect Technology 20 3.4 ASRock Cloud 25 3.5 Start8 35 Chapter 4 UEFI...
Contents Chapter 1 Introduction 1 1.1 Package Contents 1 1.2 Specifications 2 1.3 Motherboard Layout 5 1.4 I/O Panel 7 Chapter 2 Installation 8 2.1 Installing Memory Modules (DIMM) 9 2.2 Expansion Slots (PCI Express Slots) 11 2.3 Jumpers Setup 12 2.4 Onboard Headers and Connectors 13 Chapter 3 Software and Utilities Operation 17 3.1 Installing Drivers 17 3.2 A-Tuning 18 3.3 Intel® Smart Connect Technology 20 3.4 ASRock Cloud 25 3.5 Start8 35 Chapter 4 UEFI...
User Manual
Page 5
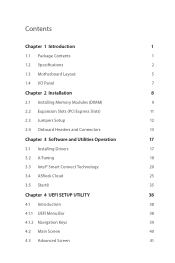
Chapter 3 contains the operation guide of the BIOS setup. If you are using. ASRock website http://www.asrock.com. 1.1 Package Contents • ASRock Q1900M / D1800M Motherboard (Micro ATX Form Factor) • ASRock Q1900M / D1800M Quick Installation Guide • ASRock Q1900M / D1800M Support CD • 2 x Serial ATA (SATA) Data Cables (Optional) • 1 x I/O Panel Shield 1 English In case any modifications of this...
Chapter 3 contains the operation guide of the BIOS setup. If you are using. ASRock website http://www.asrock.com. 1.1 Package Contents • ASRock Q1900M / D1800M Motherboard (Micro ATX Form Factor) • ASRock Q1900M / D1800M Quick Installation Guide • ASRock Q1900M / D1800M Support CD • 2 x Serial ATA (SATA) Data Cables (Optional) • 1 x I/O Panel Shield 1 English In case any modifications of this...

User Manual
Page 9
1.3 Motherboard Layout Q1900M / D1800M PS2 Mouse PS2 Keyboard CPU_FAN1 64Mb BIOS DDR3_A1 (64 bit, 240-pin module) VGA1 AT X P W R 1 DDR3_B1 (64 bit, 240-pin module) DVI1 USB 2.0: USB0 USB 3.0: USB1 Top: LINE IN Center: FRONT Bottom: MIC IN USB 2.0 T: USB2 B: USB3 HDMI1 Top: RJ-45 LAN USB 3.0 RoHS PCIE1 CMOS Battery AUDIO CODEC Super I/O HD_AUDIO1 CI1 1 TPMS1 1 1 PCIE3 LPT1 1 PCIE2 COM1 1 USB4_5 CLRCMOS1 1 USB6 1 1 SATA2_1 SATA2_2 SPEAKER1 1 PANEL1 PLED PWRBTN 1 HDLED RESET English 5
1.3 Motherboard Layout Q1900M / D1800M PS2 Mouse PS2 Keyboard CPU_FAN1 64Mb BIOS DDR3_A1 (64 bit, 240-pin module) VGA1 AT X P W R 1 DDR3_B1 (64 bit, 240-pin module) DVI1 USB 2.0: USB0 USB 3.0: USB1 Top: LINE IN Center: FRONT Bottom: MIC IN USB 2.0 T: USB2 B: USB3 HDMI1 Top: RJ-45 LAN USB 3.0 RoHS PCIE1 CMOS Battery AUDIO CODEC Super I/O HD_AUDIO1 CI1 1 TPMS1 1 1 PCIE3 LPT1 1 PCIE2 COM1 1 USB4_5 CLRCMOS1 1 USB6 1 1 SATA2_1 SATA2_2 SPEAKER1 1 PANEL1 PLED PWRBTN 1 HDLED RESET English 5
User Manual
Page 12
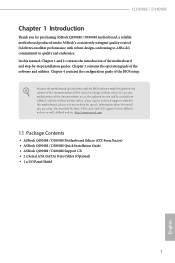
..., place them on a carpet. Doing so may cause physical injuries to you and damages to motherboard components. • In order to avoid damage from static electricity to the motherboard's components, NEVER place your chassis to ensure that comes with the components. • When placing...do not overtighten the screws! Failure to the chassis, please do so may damage the motherboard. 8 English Also remember to unplug the power cord before installing or removing the motherboard. Pre-installation Precautions Take note of the following precautions before you handle the components. &#...
..., place them on a carpet. Doing so may cause physical injuries to you and damages to motherboard components. • In order to avoid damage from static electricity to the motherboard's components, NEVER place your chassis to ensure that comes with the components. • When placing...do not overtighten the screws! Failure to the chassis, please do so may damage the motherboard. 8 English Also remember to unplug the power cord before installing or removing the motherboard. Pre-installation Precautions Take note of the following precautions before you handle the components. &#...
User Manual
Page 13
It is installed, please install it into a DDR3/DDR3L slot; It will cause permanent damage to install a DDR or DDR2 memory module into DDR3_A1. otherwise, this motherboard and DIMM may be damaged. The DIMM only fits in one DIMM module is not allowed to the motherboard and the DIMM if you force the DIMM into the slot at incorrect orientation. 9 English Q1900M / D1800M 2.1 Installing Memory Modules (DIMM) This motherboard provides two 240-pin DDR3/DDR3L (Double Data Rate 3) DIMM slots. If only one correct orientation.
It is installed, please install it into a DDR3/DDR3L slot; It will cause permanent damage to install a DDR or DDR2 memory module into DDR3_A1. otherwise, this motherboard and DIMM may be damaged. The DIMM only fits in one DIMM module is not allowed to the motherboard and the DIMM if you force the DIMM into the slot at incorrect orientation. 9 English Q1900M / D1800M 2.1 Installing Memory Modules (DIMM) This motherboard provides two 240-pin DDR3/DDR3L (Double Data Rate 3) DIMM slots. If only one correct orientation.

User Manual
Page 15
... power supply is switched off or the power cord is used for PCI Express x1 lane width cards. Q1900M / D1800M 2.2 Expansion Slots (PCI Express Slots) There are 3 PCI Express slots on the motherboard. PCIE2 (PCIe 2.0 x16 slot) is used for PCI Express x1 lane width cards. PCIE3 (PCIe 2.0 x1 slot) is used...
... power supply is switched off or the power cord is used for PCI Express x1 lane width cards. Q1900M / D1800M 2.2 Expansion Slots (PCI Express Slots) There are 3 PCI Express slots on the motherboard. PCIE2 (PCIe 2.0 x16 slot) is used for PCI Express x1 lane width cards. PCIE3 (PCIe 2.0 x1 slot) is used...
User Manual
Page 17
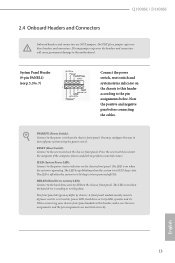
Q1900M / D1800M 2.4 Onboard Headers and Connectors Onboard headers and connectors are matched correctly. PWRBTN (Power Switch): Connect to the reset switch on the chassis front panel. RESET (... cause permanent damage to the power status indicator on the chassis front panel. You may differ by chassis. PLED (System Power LED): Connect to the motherboard. HDLED (Hard Drive Activity LED): Connect to this header, make sure the wire assignments and the pin assignments are NOT jumpers. The LED keeps blinking...
Q1900M / D1800M 2.4 Onboard Headers and Connectors Onboard headers and connectors are matched correctly. PWRBTN (Power Switch): Connect to the reset switch on the chassis front panel. RESET (... cause permanent damage to the power status indicator on the chassis front panel. You may differ by chassis. PLED (System Power LED): Connect to the motherboard. HDLED (Hard Drive Activity LED): Connect to this header, make sure the wire assignments and the pin assignments are NOT jumpers. The LED keeps blinking...

User Manual
Page 18
... wire on the I/O panel, there are for internal storage devices with up to 3.0 Gb/s data transfer rate. MIC_RET and OUT_RET are two headers on this motherboard. (4-pin USB6) (see p.5, No. 10) Front Panel Audio Header (9-pin HD_AUDIO1) (see p.5, No. 11) SATA2_1 SATA2_2 These two SATA2 connectors support SATA data cables for...
... wire on the I/O panel, there are for internal storage devices with up to 3.0 Gb/s data transfer rate. MIC_RET and OUT_RET are two headers on this motherboard. (4-pin USB6) (see p.5, No. 10) Front Panel Audio Header (9-pin HD_AUDIO1) (see p.5, No. 11) SATA2_1 SATA2_2 These two SATA2 connectors support SATA data cables for...
User Manual
Page 19
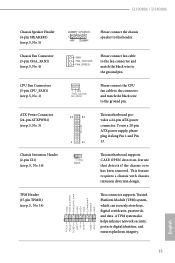
...keys, digital certificates, passwords, and data. TPM Header (17-pin TPMS1) (see p.5, No. 16) 1 13 This motherboard provides a 24-pin ATX power connector. Q1900M / D1800M Chassis Speaker Header (4-pin SPEAKER1) (see p.5, No. 4) GND FAN_VOLTAGE FAN_SPEED Please connect fan cable to the fan connector and...No. 1) GND FAN_VOLTAGE FAN_SPEED Please connect the CPU fan cable to the connector and match the black wire to this header. This motherboard supports CASE OPEN detection feature that detects if the chassis cove has been removed. A TPM system also helps enhance network security, ...
...keys, digital certificates, passwords, and data. TPM Header (17-pin TPMS1) (see p.5, No. 16) 1 13 This motherboard provides a 24-pin ATX power connector. Q1900M / D1800M Chassis Speaker Header (4-pin SPEAKER1) (see p.5, No. 4) GND FAN_VOLTAGE FAN_SPEED Please connect fan cable to the fan connector and...No. 1) GND FAN_VOLTAGE FAN_SPEED Please connect the CPU fan cable to the connector and match the black wire to this header. This motherboard supports CASE OPEN detection feature that detects if the chassis cove has been removed. A TPM system also helps enhance network security, ...
User Manual
Page 21
...Therefore, the drivers you install can work properly. Utilities Menu The Utilities Menu shows the application software that enhance the motherboard's features. Click on the support CD driver page. To improve Windows 7 compatibility, please download and install the following... from top to bottom to display the menu. Q1900M / D1800M Chapter 3 Software and Utilities Operation 3.1 Installing Drivers The Support CD that comes with the motherboard contains necessary drivers and useful utilities that the motherboard supports. Please click Install All or follow the installation wizard ...
...Therefore, the drivers you install can work properly. Utilities Menu The Utilities Menu shows the application software that enhance the motherboard's features. Click on the support CD driver page. To improve Windows 7 compatibility, please download and install the following... from top to bottom to display the menu. Q1900M / D1800M Chapter 3 Software and Utilities Operation 3.1 Installing Drivers The Support CD that comes with the motherboard contains necessary drivers and useful utilities that the motherboard supports. Please click Install All or follow the installation wizard ...
User Manual
Page 24
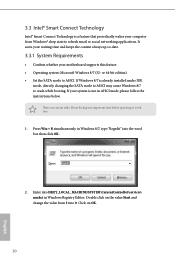
... crash while booting. Click on the value Start and change the value from Windows® sleep state to -date. 3.3.1 System Requirements • Confirm whether your motherboard supports this feature. • Operating system: Microsoft Windows 8/7 (32- Press Win + R simultaneously in Windows Registry Editor. Enter into HKEY_LOCAL_MACHINE\SYSTEM\CurrentControlSet\services\ msahci in Windows...
... crash while booting. Click on the value Start and change the value from Windows® sleep state to -date. 3.3.1 System Requirements • Confirm whether your motherboard supports this feature. • Operating system: Microsoft Windows 8/7 (32- Press Win + R simultaneously in Windows Registry Editor. Enter into HKEY_LOCAL_MACHINE\SYSTEM\CurrentControlSet\services\ msahci in Windows...

User Manual
Page 29
...any other preferred remote desktop application. This motherboard supports Wake-On-WAN with the onboard Realtek® LAN, so you emergently needed certain files in off , monitor and take control of reach? Q1900M / D1800M 3.4 ASRock Cloud ASRock partners with Kloudian to make your mobile ...devices connect to your PC from anywhere in the world. For ASRock motherboards with another smartphone, tablet or computer. 25 English Have you ever been...
...any other preferred remote desktop application. This motherboard supports Wake-On-WAN with the onboard Realtek® LAN, so you emergently needed certain files in off , monitor and take control of reach? Q1900M / D1800M 3.4 ASRock Cloud ASRock partners with Kloudian to make your mobile ...devices connect to your PC from anywhere in the world. For ASRock motherboards with another smartphone, tablet or computer. 25 English Have you ever been...

User Manual
Page 33
Q1900M / D1800M REMOTE ACCESS FROM A CLIENT DEVICE The lastest version of the LAN ports to use the Remote Wake-Up function. If you use the Remote Desktop ... portal login page: http://orbweb.me Step 2 Log in with dual LAN ports, please disable one of Java is required to be installed to use a motherboard with your host computer to Connect / Gray Online / Blue Wakable / Red 29 Step 3 Find the host computer from a client device. For Windows PC users: Step...
Q1900M / D1800M REMOTE ACCESS FROM A CLIENT DEVICE The lastest version of the LAN ports to use the Remote Wake-Up function. If you use the Remote Desktop ... portal login page: http://orbweb.me Step 2 Log in with dual LAN ports, please disable one of Java is required to be installed to use a motherboard with your host computer to Connect / Gray Online / Blue Wakable / Red 29 Step 3 Find the host computer from a client device. For Windows PC users: Step...

User Manual
Page 59
... Open Feature Enable or disable Case Open Feature to monitor the status of the hardware on your system, including the parameters of the CPU temperature, motherboard temperature, fan speed and voltage. CPU Fan 1 Setting Select a fan mode for CPU Fans 1, or choose Customize to set 5 CPU temperatures and assign a respective fan...
... Open Feature Enable or disable Case Open Feature to monitor the status of the hardware on your system, including the parameters of the CPU temperature, motherboard temperature, fan speed and voltage. CPU Fan 1 Setting Select a fan mode for CPU Fans 1, or choose Customize to set 5 CPU temperatures and assign a respective fan...

