
User Manual
Page 18
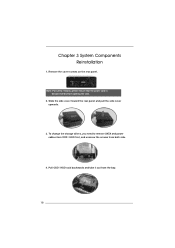
Chapter 3 System Components Reinstallation 1. Slide the side cover toward the rear panel and pull the side cover upwards. 3. Note: For safety reasons, please ensure that the power cord is disconnected before opening the case. 2. To change the storage drives, you need to remove SATA and power cables from ODD / HDD first, and unscrew the screws from the bay. 18 Remove the cover screws on the rear panel. Pull ODD / HDD rack backwards and take it out from both side. 4.
Chapter 3 System Components Reinstallation 1. Slide the side cover toward the rear panel and pull the side cover upwards. 3. Note: For safety reasons, please ensure that the power cord is disconnected before opening the case. 2. To change the storage drives, you need to remove SATA and power cables from ODD / HDD first, and unscrew the screws from the bay. 18 Remove the cover screws on the rear panel. Pull ODD / HDD rack backwards and take it out from both side. 4.

User Manual
Page 19
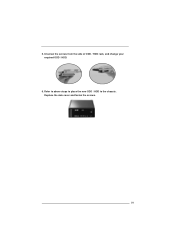
Unscrew the screws from the side of ODD / HDD rack, and change your required ODD / HDD. 6. Refer to above steps to place the new ODD / HDD to the chassis. Replace the side cover and fasten the screws. 19 5.
Unscrew the screws from the side of ODD / HDD rack, and change your required ODD / HDD. 6. Refer to above steps to place the new ODD / HDD to the chassis. Replace the side cover and fasten the screws. 19 5.
User Manual
Page 20
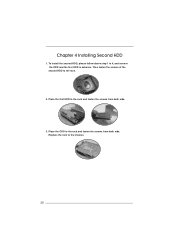
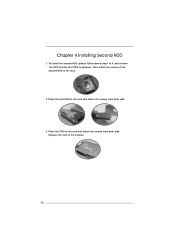
Chapter 4 Installing Second HDD 1. Then fasten the screws of the second HDD to 4, and remove the ODD and the first HDD in advance. To install the second HDD, please follow above step 1 to the rack. 2. Replace the rack to the rack and fasten the screws from both side. Place the first HDD to the rack and fasten the screws from both side. 3. Place the ODD to the chassis. 20
Chapter 4 Installing Second HDD 1. Then fasten the screws of the second HDD to 4, and remove the ODD and the first HDD in advance. To install the second HDD, please follow above step 1 to the rack. 2. Replace the rack to the rack and fasten the screws from both side. Place the first HDD to the rack and fasten the screws from both side. 3. Place the ODD to the chassis. 20

User Manual (CoreHT Server Series)
Page 18
Pull ODD / HDD rack backwards and take it out from both side. 4. Chapter 3 System Components Reinstallation 1. To change the storage drives, you need to remove SATA and power cables from ODD / HDD first, and unscrew the screws from the bay. 18 Note: For safety reasons, please ensure that the power cord is disconnected before opening the case. 2. Slide the side cover toward the rear panel and pull the side cover upwards. 3. Remove the cover screws on the rear panel.
Pull ODD / HDD rack backwards and take it out from both side. 4. Chapter 3 System Components Reinstallation 1. To change the storage drives, you need to remove SATA and power cables from ODD / HDD first, and unscrew the screws from the bay. 18 Note: For safety reasons, please ensure that the power cord is disconnected before opening the case. 2. Slide the side cover toward the rear panel and pull the side cover upwards. 3. Remove the cover screws on the rear panel.
User Manual (CoreHT Server Series)
Page 19
Refer to above steps to place the new ODD / HDD to the chassis. Unscrew the screws from the side of ODD / HDD rack, and change your required ODD / HDD. 6. Replace the side cover and fasten the screws. 19 5.
Refer to above steps to place the new ODD / HDD to the chassis. Unscrew the screws from the side of ODD / HDD rack, and change your required ODD / HDD. 6. Replace the side cover and fasten the screws. 19 5.
User Manual (CoreHT Server Series)
Page 20
Then fasten the screws of the second HDD to the chassis. 20 Place the first HDD to the rack and fasten the screws from both side. 3. Place the ODD to 4, and remove the ODD and the first HDD in advance. Replace the rack to the rack. 2. To install the second HDD, please follow above step 1 to the rack and fasten the screws from both side. Chapter 4 Installing Second HDD 1.
Then fasten the screws of the second HDD to the chassis. 20 Place the first HDD to the rack and fasten the screws from both side. 3. Place the ODD to 4, and remove the ODD and the first HDD in advance. Replace the rack to the rack. 2. To install the second HDD, please follow above step 1 to the rack and fasten the screws from both side. Chapter 4 Installing Second HDD 1.