
Intel Rapid Storage Guide
Page 12
... install an operating system onto a RAID volume, the RAID option must be used to load the Intel® Rapid Storage Technology driver during POST, press Ctrl and i at the same time to enter the option ROM user interface. 2. Click F2 or Delete to save the BIOS settings and exit the BIOS Setup program. Switch the SATA Operation Mode option to select the physical disks. 6. Press Enter to RAID. 5. Enetr the Advanced menu. 3. When the Intel Rapid Storage Technology option ROM...
... install an operating system onto a RAID volume, the RAID option must be used to load the Intel® Rapid Storage Technology driver during POST, press Ctrl and i at the same time to enter the option ROM user interface. 2. Click F2 or Delete to save the BIOS settings and exit the BIOS Setup program. Switch the SATA Operation Mode option to select the physical disks. 6. Press Enter to RAID. 5. Enetr the Advanced menu. 3. When the Intel Rapid Storage Technology option ROM...
Intel Rapid Storage Guide
Page 13
...-supplied hardware support disk into Drive A:, insert ;a floppy disk containing the following steps to load support for mass storage device(s). 2. Use the up and down arrow keys to create the volume. 9. Nothing will temporarily continue loading drivers. At this point, you to install the Intel Rapid Storage Technology driver during text-mode phase). 7. Press Enter to scroll through the list as all controllers may not be prompted Note with the Note necessary files...
...-supplied hardware support disk into Drive A:, insert ;a floppy disk containing the following steps to load support for mass storage device(s). 2. Use the up and down arrow keys to create the volume. 9. Nothing will temporarily continue loading drivers. At this point, you to install the Intel Rapid Storage Technology driver during text-mode phase). 7. Press Enter to scroll through the list as all controllers may not be prompted Note with the Note necessary files...

Intel Rapid Storage Guide
Page 16
...-supplied hardware support disk into Drive A:, insert a floppy disk containing the following steps to install the Intel® Rapid Storage Technology driver using F6 when in AHCI/RAID mode In order to install an operating system onto a single Serial ATA hard drive when the system is in RAID mode or AHCI mode, the F6 installation method must be prompted with the necessary files. Press S to install a RAID Note driver on your system, you can use a USB floppy drive or create a slipstream version...
...-supplied hardware support disk into Drive A:, insert a floppy disk containing the following steps to install the Intel® Rapid Storage Technology driver using F6 when in AHCI/RAID mode In order to install an operating system onto a single Serial ATA hard drive when the system is in RAID mode or AHCI mode, the F6 installation method must be prompted with the necessary files. Press S to install a RAID Note driver on your system, you can use a USB floppy drive or create a slipstream version...

RAID Installation Guide
Page 1
... 2.3 Installing Windows® 10 64-bit With RAID Functions..7 2.4 Configuring a RAID array 8 2.4.1 Configuring a RAID array Using UEFI Setup Utility....... 9 2.4.2 Configuring a PCIE SSD RAID Array Using UEFI Setup Utility 13 2.4.3 Configuring a RAID array Using Intel RAID BIOS....... 18 3. Installing Windows® on a HDD under 2TB in RAID mode 23 1 Installing Windows® on a HDD larger than 2TB in RAID mode 22 4. Guide to SATA Hard Disks Installation 2 1.1 Serial ATA (SATA) Hard Disks Installation 2 2. Guide to SATA Hard Disks Installation and RAID Configuration 1.
... 2.3 Installing Windows® 10 64-bit With RAID Functions..7 2.4 Configuring a RAID array 8 2.4.1 Configuring a RAID array Using UEFI Setup Utility....... 9 2.4.2 Configuring a PCIE SSD RAID Array Using UEFI Setup Utility 13 2.4.3 Configuring a RAID array Using Intel RAID BIOS....... 18 3. Installing Windows® on a HDD under 2TB in RAID mode 23 1 Installing Windows® on a HDD larger than 2TB in RAID mode 22 4. Guide to SATA Hard Disks Installation 2 1.1 Serial ATA (SATA) Hard Disks Installation 2 2. Guide to SATA Hard Disks Installation and RAID Configuration 1.

RAID Installation Guide
Page 7
...-bit With RAID Functions If you want to install Windows® 10 64-bit OS on your SATA / SATA2 / SATA3 HDDs with just one simple click in UEFI setup. Follow the onscreen instruction to enter BIOS setup utility. Go to [RAID]. STEP 1: Setting the BIOS RAID Items After installing the hard disk drives, please set SATA Mode Selection to Advanced Storage Configuration and set the necessary RAID items in your RAID configuration. Plug in the BIOS before setting your USB flash drive into a USB port B. Enter UEFI SETUP UTILITY Tool and highlight "Easy RAID Installer". Boot...
...-bit With RAID Functions If you want to install Windows® 10 64-bit OS on your SATA / SATA2 / SATA3 HDDs with just one simple click in UEFI setup. Follow the onscreen instruction to enter BIOS setup utility. Go to [RAID]. STEP 1: Setting the BIOS RAID Items After installing the hard disk drives, please set SATA Mode Selection to Advanced Storage Configuration and set the necessary RAID items in your RAID configuration. Plug in the BIOS before setting your USB flash drive into a USB port B. Enter UEFI SETUP UTILITY Tool and highlight "Easy RAID Installer". Boot...

RAID Installation Guide
Page 23
... the files into a USB flash disk or copy the files from ASRock's motherboard support CD. (Please copy the files under the following directory: 32 bit: ..\i386\Win7_Intel.. 64-bit: ..\AMD64\Win7-64_Intel.. Please make sure to boot. 23 STEP 2: Install Windows® 10 64-bit OS Press to launch boot menu at system POST and choose the item "UEFI:" to use Windows® 10 64-bit. Installing Windows® on a HDD larger than 2TB in RAID mode Windows...
... the files into a USB flash disk or copy the files from ASRock's motherboard support CD. (Please copy the files under the following directory: 32 bit: ..\i386\Win7_Intel.. 64-bit: ..\AMD64\Win7-64_Intel.. Please make sure to boot. 23 STEP 2: Install Windows® 10 64-bit OS Press to launch boot menu at system POST and choose the item "UEFI:" to use Windows® 10 64-bit. Installing Windows® on a HDD larger than 2TB in RAID mode Windows...

RAID Installation Guide
Page 25
... problem, you install Windows® 10 64-bit on a large hard disk (ex. Please start to reboot.) D. Please request the hotfix KB2505454 through this problem. E. Disk volume > 2TB), it may take a long time; >30 mins.) C. Windows® will need to follow the instructions below to boot into Windows® or install driver/utilities. After installing Windows® 10 64-bit, install the hotfix kb2505454. (This may take about 5 minutes to install motherboard drivers and utilities...
... problem, you install Windows® 10 64-bit on a large hard disk (ex. Please start to reboot.) D. Please request the hotfix KB2505454 through this problem. E. Disk volume > 2TB), it may take a long time; >30 mins.) C. Windows® will need to follow the instructions below to boot into Windows® or install driver/utilities. After installing Windows® 10 64-bit, install the hotfix kb2505454. (This may take about 5 minutes to install motherboard drivers and utilities...

Quick Installation Guide
Page 10
...cooler fan of maximum 2A (24W) fan power. * CHA_FAN1/WP and CHA_FAN2/WP can auto detect if 3-pin or 4-pin fan is in use. • 1 x 24 pin ATX Power Connector • 1 x 8 pin 12V Power Connector • 1 x Front Panel Audio Connector • 2 x USB 2.0 Headers (Support 4 USB 2.0 ports) (Supports ESD Protection) • 1 x USB 3.1 Gen1 Header (Supports 2 USB 3.1 Gen1 ports) (Supports ESD Protection) BIOS Feature • AMI UEFI Legal BIOS with multilingual GUI support • ACPI 6.0 Compliant wake up events • SMBIOS 2.7 Support • CPU, GT_CPU, DRAM, PCH 1.05V Voltage Multi...
...cooler fan of maximum 2A (24W) fan power. * CHA_FAN1/WP and CHA_FAN2/WP can auto detect if 3-pin or 4-pin fan is in use. • 1 x 24 pin ATX Power Connector • 1 x 8 pin 12V Power Connector • 1 x Front Panel Audio Connector • 2 x USB 2.0 Headers (Support 4 USB 2.0 ports) (Supports ESD Protection) • 1 x USB 3.1 Gen1 Header (Supports 2 USB 3.1 Gen1 ports) (Supports ESD Protection) BIOS Feature • AMI UEFI Legal BIOS with multilingual GUI support • ACPI 6.0 Compliant wake up events • SMBIOS 2.7 Support • CPU, GT_CPU, DRAM, PCH 1.05V Voltage Multi...

User Manual
Page 4
... Contents 1 1.2 Specifications 2 1.3 Motherboard Layout 6 1.4 I/O Panel 8 Chapter 2 Installation 9 2.1 Installing the CPU 10 2.2 Installing the CPU Fan and Heatsink 13 2.3 Installing Memory Modules (DIMM) 14 2.4 Expansion Slots (PCI Express Slots) 16 2.5 Jumpers Setup 17 2.6 Onboard Headers and Connectors 18 Chapter 3 Software and Utilities Operation 26 3.1 Installing Drivers 26 3.2 A-Tuning 27 3.3 ASRock Live Update & APP Shop 30 3.3.1 UI Overview 30 3.3.2 Apps 31 3.3.3 BIOS & Drivers 34 3.3.4 Setting 35 Chapter 4 UEFI SETUP UTILITY 36 4.1 Introduction...
... Contents 1 1.2 Specifications 2 1.3 Motherboard Layout 6 1.4 I/O Panel 8 Chapter 2 Installation 9 2.1 Installing the CPU 10 2.2 Installing the CPU Fan and Heatsink 13 2.3 Installing Memory Modules (DIMM) 14 2.4 Expansion Slots (PCI Express Slots) 16 2.5 Jumpers Setup 17 2.6 Onboard Headers and Connectors 18 Chapter 3 Software and Utilities Operation 26 3.1 Installing Drivers 26 3.2 A-Tuning 27 3.3 ASRock Live Update & APP Shop 30 3.3.1 UI Overview 30 3.3.2 Apps 31 3.3.3 BIOS & Drivers 34 3.3.4 Setting 35 Chapter 4 UEFI SETUP UTILITY 36 4.1 Introduction...
User Manual
Page 6
... specifications and the BIOS software might be updated, the content of the motherboard and step-by-step installation guides. ASRock website http://www.asrock.com. 1.1 Package Contents • ASRock B365M-HDV Motherboard (Micro ATX Form Factor) • ASRock B365M-HDV Quick Installation Guide • ASRock B365M-HDV Support CD • 1 x I/O Panel Shield • 2 x Serial ATA (SATA) Data Cables (Optional) • 1 x Screw for purchasing ASRock B365M-HDV motherboard, a reliable motherboard produced under ASRock's consistently stringent quality control. You may find the latest VGA...
... specifications and the BIOS software might be updated, the content of the motherboard and step-by-step installation guides. ASRock website http://www.asrock.com. 1.1 Package Contents • ASRock B365M-HDV Motherboard (Micro ATX Form Factor) • ASRock B365M-HDV Quick Installation Guide • ASRock B365M-HDV Support CD • 1 x I/O Panel Shield • 2 x Serial ATA (SATA) Data Cables (Optional) • 1 x Screw for purchasing ASRock B365M-HDV motherboard, a reliable motherboard produced under ASRock's consistently stringent quality control. You may find the latest VGA...

User Manual
Page 9
...3-pin or 4-pin fan is in use. • 1 x 24 pin ATX Power Connector • 1 x 8 pin 12V Power Connector • 1 x Front Panel Audio Connector • 2 x USB 2.0 Headers (Support 4 USB 2.0 ports) (Supports ESD Protection) • 1 x USB 3.1 Gen1 Header (Supports 2 USB 3.1 Gen1 ports) (Supports ESD Protection) BIOS Feature • AMI UEFI Legal BIOS with multilingual GUI support • ACPI 6.0 Compliant wake up events • SMBIOS 2.7 Support • CPU, GT_CPU, DRAM, PCH 1.05V Voltage Multi-adjust- ment English Hardware Monitor • Temperature Sensing: CPU, Chassis/Water...
...3-pin or 4-pin fan is in use. • 1 x 24 pin ATX Power Connector • 1 x 8 pin 12V Power Connector • 1 x Front Panel Audio Connector • 2 x USB 2.0 Headers (Support 4 USB 2.0 ports) (Supports ESD Protection) • 1 x USB 3.1 Gen1 Header (Supports 2 USB 3.1 Gen1 ports) (Supports ESD Protection) BIOS Feature • AMI UEFI Legal BIOS with multilingual GUI support • ACPI 6.0 Compliant wake up events • SMBIOS 2.7 Support • CPU, GT_CPU, DRAM, PCH 1.05V Voltage Multi-adjust- ment English Hardware Monitor • Temperature Sensing: CPU, Chassis/Water...
User Manual
Page 12
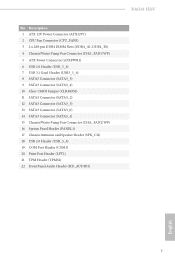
...CPU Fan Connector (CPU_FAN1) 3 2 x 288-pin DDR4 DIMM Slots (DDR4_A1, DDR4_B1) 4 Chassis/Water Pump Fan Connector (CHA_FAN1/WP) 5 ATX Power Connector (ATXPWR1) 6 USB 2.0 Header (USB_5_6) 7 USB 3.1 Gen1 Header (USB3_5_6) 8 SATA3 Connector (SATA3_5) 9 SATA3 Connector (SATA3_4) 10 Clear CMOS Jumper (CLRMOS1) 11 SATA3 Connector (SATA3_2) 12 SATA3 Connector (SATA3_3) 13 SATA3 Connector (SATA3_0) 14 SATA3 Connector (SATA3_1) 15 Chassis/Water Pump Fan Connector (CHA_FAN2/WP) 16 System Panel Header (PANEL1) 17 Chassis Intrusion and Speaker Header (SPK_CI1) 18 USB 2.0 Header (USB_3_4) 19 COM Port Header...
...CPU Fan Connector (CPU_FAN1) 3 2 x 288-pin DDR4 DIMM Slots (DDR4_A1, DDR4_B1) 4 Chassis/Water Pump Fan Connector (CHA_FAN1/WP) 5 ATX Power Connector (ATXPWR1) 6 USB 2.0 Header (USB_5_6) 7 USB 3.1 Gen1 Header (USB3_5_6) 8 SATA3 Connector (SATA3_5) 9 SATA3 Connector (SATA3_4) 10 Clear CMOS Jumper (CLRMOS1) 11 SATA3 Connector (SATA3_2) 12 SATA3 Connector (SATA3_3) 13 SATA3 Connector (SATA3_0) 14 SATA3 Connector (SATA3_1) 15 Chassis/Water Pump Fan Connector (CHA_FAN2/WP) 16 System Panel Header (PANEL1) 17 Chassis Intrusion and Speaker Header (SPK_CI1) 18 USB 2.0 Header (USB_3_4) 19 COM Port Header...

User Manual
Page 22
... previous chassis intrusion status. If you to short the pins on CLRCMOS1 for 3 seconds. Please adjust the BIOS option "Clear Status" to clear the CMOS when you just finish updating the BIOS, you must boot up the system first, and then shut it down before you clear the CMOS, the case open may be detected. When the jumper cap is placed on the pins, the jumper is "Short". B365M-HDV 2.5 Jumpers Setup...
... previous chassis intrusion status. If you to short the pins on CLRCMOS1 for 3 seconds. Please adjust the BIOS option "Clear Status" to clear the CMOS when you just finish updating the BIOS, you must boot up the system first, and then shut it down before you clear the CMOS, the case open may be detected. When the jumper cap is placed on the pins, the jumper is "Short". B365M-HDV 2.5 Jumpers Setup...
User Manual
Page 31
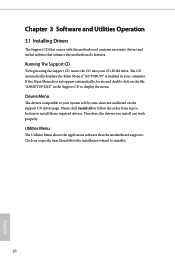
... auto-detected and listed on the support CD driver page. The CD automatically displays the Main Menu if "AUTORUN" is enabled in the Support CD to your CD-ROM drive. If the Main Menu does not appear automatically, locate and double click on a specific item then follow the order from top to bottom to install it. 26 English Therefore, the drivers you install can work properly. Chapter 3 Software and Utilities Operation 3.1 Installing Drivers...
... auto-detected and listed on the support CD driver page. The CD automatically displays the Main Menu if "AUTORUN" is enabled in the Support CD to your CD-ROM drive. If the Main Menu does not appear automatically, locate and double click on a specific item then follow the order from top to bottom to install it. 26 English Therefore, the drivers you install can work properly. Chapter 3 Software and Utilities Operation 3.1 Installing Drivers...

User Manual
Page 59
... supports 64 bit PCI decoding). PCI Express Native Control 54 Select Enable for PCIE2. VT-d Intel® Virtualization Technology for PCIE3. PCIE3 Link Speed Select the link speed for Directed I/O helps your virtual machine monitor better utilize hardware by improving application compatibility and reliability, and providing additional levels of manageability, security, isolation, and I/O performance. PCIE1 Link Speed Select the link speed for PCIE1. Above 4G Decoding Enable or disable...
... supports 64 bit PCI decoding). PCI Express Native Control 54 Select Enable for PCIE2. VT-d Intel® Virtualization Technology for PCIE3. PCIE3 Link Speed Select the link speed for Directed I/O helps your virtual machine monitor better utilize hardware by improving application compatibility and reliability, and providing additional levels of manageability, security, isolation, and I/O performance. PCIE1 Link Speed Select the link speed for PCIE1. Above 4G Decoding Enable or disable...

User Manual
Page 60
... AC/Power Loss Select the power state after a power failure. Set to Auto to enable onboard HD audio and automatically disable it when a sound card is installed. Front Panel Enable/disable front panel HD audio. IGPU Multi-Monitor Select disable to boot up . Inte(R) Ethernet Connection I219-V Enable or disable the onboard network interface controller (Intel® I219V). Restore on CPU side of memory that is selected, the power will start to disable the integrated graphics when an external graphics card is installed. Onboard HDMI HD Audio Enable audio for power saving...
... AC/Power Loss Select the power state after a power failure. Set to Auto to enable onboard HD audio and automatically disable it when a sound card is installed. Front Panel Enable/disable front panel HD audio. IGPU Multi-Monitor Select disable to boot up . Inte(R) Ethernet Connection I219-V Enable or disable the onboard network interface controller (Intel® I219V). Restore on CPU side of memory that is selected, the power will start to disable the integrated graphics when an external graphics card is installed. Onboard HDMI HD Audio Enable audio for power saving...

User Manual
Page 62
Change Settings Select the address of the Serial port. PS2 Y-Cable Enable the PS2 Y-Cable or set this option to your connected device. Device Mode Select the device mode according to Auto. 57 English Serial Port Address Select the address of the Parallel port. Parallel Port Enable or disable the Parallel port. 4.6.4 Super IO Configuration B365M-HDV Serial Port Enable or disable the Serial port.
Change Settings Select the address of the Serial port. PS2 Y-Cable Enable the PS2 Y-Cable or set this option to your connected device. Device Mode Select the device mode according to Auto. 57 English Serial Port Address Select the address of the Parallel port. Parallel Port Enable or disable the Parallel port. 4.6.4 Super IO Configuration B365M-HDV Serial Port Enable or disable the Serial port.
User Manual
Page 67
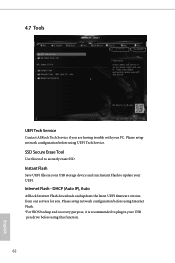
... BIOS backup and recovery purpose, it is recommended to plug in your USB storage device and run Instant Flash to update your USB pen drive before using this tool to securely erase SSD. Please setup network configuration before using UEFI Tech Service. Internet Flash - SSD Secure Erase Tool Use this function. 62 English Instant Flash Save UEFI files in your UEFI. 4.7 Tools UEFI Tech Service Contact ASRock Tech Service if you . DHCP (Auto IP), Auto ASRock Internet Flash downloads and updates the latest UEFI firmware version...
... BIOS backup and recovery purpose, it is recommended to plug in your USB storage device and run Instant Flash to update your USB pen drive before using this tool to securely erase SSD. Please setup network configuration before using UEFI Tech Service. Internet Flash - SSD Secure Erase Tool Use this function. 62 English Instant Flash Save UEFI files in your UEFI. 4.7 Tools UEFI Tech Service Contact ASRock Tech Service if you . DHCP (Auto IP), Auto ASRock Internet Flash downloads and updates the latest UEFI firmware version...

User Manual
Page 68
B365M-HDV Network Configuration Use this to download the UEFI firmware. 63 English Internet Setting Enable or disable sound effects in the setup utility. UEFI Download Server Select a server to configure internet connection settings for Internet Flash.
B365M-HDV Network Configuration Use this to download the UEFI firmware. 63 English Internet Setting Enable or disable sound effects in the setup utility. UEFI Download Server Select a server to configure internet connection settings for Internet Flash.

User Manual
Page 72
... Password Set or change the password for the system. Users are unable to use discrete TPM Module. 67 English Disable this option to change the supervisor/user password for the user account. Leave it blank and press enter to change the settings in the UEFI Setup Utility. User Password Set or change the password for Secure Boot. B365M-HDV 4.9 Security Screen In this item to remove the password. Secure Boot Use this section you may also clear the user password. Intel(R) Platform Trust Technology Enable/disable Intel...
... Password Set or change the password for the system. Users are unable to use discrete TPM Module. 67 English Disable this option to change the supervisor/user password for the user account. Leave it blank and press enter to change the settings in the UEFI Setup Utility. User Password Set or change the password for Secure Boot. B365M-HDV 4.9 Security Screen In this item to remove the password. Secure Boot Use this section you may also clear the user password. Intel(R) Platform Trust Technology Enable/disable Intel...


