User Manual
Page 2
...Notice: No part of this device must accept any defect or error in the United States and other countries. ASRock assumes no event shall ASRock, its directors, officers, employees, or agents be registered trademarks or copyrights of their respective companies, and are... trademarks or registered trademarks of such damages arising from any interference received, including interference that may appear in this motherboard contains Perchlorate, a...
...Notice: No part of this device must accept any defect or error in the United States and other countries. ASRock assumes no event shall ASRock, its directors, officers, employees, or agents be registered trademarks or copyrights of their respective companies, and are... trademarks or registered trademarks of such damages arising from any interference received, including interference that may appear in this motherboard contains Perchlorate, a...
User Manual
Page 3
Contents Chapter 1 Introduction 1 1.1 Package Contents 1 1.2 Specifications 2 1.3 Unique Features 6 1.4 Motherboard Layout 10 1.5 I/O Panel 12 Chapter 2 Installation 14 2.1 Installing the CPU 15 2.2 Installing the CPU Fan and Heatsink 17 2.3 Installing Memory Modules (DIMM) 18 2.4 Expansion Slots (...
Contents Chapter 1 Introduction 1 1.1 Package Contents 1 1.2 Specifications 2 1.3 Unique Features 6 1.4 Motherboard Layout 10 1.5 I/O Panel 12 Chapter 2 Installation 14 2.1 Installing the CPU 15 2.2 Installing the CPU Fan and Heatsink 17 2.3 Installing Memory Modules (DIMM) 18 2.4 Expansion Slots (...
User Manual
Page 5
... as well. If you require technical support related to this manual will be subject to quality and endurance. ASRock website http://www.asrock.com. 1.1 Package Contents • ASRock AM1H-ITX Motherboard (Mini-ITX Form Factor) • ASRock AM1H-ITX Quick Installation Guide • ASRock AM1H-ITX Support CD • 2 x Serial ATA (SATA) Data Cables (Optional) • 1 x Serial ATA (SATA) Power Cable (Optional) •...
... as well. If you require technical support related to this manual will be subject to quality and endurance. ASRock website http://www.asrock.com. 1.1 Package Contents • ASRock AM1H-ITX Motherboard (Mini-ITX Form Factor) • ASRock AM1H-ITX Quick Installation Guide • ASRock AM1H-ITX Support CD • 2 x Serial ATA (SATA) Data Cables (Optional) • 1 x Serial ATA (SATA) Power Cable (Optional) •...
User Manual
Page 11
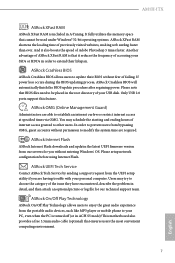
... times via OMG. ASRock OMG (Online Management Guard) Administrators are able to update their lifespan. You may try to other users. Users may schedule the starting and ending hours of internet access granted to choose the category of failing. This motherboard also provides a free... ever. If power loss occurs during the BIOS updating process, ASRock Crashless BIOS will automatically finish the BIOS update procedure after regaining power. Only USB 2.0 ports support this feature. AM1H-ITX ASRock XFast RAM ASRock XFast RAM is that cannot be placed in the root directory of...
... times via OMG. ASRock OMG (Online Management Guard) Administrators are able to update their lifespan. You may try to other users. Users may schedule the starting and ending hours of internet access granted to choose the category of failing. This motherboard also provides a free... ever. If power loss occurs during the BIOS updating process, ASRock Crashless BIOS will automatically finish the BIOS update procedure after regaining power. Only USB 2.0 ports support this feature. AM1H-ITX ASRock XFast RAM ASRock XFast RAM is that cannot be placed in the root directory of...
User Manual
Page 12
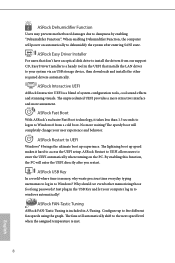
... USB storage device, then downloads and installs the other required drivers automatically. ASRock Restart to dampness by enabling "Dehumidifier Function". ASRock Dehumidifier Function Users may prevent motherboard damages due to UEFI Windows® 8 brings the ultimate boot up experience. ASRock Fast Boot With ASRock's exclusive Fast Boot technology, it hard to dehumidify the system after...
... USB storage device, then downloads and installs the other required drivers automatically. ASRock Restart to dampness by enabling "Dehumidifier Function". ASRock Dehumidifier Function Users may prevent motherboard damages due to UEFI Windows® 8 brings the ultimate boot up experience. ASRock Fast Boot With ASRock's exclusive Fast Boot technology, it hard to dehumidify the system after...
User Manual
Page 14
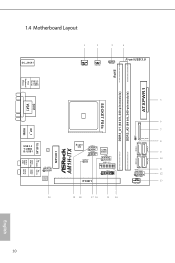
1.4 Motherboard Layout DC_JACK1 1 2 3 4 CPU_FAN1 PWR_FAN1 1 SPEAKER1 Front USB 3.0 RoHS PS2 Keyboard/ Mouse USB 2.0 T: USB0 B: USB1 5 ATXPWR1 DDR3_A1 (64 bit, 240-FpinSBmo8d0ul0e) DDR3_A2 (64 bit, 240-pin ... DP_1 HDMI REAR SPK FRONT Center: Center: CTR BASS LINE IN RJ-45 LAN USB 3.0 T: USB0 LAN B: USB1 HD_AUDIO1 1 AUDIO CODEC 20 Top: Top: MPCIE1 AM1H-ITX Super I/O USB2_3 1 USB4_5 1 CLRCMOS1 1 32Mb BIOS COM1 1 USB3_2_3 PCIE1 TPMS1 1 19 18 17 16 15 14 SATA3_A1 SATA3_A2 SATA3_1 SATA3_2 CI1 SATA_POW1 1 PANEL 1 PLED PWRBTN...
1.4 Motherboard Layout DC_JACK1 1 2 3 4 CPU_FAN1 PWR_FAN1 1 SPEAKER1 Front USB 3.0 RoHS PS2 Keyboard/ Mouse USB 2.0 T: USB0 B: USB1 5 ATXPWR1 DDR3_A1 (64 bit, 240-FpinSBmo8d0ul0e) DDR3_A2 (64 bit, 240-pin ... DP_1 HDMI REAR SPK FRONT Center: Center: CTR BASS LINE IN RJ-45 LAN USB 3.0 T: USB0 LAN B: USB1 HD_AUDIO1 1 AUDIO CODEC 20 Top: Top: MPCIE1 AM1H-ITX Super I/O USB2_3 1 USB4_5 1 CLRCMOS1 1 32Mb BIOS COM1 1 USB3_2_3 PCIE1 TPMS1 1 19 18 17 16 15 14 SATA3_A1 SATA3_A2 SATA3_1 SATA3_2 CI1 SATA_POW1 1 PANEL 1 PLED PWRBTN...
User Manual
Page 17
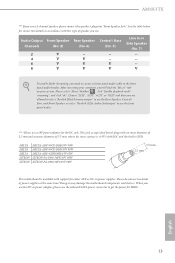
... Speaker, Central/ Bass, and Front Speaker, or select "Realtek HDA Audio 2nd output" to the front panel audio header. Doing so may damage the motherboard components and devices. AM1H-ITX *** If you use a 19V power adapter for the DC jack. After restarting your computer, you will find the "Mixer" tool on your system.../19V 90W DELTA DELTA-ADP-65JH DBH/19V 65W 2.5 mm LITEON LITEON-PA-1900-36PK/19V 90W LITEON LITEON-PA-1900-32P1/19V 90W This motherboard is GND. Please do not use .
... Speaker, Central/ Bass, and Front Speaker, or select "Realtek HDA Audio 2nd output" to the front panel audio header. Doing so may damage the motherboard components and devices. AM1H-ITX *** If you use a 19V power adapter for the DC jack. After restarting your computer, you will find the "Mixer" tool on your system.../19V 90W DELTA DELTA-ADP-65JH DBH/19V 65W 2.5 mm LITEON LITEON-PA-1900-36PK/19V 90W LITEON LITEON-PA-1900-32P1/19V 90W This motherboard is GND. Please do not use .
User Manual
Page 18
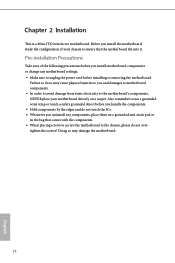
...do not touch the ICs. • Whenever you uninstall any motherboard settings. • Make sure to you install the motherboard, study the configuration of the following precautions before installing or removing the motherboard. Doing so may cause physical injuries to unplug the power cord... that comes with the components. • When placing screws to secure the motherboard to the motherboard's components, NEVER place your motherboard directly on a grounded anti-static pad or in the bag that the motherboard fits into it. Chapter 2 Installation This is a Mini-ITX form factor...
...do not touch the ICs. • Whenever you uninstall any motherboard settings. • Make sure to you install the motherboard, study the configuration of the following precautions before installing or removing the motherboard. Doing so may cause physical injuries to unplug the power cord... that comes with the components. • When placing screws to secure the motherboard to the motherboard's components, NEVER place your motherboard directly on a grounded anti-static pad or in the bag that the motherboard fits into it. Chapter 2 Installation This is a Mini-ITX form factor...
User Manual
Page 21
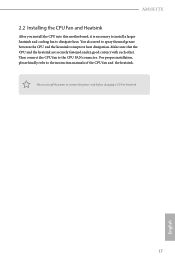
... the power or remove the power cord before changing a CPU or heatsink. 17 English Then connect the CPU fan to dissipate heat. AM1H-ITX 2.2 Installing the CPU Fan and Heatsink After you install the CPU into this motherboard, it is necessary to install a larger heatsink and cooling fan to the CPU FAN connector.
... the power or remove the power cord before changing a CPU or heatsink. 17 English Then connect the CPU fan to dissipate heat. AM1H-ITX 2.2 Installing the CPU Fan and Heatsink After you install the CPU into this motherboard, it is necessary to install a larger heatsink and cooling fan to the CPU FAN connector.
User Manual
Page 22
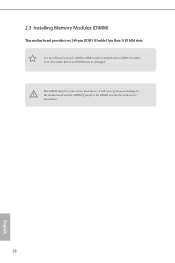
It will cause permanent damage to install a DDR or DDR2 memory module into the slot at incorrect orientation. 18 English The DIMM only fits in one correct orientation. 2.3 Installing Memory Modules (DIMM) This motherboard provides two 240-pin DDR3 (Double Data Rate 3) DIMM slots. otherwise, this motherboard and DIMM may be damaged. It is not allowed to the motherboard and the DIMM if you force the DIMM into a DDR3 slot;
It will cause permanent damage to install a DDR or DDR2 memory module into the slot at incorrect orientation. 18 English The DIMM only fits in one correct orientation. 2.3 Installing Memory Modules (DIMM) This motherboard provides two 240-pin DDR3 (Double Data Rate 3) DIMM slots. otherwise, this motherboard and DIMM may be damaged. It is not allowed to the motherboard and the DIMM if you force the DIMM into a DDR3 slot;
User Manual
Page 24
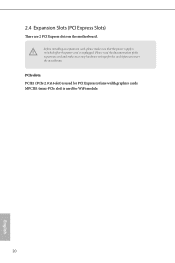
2.4 Expansion Slots (PCI Express Slots) There are 2 PCI Express slots on the motherboard. Please read the documentation of the expansion card and make sure that the power supply is switched off or the power cord is unplugged. PCIe slots: PCIE1 (PCIe 2.0 x16 slot) is used for the card before you start the installation. MPCIE1 (mini-PCIe slot) is used for WiFi module. 20 English Before installing an expansion card, please make necessary hardware settings for PCI Express x4 lane width graphics cards.
2.4 Expansion Slots (PCI Express Slots) There are 2 PCI Express slots on the motherboard. Please read the documentation of the expansion card and make sure that the power supply is switched off or the power cord is unplugged. PCIe slots: PCIE1 (PCIe 2.0 x16 slot) is used for the card before you start the installation. MPCIE1 (mini-PCIe slot) is used for WiFi module. 20 English Before installing an expansion card, please make necessary hardware settings for PCI Express x4 lane width graphics cards.
User Manual
Page 26
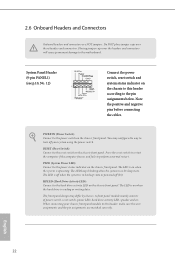
... switch on when the hard drive is in S3 sleep state. Placing jumper caps over these headers and connectors. RESET (Reset Switch): Connect to the motherboard. The LED keeps blinking when the system is on the chassis front panel. The LED is in S4 sleep state or powered off your chassis...
... switch on when the hard drive is in S3 sleep state. Placing jumper caps over these headers and connectors. RESET (Reset Switch): Connect to the motherboard. The LED keeps blinking when the system is on the chassis front panel. The LED is in S4 sleep state or powered off your chassis...
User Manual
Page 27
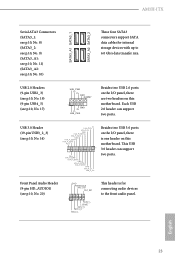
... ports on the I /O panel, there is for internal storage devices with up to the front audio panel. This USB 3.0 header can support two ports. AM1H-ITX Serial ATA3 Connectors (SATA3_1: see p.10, No. 8) (SATA3_2: see p.10, No. 9) (SATA3_A1: see p.10, No. 11) (SATA3_A2: see ...data transfer rate. IntA_P_SSRX+ GND IntA_P_SSTXIntA_P_SSTX+ GND IntA_P_DIntA_P_D+ Besides two USB 3.0 ports on the I /O panel, there are two headers on this motherboard. English 23 Each USB 2.0 header can support two ports. Front Panel Audio Header (9-pin HD_AUDIO1) (see p.10, No. 14) ID IntA_P_D+...
... ports on the I /O panel, there is for internal storage devices with up to the front audio panel. This USB 3.0 header can support two ports. AM1H-ITX Serial ATA3 Connectors (SATA3_1: see p.10, No. 8) (SATA3_2: see p.10, No. 9) (SATA3_A1: see p.10, No. 11) (SATA3_A2: see ...data transfer rate. IntA_P_SSRX+ GND IntA_P_SSTXIntA_P_SSTX+ GND IntA_P_DIntA_P_D+ Besides two USB 3.0 ports on the I /O panel, there are two headers on this motherboard. English 23 Each USB 2.0 header can support two ports. Front Panel Audio Header (9-pin HD_AUDIO1) (see p.10, No. 14) ID IntA_P_D+...
User Manual
Page 28
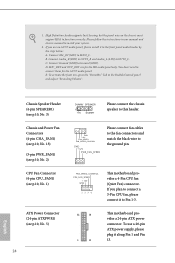
... to the ground pin. To use an AC'97 audio panel, please install it to Pin 1-3. 12 24 1 13 This motherboard provides a 24-pin ATX power connector. FAN_SPEED_CONTROL CPU_FAN_SPEED +12V GND 1 2 3 4 This motherboard provides a 4-Pin CPU fan (Quiet Fan) connector. English B. E. GND +12V FAN_SPEED FAN_SPEED_CONTROL Please connect fan cables to the fan...
... to the ground pin. To use an AC'97 audio panel, please install it to Pin 1-3. 12 24 1 13 This motherboard provides a 24-pin ATX power connector. FAN_SPEED_CONTROL CPU_FAN_SPEED +12V GND 1 2 3 4 This motherboard provides a 4-Pin CPU fan (Quiet Fan) connector. English B. E. GND +12V FAN_SPEED FAN_SPEED_CONTROL Please connect fan cables to the fan...
User Manual
Page 29
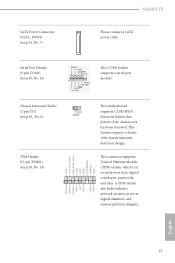
... +3V LAD0 +3VSB GND GND SMB_CLK_MAIN SMB_DATA_MAIN LAD2 LAD1 GND S_PWRDWN# SERIRQ# GND AM1H-ITX Please connect a SATA power cable. This connector supports Trusted Platform Module (TPM) system, which can securely store keys, digital certificates, passwords, and data. This motherboard supports CASE OPEN detection feature that detects if the chassis cove has been...
... +3V LAD0 +3VSB GND GND SMB_CLK_MAIN SMB_DATA_MAIN LAD2 LAD1 GND S_PWRDWN# SERIRQ# GND AM1H-ITX Please connect a SATA power cable. This connector supports Trusted Platform Module (TPM) system, which can securely store keys, digital certificates, passwords, and data. This motherboard supports CASE OPEN detection feature that detects if the chassis cove has been...
User Manual
Page 30
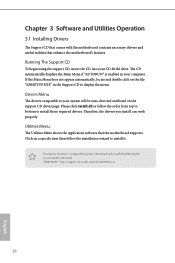
... driver page. Utilities Menu The Utilities Menu shows the application software that enhance the motherboard's features. Chapter 3 Software and Utilities Operation 3.1 Installing Drivers The Support CD that comes with the motherboard contains necessary drivers and useful utilities that the motherboard supports. Therefore, the drivers you install can work properly. To improve Windows 7 compatibility...
... driver page. Utilities Menu The Utilities Menu shows the application software that enhance the motherboard's features. Chapter 3 Software and Utilities Operation 3.1 Installing Drivers The Support CD that comes with the motherboard contains necessary drivers and useful utilities that the motherboard supports. Therefore, the drivers you install can work properly. To improve Windows 7 compatibility...
User Manual
Page 33
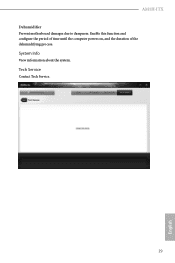
Enable this function and configure the period of time until the computer powers on, and the duration of the dehumidifying process. System Info View information about the system. AM1H-ITX Dehumidifier Prevent motherboard damages due to dampness. Tech Service Contact Tech Service. 29 English
Enable this function and configure the period of time until the computer powers on, and the duration of the dehumidifying process. System Info View information about the system. AM1H-ITX Dehumidifier Prevent motherboard damages due to dampness. Tech Service Contact Tech Service. 29 English
User Manual
Page 40
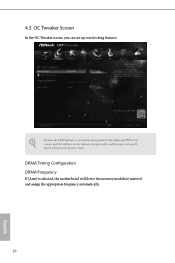
4.3 OC Tweaker Screen In the OC Tweaker screen, you see on your screen. DRAM Timing Configuration DRAM Frequency If [Auto] is constantly being updated, the following UEFI setup screens and descriptions are for reference purpose only, and they may not exactly match what you can set up overclocking features. Because the UEFI software is selected, the motherboard will detect the memory module(s) inserted and assign the appropriate frequency automatically. 36 English
4.3 OC Tweaker Screen In the OC Tweaker screen, you see on your screen. DRAM Timing Configuration DRAM Frequency If [Auto] is constantly being updated, the following UEFI setup screens and descriptions are for reference purpose only, and they may not exactly match what you can set up overclocking features. Because the UEFI software is selected, the motherboard will detect the memory module(s) inserted and assign the appropriate frequency automatically. 36 English
User Manual
Page 56
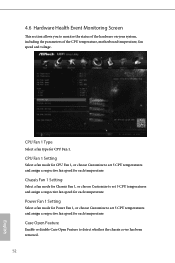
... Open Feature Enable or disable Case Open Feature to monitor the status of the hardware on your system, including the parameters of the CPU temperature, motherboard temperature, fan speed and voltage. 4.6 Hardware Health Event Monitoring Screen This section allows you to detect whether the chassis cover has been removed. 52 English...
... Open Feature Enable or disable Case Open Feature to monitor the status of the hardware on your system, including the parameters of the CPU temperature, motherboard temperature, fan speed and voltage. 4.6 Hardware Health Event Monitoring Screen This section allows you to detect whether the chassis cover has been removed. 52 English...
Quick Installation Guide
Page 1
...damages for any interference received, including interference that may appear in the documentation or product. Products and corporate names appearing in this motherboard contains Perchlorate, a toxic substance controlled in Perchlorate Best Management Practices (BMP) regulations passed by any defect or error in this ...In no responsibility for loss of profits, loss of business, loss of data, interruption of business and the like), even if ASRock has been advised of the possibility of such damages arising from any means, except duplication of their respective companies, and are used...
...damages for any interference received, including interference that may appear in the documentation or product. Products and corporate names appearing in this motherboard contains Perchlorate, a toxic substance controlled in Perchlorate Best Management Practices (BMP) regulations passed by any defect or error in this ...In no responsibility for loss of profits, loss of business, loss of data, interruption of business and the like), even if ASRock has been advised of the possibility of such damages arising from any means, except duplication of their respective companies, and are used...


