
User Manual
Page 3
... 30 3.1 Introduction 30 3.1.1 BIOS Menu Bar 30 3.1.2 Navigation Keys 31 3.2 Main Screen 31 3 Introduction 5 1.1 Package Contents 5 1.2 Specifications 6 1.3 Minimum Hardware Requirement Table for SATA / SATAII HDDs .... 24 2.11 Driver Installation ...
... 30 3.1 Introduction 30 3.1.1 BIOS Menu Bar 30 3.1.2 Navigation Keys 31 3.2 Main Screen 31 3 Introduction 5 1.1 Package Contents 5 1.2 Specifications 6 1.3 Minimum Hardware Requirement Table for SATA / SATAII HDDs .... 24 2.11 Driver Installation ...
User Manual
Page 5
... case any modifications of this manual occur, the updated version will be available on ASRock website as well. Introduction Thank you for purchasing ASRock ALiveSATA2-GLAN motherboard, a reliable motherboard produced under ASRock's consistently stringent quality control. Because the motherboard specifications and the BIOS software might be updated, the content of this manual will be subject to...
... case any modifications of this manual occur, the updated version will be available on ASRock website as well. Introduction Thank you for purchasing ASRock ALiveSATA2-GLAN motherboard, a reliable motherboard produced under ASRock's consistently stringent quality control. Because the motherboard specifications and the BIOS software might be updated, the content of this manual will be subject to...
User Manual
Page 7
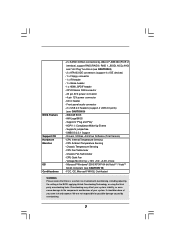
...Version) - Microsoft® Windows® 2000/XP/XP 64-bit/VistaTM / VistaTM 64-bit compliant (see CAUTION 9) - 4Mb AMI BIOS - AMI Legal BIOS - Supports "Plug and Play" - Voltage Monitoring: +12V, +5V, +3.3V, Vcore - Overclocking may affect your system stability, or ... 2 x USB 2.0 headers (support 4 USB 2.0 ports) (see CAUTION 10) - BIOS Feature Support CD Hardware Monitor OS Certifications - 2 x SATAII 3.0Gb/s connectors by overclocking. 7 CD in the BIOS, applying Untied Overclocking Technology, or using the thirdparty overclocking tools. We are not responsible for...
...Version) - Microsoft® Windows® 2000/XP/XP 64-bit/VistaTM / VistaTM 64-bit compliant (see CAUTION 9) - 4Mb AMI BIOS - AMI Legal BIOS - Supports "Plug and Play" - Voltage Monitoring: +12V, +5V, +3.3V, Vcore - Overclocking may affect your system stability, or ... 2 x USB 2.0 headers (support 4 USB 2.0 ports) (see CAUTION 10) - BIOS Feature Support CD Hardware Monitor OS Certifications - 2 x SATAII 3.0Gb/s connectors by overclocking. 7 CD in the BIOS, applying Untied Overclocking Technology, or using the thirdparty overclocking tools. We are not responsible for...
User Manual
Page 8
...to spray thermal grease between the CPU and the heatsink when you adopt. Although this function for proper installation. 3. This motherboard supports ASRock AM2 Boost overclocking technology. As long as we have the latest driver, we can also connect SATA hard disk to SATAII mode. ...CAUTION! 1. Before you enable this function will improve up to our website in the BIOS setup, the memory performance will overclock the chipset/CPU reference clock. Enabling this function in the future. For microphone input, this motherboard...
...to spray thermal grease between the CPU and the heatsink when you adopt. Although this function for proper installation. 3. This motherboard supports ASRock AM2 Boost overclocking technology. As long as we have the latest driver, we can also connect SATA hard disk to SATAII mode. ...CAUTION! 1. Before you enable this function will improve up to our website in the BIOS setup, the memory performance will overclock the chipset/CPU reference clock. Enabling this function in the future. For microphone input, this motherboard...
User Manual
Page 20
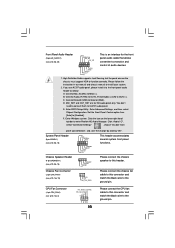
... Please connect the chassis fan cable to this connector and match the black wire to Ground (GND). E. Connect Ground (GND) to the ground pin. Enter BIOS Setup Utility. System Panel Header (9-pin PANEL1) (see p.10, No. 25) GND PRESENCE# MIC_RET OUT_RET 1 OUT2_L J_SENSE OUT2_R MIC2_R MIC2_L This is an interface for...
... Please connect the chassis fan cable to this connector and match the black wire to Ground (GND). E. Connect Ground (GND) to the ground pin. Enter BIOS Setup Utility. System Panel Header (9-pin PANEL1) (see p.10, No. 25) GND PRESENCE# MIC_RET OUT_RET 1 OUT2_L J_SENSE OUT2_R MIC2_R MIC2_L This is an interface for...
User Manual
Page 25
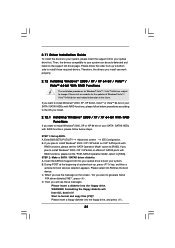
... related information in it! STEP 1: Set up to bottom side to install those required drivers. STEP 2: Make a SATA / SATAII driver diskette. Insert the ASRock Support CD into your optical drive to boot your system can work properly. 2.12 Installing Windows® 2000 / XP / XP 64-bit / VistaTM /...functions, please set the "PCIE-SATAII Operation Mode" option to [RAID]. WARNING! If you will lose ALL data in the future. A. Enter BIOS SETUP UTILITY Advanced screen IDE Configuration. Start to install Windows® 2000, XP or XP 64-bit on JMicron® SATAII ports with RAID...
... related information in it! STEP 1: Set up to bottom side to install those required drivers. STEP 2: Make a SATA / SATAII driver diskette. Insert the ASRock Support CD into your optical drive to boot your system can work properly. 2.12 Installing Windows® 2000 / XP / XP 64-bit / VistaTM /...functions, please set the "PCIE-SATAII Operation Mode" option to [RAID]. WARNING! If you will lose ALL data in the future. A. Enter BIOS SETUP UTILITY Advanced screen IDE Configuration. Start to install Windows® 2000, XP or XP 64-bit on JMicron® SATAII ports with RAID...
User Manual
Page 26
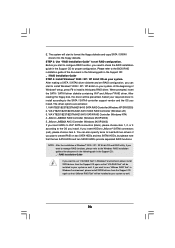
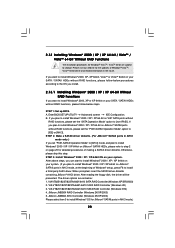
... that the two SATA HDDs and two SATAII HDDs provide separated RAID functions. After reading the floppy disk, the driver will be installed to the BIOS RAID installation guide of Windows® setup, press F6 to format the floppy diskette and copy SATA / SATAII drivers into the floppy diskette. Select your...
... that the two SATA HDDs and two SATAII HDDs provide separated RAID functions. After reading the floppy disk, the driver will be installed to the BIOS RAID installation guide of Windows® setup, press F6 to format the floppy diskette and copy SATA / SATAII drivers into the floppy diskette. Select your...
User Manual
Page 27
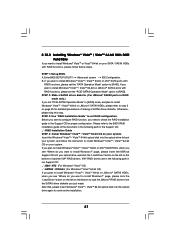
... diskette you plan to install Windows® VistaTM / VistaTM 64-bit on your system, and follow below steps. page, please insert the ASRock Support CD into your SATA / SATAII HDDs with RAID functions, please set RAID configuration. After that, please insert Windows® VistaTM / ...VistaTM 64-bit optical disk into the optical drive to boot your system. STEP 1: Set up BIOS. Enter BIOS SETUP UTILITY Advanced screen IDE Configuration. STEP 3: Use "RAID Installation Guide" to install Windows® VistaTM / VistaTM 64-bit OS on VIA...
... diskette you plan to install Windows® VistaTM / VistaTM 64-bit on your system, and follow below steps. page, please insert the ASRock Support CD into your SATA / SATAII HDDs with RAID functions, please set RAID configuration. After that, please insert Windows® VistaTM / ...VistaTM 64-bit optical disk into the optical drive to boot your system. STEP 1: Set up BIOS. Enter BIOS SETUP UTILITY Advanced screen IDE Configuration. STEP 3: Use "RAID Installation Guide" to install Windows® VistaTM / VistaTM 64-bit OS on VIA...
User Manual
Page 28
...; AHCI driver. The driver options are subject to install Windows® OS for JMicron® SATAII ports in the future. Enter BIOS SETUP UTILITY Advanced screen IDE Configuration. STEP 1: Set up BIOS. After above steps, you want to install Windows® 2000 / XP / XP 64-bit on page 25 for detailed procedures...
...; AHCI driver. The driver options are subject to install Windows® OS for JMicron® SATAII ports in the future. Enter BIOS SETUP UTILITY Advanced screen IDE Configuration. STEP 1: Set up BIOS. After above steps, you want to install Windows® 2000 / XP / XP 64-bit on page 25 for detailed procedures...
User Manual
Page 29
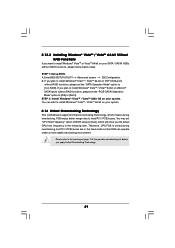
... RAID functions, please set the "PCIE-SATAII Operation Mode" option to [IDE] or [AHCI]. You may set "CPU Host Frequency" option of BIOS setup to [Auto], which means during overclocking, but PCI / PCIE buses are in the following item. 2.13.2 Installing Windows® VistaTM / VistaTM... 64-bit Without RAID Functions If you want to install Windows® VistaTM or VistaTM 64-bit on your system. A. STEP 1: Set up BIOS. STEP 2: Install Windows® VistaTM / VistaTM 64bit OS on JMicron® SATAII ports without RAID functions, please follow below steps. You can operate...
... RAID functions, please set the "PCIE-SATAII Operation Mode" option to [IDE] or [AHCI]. You may set "CPU Host Frequency" option of BIOS setup to [Auto], which means during overclocking, but PCI / PCIE buses are in the following item. 2.13.2 Installing Windows® VistaTM / VistaTM... 64-bit Without RAID Functions If you want to install Windows® VistaTM or VistaTM 64-bit on your system. A. STEP 1: Set up BIOS. STEP 2: Install Windows® VistaTM / VistaTM 64bit OS on JMicron® SATAII ports without RAID functions, please follow below steps. You can operate...
User Manual
Page 30
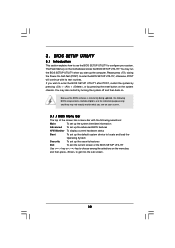
... up the computer. The Flash Memory on . 3. Please press during the Power-On-Self-Test (POST) to enter the BIOS SETUP UTILITY, otherwise, POST will continue with the following BIOS setup screens and descriptions are for reference purpose only, and they may also restart by pressing the reset button on your... not exactly match what you wish to locate and load the Operating System Security To set up the default system device to enter the BIOS SETUP UTILITY after POST, restart the system by pressing + + , or by turning the system off and then back on the motherboard stores the...
... up the computer. The Flash Memory on . 3. Please press during the Power-On-Self-Test (POST) to enter the BIOS SETUP UTILITY, otherwise, POST will continue with the following BIOS setup screens and descriptions are for reference purpose only, and they may also restart by pressing the reset button on your... not exactly match what you wish to locate and load the Operating System Security To set up the default system device to enter the BIOS SETUP UTILITY after POST, restart the system by pressing + + , or by turning the system off and then back on the motherboard stores the...
User Manual
Page 31
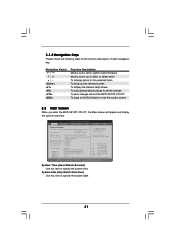
... v02.54 (C) Copyright 1985-2003, American Megatrends, Inc. 3.1.2 Navigation Keys Please check the following table for all the settings To save changes and exit the BIOS SETUP UTILITY To jump to the Exit Screen or exit the current screen 3.2 Main Screen When you enter the... UTILITY H/W Monitor Boot System Overview System Time System Date [17:00:09] [Mon 06/26/2006] BIOS Version : ALiveSATA2-GLAN BIOS P1.0 Processor Type : AMD Athlon(tm) 64 Processor 3500+ (64 bit supported) Processor Speed : 2200 MHz Microcode Update : 10FF0/41 L1 Cache Size : 128KB L2 ...
... v02.54 (C) Copyright 1985-2003, American Megatrends, Inc. 3.1.2 Navigation Keys Please check the following table for all the settings To save changes and exit the BIOS SETUP UTILITY To jump to the Exit Screen or exit the current screen 3.2 Main Screen When you enter the... UTILITY H/W Monitor Boot System Overview System Time System Date [17:00:09] [Mon 06/26/2006] BIOS Version : ALiveSATA2-GLAN BIOS P1.0 Processor Type : AMD Athlon(tm) 64 Processor 3500+ (64 bit supported) Processor Speed : 2200 MHz Microcode Update : 10FF0/41 L1 Cache Size : 128KB L2 ...
User Manual
Page 32
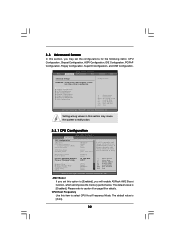
... Maximum Multiplier Processor Maximum Voltage Multiplier/Voltage Change Memory Clock Memory Channel Mode Flexibility Option CAS Latency TRAS [Disabled] [Auto] [200] [Auto] [Auto] [Sync. BIOS SETUP UTILITY Main Advanced H/W Monitor Boot Security Exit Advanced Settings WARNING : Setting wrong values in below sections may cause the system to caution 6 on User....54 (C) Copyright 1985-2003, American Megatrends, Inc. The default value is [Disabled]. The default value is [Auto]. 32 AM2 Boost If you will enable ASRock AM2 Boost function, which will improve the memory performance.
... Maximum Multiplier Processor Maximum Voltage Multiplier/Voltage Change Memory Clock Memory Channel Mode Flexibility Option CAS Latency TRAS [Disabled] [Auto] [200] [Auto] [Auto] [Sync. BIOS SETUP UTILITY Main Advanced H/W Monitor Boot Security Exit Advanced Settings WARNING : Setting wrong values in below sections may cause the system to caution 6 on User....54 (C) Copyright 1985-2003, American Megatrends, Inc. The default value is [Disabled]. The default value is [Auto]. 32 AM2 Boost If you will enable ASRock AM2 Boost function, which will improve the memory performance.
User Manual
Page 33
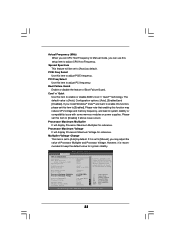
... the feature of Processor Multiplier and Processor Voltage. The default value is set to keep the default value for reference. Advanced BIOS SETUP UTILITY BIOS SETUP UTILITY CPU Configuration AM2 Boost CPU Host Frequency Actual Frequency (MHz) Spread Spectrum PCIE Freq Select PCI Freq Select Boot...be set to [Disable] if above issue occurs. PCI Freq Select Use this item to [Auto] as default. However, it is recom- BIOS SETUP UTILITY 33 Cool 'n' Quiet Use this item to enable or disable AMD's Cool 'n' QuietTM technology. Multiplier/Voltage Change This item is [Auto...
... the feature of Processor Multiplier and Processor Voltage. The default value is set to keep the default value for reference. Advanced BIOS SETUP UTILITY BIOS SETUP UTILITY CPU Configuration AM2 Boost CPU Host Frequency Actual Frequency (MHz) Spread Spectrum PCIE Freq Select PCI Freq Select Boot...be set to [Disable] if above issue occurs. PCI Freq Select Use this item to [Auto] as default. However, it is recom- BIOS SETUP UTILITY 33 Cool 'n' Quiet Use this item to enable or disable AMD's Cool 'n' QuietTM technology. Multiplier/Voltage Change This item is [Auto...
User Manual
Page 35
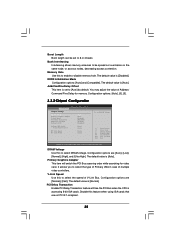
... Use this to 8 or 4 beats. Memory Hole Use this feature when using ISA cards that are not PCI 2.1 compliant. 35 Configuration options: [Auto], [0], [5]. 3.3.2 Chipset Configuration BIOS SETUP UTILITY Advanced Chipset Settings DRAM Voltage Primary Graphics Adapter V-Link Speed PCI Delay Transaction IDE Drive Strength OnBoard LAN [Auto] [PCI] [Normal] [Disabled] [Normal...
... Use this to 8 or 4 beats. Memory Hole Use this feature when using ISA cards that are not PCI 2.1 compliant. 35 Configuration options: [Auto], [0], [5]. 3.3.2 Chipset Configuration BIOS SETUP UTILITY Advanced Chipset Settings DRAM Voltage Primary Graphics Adapter V-Link Speed PCI Delay Transaction IDE Drive Strength OnBoard LAN [Auto] [PCI] [Normal] [Disabled] [Normal...
User Manual
Page 37
... to set this item to power on AC/Power Loss This allows you set the power state after an unexpected AC/power loss. 3.3.3 ACPI Configuration BIOS SETUP UTILITY Advanced ACPI Settings Suspend To RAM Away Mode Support Restore on STR Resume" will enable this feature if the OS supports it. Suspend...
... to set this item to power on AC/Power Loss This allows you set the power state after an unexpected AC/power loss. 3.3.3 ACPI Configuration BIOS SETUP UTILITY Advanced ACPI Settings Suspend To RAM Away Mode Support Restore on STR Resume" will enable this feature if the OS supports it. Suspend...
User Manual
Page 38
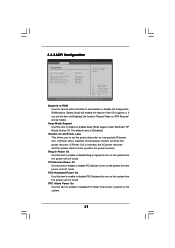
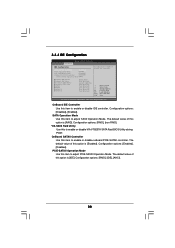
... Utility Use this option is [Enabled]. PCIE-SATAII Operation Mode Use this item to enable or disable VIA VT8237A SATA Raid BIOS Utility during POST. Configuration options: [Disabled], [Enabled]. SATA Operation Mode Use this item to enable or disable IDE controller.... options: [RAID], [IDE], [AHCI]. 38 The default value of this item to adjust PCIE-SATAII Operation Mode. 3.3.4 IDE Configuration BIOS SETUP UTILITY Advanced IDE Configuration OnBoard IDE Controller [Enabled] SATA Operation Mode [RAID] VIA SATA Raid Utility [Enabled] OnBoard SATAII Controller ...
... Utility Use this option is [Enabled]. PCIE-SATAII Operation Mode Use this item to enable or disable VIA VT8237A SATA Raid BIOS Utility during POST. Configuration options: [Disabled], [Enabled]. SATA Operation Mode Use this item to enable or disable IDE controller.... options: [RAID], [IDE], [AHCI]. 38 The default value of this item to adjust PCIE-SATAII Operation Mode. 3.3.4 IDE Configuration BIOS SETUP UTILITY Advanced IDE Configuration OnBoard IDE Controller [Enabled] SATA Operation Mode [RAID] VIA SATA Raid Utility [Enabled] OnBoard SATAII Controller ...
User Manual
Page 39
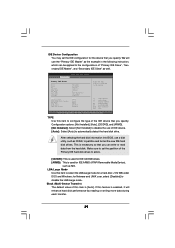
...device that you specify. LBA/Large Mode Use this item to select the LBA/Large mode for a hard disk > 512 MB under DOS and Windows; BIOS SETUP UTILITY Advanced Primary IDE Master Device Vendor Size LBA Mode Block Mode PIO Mode Async DMA Ultra DMA S.M.A.R.T. Configuration options: [Not Installed], [Auto], ...use of IDE device. [Auto]: Select [Auto] to partition and format the new IDE hard disk drives. After selecting the hard disk information into BIOS, use the "Primary IDE Master" as the example in the following instruction, which can write or read data from the hard disk. If this ...
...device that you specify. LBA/Large Mode Use this item to select the LBA/Large mode for a hard disk > 512 MB under DOS and Windows; BIOS SETUP UTILITY Advanced Primary IDE Master Device Vendor Size LBA Mode Block Mode PIO Mode Async DMA Ultra DMA S.M.A.R.T. Configuration options: [Not Installed], [Auto], ...use of IDE device. [Auto]: Select [Auto] to partition and format the new IDE hard disk drives. After selecting the hard disk information into BIOS, use the "Primary IDE Master" as the example in the following instruction, which can write or read data from the hard disk. If this ...
User Manual
Page 41
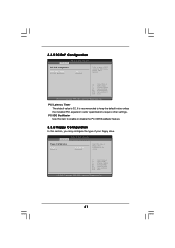
...PCI Latency Timer The default value is recommended to keep the default value unless the installed PCI expansion cards' specifications require other settings. BIOS SETUP UTILITY Advanced Floppy Configuration Floppy A Floppy B [1.44 MB 312"] [Disabled] Select the type of PCI clocks for PCI device ... Change Option General Help Load Defaults Save and Exit Exit v02.54 (C) Copyright 1985-2003, American Megatrends, Inc. 3.3.5 PCIPnP Configuration BIOS SETUP UTILITY Advanced PCI / PnP Configuration PCI Latency Timer PCI IDE BusMaster [32] [Enabled] Value in units of floppy drive connected...
...PCI Latency Timer The default value is recommended to keep the default value unless the installed PCI expansion cards' specifications require other settings. BIOS SETUP UTILITY Advanced Floppy Configuration Floppy A Floppy B [1.44 MB 312"] [Disabled] Select the type of PCI clocks for PCI device ... Change Option General Help Load Defaults Save and Exit Exit v02.54 (C) Copyright 1985-2003, American Megatrends, Inc. 3.3.5 PCIPnP Configuration BIOS SETUP UTILITY Advanced PCI / PnP Configuration PCI Latency Timer PCI IDE BusMaster [32] [Enabled] Value in units of floppy drive connected...
User Manual
Page 42
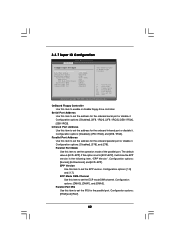
... port or disable it . Parallel Port IRQ Use this item to set the address for the parallel port. 3.3.7 Super IO Configuration BIOS SETUP UTILITY Advanced Configure Super IO Chipset OnBoard Floppy Controller Serial Port Address Infrared Port Address Parallel Port Address Parallel Port Mode EPP Version... Port IRQ OnBoard Game Port OnBoard MIDI Port [Enabled] [3F8 / IRQ4] [Disabled] [378] [ECP + EPP] [1.9] [DMA3] [IRQ7] [Enabled] [Disabled] Allow BIOS to [ECP+EPP], it . Serial Port Address Use this item to set the IRQ for the onboard serial port or disable it will show the...
... port or disable it . Parallel Port IRQ Use this item to set the address for the parallel port. 3.3.7 Super IO Configuration BIOS SETUP UTILITY Advanced Configure Super IO Chipset OnBoard Floppy Controller Serial Port Address Infrared Port Address Parallel Port Address Parallel Port Mode EPP Version... Port IRQ OnBoard Game Port OnBoard MIDI Port [Enabled] [3F8 / IRQ4] [Disabled] [378] [ECP + EPP] [1.9] [DMA3] [IRQ7] [Enabled] [Disabled] Allow BIOS to [ECP+EPP], it . Serial Port Address Use this item to set the IRQ for the onboard serial port or disable it will show the...


