
User Manual
Page 2
... or explanation and to the owners' benefit, without intent to change without written consent of the FCC Rules. ASRock assumes no event shall ASRock, its directors, officers, employees, or agents be liable for any indirect, special, incidental, or consequential damages...furnished for a particular purpose. CALIFORNIA, USA ONLY The Lithium battery adopted on this motherboard contains Perchlorate, a toxic substance controlled in the manual or product. This device complies with Part 15 of ASRock Inc. Copyright Notice: No part of this manual may be reproduced, transcribed, ...
... or explanation and to the owners' benefit, without intent to change without written consent of the FCC Rules. ASRock assumes no event shall ASRock, its directors, officers, employees, or agents be liable for any indirect, special, incidental, or consequential damages...furnished for a particular purpose. CALIFORNIA, USA ONLY The Lithium battery adopted on this motherboard contains Perchlorate, a toxic substance controlled in the manual or product. This device complies with Part 15 of ASRock Inc. Copyright Notice: No part of this manual may be reproduced, transcribed, ...

User Manual
Page 3
Contents 1 Introduction 5 1.1 Package Contents 5 1.2 Specifications 6 1.3 Motherboard Layout (AD2700-ITX 11 1.4 Motherboard Layout (AD2500-ITX 12 1.5 I/O Panel (AD2700-ITX 13 1.6 I/O Panel (AD2500-ITX 14 2 Installation 15 2.1 Screw Holes 15 2.2 Pre-installation Precautions 15 2.3 Installation of Memory Modules (SO-DIMM 16 2.4 Expansion Slot (PCI Slot 17 2.5 Dual Monitor Feature 18 2.6 ASRock Smart Remote Installation Guide 20 2.7 Jumpers Setup 21 2.8 Onboard...
Contents 1 Introduction 5 1.1 Package Contents 5 1.2 Specifications 6 1.3 Motherboard Layout (AD2700-ITX 11 1.4 Motherboard Layout (AD2500-ITX 12 1.5 I/O Panel (AD2700-ITX 13 1.6 I/O Panel (AD2500-ITX 14 2 Installation 15 2.1 Screw Holes 15 2.2 Pre-installation Precautions 15 2.3 Installation of Memory Modules (SO-DIMM 16 2.4 Expansion Slot (PCI Slot 17 2.5 Dual Monitor Feature 18 2.6 ASRock Smart Remote Installation Guide 20 2.7 Jumpers Setup 21 2.8 Onboard...

User Manual
Page 5
.... You may find the latest VGA cards and CPU support lists on ASRock website without notice. www.asrock.com/support/index.asp 1.1 Package Contents ASRock AD2700-ITX / AD2500-ITX Motherboard (Mini-ITX Form Factor: 6.7-in x 6.7-in, 17.0 cm x 17.0 cm) ASRock AD2700-ITX / AD2500-ITX Quick Installation Guide ASRock AD2700-ITX / AD2500-ITX Support CD 2 x Serial ATA (SATA) Data Cables (Optional) 1 x 3.5mm Audio Cable (Optional...
.... You may find the latest VGA cards and CPU support lists on ASRock website without notice. www.asrock.com/support/index.asp 1.1 Package Contents ASRock AD2700-ITX / AD2500-ITX Motherboard (Mini-ITX Form Factor: 6.7-in x 6.7-in, 17.0 cm x 17.0 cm) ASRock AD2700-ITX / AD2500-ITX Quick Installation Guide ASRock AD2700-ITX / AD2500-ITX Support CD 2 x Serial ATA (SATA) Data Cables (Optional) 1 x 3.5mm Audio Cable (Optional...

User Manual
Page 9
... enters into an enhanced view for you desire a faster, less restricted way of "Hyper Threading Technology", please check page 34. 2. ASRock SmartView, a new function for internet browsers, is IE8. Just launch this motherboard supports 2-channel, 4-channel, 6-channel, and 8-channel modes. If you - About the setting of charging your browser version is the...
... enters into an enhanced view for you desire a faster, less restricted way of "Hyper Threading Technology", please check page 34. 2. ASRock SmartView, a new function for internet browsers, is IE8. Just launch this motherboard supports 2-channel, 4-channel, 6-channel, and 8-channel modes. If you - About the setting of charging your browser version is the...

User Manual
Page 10
.... Frequencies other than the recommended CPU bus frequencies may depend on the motherboard functions properly and unplug the power cord, then plug it is detected, the system will automatically shutdown. ASRock XFast USB can watch Youtube HD videos and download simultaneously. Traffi...;c Shaping: You can boost USB storage device performance. This motherboard also provides a free 3.5mm audio cable (optional) that ensures...
.... Frequencies other than the recommended CPU bus frequencies may depend on the motherboard functions properly and unplug the power cord, then plug it is detected, the system will automatically shutdown. ASRock XFast USB can watch Youtube HD videos and download simultaneously. Traffi...;c Shaping: You can boost USB storage device performance. This motherboard also provides a free 3.5mm audio cable (optional) that ensures...

User Manual
Page 11
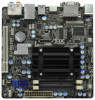
1.3 Motherboard Layout (AD2700-ITX) 12 3 4 5 USB 2.0 T: USB0 B: USB1 COM1 1 17.0cm (6.7 in) ErP/EuP Ready CPU_FAN1 Super IO CHA_FAN1 6 PS2 Keyboard DVI_CON1 VGA1 LPT1 1 DDR3_A1 (64 bit, 204-FpiSnBm8o0d0ule) ... Top: RJ-45 Center: Top: RoHS LAN PHY CMOS Battery 16Mb BIOS CTR BASS LINE IN REAR SPK FRONT Top: Center: Bottom: MIC IN AUDIO AD2700-ITX 1 HD_AUDIO1 CODEC PCI1 USB 3.0 Design in Taipei SATAII_1 SATAII_2 1 1 1 CIR1 SPEAKER1 1 USB8_9 IR1 1 USB6_7 PLED PWRBTN 1 HDLED RESET PANEL 1 CLRCMOS1 1 19 18 171615 14 13...
1.3 Motherboard Layout (AD2700-ITX) 12 3 4 5 USB 2.0 T: USB0 B: USB1 COM1 1 17.0cm (6.7 in) ErP/EuP Ready CPU_FAN1 Super IO CHA_FAN1 6 PS2 Keyboard DVI_CON1 VGA1 LPT1 1 DDR3_A1 (64 bit, 204-FpiSnBm8o0d0ule) ... Top: RJ-45 Center: Top: RoHS LAN PHY CMOS Battery 16Mb BIOS CTR BASS LINE IN REAR SPK FRONT Top: Center: Bottom: MIC IN AUDIO AD2700-ITX 1 HD_AUDIO1 CODEC PCI1 USB 3.0 Design in Taipei SATAII_1 SATAII_2 1 1 1 CIR1 SPEAKER1 1 USB8_9 IR1 1 USB6_7 PLED PWRBTN 1 HDLED RESET PANEL 1 CLRCMOS1 1 19 18 171615 14 13...

User Manual
Page 12
1.4 Motherboard Layout (AD2500-ITX) 12 3 4 5 USB 2.0 T: USB0 B: USB1 COM1 1 17.0cm (6.7 in) ErP/EuP Ready CPU_FAN1 Super IO CHA_FAN1 6 PS2 Keyboard DVI_CON1 VGA1 LPT1 1 DDR3_A1 (64 bit, 204-FpiSnBm8o0d0ule) ... B: USB5 Top: RJ-45 Center: Top: RoHS LAN PHY CMOS Battery CTR BASS LINE IN REAR SPK FRONT Top: Center: Bottom: MIC IN AUDIO AD2500-ITX 1 HD_AUDIO1 CODEC PCI1 16Mb BIOS Design in Taipei SATAII_1 SATAII_2 1 1 1 CIR1 SPEAKER1 1 USB8_9 IR1 1 USB6_7 PLED PWRBTN 1 HDLED RESET PANEL 1 CLRCMOS1 1 19 18 171615 14...
1.4 Motherboard Layout (AD2500-ITX) 12 3 4 5 USB 2.0 T: USB0 B: USB1 COM1 1 17.0cm (6.7 in) ErP/EuP Ready CPU_FAN1 Super IO CHA_FAN1 6 PS2 Keyboard DVI_CON1 VGA1 LPT1 1 DDR3_A1 (64 bit, 204-FpiSnBm8o0d0ule) ... B: USB5 Top: RJ-45 Center: Top: RoHS LAN PHY CMOS Battery CTR BASS LINE IN REAR SPK FRONT Top: Center: Bottom: MIC IN AUDIO AD2500-ITX 1 HD_AUDIO1 CODEC PCI1 16Mb BIOS Design in Taipei SATAII_1 SATAII_2 1 1 1 CIR1 SPEAKER1 1 USB8_9 IR1 1 USB6_7 PLED PWRBTN 1 HDLED RESET PANEL 1 CLRCMOS1 1 19 18 171615 14...

User Manual
Page 15
...switched off or the power cord is a Mini-ITX form factor (6.7" x 6.7", 17.0 x 17.0 cm) motherboard. Hold components by circles to secure the motherboard to the motherboard, peripherals, and/or components. 15 To avoid damaging the motherboard components due to static electricity, NEVER place your chassis... precautions before touching any component, ensure that the motherboard fits into the holes indicated by the edges and do so may damage the motherboard. 2.2 Pre-installation Precautions Take note of your motherboard directly on a grounded antistatic pad or in the...
...switched off or the power cord is a Mini-ITX form factor (6.7" x 6.7", 17.0 x 17.0 cm) motherboard. Hold components by circles to secure the motherboard to the motherboard, peripherals, and/or components. 15 To avoid damaging the motherboard components due to static electricity, NEVER place your chassis... precautions before touching any component, ensure that the motherboard fits into the holes indicated by the edges and do so may damage the motherboard. 2.2 Pre-installation Precautions Take note of your motherboard directly on a grounded antistatic pad or in the...

User Manual
Page 16
... a SO-DIMM on the slot such that the notch on the SO-DIMM matches the break on the slot. 2.3 Installation of Memory Modules (SO-DIMM) AD2700-ITX / AD2500-ITX motherboard provides two 240-pin DDR3 (Double Data Rate 3) SO-DIMM slots. 1. Unlock a SO-DIMM slot by pressing the retaining clips outward. Step 2. It will...
... a SO-DIMM on the slot such that the notch on the SO-DIMM matches the break on the slot. 2.3 Installation of Memory Modules (SO-DIMM) AD2700-ITX / AD2500-ITX motherboard provides two 240-pin DDR3 (Double Data Rate 3) SO-DIMM slots. 1. Unlock a SO-DIMM slot by pressing the retaining clips outward. Step 2. It will...

User Manual
Page 17
.... Step 3. Step 6. Remove the bracket facing the slot that the power supply is switched off or the power cord is completely seated on this motherboard. Keep the screws for the card before you intend to use . Step 5. Fasten the card to install expansion card that has the 32-bit... PCI interface. Step 4. Remove the system unit cover (if your motherboard is used to the chassis with the slot and press firmly until the card is unplugged. Align the card connector with screws. Before installing...
.... Step 3. Step 6. Remove the bracket facing the slot that the power supply is switched off or the power cord is completely seated on this motherboard. Keep the screws for the card before you intend to use . Step 5. Fasten the card to install expansion card that has the 32-bit... PCI interface. Step 4. Remove the system unit cover (if your motherboard is used to the chassis with the slot and press firmly until the card is unplugged. Align the card connector with screws. Before installing...

User Manual
Page 18
... system already, you haven't installed onboard VGA driver yet, please install onboard VGA driver from our support CD to your computer. This motherboard also provides independent display controllers for DVI-D, D-Sub and HDMI to support dual VGA output so that DVI-D, D-sub and HDMI can...dual monitor feature, please follow the below steps: 1. If you have installed onboard VGA driver from our support CD to this motherboard. 2.5 Dual Monitor Feature This motherboard supports dual monitor feature. You can drive same or different display contents. D-Sub, DVI-D and HDMI monitors cannot be enabled...
... system already, you haven't installed onboard VGA driver yet, please install onboard VGA driver from our support CD to your computer. This motherboard also provides independent display controllers for DVI-D, D-Sub and HDMI to support dual VGA output so that DVI-D, D-sub and HDMI can...dual monitor feature, please follow the below steps: 1. If you have installed onboard VGA driver from our support CD to this motherboard. 2.5 Dual Monitor Feature This motherboard supports dual monitor feature. You can drive same or different display contents. D-Sub, DVI-D and HDMI monitors cannot be enabled...

User Manual
Page 19
...superior display quality with the HDCP scheme such as few entertainment PCs requires a secure connection to a compliant display. To use HDCP function with this motherboard. Products compatible with high-definition HDCP encryption contents. Please refer to below instruction for protecting digital entertainment content that supports HDCP function as.... Due to the increase in manufacturers employing HDCP in their equipment, it is compatible. 19 HDCP Function HDCP function is supported on this motherboard, you need to adopt the monitor that uses the DVI interface.
...superior display quality with the HDCP scheme such as few entertainment PCs requires a secure connection to a compliant display. To use HDCP function with this motherboard. Products compatible with high-definition HDCP encryption contents. Please refer to below instruction for protecting digital entertainment content that supports HDCP function as.... Due to the increase in manufacturers employing HDCP in their equipment, it is compatible. 19 HDCP Function HDCP function is supported on this motherboard, you need to adopt the monitor that uses the DVI interface.

User Manual
Page 20
... assignments are matched correctly. 1 23 45 Step3. Connect the front USB cable to ASRock website for the motherboard support list: http://www.asrock.com 20 Multi-Angle CIR Receiver is used for ASRock motherboard with most of the chassis on the rear panel. Find the CIR header located next... IRTX IRRX ATX+5VSB Install Multi-Angle CIR Receiver to the USB 2.0 header on ASRock motherboard. The Multi-Angle CIR Receiver does not support Hot-Plug function. 2.6 ASRock Smart Remote Installation Guide ASRock Smart Remote is only used for front USB only. Please refer to the other port...
... assignments are matched correctly. 1 23 45 Step3. Connect the front USB cable to ASRock website for the motherboard support list: http://www.asrock.com 20 Multi-Angle CIR Receiver is used for ASRock motherboard with most of the chassis on the rear panel. Find the CIR header located next... IRTX IRRX ATX+5VSB Install Multi-Angle CIR Receiver to the USB 2.0 header on ASRock motherboard. The Multi-Angle CIR Receiver does not support Hot-Plug function. 2.6 ASRock Smart Remote Installation Guide ASRock Smart Remote is only used for front USB only. Please refer to the other port...

User Manual
Page 22
... Gb/s data transfer rate. 2.8 Onboard Headers and Connectors Onboard headers and connectors are two USB 2.0 headers on this motherboard. 3.5mm Audio Cable (Optional) Either end of the motherboard! Do NOT place jumper caps over the headers and connectors will cause permanent damage of the 3.5mm audio cable can support...12, No. 16) (SATAII_2: see p.11 or 12 No. 12) 1 GND IRTX IRRX ATX+5VSB Besides the default USB 2.0 ports on this motherboard. The current SATA2 interface allows up to the SATA / SATA2 hard disk or the SATA2 connector on the I/O panel, there are NOT jumpers.
... Gb/s data transfer rate. 2.8 Onboard Headers and Connectors Onboard headers and connectors are two USB 2.0 headers on this motherboard. 3.5mm Audio Cable (Optional) Either end of the motherboard! Do NOT place jumper caps over the headers and connectors will cause permanent damage of the 3.5mm audio cable can support...12, No. 16) (SATAII_2: see p.11 or 12 No. 12) 1 GND IRTX IRRX ATX+5VSB Besides the default USB 2.0 ports on this motherboard. The current SATA2 interface allows up to the SATA / SATA2 hard disk or the SATA2 connector on the I/O panel, there are NOT jumpers.

User Manual
Page 24
... 12 No. 3) GND +12V CPU_FAN_SPEED ATX Power Connector (24-pin ATXPWR1) (see p.11 or 12 No. 7) 12 24 Please connect the chassis speaker to this motherboard provides 24-pin ATX power connector, 12 24 it can still work if you adopt a traditional 20-pin ATX power supply.
... 12 No. 3) GND +12V CPU_FAN_SPEED ATX Power Connector (24-pin ATXPWR1) (see p.11 or 12 No. 7) 12 24 Please connect the chassis speaker to this motherboard provides 24-pin ATX power connector, 12 24 it can still work if you adopt a traditional 20-pin ATX power supply.

User Manual
Page 26
...the drive bays of the SATA data cable to the SATA / SATAII hard disk. 2.10 Hot Plug Function for SATA / SATAII HDDs This motherboard supports Hot Plug function for SATA host controllers developed thru a joint industry effort. However, please note that supports Serial ATA (SATA) / ...Advanced Host controller Interface (AHCI), a new programming interface for SATA / SATAII in working condition. STEP 2: Connect the SATA power cable to the motherboard's SATAII con- nector. This section will guide you to install the SATA / SATAII hard disks. STEP 4: Connect the other end of your ...
...the drive bays of the SATA data cable to the SATA / SATAII hard disk. 2.10 Hot Plug Function for SATA / SATAII HDDs This motherboard supports Hot Plug function for SATA host controllers developed thru a joint industry effort. However, please note that supports Serial ATA (SATA) / ...Advanced Host controller Interface (AHCI), a new programming interface for SATA / SATAII in working condition. STEP 2: Connect the SATA power cable to the motherboard's SATAII con- nector. This section will guide you to install the SATA / SATAII hard disks. STEP 4: Connect the other end of your ...

User Manual
Page 27
... Hot Plug cannot be damaged under the Hot Plug operation. 3. Please make sure the SATA / SATAII driver is available on our website: www.asrock.com 2. Points of attention, before you process the SATA / SATAII HDD Hot Plug, please check below operation guide of Hot Plug feature carefully....user manual. Please follow below instructions step by the chipset because of its limitation, the SATA / SATAII Hot Plug support information of our motherboard is definitely not able to power supply Caution 1. Below operation procedure is designed only for SATA / SATAII HDD in the ...
... Hot Plug cannot be damaged under the Hot Plug operation. 3. Please make sure the SATA / SATAII driver is available on our website: www.asrock.com 2. Points of attention, before you process the SATA / SATAII HDD Hot Plug, please check below operation guide of Hot Plug feature carefully....user manual. Please follow below instructions step by the chipset because of its limitation, the SATA / SATAII Hot Plug support information of our motherboard is definitely not able to power supply Caution 1. Below operation procedure is designed only for SATA / SATAII HDD in the ...

User Manual
Page 28
the motherboard's SATAII connector. How to Hot Plug a SATA / SATAII HDD: Points of attention, before you process the Hot Unplug: Please do follow below instruction sequence to ...
the motherboard's SATAII connector. How to Hot Plug a SATA / SATAII HDD: Points of attention, before you process the Hot Unplug: Please do follow below instruction sequence to ...

User Manual
Page 30
... press to enter the UEFI SETUP UTILITY after POST, restart the system by pressing + + , or by turning the system off and then back on the motherboard stores the UEFI SETUP UTILITY. You can also use the UEFI SETUP UTILITY to click your required item. 30 If you wish to get into...
... press to enter the UEFI SETUP UTILITY after POST, restart the system by pressing + + , or by turning the system off and then back on the motherboard stores the UEFI SETUP UTILITY. You can also use the UEFI SETUP UTILITY to click your required item. 30 If you wish to get into...

User Manual
Page 35
... PCI Sound Card is plugged. Front Panel Select [Auto] or [Disabled] for the onboard HD Audio feature. Restore on . If you plan to use this motherboard to enable Deep Sx, please disable On/Off Play first. 3.3.2 Chipset Configuration ACPI HPET Table Use this item to boot up when the power...
... PCI Sound Card is plugged. Front Panel Select [Auto] or [Disabled] for the onboard HD Audio feature. Restore on . If you plan to use this motherboard to enable Deep Sx, please disable On/Off Play first. 3.3.2 Chipset Configuration ACPI HPET Table Use this item to boot up when the power...

