RAID Installation Guide
Page 1
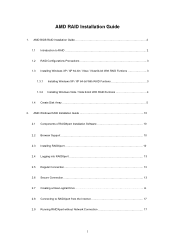
AMD RAID Installation Guide 1. AMD BIOS RAID Installation Guide 2 1.1 Introduction to RAIDXpert from the Internet 17 2.9 Running RAIDXpert without Network Connection 17 1 AMD Windows RAID Installation Guide 10 2.1 Components of RAIDXpert ...
AMD RAID Installation Guide 1. AMD BIOS RAID Installation Guide 2 1.1 Introduction to RAIDXpert from the Internet 17 2.9 Running RAIDXpert without Network Connection 17 1 AMD Windows RAID Installation Guide 10 2.1 Components of RAIDXpert ...
RAID Installation Guide
Page 2
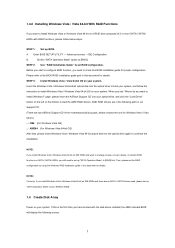
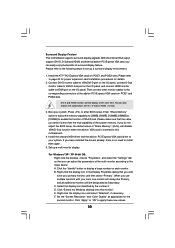
... following the detailed instruction of drives. When one logical unit. 1. After you make a SATA / SATAII driver diskette, press to enter BIOS setup to set the option to RAID mode by using RAID 1 techniques, resulting in the other drive if one drive to RAID The term... not offer the performance or security advantages of disk mirroring (RAID 1). WARNING!! AMD BIOS RAID Installation Guide AMD BIOS RAID Installation Guide is an instruction for you can start to use the onboard FastBuild BIOS utility to configure RAID. 1.1 Introduction to a second drive. Although RAID 0 function ...
... following the detailed instruction of drives. When one logical unit. 1. After you make a SATA / SATAII driver diskette, press to enter BIOS setup to set the option to RAID mode by using RAID 1 techniques, resulting in the other drive if one drive to RAID The term... not offer the performance or security advantages of disk mirroring (RAID 1). WARNING!! AMD BIOS RAID Installation Guide AMD BIOS RAID Installation Guide is an instruction for you can start to use the onboard FastBuild BIOS utility to configure RAID. 1.1 Introduction to a second drive. Although RAID 0 function ...
RAID Installation Guide
Page 4
... see the message on the screen, "Do you want to install Windows XP or Windows XP 64-bit on your system. (There are two ASRock Support CD in this document for Windows XP / XP 64-bit.) B. Select your required driver to install according to the OS you will be.... E. Before you start to configure RAID function, you can start Please insert a floppy diskette into your system. Enter BIOS SETUP UTILITY → Advanced screen →IDE Configuration. B. A. Insert the ASRock Support CD into the floppy drive, and press any key to start to boot your system. Please select CD-ROM...
... see the message on the screen, "Do you want to install Windows XP or Windows XP 64-bit on your system. (There are two ASRock Support CD in this document for Windows XP / XP 64-bit.) B. Select your required driver to install according to the OS you will be.... E. Before you start to configure RAID function, you can start Please insert a floppy diskette into your system. Enter BIOS SETUP UTILITY → Advanced screen →IDE Configuration. B. A. Insert the ASRock Support CD into the floppy drive, and press any key to start to boot your system. Please select CD-ROM...
RAID Installation Guide
Page 5
...system, and follow below steps. NOTE1. Enter BIOS SETUP UTILITY → Advanced screen →IDE Configuration. Insert the Windows Vista / Windows Vista 64-bit optical disk into the optical drive to boot your system. page, please insert the ASRock Support CD into the optical drive again to ...are no SATA / SATAII device used, please set up BIOS. Currently, if you have booted with RAID functions, please follow the instruction to install Windows Vista / Windows Vista 64-bit OS on IDE HDDs and there are two ASRock Support CD in the motherboard gift box pack, please choose...
...system, and follow below steps. NOTE1. Enter BIOS SETUP UTILITY → Advanced screen →IDE Configuration. Insert the Windows Vista / Windows Vista 64-bit optical disk into the optical drive to boot your system. page, please insert the ASRock Support CD into the optical drive again to ...are no SATA / SATAII device used, please set up BIOS. Currently, if you have booted with RAID functions, please follow the instruction to install Windows Vista / Windows Vista 64-bit OS on IDE HDDs and there are two ASRock Support CD in the motherboard gift box pack, please choose...
User Manual
Page 4
... 66 4.1 Install Operating System 66 4.2 Support CD Information 66 4.2.1 Running Support CD 66 4.2.2 Drivers Menu 66 4.2.3 Utilities Menu 66 4.2.4 Contact Information 66 4 3 . BIOS SETUP UTILITY 46 3.1 Introduction 46 3.1.1 BIOS Menu Bar 46 3.1.2 Navigation Keys 47 3.2 Main Screen 47 3.3 Smart Screen 48 3.4 Advanced Screen 49 3.4.1 CPU Configuration 49 3.4.2 Chipset Configuration 54 3.4.3 ACPI Configuration...
... 66 4.1 Install Operating System 66 4.2 Support CD Information 66 4.2.1 Running Support CD 66 4.2.2 Drivers Menu 66 4.2.3 Utilities Menu 66 4.2.4 Contact Information 66 4 3 . BIOS SETUP UTILITY 46 3.1 Introduction 46 3.1.1 BIOS Menu Bar 46 3.1.2 Navigation Keys 47 3.2 Main Screen 47 3.3 Smart Screen 48 3.4 Advanced Screen 49 3.4.1 CPU Configuration 49 3.4.2 Chipset Configuration 54 3.4.3 ACPI Configuration...
User Manual
Page 5
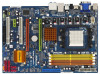
... cards and CPU support lists on ASRock website without notice. www.asrock.com/support/index.asp 1.1 Package Contents 1 x ASRock A790GXH/128M Motherboard (ATX Form Factor: 12.0-in x 8.4-in Floppy Drive 2 x Serial ATA (SATA) Data Cables (Optional) 1 x I/O Panel Shield 5 It delivers excellent performance with robust design conforming to ASRock's commitment to BIOS setup and information of the motherboard...
... cards and CPU support lists on ASRock website without notice. www.asrock.com/support/index.asp 1.1 Package Contents 1 x ASRock A790GXH/128M Motherboard (ATX Form Factor: 12.0-in x 8.4-in Floppy Drive 2 x Serial ATA (SATA) Data Cables (Optional) 1 x I/O Panel Shield 5 It delivers excellent performance with robust design conforming to ASRock's commitment to BIOS setup and information of the motherboard...
User Manual
Page 7
...USB 2.0 headers (support 6 USB 2.0 ports) (see CAUTION 13) - ACPI 1.1 Compliance Wake Up Events - Explorer, AMD Fusion - ASRock OC DNA (see CAUTION 9) - 8Mb AMI BIOS - CD in /Front Speaker/Microphone (see CAUTION 7) - 6 x Serial ATAII 3.0Gb/s connectors, support RAID (RAID 0, RAID 1, ... Tuner (see CAUTION 12) - ASRock Instant Flash (see CAUTION 10) - HD Audio Jack: Side Speaker/Rear Speaker/Central/Bass/ Line in header - Supports "Plug and Play" - Supports jumperfree - Instant Boot - Rear Panel I/O Connector BIOS Feature Support CD Unique Feature I/O Panel - 1 x PS/2 Mouse ...
...USB 2.0 headers (support 6 USB 2.0 ports) (see CAUTION 13) - ACPI 1.1 Compliance Wake Up Events - Explorer, AMD Fusion - ASRock OC DNA (see CAUTION 9) - 8Mb AMI BIOS - CD in /Front Speaker/Microphone (see CAUTION 7) - 6 x Serial ATAII 3.0Gb/s connectors, support RAID (RAID 0, RAID 1, ... Tuner (see CAUTION 12) - ASRock Instant Flash (see CAUTION 10) - HD Audio Jack: Side Speaker/Rear Speaker/Central/Bass/ Line in header - Supports "Plug and Play" - Supports jumperfree - Instant Boot - Rear Panel I/O Connector BIOS Feature Support CD Unique Feature I/O Panel - 1 x PS/2 Mouse ...
User Manual
Page 8
... you want to adopt DDR2 1066 memory module on this motherboard, please refer to 12.5% (see CAUTION 14) - ASRock website http://www.asrock.com 4. ASRock AM2 Boost: ASRock Patented Technology to boost memory performance up to the memory support list on the AM2+ CPU you adopt. CPU/Chassis/...by overclocking. For Windows® XP 64-bit and Windows® VistaTM 64bit with overclocking, including adjusting the setting in the BIOS, applying Untied Overclocking Technology, or using the thirdparty overclocking tools. The maximum shared memory size is supported depends on our website for...
... you want to adopt DDR2 1066 memory module on this motherboard, please refer to 12.5% (see CAUTION 14) - ASRock website http://www.asrock.com 4. ASRock AM2 Boost: ASRock Patented Technology to boost memory performance up to the memory support list on the AM2+ CPU you adopt. CPU/Chassis/...by overclocking. For Windows® XP 64-bit and Windows® VistaTM 64bit with overclocking, including adjusting the setting in the BIOS, applying Untied Overclocking Technology, or using the thirdparty overclocking tools. The maximum shared memory size is supported depends on our website for...
User Manual
Page 9
... without sacrificing computing performance. OC DNA literally tells you can press key during the POST or press key to BIOS setup menu to access ASRock Instant Flash. Please visit our website for the operation procedures of Intelligent Energy Saver. For audio output, this ... Featuring an advanced proprietary hardware and software design, Intelligent Energy Saver is a BIOS flash utility embedded in advance. To use FAT32/16/12 file system. 13. ASRock website: http://www.asrock.com 12. ASRock Instant Flash is a revolutionary technology that the USB flash drive or hard drive...
... without sacrificing computing performance. OC DNA literally tells you can press key during the POST or press key to BIOS setup menu to access ASRock Instant Flash. Please visit our website for the operation procedures of Intelligent Energy Saver. For audio output, this ... Featuring an advanced proprietary hardware and software design, Intelligent Energy Saver is a BIOS flash utility embedded in advance. To use FAT32/16/12 file system. 13. ASRock website: http://www.asrock.com 12. ASRock Instant Flash is a revolutionary technology that the USB flash drive or hard drive...
User Manual
Page 10
...the EuP ready power supply must meet EuP standard, an EuP ready motherboard and an EuP ready power supply are required. This motherboard supports ASRock AM2 Boost overclocking technology. If your system. 17. For EuP ready power supply selection, we can not guarantee the system stability for more ... standby power efficiency is detected, the system will overclock the chipset/CPU reference clock. Frequencies other than 50% under 1.00W in the BIOS setup, the memory performance will improve up to 12.5%, but the effect still depends on the motherboard functions properly and unplug the power ...
...the EuP ready power supply must meet EuP standard, an EuP ready motherboard and an EuP ready power supply are required. This motherboard supports ASRock AM2 Boost overclocking technology. If your system. 17. For EuP ready power supply selection, we can not guarantee the system stability for more ... standby power efficiency is detected, the system will overclock the chipset/CPU reference clock. Frequencies other than 50% under 1.00W in the BIOS setup, the memory performance will improve up to 12.5%, but the effect still depends on the motherboard functions properly and unplug the power ...
User Manual
Page 13
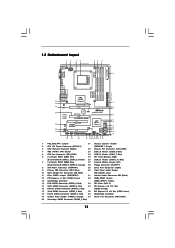
... NB_FAN1 Chipset HT3.0 Sideport memory 128MB PCIE1 Super I/O AUDIO CODEC CMOS BATTERY CLRCMOS1 1 EuP Ready PCIE2 A790GXH/128M PCI1 CrossFireX PCIE3 Hybrid CrossFire AMD SB750 Chipset RAID SATAII_5 SATAII_6 HDMI_SPDIF1 1 CD1 HD_AUDIO1 COM1 1 1 PCI2 FLOPPY1 8Mb BIOS IR1 1 USB10_11 1 USB8_9 1 USB6_7 1 SATAII_1 SATAII_3 CHA_FAN1 SATAII_2 SPEAKER1 1 SATAII_4 PLED PWRBTN 1 HDLED RESET PANEL 1 30...
... NB_FAN1 Chipset HT3.0 Sideport memory 128MB PCIE1 Super I/O AUDIO CODEC CMOS BATTERY CLRCMOS1 1 EuP Ready PCIE2 A790GXH/128M PCI1 CrossFireX PCIE3 Hybrid CrossFire AMD SB750 Chipset RAID SATAII_5 SATAII_6 HDMI_SPDIF1 1 CD1 HD_AUDIO1 COM1 1 1 PCI2 FLOPPY1 8Mb BIOS IR1 1 USB10_11 1 USB8_9 1 USB6_7 1 SATAII_1 SATAII_3 CHA_FAN1 SATAII_2 SPEAKER1 1 SATAII_4 PLED PWRBTN 1 HDLED RESET PANEL 1 30...
User Manual
Page 22
... Windows® XP / XP 64-bit OS: Right click the desktop, choose "Properties", and select the "Settings" tab so that you do not adjust the BIOS setup, the default value of the system memory. Enter "Share Memory" option to adjust the memory capability to [32MB], [64MB], [128MB] [256MB] or [512MB] ... multiple monitors with your primary monitor, and then select "Primary". A. When you can easily enjoy the benefits of the multi-monitor according to enter BIOS setup. Select the display icon identified by the number 2. Set the "Screen Resolution" and "Color Quality" as Secondary.
... Windows® XP / XP 64-bit OS: Right click the desktop, choose "Properties", and select the "Settings" tab so that you do not adjust the BIOS setup, the default value of the system memory. Enter "Share Memory" option to adjust the memory capability to [32MB], [64MB], [128MB] [256MB] or [512MB] ... multiple monitors with your primary monitor, and then select "Primary". A. When you can easily enjoy the benefits of the multi-monitor according to enter BIOS setup. Select the display icon identified by the number 2. Set the "Screen Resolution" and "Color Quality" as Secondary.
User Manual
Page 28
... HD2400 XT Catalyst 8.7 256MB DDR3 RADEON HD3450 POWERCOLOR AX3450 Catalyst 8.7 256MD2-S * Currently, RADEON HD2400XT series graphics cards are only supported with combined output to enter BIOS setup. Enjoy the benefit of more compatible PCI Express graphics cards, please visit our website for updated information. Boot your computer. Step 5. Install the onboard...
... HD2400 XT Catalyst 8.7 256MB DDR3 RADEON HD3450 POWERCOLOR AX3450 Catalyst 8.7 256MD2-S * Currently, RADEON HD2400XT series graphics cards are only supported with combined output to enter BIOS setup. Enjoy the benefit of more compatible PCI Express graphics cards, please visit our website for updated information. Boot your computer. Step 5. Install the onboard...
User Manual
Page 30
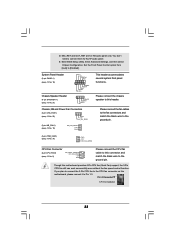
..., the jumper is placed on these 2 pins. To clear and reset the system parameters to clear the CMOS when you just finish updating the BIOS, you update the BIOS. However, please do the clear-CMOS action. 30 The illustration shows a 3-pin jumper whose pin1 and pin2 are setup. Clear CMOS Jumper (CLRCMOS1...
..., the jumper is placed on these 2 pins. To clear and reset the system parameters to clear the CMOS when you just finish updating the BIOS, you update the BIOS. However, please do the clear-CMOS action. 30 The illustration shows a 3-pin jumper whose pin1 and pin2 are setup. Clear CMOS Jumper (CLRCMOS1...
User Manual
Page 33
Set the Front Panel Control option from [Auto] to the ground pin. MIC_RET and OUT_RET are for AC'97 audio panel. Enter BIOS Setup Utility. Enter Advanced Settings, and then select Chipset Configuration. You don't need to Pin 1-3. E. System Panel Header (9-pin PANEL1) (see p.13 No. 19) Chassis ...
Set the Front Panel Control option from [Auto] to the ground pin. MIC_RET and OUT_RET are for AC'97 audio panel. Enter BIOS Setup Utility. Enter Advanced Settings, and then select Chipset Configuration. You don't need to Pin 1-3. E. System Panel Header (9-pin PANEL1) (see p.13 No. 19) Chassis ...
User Manual
Page 41
Then, the drivers compatible to your optical drive first. A. Insert the ASRock Support CD into your optical drive to boot your system. (There are two ASRock Support CD in the Support CD for proper configuration. During POST at the beginning of 2 or more SATA / SATAII HDDs with RAID ...Windows® XP 64-bit on a RAID disk composed of 2 or more SATA / SATAII HDDs with RAID functions, please follow the order from up BIOS. Before you start to configure RAID function, you will start Please insert a floppy diskette into the floppy diskette. STEP 3: Use "RAID Installation Guide" ...
Then, the drivers compatible to your optical drive first. A. Insert the ASRock Support CD into your optical drive to boot your system. (There are two ASRock Support CD in the Support CD for proper configuration. During POST at the beginning of 2 or more SATA / SATAII HDDs with RAID ...Windows® XP 64-bit on a RAID disk composed of 2 or more SATA / SATAII HDDs with RAID functions, please follow the order from up BIOS. Before you start to configure RAID function, you will start Please insert a floppy diskette into the floppy diskette. STEP 3: Use "RAID Installation Guide" ...
User Manual
Page 42
...your system. STEP 1: Set up "SATA Operation Mode" to [RAID] first. Please refer to the BIOS RAID installation guide part of the document in the following path in our Support CD: (There are two ASRock Support CD in the Support CD for Windows® XP 64-bit.) NOTE. When you see... Controller-x64 platform" for proper configuration. When prompted, insert the SATA / SATAII driver diskette containing the AMD RAID driver. " page, please insert the ASRock Support CD into the optical drive to boot your system, and follow below steps. At the beginning of 2 or more SATA / SATAII HDDs with RAID...
...your system. STEP 1: Set up "SATA Operation Mode" to [RAID] first. Please refer to the BIOS RAID installation guide part of the document in the following path in our Support CD: (There are two ASRock Support CD in the Support CD for Windows® XP 64-bit.) NOTE. When you see... Controller-x64 platform" for proper configuration. When prompted, insert the SATA / SATAII driver diskette containing the AMD RAID driver. " page, please insert the ASRock Support CD into the optical drive to boot your system, and follow below steps. At the beginning of 2 or more SATA / SATAII HDDs with RAID...
User Manual
Page 43
... Windows® XP / Windows® XP 64-bit OS on your system. Using SATA / SATAII HDDs with NCQ and Hot Plug functions STEP 1: Set Up BIOS. B. STEP 2: Make a SATA / SATAII driver diskette. After step 1, 2, you can start to install Windows® XP / Windows® XP 64-bit OS on SATA...43 A. At the beginning of Windows® setup, press F6 to [RAID]. Make a SATA / SATAII driver diskette by using the Windows RAID installation guide in BIOS. 2.17 Installing Windows® XP / XP 64-bit / VistaTM / VistaTM 64-bit Without RAID Functions If you want to install Windows® XP, Windows...
... Windows® XP / Windows® XP 64-bit OS on your system. Using SATA / SATAII HDDs with NCQ and Hot Plug functions STEP 1: Set Up BIOS. B. STEP 2: Make a SATA / SATAII driver diskette. After step 1, 2, you can start to install Windows® XP / Windows® XP 64-bit OS on SATA...43 A. At the beginning of Windows® setup, press F6 to [RAID]. Make a SATA / SATAII driver diskette by using the Windows RAID installation guide in BIOS. 2.17 Installing Windows® XP / XP 64-bit / VistaTM / VistaTM 64-bit Without RAID Functions If you want to install Windows® XP, Windows...
User Manual
Page 44
...without RAID functions, please follow the instruction to [IDE]. " page, please insert the ASRock Support CD into Using SATA / SATAII HDDs without NCQ and Hot Plug functions STEP 1: Set up BIOS. A. Enter BIOS SETUP UTILITY Advanced screen Storage Configuration. Set the "SATA Operation Mode" option to load... the AMD AHCI drivers. Make a SATA / SATAII driver diskette by following path in our Support CD: (There are two ASRock Support CD in the ...
...without RAID functions, please follow the instruction to [IDE]. " page, please insert the ASRock Support CD into Using SATA / SATAII HDDs without NCQ and Hot Plug functions STEP 1: Set up BIOS. A. Enter BIOS SETUP UTILITY Advanced screen Storage Configuration. Set the "SATA Operation Mode" option to load... the AMD AHCI drivers. Make a SATA / SATAII driver diskette by following path in our Support CD: (There are two ASRock Support CD in the ...
User Manual
Page 45
.... 45 Please refer to the warning on page 8 for the possible overclocking risk before you enable Untied Overclocking function, please enter "Overclock Mode" option of BIOS setup to set the selection from [Auto] to fixed PCI / PCIE buses. 2.18 Untied Overclocking Technology This motherboard supports Untied Overclocking Technology, which means during...
.... 45 Please refer to the warning on page 8 for the possible overclocking risk before you enable Untied Overclocking function, please enter "Overclock Mode" option of BIOS setup to set the selection from [Auto] to fixed PCI / PCIE buses. 2.18 Untied Overclocking Technology This motherboard supports Untied Overclocking Technology, which means during...


