User Manual
Page 6
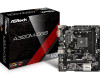
... BIOS setup. You may find the latest VGA cards and CPU support list on ASRock's website without notice. ASRock website http://www.asrock.com. 1.1 Package Contents • ASRock AB350M-HDV/A320M-HDV/A320M-DGS Motherboard (Micro ATX Form Factor) • ASRock AB350M-HDV/A320M-HDV/A320M-DGS Quick Installation Guide • ASRock AB350M-HDV/A320M-HDV/A320M-DGS Support CD • 2 x Serial ATA (SATA) Data Cables (Optional) • 1 x I/O Panel Shield 1 English...
... BIOS setup. You may find the latest VGA cards and CPU support list on ASRock's website without notice. ASRock website http://www.asrock.com. 1.1 Package Contents • ASRock AB350M-HDV/A320M-HDV/A320M-DGS Motherboard (Micro ATX Form Factor) • ASRock AB350M-HDV/A320M-HDV/A320M-DGS Quick Installation Guide • ASRock AB350M-HDV/A320M-HDV/A320M-DGS Support CD • 2 x Serial ATA (SATA) Data Cables (Optional) • 1 x I/O Panel Shield 1 English...
User Manual
Page 7
...8226; Digi Power design • 7 Power Phase design • Supports CPU up to 65W Chipset • AMD Promontory B350 (AB350M-HDV) • AMD Promontory A320 (A320M-HDV/A320M-DGS) Memory • Dual Channel DDR4 Memory Technology • 2 x DDR4 DIMM Slots • AMD Ryzen series CPUs support DDR4 3200+(...Series APUs support DDR4 2400/2133 ECC & non-ECC, un-buffered memory* * Please refer to Memory Support List on ASRock's website for more information. (http://www.asrock.com/) * Please refer to page 23 for DDR4 UDIMM maximum frequency support. • Max. capacity of system memory:...
...8226; Digi Power design • 7 Power Phase design • Supports CPU up to 65W Chipset • AMD Promontory B350 (AB350M-HDV) • AMD Promontory A320 (A320M-HDV/A320M-DGS) Memory • Dual Channel DDR4 Memory Technology • 2 x DDR4 DIMM Slots • AMD Ryzen series CPUs support DDR4 3200+(...Series APUs support DDR4 2400/2133 ECC & non-ECC, un-buffered memory* * Please refer to Memory Support List on ASRock's website for more information. (http://www.asrock.com/) * Please refer to page 23 for DDR4 UDIMM maximum frequency support. • Max. capacity of system memory:...
User Manual
Page 8
... monitor is required) • Supports HDCP with DVI-D and HDMI Ports • Supports Full HD 1080p Blu-ray (BD) playback with DVI-D and HDMI Ports A320M-DGS: • Supports DVI-D with DVI-D Port Audio • 7.1 CH HD Audio (Realtek ALC887 Audio Codec) * To configure 7.1 CH HD Audio, it is required ...• Supports PXE Rear Panel I/O • 1 x PS/2 Mouse/Keyboard Port • 2 x USB 2.0 Ports (Supports ESD Protection) • 4 x USB 3.0 Ports (Supports ESD Protection) 3 English AB350M-HDV/A320M-HDV/A320M-DGS • Supports Triple Monitor • Supports HDMI with max.
... monitor is required) • Supports HDCP with DVI-D and HDMI Ports • Supports Full HD 1080p Blu-ray (BD) playback with DVI-D and HDMI Ports A320M-DGS: • Supports DVI-D with DVI-D Port Audio • 7.1 CH HD Audio (Realtek ALC887 Audio Codec) * To configure 7.1 CH HD Audio, it is required ...• Supports PXE Rear Panel I/O • 1 x PS/2 Mouse/Keyboard Port • 2 x USB 2.0 Ports (Supports ESD Protection) • 4 x USB 3.0 Ports (Supports ESD Protection) 3 English AB350M-HDV/A320M-HDV/A320M-DGS • Supports Triple Monitor • Supports HDMI with max.
User Manual
Page 9
... LAN Port with LED (ACT/LINK LED and SPEED LED) • HD Audio Jacks: Line in / Front Speaker / Microphone AB350M-HDV/A320M-HDV: • 1 x D-Sub Port • 1 x DVI-D Port 1 x HDMI Port A320M-DGS: • 1 x DVI-D Port Storage • 4 x SATA3 6.0 Gb/s Connectors, support RAID (RAID 0, RAID 1 and ... up to Gen3 x4 (32 Gb/s) (with Ryzen Series CPU) or Gen3 x2 (16 Gb/s) (with A-Series APU)* * Supports NVMe SSD as boot disks * Supports ASRock U.2 Kit Connector • 1 x Print Port Header • 1 x COM Port Header • 1 x TPM Header • 1 x Chassis Intrusion and Speaker Header ...
... LAN Port with LED (ACT/LINK LED and SPEED LED) • HD Audio Jacks: Line in / Front Speaker / Microphone AB350M-HDV/A320M-HDV: • 1 x D-Sub Port • 1 x DVI-D Port 1 x HDMI Port A320M-DGS: • 1 x DVI-D Port Storage • 4 x SATA3 6.0 Gb/s Connectors, support RAID (RAID 0, RAID 1 and ... up to Gen3 x4 (32 Gb/s) (with Ryzen Series CPU) or Gen3 x2 (16 Gb/s) (with A-Series APU)* * Supports NVMe SSD as boot disks * Supports ASRock U.2 Kit Connector • 1 x Print Port Header • 1 x COM Port Header • 1 x TPM Header • 1 x Chassis Intrusion and Speaker Header ...
User Manual
Page 10
...cause damage to the components and devices of your own risk and expense. It should be done at your system. English 5 AB350M-HDV/A320M-HDV/A320M-DGS Hardware Monitor • CPU/Chassis temperature sensing • CPU/Chassis Fan Tachometer • CPU/Chassis Quiet Fan • CPU/Chassis...8226; ErP/EuP ready (ErP/EuP ready power supply is required) * For detailed product information, please visit our website: http://www.asrock.com Please realize that there is a certain risk involved with overclocking, including adjusting the setting in the BIOS, applying Untied Overclocking Technology...
...cause damage to the components and devices of your own risk and expense. It should be done at your system. English 5 AB350M-HDV/A320M-HDV/A320M-DGS Hardware Monitor • CPU/Chassis temperature sensing • CPU/Chassis Fan Tachometer • CPU/Chassis Quiet Fan • CPU/Chassis...8226; ErP/EuP ready (ErP/EuP ready power supply is required) * For detailed product information, please visit our website: http://www.asrock.com Please realize that there is a certain risk involved with overclocking, including adjusting the setting in the BIOS, applying Untied Overclocking Technology...

User Manual
Page 16
AB350M-HDV/A320M-HDV/A320M-DGS ** To configure 7.1 CH HD Audio, it is required to "7.1 Speaker"in 7.1-channel Configuration: Port Light Blue (Rear panel) Lime (Rear panel) Pink (Rear panel) Lime (Front panel) Function Rear Speaker Out Front Speaker Out Central /Subwoofer Speaker Out Side Speaker Out 11 English Function of the Audio Ports in the Realtek HD Audio Manager. Please set Speaker Configuration to use an HD front panel audio module and enable the multichannel audio feature through the audio driver.
AB350M-HDV/A320M-HDV/A320M-DGS ** To configure 7.1 CH HD Audio, it is required to "7.1 Speaker"in 7.1-channel Configuration: Port Light Blue (Rear panel) Lime (Rear panel) Pink (Rear panel) Lime (Front panel) Function Rear Speaker Out Front Speaker Out Central /Subwoofer Speaker Out Side Speaker Out 11 English Function of the Audio Ports in the Realtek HD Audio Manager. Please set Speaker Configuration to use an HD front panel audio module and enable the multichannel audio feature through the audio driver.
User Manual
Page 18
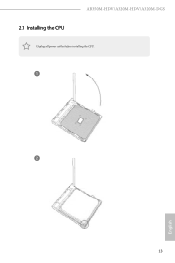
2.1 Installing the CPU AB350M-HDV/A320M-HDV/A320M-DGS Unplug all power cables before installing the CPU. 1 2 English 13
2.1 Installing the CPU AB350M-HDV/A320M-HDV/A320M-DGS Unplug all power cables before installing the CPU. 1 2 English 13
User Manual
Page 20
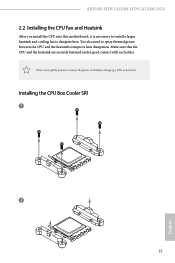
Please turn off the power or remove the power cord before changing a CPU or heatsink. Installing the CPU Box Cooler SR1 1 2 15 English Make sure that the CPU and the heatsink are securely fastened and in good contact with each other. You also need to spray thermal grease between the CPU and the heatsink to dissipate heat. AB350M-HDV/A320M-HDV/A320M-DGS 2.2 Installing the CPU Fan and Heatsink After you install the CPU into this motherboard, it is necessary to install a larger heatsink and cooling fan to improve heat dissipation.
Please turn off the power or remove the power cord before changing a CPU or heatsink. Installing the CPU Box Cooler SR1 1 2 15 English Make sure that the CPU and the heatsink are securely fastened and in good contact with each other. You also need to spray thermal grease between the CPU and the heatsink to dissipate heat. AB350M-HDV/A320M-HDV/A320M-DGS 2.2 Installing the CPU Fan and Heatsink After you install the CPU into this motherboard, it is necessary to install a larger heatsink and cooling fan to improve heat dissipation.
User Manual
Page 22
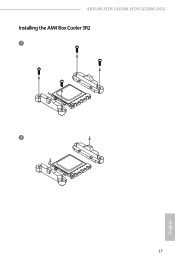
AB350M-HDV/A320M-HDV/A320M-DGS Installing the AM4 Box Cooler SR2 1 2 17 English
AB350M-HDV/A320M-HDV/A320M-DGS Installing the AM4 Box Cooler SR2 1 2 17 English
User Manual
Page 28
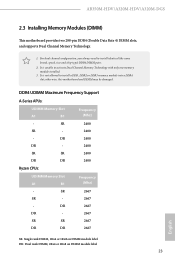
... to activate Dual Channel Memory Technology with only one memory module installed. 3. otherwise, this motherboard and DIMM may be damaged. SR 2400 SR - 2400 - AB350M-HDV/A320M-HDV/A320M-DGS 2.3 Installing Memory Modules (DIMM) This motherboard provides two 288-pin DDR4 (Double Data Rate 4) DIMM slots, and supports Dual Channel Memory Technology. 1. DR 2400 DR...
... to activate Dual Channel Memory Technology with only one memory module installed. 3. otherwise, this motherboard and DIMM may be damaged. SR 2400 SR - 2400 - AB350M-HDV/A320M-HDV/A320M-DGS 2.3 Installing Memory Modules (DIMM) This motherboard provides two 288-pin DDR4 (Double Data Rate 4) DIMM slots, and supports Dual Channel Memory Technology. 1. DR 2400 DR...
User Manual
Page 30
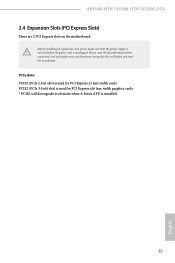
..., please make necessary hardware settings for PCI Express x16 lane width graphics cards. * PCIE2 will downgrade to x8 mode when A-Series APU is unplugged. AB350M-HDV/A320M-HDV/A320M-DGS 2.4 Expansion Slots (PCI Express Slots) There are 2 PCI Express slots on the motherboard.
..., please make necessary hardware settings for PCI Express x16 lane width graphics cards. * PCIE2 will downgrade to x8 mode when A-Series APU is unplugged. AB350M-HDV/A320M-HDV/A320M-DGS 2.4 Expansion Slots (PCI Express Slots) There are 2 PCI Express slots on the motherboard.
User Manual
Page 32
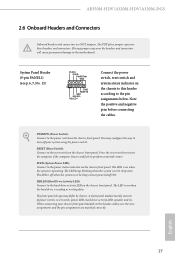
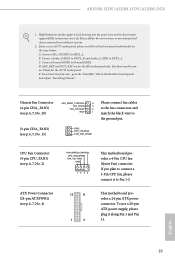
... is on when the system is reading or writing data. The front panel design may configure the way to turn off (S5). English 27 AB350M-HDV/A320M-HDV/A320M-DGS 2.6 Onboard Headers and Connectors Onboard headers and connectors are matched correctly. PLED (System Power LED): Connect to the power switch on the chassis front panel...
... is on when the system is reading or writing data. The front panel design may configure the way to turn off (S5). English 27 AB350M-HDV/A320M-HDV/A320M-DGS 2.6 Onboard Headers and Connectors Onboard headers and connectors are matched correctly. PLED (System Power LED): Connect to the power switch on the chassis front panel...
User Manual
Page 34
... follow the instructions in the Realtek Control panel and adjust "Recording Volume". Connect Ground (GND) to connect them for the HD audio panel only. AB350M-HDV/A320M-HDV/A320M-DGS 1.
... follow the instructions in the Realtek Control panel and adjust "Recording Volume". Connect Ground (GND) to connect them for the HD audio panel only. AB350M-HDV/A320M-HDV/A320M-DGS 1.
User Manual
Page 36
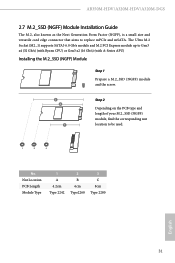
... nut location to replace mPCIe and mSATA. Nut Location PCB Length Module Type 1 A 4.2cm Type 2242 2 B 6cm Type2260 3 C 8cm Type 2280 English 31 C B A No. AB350M-HDV/A320M-HDV/A320M-DGS 2.7 M.2_SSD (NGFF) Module Installation Guide The M.2, also known as the Next Generation Form Factor (NGFF), is a small size and versatile card edge connector that aims...
... nut location to replace mPCIe and mSATA. Nut Location PCB Length Module Type 1 A 4.2cm Type 2242 2 B 6cm Type2260 3 C 8cm Type 2280 English 31 C B A No. AB350M-HDV/A320M-HDV/A320M-DGS 2.7 M.2_SSD (NGFF) Module Installation Guide The M.2, also known as the Next Generation Form Factor (NGFF), is a small size and versatile card edge connector that aims...

User Manual
Page 38
Please do not overtighten the screw as this might damage the module. English 33 C NUT2 NUT1 AB350M-HDV/A320M-HDV/A320M-DGS Step 6 Tighten the screw with a screwdriver to secure the module into place.
Please do not overtighten the screw as this might damage the module. English 33 C NUT2 NUT1 AB350M-HDV/A320M-HDV/A320M-DGS Step 6 Tighten the screw with a screwdriver to secure the module into place.
User Manual
Page 40
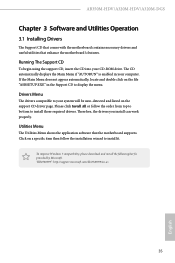
... in the Support CD to install those required drivers. To improve Windows 7 compatibility, please download and install the following hot fix provided by Microsoft. AB350M-HDV/A320M-HDV/A320M-DGS Chapter 3 Software and Utilities Operation 3.1 Installing Drivers The Support CD that comes with the motherboard contains necessary drivers and useful utilities that the motherboard supports.
... in the Support CD to install those required drivers. To improve Windows 7 compatibility, please download and install the following hot fix provided by Microsoft. AB350M-HDV/A320M-HDV/A320M-DGS Chapter 3 Software and Utilities Operation 3.1 Installing Drivers The Support CD that comes with the motherboard contains necessary drivers and useful utilities that the motherboard supports.

User Manual
Page 42
AB350M-HDV/A320M-HDV/A320M-DGS 3.2.2 Apps When the "Apps" tab is installed on your computer. Please scroll up and down to download. You can check the price of charge. - The ...
AB350M-HDV/A320M-HDV/A320M-DGS 3.2.2 Apps When the "Apps" tab is installed on your computer. Please scroll up and down to download. You can check the price of charge. - The ...

User Manual
Page 44
English 39 When there is an available new version for your app, you have already installed. Step 2 Click on the app icon to start upgrading. AB350M-HDV/A320M-HDV/A320M-DGS Upgrading an App You can only upgrade the apps you will find the mark of "New Version" appears below the installed app icon. Step 1 Click on the yellow icon to see more details.
English 39 When there is an available new version for your app, you have already installed. Step 2 Click on the app icon to start upgrading. AB350M-HDV/A320M-HDV/A320M-DGS Upgrading an App You can only upgrade the apps you will find the mark of "New Version" appears below the installed app icon. Step 1 Click on the yellow icon to see more details.

User Manual
Page 46
AB350M-HDV/A320M-HDV/A320M-DGS 3.2.4 Setting In the "Setting" page, you can change the language, select the server location, and determine if you want to automatically run the ASRock Live Update & APP Shop on Windows startup. 41 English
AB350M-HDV/A320M-HDV/A320M-DGS 3.2.4 Setting In the "Setting" page, you can change the language, select the server location, and determine if you want to automatically run the ASRock Live Update & APP Shop on Windows startup. 41 English
User Manual
Page 48
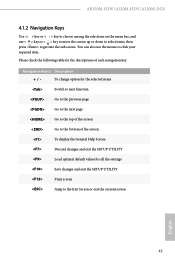
... use < > key or < > key to move the cursor up or down to select items, then press to click your required item. Navigation Key(s) Description + / - AB350M-HDV/A320M-HDV/A320M-DGS 4.1.2 Navigation Keys Use < > key or < > key to choose among the selections on the menu bar, and use the mouse to get into the sub screen.
... use < > key or < > key to move the cursor up or down to select items, then press to click your required item. Navigation Key(s) Description + / - AB350M-HDV/A320M-HDV/A320M-DGS 4.1.2 Navigation Keys Use < > key or < > key to choose among the selections on the menu bar, and use the mouse to get into the sub screen.
