e950Sw
Page 1
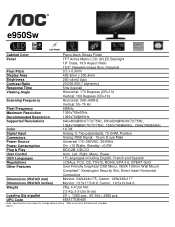
e950Sw Cabinet Color Piano-black Glossy Finish Panel TFT Active Matrix LCD, WLED Backlight 19" Class, 16:9 Aspect Ratio 18.5" Viewable Image Size, Diagonal Pixel Pitch 0.3 x 0....: 170 Degrees (CR>10) Vertical: 160 Degrees (CR>10) Scanning Frequency Horizontal: 30K~60KHz Vertical: 55~75 Hz Pixel Frequency 85MHz Maximum Resolution 1366x768x60Hz Recommended Resolution 1366x768@60Hz Supported Resolutions 640x480@60/67/72/75Hz, 800x600@56/60/72/75Hz, 1024x768@60/70/72/75Hz, 1360x768@60Hz, 1366x768@60Hz Color 16.7M Signal...
e950Sw Cabinet Color Piano-black Glossy Finish Panel TFT Active Matrix LCD, WLED Backlight 19" Class, 16:9 Aspect Ratio 18.5" Viewable Image Size, Diagonal Pixel Pitch 0.3 x 0....: 170 Degrees (CR>10) Vertical: 160 Degrees (CR>10) Scanning Frequency Horizontal: 30K~60KHz Vertical: 55~75 Hz Pixel Frequency 85MHz Maximum Resolution 1366x768x60Hz Recommended Resolution 1366x768@60Hz Supported Resolutions 640x480@60/67/72/75Hz, 800x600@56/60/72/75Hz, 1024x768@60/70/72/75Hz, 1360x768@60Hz, 1366x768@60Hz Color 16.7M Signal...
E950SW - Manual
Page 2
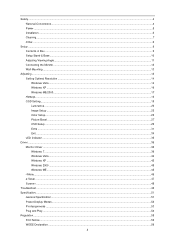
... ...6 Cleaning...7 Other ...8 Setup ...9 Contents in Box ...9 Setup Stand & Base...10 Adjusting Viewing Angle...11 Connecting the Monitor...12 Wall Mounting ...13 Adjusting ...14 Setting Optimal Resolution ...14 Windows Vista ...14 Windows XP ...16 Windows ME/2000...17 Hotkeys ...18 OSD Setting...19 Luminance ...20 Image Setup ...23 Color Setup...25 Picture...
... ...6 Cleaning...7 Other ...8 Setup ...9 Contents in Box ...9 Setup Stand & Base...10 Adjusting Viewing Angle...11 Connecting the Monitor...12 Wall Mounting ...13 Adjusting ...14 Setting Optimal Resolution ...14 Windows Vista ...14 Windows XP ...16 Windows ME/2000...17 Hotkeys ...18 OSD Setting...19 Luminance ...20 Image Setup ...23 Color Setup...25 Picture...

E950SW - Manual
Page 15
5 Click Display Settings. 6 Set the resolution SLIDE-BAR to 1366 by 768. 15
5 Click Display Settings. 6 Set the resolution SLIDE-BAR to 1366 by 768. 15

E950SW - Manual
Page 17
Windows ME/2000 For Windows ME/2000: 1 Click START. 2 Click SETTINGS. 3 Click CONTROL PANEL. 4 Double click DISPLAY. 5 Click SETTINGS. 6 Set the resolution SLIDE-BAR to 1366 by 768. 17 6 Click SETTINGS. 7 Set the resolution SLIDE-BAR to 1366 by 768.
Windows ME/2000 For Windows ME/2000: 1 Click START. 2 Click SETTINGS. 3 Click CONTROL PANEL. 4 Double click DISPLAY. 5 Click SETTINGS. 6 Set the resolution SLIDE-BAR to 1366 by 768. 17 6 Click SETTINGS. 7 Set the resolution SLIDE-BAR to 1366 by 768.
E950SW - Manual
Page 18
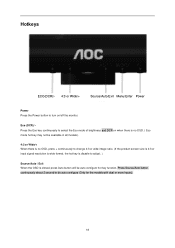
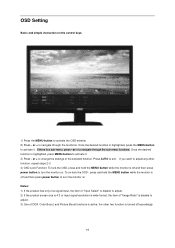
... models). 4:3 or Wide/+ When there is no OSD, press + continuously to change 4:3 or wide image ratio. (If the product screen size is 4:3 or input signal resolution is wide format, the hot key is disable to adjust. ) Source/Auto / Exit When the OSD is closed, press Auto button will be auto configure...
... models). 4:3 or Wide/+ When there is no OSD, press + continuously to change 4:3 or wide image ratio. (If the product screen size is 4:3 or input signal resolution is wide format, the hot key is disable to adjust. ) Source/Auto / Exit When the OSD is closed, press Auto button will be auto configure...
E950SW - Manual
Page 19
... the product has only one signal input, the item of "Input Select" is disable to adjust. 2) If the product screen size is 4:3 or input signal resolution is wide format, the item of "Image Ratio" is disable to adjust any other two function is highlighted, press MENU-button to turn the monitor...
... the product has only one signal input, the item of "Input Select" is disable to adjust. 2) If the product screen size is 4:3 or input signal resolution is wide format, the item of "Image Ratio" is disable to adjust any other two function is highlighted, press MENU-button to turn the monitor...
E950SW - Manual
Page 49
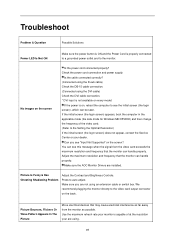
... Make sure the power button is ON and the Power Cord is properly connected to a grounded power outlet and to auto adjust. Make sure the AOC Monitor Drivers are installed. You can see "Input Not Supported" on the back . Is the cable connected correctly? (Connected using the D-sub cable)...be seen. Check the power cord connection and power supply. Press to the monitor. We recommend plugging the monitor directly to the Setting the Optimal Resolution) If the initial screen (the login screen) does not appear, contact the Service Center or your are not using the DVI cable) Check ...
... Make sure the power button is ON and the Power Cord is properly connected to a grounded power outlet and to auto adjust. Make sure the AOC Monitor Drivers are installed. You can see "Input Not Supported" on the back . Is the cable connected correctly? (Connected using the D-sub cable)...be seen. Check the power cord connection and power supply. Press to the monitor. We recommend plugging the monitor directly to the Setting the Optimal Resolution) If the initial screen (the login screen) does not appear, contact the Service Center or your are not using the DVI cable) Check ...
E950SW - Manual
Page 51
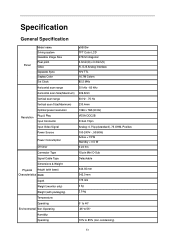
...Clock e950Sw TFT Color LCD 470mm diagonal 0.3mm(H) x 0.3mm(V) R, G, B Analog lnterface H/V TTL 16.7M Colors 85.5 MHz Horizontal scan range 30 kHz - 60 kHz Horizontal scan Size(Maximum) 409.8mm Vertical scan range 50 Hz - 75 Hz Vertical scan Size(Maximum) 230.4mm Optimal preset resolution 1366 ...x 768 (60 Hz) Resolution Plug & Play Input Connector VESA DDC2B D-Sub 15pin Input Video Signal Analog: 0.7Vp-p(standard), 75 OHM, Positive Power Source...
...Clock e950Sw TFT Color LCD 470mm diagonal 0.3mm(H) x 0.3mm(V) R, G, B Analog lnterface H/V TTL 16.7M Colors 85.5 MHz Horizontal scan range 30 kHz - 60 kHz Horizontal scan Size(Maximum) 409.8mm Vertical scan range 50 Hz - 75 Hz Vertical scan Size(Maximum) 230.4mm Optimal preset resolution 1366 ...x 768 (60 Hz) Resolution Plug & Play Input Connector VESA DDC2B D-Sub 15pin Input Video Signal Analog: 0.7Vp-p(standard), 75 OHM, Positive Power Source...