User's Manual_e2425Swd
Page 13
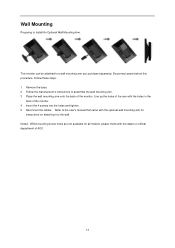
... the manufacturer's instructions to a wall mounting arm you purchase separately. Refer to the user's manual that came with the optional wall mounting arm for all models, please check with the holes in the back of AOC. 13 Wall Mounting Preparing to the wall.
... the manufacturer's instructions to a wall mounting arm you purchase separately. Refer to the user's manual that came with the optional wall mounting arm for all models, please check with the holes in the back of AOC. 13 Wall Mounting Preparing to the wall.

User's Manual_e2425Swd
Page 20
... dual or more inputs). When the OSD is closed, press Auto/Source/Exit button will be available in all models). 4:3 or Wide/+ When there is no OSD, press + continuously to change 4:3 or wide image ratio. (If the product screen size is 4:3 or input signal resolution ... the Power button to display the OSD or confirm the selection. Eco (DCR)/Press the Eco key continuously to do auto configure (only for the models with dual or more inputs). 20
... dual or more inputs). When the OSD is closed, press Auto/Source/Exit button will be available in all models). 4:3 or Wide/+ When there is no OSD, press + continuously to change 4:3 or wide image ratio. (If the product screen size is 4:3 or input signal resolution ... the Power button to display the OSD or confirm the selection. Eco (DCR)/Press the Eco key continuously to do auto configure (only for the models with dual or more inputs). 20
User's Manual_e2425Swd
Page 32
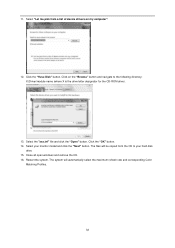
... and corresponding Color Matching Profiles. 32 The system will be copied from a list of device drivers on the "Browse" button and navigate to your monitor model and click the "Next" button. Click the "OK" button. 14. Restart the system. Click on my computer". 12. Select the "xxx.inf" file and click...
... and corresponding Color Matching Profiles. 32 The system will be copied from a list of device drivers on the "Browse" button and navigate to your monitor model and click the "Next" button. Click the "OK" button. 14. Restart the system. Click on my computer". 12. Select the "xxx.inf" file and click...
User's Manual_e2425Swd
Page 36
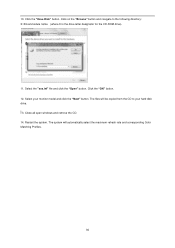
Restart the system. Close all open windows and remove the CD. 14. Click on the "Browse" button and navigate to your monitor model and click the "Next" button. Select the "xxx.inf" file and click the "Open" button. Click the "Have Disk" button. The files will automatically select the maximum refresh rate and corresponding Color Matching Profiles. 36 The system will be copied from the CD to the following directory: X:\Driver\module name (where X is the drive letter designator for the CD-ROM drive). 11. Click the "OK" button. 12. 10. Select your hard disk drive. 3.
Restart the system. Close all open windows and remove the CD. 14. Click on the "Browse" button and navigate to your monitor model and click the "Next" button. Select the "xxx.inf" file and click the "Open" button. Click the "Have Disk" button. The files will automatically select the maximum refresh rate and corresponding Color Matching Profiles. 36 The system will be copied from the CD to the following directory: X:\Driver\module name (where X is the drive letter designator for the CD-ROM drive). 11. Click the "OK" button. 12. 10. Select your hard disk drive. 3.
User's Manual_e2425Swd
Page 38
... click "Let me pick from a list of device drivers on the 'Browse...' If the message "Windows needs..." Check the "Browse my computer for your monitor model and click on the 'Have disk...' is completed. button, then click on my computer". 7. 4. If the "Properties" button is .
... click "Let me pick from a list of device drivers on the 'Browse...' If the message "Windows needs..." Check the "Browse my computer for your monitor model and click on the 'Have disk...' is completed. button, then click on my computer". 7. 4. If the "Properties" button is .

User's Manual_e2425Swd
Page 41
... to verify its compatibility with Windows® XP' message, please click on the 'Continue Anyway' button. 13. Click on the 'Next' button. - Select your monitor model and click on the 'Open' button, then click the 'OK' button. 12. Select the 'Don't Search. button and then select the appropriate drive F: (CD-ROM...
... to verify its compatibility with Windows® XP' message, please click on the 'Continue Anyway' button. 13. Click on the 'Next' button. - Select your monitor model and click on the 'Open' button, then click the 'OK' button. 12. Select the 'Don't Search. button and then select the appropriate drive F: (CD-ROM...
User's Manual_e2425Swd
Page 42
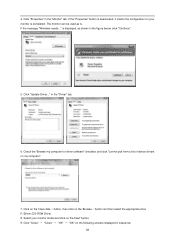
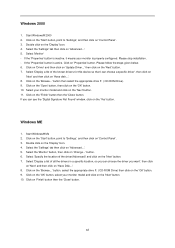
... on 'Driver' and then click on the 'Display' Icon. 4. Windows ME 1. button. 6. If the 'Properties' button is inactive, it means your monitor model and click on the 'Browse...' then click on the 'OK' button. 10. Click on the 'Open' button, then click on the 'Next' button. 7.... then click on the 'Yes' button. button, select the appropriate drive F: ( CD-ROM Drive) then click on the 'Next' button. 11. Select your monitor model and click on the 'OK' button. 9. Double click on 'Advanced...'. 5. Select the 'Settings' tab then click on the 'Display' Icon. 4. Select 'Display ...
... on 'Driver' and then click on the 'Display' Icon. 4. Windows ME 1. button. 6. If the 'Properties' button is inactive, it means your monitor model and click on the 'Browse...' then click on the 'OK' button. 10. Click on the 'Open' button, then click on the 'Next' button. 7.... then click on the 'Yes' button. button, select the appropriate drive F: ( CD-ROM Drive) then click on the 'Next' button. 11. Select your monitor model and click on the 'OK' button. 9. Double click on 'Advanced...'. 5. Select the 'Settings' tab then click on the 'Display' Icon. 4. Select 'Display ...
User's Manual_e2425Swd
Page 46
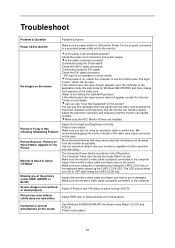
...on the keyboard while observing the CAPS LOCK LED. Adjust the maximum resolution and frequency that the monitor can handle properly. Make sure the AOC Monitor Drivers are not using . We recommend plugging the monitor directly to the computer. The Computer Power Switch should be snugly fitted in... Missing one of at the resolution your monitor is damaged. Make sure the monitor's video cable is bent. Horizontal or vertical disturbances on every model. Inspect the monitor's video cable and make sure no pin is capable of the primary colors (RED, GREEN, or BLUE) Is the power...
...on the keyboard while observing the CAPS LOCK LED. Adjust the maximum resolution and frequency that the monitor can handle properly. Make sure the AOC Monitor Drivers are not using . We recommend plugging the monitor directly to the computer. The Computer Power Switch should be snugly fitted in... Missing one of at the resolution your monitor is damaged. Make sure the monitor's video cable is bent. Horizontal or vertical disturbances on every model. Inspect the monitor's video cable and make sure no pin is capable of the primary colors (RED, GREEN, or BLUE) Is the power...

User's Manual_e2425Swd
Page 47
...& Play Input Connector Input Video Signal Power Source Power Consumption Off timer Connector Type Signal Cable Type Physical Characteristics Dimensions & Weight Temperature Environmental Humidity Altitude E2425SWD TFT Color LCD 59.8 cm diagonal 0. 2715(H)mm x 0. 2715(V)mm R, G, B Analog Interface & Digital Interface H/V TTL 16.7M Colors 165... 5% to 93% (non-condensing) Operating 0~ 3658m (0~ 12000 ft ) Non-Operating 0~ 12192m (0~ 40000 ft ) 47 Specification General Specification Panel Resolution Model name Driving system Viewable Image Size Pixel pitch Video Separate Sync.
...& Play Input Connector Input Video Signal Power Source Power Consumption Off timer Connector Type Signal Cable Type Physical Characteristics Dimensions & Weight Temperature Environmental Humidity Altitude E2425SWD TFT Color LCD 59.8 cm diagonal 0. 2715(H)mm x 0. 2715(V)mm R, G, B Analog Interface & Digital Interface H/V TTL 16.7M Colors 165... 5% to 93% (non-condensing) Operating 0~ 3658m (0~ 12000 ft ) Non-Operating 0~ 12192m (0~ 40000 ft ) 47 Specification General Specification Panel Resolution Model name Driving system Viewable Image Size Pixel pitch Video Separate Sync.

User's Manual_e2425Swd
Page 51
... protection against harmful interference in order to comply with the emission limits. Regulation FCC Notice FCC Class B Radio Frequency Interference Statement WARNING: (FOR FCC CERTIFIED MODELS) NOTE: This equipment has been tested and found to comply with the instructions, may cause harmful interference to radio communications. Increase the separation between the...
... protection against harmful interference in order to comply with the emission limits. Regulation FCC Notice FCC Class B Radio Frequency Interference Statement WARNING: (FOR FCC CERTIFIED MODELS) NOTE: This equipment has been tested and found to comply with the instructions, may cause harmful interference to radio communications. Increase the separation between the...
