
E2470SWHE Data Sheet
Page 1
...and connectivity that benefits you need for high quality digital video and audio. The 24-inch class monitor is EPEAT Silver and Energy Star certified, with 20M:1 contrast ratio, the E2470SWHE also has all the connectivity you . Key Features 23.6" viewable image with 16:9 ...design with extra narrow bezel while offering vibrant images with AOC's eSaver software to set low-power configuration and iMenu software to access the user-friendly On Screen Display. AOC Monitors LED monitor 70 Series 24" Class, 1920 x 1080 E2470SWHE Slim Design with HDCP, HDMI connectivity VESA...
...and connectivity that benefits you need for high quality digital video and audio. The 24-inch class monitor is EPEAT Silver and Energy Star certified, with 20M:1 contrast ratio, the E2470SWHE also has all the connectivity you . Key Features 23.6" viewable image with 16:9 ...design with extra narrow bezel while offering vibrant images with AOC's eSaver software to set low-power configuration and iMenu software to access the user-friendly On Screen Display. AOC Monitors LED monitor 70 Series 24" Class, 1920 x 1080 E2470SWHE Slim Design with HDCP, HDMI connectivity VESA...

E2470SWHE Data Sheet
Page 2
... Design with the Right Connectivity AOC's E2470SWHE has a slim design and extra narrow bezel that allows you the optimum 23.6" viewable image screen with 16:9 aspect ratio. The E2470SWHE is perfect for saving desktop space, while giving you to have the monitor mounted on the wall with... the appropriate mounting accessory. friendly and user-friendly configuration and navigation. The E2470SWHE comes with VGA, DVI-D with HDCP, and...
... Design with the Right Connectivity AOC's E2470SWHE has a slim design and extra narrow bezel that allows you the optimum 23.6" viewable image screen with 16:9 aspect ratio. The E2470SWHE is perfect for saving desktop space, while giving you to have the monitor mounted on the wall with... the appropriate mounting accessory. friendly and user-friendly configuration and navigation. The E2470SWHE comes with VGA, DVI-D with HDCP, and...

E2470SWHE User Manual
Page 2
......4 Power ...5 Installation...6 Cleaning...7 Other ...8 Setup ...9 Contents in Box ...9 Setup Stand & Base ...10 Adjusting Viewing Angle...11 Connecting the Monitor...12 Wall Mounting ...13 Adjusting ...14 Setting Optimal Resolution ...14 Windows Vista ...14 Windows XP ...16 Windows ME/2000...17 Windows 8 ...... Luminance ...23 Image Setup ...24 Color Setup...25 Picture Boost ...26 OSD Setup ...27 Extra ...28 Exit...29 LED Indicator ...29 Driver ...30 Monitor Driver ...30 Windows 8 ...30 Windows 7 ...34 Windows Vista ...38 Windows XP ...40 Windows 2000 ...43 Windows ME...43 i-Menu ...44 e-Saver...
......4 Power ...5 Installation...6 Cleaning...7 Other ...8 Setup ...9 Contents in Box ...9 Setup Stand & Base ...10 Adjusting Viewing Angle...11 Connecting the Monitor...12 Wall Mounting ...13 Adjusting ...14 Setting Optimal Resolution ...14 Windows Vista ...14 Windows XP ...16 Windows ME/2000...17 Windows 8 ...... Luminance ...23 Image Setup ...24 Color Setup...25 Picture Boost ...26 OSD Setup ...27 Extra ...28 Exit...29 LED Indicator ...29 Driver ...30 Monitor Driver ...30 Windows 8 ...30 Windows 7 ...34 Windows Vista ...38 Windows XP ...40 Windows 2000 ...43 Windows ME...43 i-Menu ...44 e-Saver...
E2470SWHE User Manual
Page 5
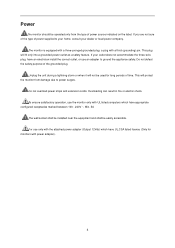
... to your home, consult your outlet does not accommodate the three-wire plug, have an electrician install the correct outlet, or use the monitor only with UL listed computers which have appropriate configured receptacles marked between 100 - 240V ~, Min. 5A The wall socket shall be installed ...of power source indicated on the label. This plug will not be used for monitors with a third (grounding) pin. The monitor is equipped with a three-pronged grounded plug, a plug with power adapter). 5 Power The monitor should be operated only from damage due to power surges. This will protect the...
... to your home, consult your outlet does not accommodate the three-wire plug, have an electrician install the correct outlet, or use the monitor only with UL listed computers which have appropriate configured receptacles marked between 100 - 240V ~, Min. 5A The wall socket shall be installed ...of power source indicated on the label. This plug will not be used for monitors with a third (grounding) pin. The monitor is equipped with a three-pronged grounded plug, a plug with power adapter). 5 Power The monitor should be operated only from damage due to power surges. This will protect the...
E2470SWHE User Manual
Page 6
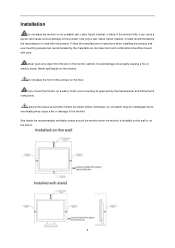
... this product. It could damage circuit parts causing a fire or electric shock. Do not place the front of the product on the monitor cabinet. Follow the manufacturer‟s instructions when installing the product and use a mounting kit approved by the manufacturer and follow the kit ... wall or on an unstable cart, stand, tripod, bracket, or table. If you mount the monitor on the monitor. If the monitor falls, it can injure a person and cause serious damage to the monitor. Use only a cart, stand, tripod, bracket, or table recommended by the manufacturer. See below...
... this product. It could damage circuit parts causing a fire or electric shock. Do not place the front of the product on the monitor cabinet. Follow the manufacturer‟s instructions when installing the product and use a mounting kit approved by the manufacturer and follow the kit ... wall or on an unstable cart, stand, tripod, bracket, or table. If you mount the monitor on the monitor. If the monitor falls, it can injure a person and cause serious damage to the monitor. Use only a cart, stand, tripod, bracket, or table recommended by the manufacturer. See below...

E2470SWHE User Manual
Page 8
Other If the product is emitting a strange smell, sound or smoke, disconnect the power plug IMMEDIATELY and contact a Service Center. Do not engage the LCD monitor in severe vibration or high impact conditions during operation or transportation. 8 Do not knock or drop the monitor during operation. Make sure that the ventilating openings are not blocked by a table or curtain.
Other If the product is emitting a strange smell, sound or smoke, disconnect the power plug IMMEDIATELY and contact a Service Center. Do not engage the LCD monitor in severe vibration or high impact conditions during operation or transportation. 8 Do not knock or drop the monitor during operation. Make sure that the ventilating openings are not blocked by a table or curtain.

E2470SWHE User Manual
Page 9
Setup Contents in Box CD Manual Monitor Monitor Base Stand Power Cable DVI Cable Analog Cable Audio Cable HDMI Cable Not all countries and regions. Please check with the local dealer or AOC branch office for all signal cables (Audio,Analog, DVI and HDMI cables) will be provided for confirmation. 9
Setup Contents in Box CD Manual Monitor Monitor Base Stand Power Cable DVI Cable Analog Cable Audio Cable HDMI Cable Not all countries and regions. Please check with the local dealer or AOC branch office for all signal cables (Audio,Analog, DVI and HDMI cables) will be provided for confirmation. 9
E2470SWHE User Manual
Page 11
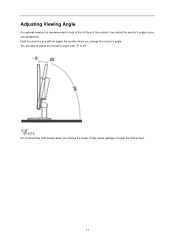
NOTE: Do not touch the LCD screen when you change the angle. Adjusting Viewing Angle For optimal viewing it is recommended to look at the full face of the monitor, then adjust the monitor's angle to 25 °. You are able to adjust the monitor's angle from -5°to your own preference. It may cause damage or break the LCD screen. 11 Hold the stand so you will not topple the monitor when you change the monitor's angle.
NOTE: Do not touch the LCD screen when you change the angle. Adjusting Viewing Angle For optimal viewing it is recommended to look at the full face of the monitor, then adjust the monitor's angle to 25 °. You are able to adjust the monitor's angle from -5°to your own preference. It may cause damage or break the LCD screen. 11 Hold the stand so you will not topple the monitor when you change the monitor's angle.

E2470SWHE User Manual
Page 12
...monitor and computer. Power 2. DVI 4. HDMI 1 / HDMI 2 3. Power 2. Connecting the Monitor Cable Connections In Back of the monitor and connect the other end to the computer‟s Audio port. 6 Turn on your monitor...the back of the monitor. 2 Connect one end of the 15-pin D-Sub cable to the back of the monitor and connect the ...other end to the computer's D-Sub port. 3 Connect one end of the DVI cable to the back of the monitor... and connect the other end to the computer‟s DVI port. 4 Connect one end of the HDMI cable to the back of the monitor...
...monitor and computer. Power 2. DVI 4. HDMI 1 / HDMI 2 3. Power 2. Connecting the Monitor Cable Connections In Back of the monitor and connect the other end to the computer‟s Audio port. 6 Turn on your monitor...the back of the monitor. 2 Connect one end of the 15-pin D-Sub cable to the back of the monitor and connect the ...other end to the computer's D-Sub port. 3 Connect one end of the DVI cable to the back of the monitor... and connect the other end to the computer‟s DVI port. 4 Connect one end of the HDMI cable to the back of the monitor...

E2470SWHE User Manual
Page 13
... not available for instructions on attaching it to Install An Optional Wall Mounting Arm. This monitor can be attached to assemble the wall mounting arm. 3 Place the wall mounting arm onto the back of AOC. 13 Line up the holes of the arm with the dealer or official department of ...the monitor. Follow these steps: 1 Remove the base. 2 Follow the manufacturer's instructions to a wall mounting arm you ...
... not available for instructions on attaching it to Install An Optional Wall Mounting Arm. This monitor can be attached to assemble the wall mounting arm. 3 Place the wall mounting arm onto the back of AOC. 13 Line up the holes of the arm with the dealer or official department of ...the monitor. Follow these steps: 1 Remove the base. 2 Follow the manufacturer's instructions to a wall mounting arm you ...
E2470SWHE User Manual
Page 20
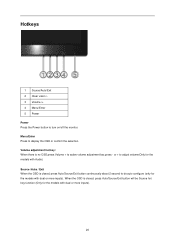
... OSD is closed , press Auto/Source/Exit button continuously about 2 second to active volume adjustment bar,press - Menu/Enter Press to turn on/off the monitor. Hotkeys 1 Source/Auto/Exit 2 Clear vision /3 Volume /+ 4 Menu/Enter 5 Power Power Press the Power button to display the OSD or confirm the selection...
... OSD is closed , press Auto/Source/Exit button continuously about 2 second to active volume adjustment bar,press - Menu/Enter Press to turn on/off the monitor. Hotkeys 1 Source/Auto/Exit 2 Clear vision /3 Volume /+ 4 Menu/Enter 5 Power Power Press the Power button to display the OSD or confirm the selection...
E2470SWHE User Manual
Page 22
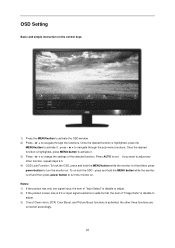
...-button to exit. the other function, repeat steps 2-3. 4) OSD Lock Function: To lock the OSD, press and hold the MENU button while the monitor is activated; OSD Setting Basic and simple instruction on the control keys. 1) Press the MENU-button to activate it . 3) Press - or + to turn... the monitor on. Once the desired function is off accordingly. 22 press - press and hold the MENU button while the monitor is highlighted, press the MENU-button to activate the OSD window. 2) Press -
...-button to exit. the other function, repeat steps 2-3. 4) OSD Lock Function: To lock the OSD, press and hold the MENU button while the monitor is activated; OSD Setting Basic and simple instruction on the control keys. 1) Press the MENU-button to activate it . 3) Press - or + to turn... the monitor on. Once the desired function is off accordingly. 22 press - press and hold the MENU button while the monitor is highlighted, press the MENU-button to activate the OSD window. 2) Press -
E2470SWHE User Manual
Page 30
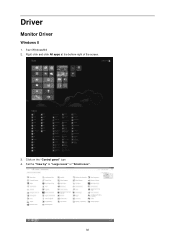
Set the "View by" to "Large icons" or "Small icons". 30 Start Windows® 8 2. Right click and click All apps at the bottom-right of the screen. 3. Driver Monitor Driver Windows 8 1. Click on the "Control panel" icon 4.
Set the "View by" to "Large icons" or "Small icons". 30 Start Windows® 8 2. Right click and click All apps at the bottom-right of the screen. 3. Driver Monitor Driver Windows 8 1. Click on the "Control panel" icon 4.
E2470SWHE User Manual
Page 32
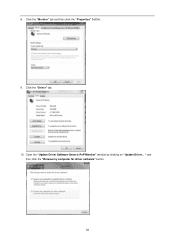
" and then click the "Browse my computer for driver software" button. 32 Open the "Update Driver Software-Generic PnP Monitor" window by clicking on "Update Driver... Click the "Driver" tab. 10. 8. Click the "Monitor" tab and then click the "Properties" button. 9.
" and then click the "Browse my computer for driver software" button. 32 Open the "Update Driver Software-Generic PnP Monitor" window by clicking on "Update Driver... Click the "Driver" tab. 10. 8. Click the "Monitor" tab and then click the "Properties" button. 9.

E2470SWHE User Manual
Page 33
... open windows and remove the CD. 16. The system will be copied from a list of device drivers on the "Browse" button and navigate to your monitor model and click the "Next" button. Select the "xxx.inf" file and click the "Open" button. Click the "OK" button. 14. Click on my computer...
... open windows and remove the CD. 16. The system will be copied from a list of device drivers on the "Browse" button and navigate to your monitor model and click the "Next" button. Select the "xxx.inf" file and click the "Open" button. Click the "OK" button. 14. Click on my computer...
E2470SWHE User Manual
Page 35
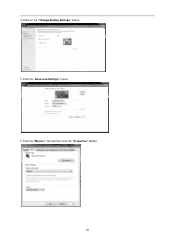
4.Ckick on the "Change display settings" button. Click the "Advanced Settings" button. Click the "Monitor" tab and then click the "Properties" button. 35
4.Ckick on the "Change display settings" button. Click the "Advanced Settings" button. Click the "Monitor" tab and then click the "Properties" button. 35
E2470SWHE User Manual
Page 36
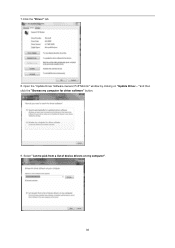
Select "Let me pick from a list of device drivers on "Update Driver... "and then click the "Browse my computer for driver software" button. 9. Open the "Update Driver Software-Generic PnP Monitor" window by clicking on my computer". 36 7.Click the "Driver" tab. 8.
Select "Let me pick from a list of device drivers on "Update Driver... "and then click the "Browse my computer for driver software" button. 9. Open the "Update Driver Software-Generic PnP Monitor" window by clicking on my computer". 36 7.Click the "Driver" tab. 8.
E2470SWHE User Manual
Page 37
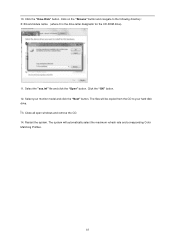
Click the "Have Disk" button. Restart the system. Click on the "Browse" button and navigate to your monitor model and click the "Next" button. Select the "xxx.inf" file and click the "Open" button. Close all open windows and remove the CD. 14. 10. The system will be copied from the CD to the following directory: X:\Driver\module name (where X is the drive letter designator for the CD-ROM drive). 11. The files will automatically select the maximum refresh rate and corresponding Color Matching Profiles. 37 Select your hard disk drive. 3. Click the "OK" button. 12.
Click the "Have Disk" button. Restart the system. Click on the "Browse" button and navigate to your monitor model and click the "Next" button. Select the "xxx.inf" file and click the "Open" button. Close all open windows and remove the CD. 14. 10. The system will be copied from the CD to the following directory: X:\Driver\module name (where X is the drive letter designator for the CD-ROM drive). 11. The files will automatically select the maximum refresh rate and corresponding Color Matching Profiles. 37 Select your hard disk drive. 3. Click the "OK" button. 12.

E2470SWHE User Manual
Page 39
... my computer". 7. in sequence. 39 Click on the 'Browse...' If the "Properties" button is displayed, as is completed. Check the "Browse my computer for your monitor model and click on the following screens displayed in the "Driver" tab. 6. Click "Close" → "Close" → "OK" → "OK" on the 'Next' button. 9. Select...
... my computer". 7. in sequence. 39 Click on the 'Browse...' If the "Properties" button is displayed, as is completed. Check the "Browse my computer for your monitor model and click on the following screens displayed in the "Driver" tab. 6. Click "Close" → "Close" → "OK" → "OK" on the 'Next' button. 9. Select...

E2470SWHE User Manual
Page 41
Select 'Monitor' tab - Please stop installation. - Click on the 'Driver' tab and then click on 'Properties' button. button. 41 Please follow the steps below. 7. If the 'Properties' button is inactive, it means your monitor is active, click on 'Update Driver...' If the 'Properties' button is properly configured. 5. Select the 'Settings' tab then click on the 'Advanced' button. 6.
Select 'Monitor' tab - Please stop installation. - Click on the 'Driver' tab and then click on 'Properties' button. button. 41 Please follow the steps below. 7. If the 'Properties' button is inactive, it means your monitor is active, click on 'Update Driver...' If the 'Properties' button is properly configured. 5. Select the 'Settings' tab then click on the 'Advanced' button. 6.


