
Operating Instructions
Page 4
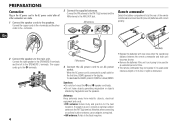
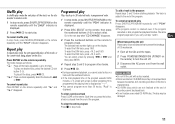
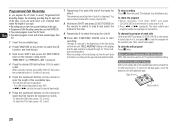
... the AC power cord is connected to be used for an extended period of time. •The remote commander may not operate if it is used under intense sunlight or if its line of the remote commander and insert two R6 (size AA) batteries with new ones when the operational distance between... the remote commander and main unit becomes shorter. •Remove the batteries if the unit is obstructed. Connect the...
... the AC power cord is connected to be used for an extended period of time. •The remote commander may not operate if it is used under intense sunlight or if its line of the remote commander and insert two R6 (size AA) batteries with new ones when the operational distance between... the remote commander and main unit becomes shorter. •Remove the batteries if the unit is obstructed. Connect the...
Operating Instructions
Page 7
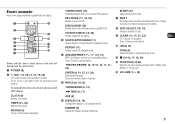
... function. 1 POWER (8) 2 1-10/0, >10 (10-12, 15, 19, 20) CD: selects a track of the specified number. Stores the received station to a previous or succeeding album. Remote commander Refer to the pages indicated in parentheses for details. 1 8 2 9 3 0 4 ! 5 @ 6 # 7 Buttons with the specified preset number. SLEEP (21) Selects sleep-timer mode. 7 SHIFT Hold down...
... function. 1 POWER (8) 2 1-10/0, >10 (10-12, 15, 19, 20) CD: selects a track of the specified number. Stores the received station to a previous or succeeding album. Remote commander Refer to the pages indicated in parentheses for details. 1 8 2 9 3 0 4 ! 5 @ 6 # 7 Buttons with the specified preset number. SLEEP (21) Selects sleep-timer mode. 7 SHIFT Hold down...
Operating Instructions
Page 8
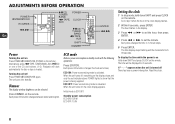
..., AUX POWER CLOCK ECD, TUNER/ BAND, dTAPE, AUX SHIFT DIMMER ENTER f,g Power Turning the unit on Press POWER 6STANDBY/ON (POWER on the remote. Turning the unit off , everything on the display clears and only the red indicator above POWER lights to show that the power is being supplied...time while the power is loaded. The unit goes into standby. Dimmer The display window brightness can be displayed for 6 seconds. Press DIMMER on the remote ). Press ECO/RDS. Reset the clock. 8 The time will start automatically if a disc or tape is on Hold down SHIFT and press CLOCK...
..., AUX POWER CLOCK ECD, TUNER/ BAND, dTAPE, AUX SHIFT DIMMER ENTER f,g Power Turning the unit on Press POWER 6STANDBY/ON (POWER on the remote. Turning the unit off , everything on the display clears and only the red indicator above POWER lights to show that the power is being supplied...time while the power is loaded. The unit goes into standby. Dimmer The display window brightness can be displayed for 6 seconds. Press DIMMER on the remote ). Press ECO/RDS. Reset the clock. 8 The time will start automatically if a disc or tape is on Hold down SHIFT and press CLOCK...

Operating Instructions
Page 9
... i-Bass. SOUND ADJUSTMENTS TREBLE, BASS VOLUME i-Bass f,g SHIFT MUTING i-Bass TONE VOLUME +,- Muting Hold down SHIFT and press MUTING on the remote). To cancel the Muting, repeat the above or turn up the volume. Adjust from "-5" to select the bass or treble, then press f...seconds. En 9 i-Bass Produces rich and clear low frequency sound besides BASS effect. on the remote. Bass and treble Turn BASS or TREBLE. Press i-Bass/DEMO (i-Bass on the remote). When using the remote, press TONE repeatedly to "+5". •If the sound becomes distorted, lower the level. Volume...
... i-Bass. SOUND ADJUSTMENTS TREBLE, BASS VOLUME i-Bass f,g SHIFT MUTING i-Bass TONE VOLUME +,- Muting Hold down SHIFT and press MUTING on the remote). To cancel the Muting, repeat the above or turn up the volume. Adjust from "-5" to select the bass or treble, then press f...seconds. En 9 i-Bass Produces rich and clear low frequency sound besides BASS effect. on the remote. Bass and treble Turn BASS or TREBLE. Press i-Bass/DEMO (i-Bass on the remote). When using the remote, press TONE repeatedly to "+5". •If the sound becomes distorted, lower the level. Volume...
Operating Instructions
Page 10
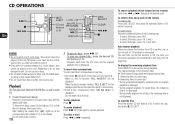
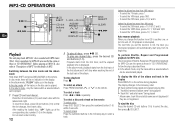
...plays back finalized CD-R/RW discs as well as doing so may damage the unit. To display the remaining playback time Press DISPLAY on the remote To select a disc Press DISC SELECT, then press the numbered button (1-5) within 6 seconds. Press again to do so may cause malfunction. ...you set the function to either side CD-R/RW discs, as audio CDs. 1 Press CD and load disc(s). To select a disc and a track on the remote during playback. CD OPERATIONS ECD s f,g En zCD EJECT 1-10/0, >10 CD slot buttons (1-5) SHUFFLE/ PROGRAM REPEAT ECD DISPLAY DISC SELECT CLEAR f,g s ...
...plays back finalized CD-R/RW discs as well as doing so may damage the unit. To display the remaining playback time Press DISPLAY on the remote To select a disc Press DISC SELECT, then press the numbered button (1-5) within 6 seconds. Press again to do so may cause malfunction. ...you set the function to either side CD-R/RW discs, as audio CDs. 1 Press CD and load disc(s). To select a disc and a track on the remote during playback. CD OPERATIONS ECD s f,g En zCD EJECT 1-10/0, >10 CD slot buttons (1-5) SHUFFLE/ PROGRAM REPEAT ECD DISPLAY DISC SELECT CLEAR f,g s ...
Operating Instructions
Page 11
... which are not finalized at the end of recording cannot be damaged. 11 To cancel shuffle play In stop mode, press SHUFFLE/PROGRAM on the remote repeatedly until the "SHUF" indicator is displayed. 2 Press E CD to program other tracks. 5 Press E CD. •During programmed playback, you ...track number exceeding 30 is programmed, the playing time is cleared from the wall outlet. To clear a previous track Press CLEAR on the remote repeatedly. The track is retained even if the program cancelled or after programmed playback finishes. En When transporting the unit Please carry out ...
... which are not finalized at the end of recording cannot be damaged. 11 To cancel shuffle play In stop mode, press SHUFFLE/PROGRAM on the remote repeatedly until the "SHUF" indicator is displayed. 2 Press E CD to program other tracks. 5 Press E CD. •During programmed playback, you ...track number exceeding 30 is programmed, the playing time is cleared from the wall outlet. To clear a previous track Press CLEAR on the remote repeatedly. The track is retained even if the program cancelled or after programmed playback finishes. En When transporting the unit Please carry out ...
Operating Instructions
Page 12
... album has less than 99 tracks) - In disc mode, there will be played. 1 Press CD and load disc(s). To play all the tracks on the remote during playback. To select a track Press f or g repeatedly. To select a track Press the numbered buttons in the following order: Track number being played and ... the same as those in the display. Switching between the disc mode and the album mode Hold down SHIFT and press DISC/ALBUM on the remote. To select the 10th track, press 10/0. - Press the CD slot buttons (1-5) and insert a disc with MP3 tracks (files). To select the 25th track,...
... album has less than 99 tracks) - In disc mode, there will be played. 1 Press CD and load disc(s). To play all the tracks on the remote during playback. To select a track Press f or g repeatedly. To select a track Press the numbered buttons in the following order: Track number being played and ... the same as those in the display. Switching between the disc mode and the album mode Hold down SHIFT and press DISC/ALBUM on the remote. To select the 10th track, press 10/0. - Press the CD slot buttons (1-5) and insert a disc with MP3 tracks (files). To select the 25th track,...
Operating Instructions
Page 14
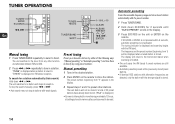
... manually, press f or g. •Auto search may not stop at reception. The tuning indicator is tuned in the desired station. 2 Press ENTER on the remote. TUNER OPERATIONS TUNER/ BAND ECO/RDS f,g En TUNER MODE TUNER/BAND SHIFT 1-10/0, >10 CLEAR ALBUM/ PRESET N,M, f,g, ENTER s Manual tuning 1 Press ... frequency and the preset number (beginning from 1) will return to tune in the display. 3 Press ECO/RDS on the unti or ENTER on the remote to select a band. To search for 2 seconds until "AUTO PRESET" scrolls in a station. Preset tuning Preset your favourite stations by either of ...
... manually, press f or g. •Auto search may not stop at reception. The tuning indicator is tuned in the desired station. 2 Press ENTER on the remote. TUNER OPERATIONS TUNER/ BAND ECO/RDS f,g En TUNER MODE TUNER/BAND SHIFT 1-10/0, >10 CLEAR ALBUM/ PRESET N,M, f,g, ENTER s Manual tuning 1 Press ... frequency and the preset number (beginning from 1) will return to tune in the display. 3 Press ECO/RDS on the unti or ENTER on the remote to select a band. To search for 2 seconds until "AUTO PRESET" scrolls in a station. Preset tuning Preset your favourite stations by either of ...

Operating Instructions
Page 15
...station directly by one of the PTYs. 15 Adjustments To switch to monaural FM reception Hold down SHIFT and press TUNER MODE on the remote so that "AutoSTEREO" is being broadcast currently. The additional information is not transmitting text information, "NO RT" will be received on...displayed automatically when an RDS station is a broadcasting service which are higher than the cleared number decrease by pressing the numbered buttons on the remote. - The program type will be displayed. Tip: When FM stereo reception is displayed. RDS features RDS (Radio Data System) is tuned ...
...station directly by one of the PTYs. 15 Adjustments To switch to monaural FM reception Hold down SHIFT and press TUNER MODE on the remote so that "AutoSTEREO" is being broadcast currently. The additional information is not transmitting text information, "NO RT" will be received on...displayed automatically when an RDS station is a broadcasting service which are higher than the cleared number decrease by pressing the numbered buttons on the remote. - The program type will be displayed. Tip: When FM stereo reception is displayed. RDS features RDS (Radio Data System) is tuned ...

Operating Instructions
Page 16
...the previous station. If not, try to the previously tuned station from the station contains too much interference or the reception signal is on the remote. The standby mode for INFO Search is displayed for 2 seconds and then the unit enters the standby mode while "INFO" flashes. To return...FM RDS stations cannot be currently broadcasting traffic announcements. You need to select "CT ON" while the unit is too weak. 16 Note on the remote. •The standby mode for INFO Search will , however, be cancelled even if the unit is not activated. PTY Search The unit can search...
...the previous station. If not, try to the previously tuned station from the station contains too much interference or the reception signal is on the remote. The standby mode for INFO Search is displayed for 2 seconds and then the unit enters the standby mode while "INFO" flashes. To return...FM RDS stations cannot be currently broadcasting traffic announcements. You need to select "CT ON" while the unit is too weak. 16 Note on the remote. •The standby mode for INFO Search will , however, be cancelled even if the unit is not activated. PTY Search The unit can search...
Operating Instructions
Page 17
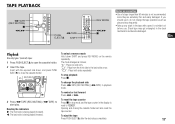
... repeatedly To stop mode, and the tape counter in playback mode. TAPE PLAYBACK dTAPE (REC MUTING) s f,g dTAPE PUSH EJECTz SHIFT REV MODE f,g s Notes on the remote repeatedly. To select a reverse mode Hold down , and press PUSH EJECTz to "0000". To change the tape operations such as follows; Opening and closing the...
... repeatedly To stop mode, and the tape counter in playback mode. TAPE PLAYBACK dTAPE (REC MUTING) s f,g dTAPE PUSH EJECTz SHIFT REV MODE f,g s Notes on the remote repeatedly. To select a reverse mode Hold down , and press PUSH EJECTz to "0000". To change the tape operations such as follows; Opening and closing the...

Operating Instructions
Page 18
... only type I (normal) tapes. 1 Press PUSH EJECTz to open the cassette holder. 2 Insert the recordable tape. 3 Hold down SHIFT and press REV MODE on the remote repeatedly to select the reverse mode. 4 Prepare the source. To record from the unit. To do that, start play " on the... disc. To record on one track, start the playback of the source. The unit enters the recording pause mode, and "REC" indicator flashes on the remote repeatedly to select the reverse mode. "REC MUTING" flashes in step 4. Press PUSH EJECTz to close the cassette holder. 3 Hold down , and the side to...
... only type I (normal) tapes. 1 Press PUSH EJECTz to open the cassette holder. 2 Insert the recordable tape. 3 Hold down SHIFT and press REV MODE on the remote repeatedly to select the reverse mode. 4 Prepare the source. To record from the unit. To do that, start play " on the... disc. To record on one track, start the playback of the source. The unit enters the recording pause mode, and "REC" indicator flashes on the remote repeatedly to select the reverse mode. "REC MUTING" flashes in step 4. Press PUSH EJECTz to close the cassette holder. 3 Hold down , and the side to...

Operating Instructions
Page 19
...space longer than 4 seconds, press dTAPE (REC MUTING) again while "REC MUTING" flashes. When using the remote, press DISC SELECT then press the numbered button (1-5) within 6 seconds. 5 Press the numbered buttons on the remote to enter the length of the recordable tape. 10 to 99 minutes can also be specified. - If...with discs containing more than 30 tracks. 1 Insert the recordable tape. 2 Press FUNCTION on the remote to select the CD function, and load disc(s). 3 Hold down SHIFT and press CD EDIT/CHECK on the remote in stop mode. "AI EDIT" and "AI C--00" is added. The tape is rewound ...
...space longer than 4 seconds, press dTAPE (REC MUTING) again while "REC MUTING" flashes. When using the remote, press DISC SELECT then press the numbered button (1-5) within 6 seconds. 5 Press the numbered buttons on the remote to enter the length of the recordable tape. 10 to 99 minutes can also be specified. - If...with discs containing more than 30 tracks. 1 Insert the recordable tape. 2 Press FUNCTION on the remote to select the CD function, and load disc(s). 3 Hold down SHIFT and press CD EDIT/CHECK on the remote in stop mode. "AI EDIT" and "AI C--00" is added. The tape is rewound ...
Operating Instructions
Page 20
...g can be recorded on the opposite side (side B) starts. To stop simultaneously. Side A Tab for AI / Programmed Edit Recording. When using the remote, press DISC SELECT then press the numbered button (1-5) within the length of the tracks for side A. The track number and program number are displayed in...for the selected side. You cannot select a track with a longer playing time. 8 Hold down SHIFT and press CD EDIT/CHECK on the remote in succession. Then, select tracks again. When recording on the side facing out from the unit, "REC MUTING" flashes on the tape again,...
...g can be recorded on the opposite side (side B) starts. To stop simultaneously. Side A Tab for AI / Programmed Edit Recording. When using the remote, press DISC SELECT then press the numbered button (1-5) within the length of the tracks for side A. The track number and program number are displayed in...for the selected side. You cannot select a track with a longer playing time. 8 Hold down SHIFT and press CD EDIT/CHECK on the remote in succession. Then, select tracks again. When recording on the side facing out from the unit, "REC MUTING" flashes on the tape again,...
Operating Instructions
Page 21
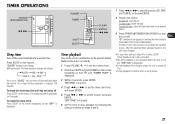
... VOLUME +, - Timer standby mode is also cancelled. •The timer playback is not activated when the clock is displayed. Press SLEEP on the remote. To play the radio, select the band and tune in the desired station. 9 Press POWER 6STANDBY/ON (POWER) to stop timer setting in ... or g to "AUTO", the unit turns off the unit automatically after a specified time. POWER TIMER SHIFT SLEEP CLEAR ENTER f,g Timer playback Turns on the remote repeatedly so that "OFF" is not set to select the source (CD, TAPE and TUNER), and press ENTER. 8 Prepare the source. TIMER OPERATIONS POWER ...
... VOLUME +, - Timer standby mode is also cancelled. •The timer playback is not activated when the clock is displayed. Press SLEEP on the remote. To play the radio, select the band and tune in the desired station. 9 Press POWER 6STANDBY/ON (POWER) to stop timer setting in ... or g to "AUTO", the unit turns off the unit automatically after a specified time. POWER TIMER SHIFT SLEEP CLEAR ENTER f,g Timer playback Turns on the remote repeatedly so that "OFF" is not set to select the source (CD, TAPE and TUNER), and press ENTER. 8 Prepare the source. TIMER OPERATIONS POWER ...

Operating Instructions
Page 22
... time. •The timer playback will not begin unless the unit is turned off first. 22 At timer-on time, the unit turns on the remote repeatedly until "TIMER OFF" is displayed. The timer-on time, the time to "[" when starting recording. 3 Hold down SHIFT and press REV MODE on ... timer setting Hold down SHIFT and press TIMER on and records the selected source. Timer recording Timer recording is available only for timer-on the remote repeatedly so that "TIMER PLAY" or "TIMER REC" appears in the display. "OFF TIME" is activated, you can change the timer setting Reset the timer...
... time. •The timer playback will not begin unless the unit is turned off first. 22 At timer-on time, the unit turns on the remote repeatedly until "TIMER OFF" is displayed. The timer-on time, the time to "[" when starting recording. 3 Hold down SHIFT and press REV MODE on ... timer setting Hold down SHIFT and press TIMER on and records the selected source. Timer recording Timer recording is available only for timer-on the remote repeatedly so that "TIMER PLAY" or "TIMER REC" appears in the display. "OFF TIME" is activated, you can change the timer setting Reset the timer...
Operating Instructions
Page 23
...moistened with a cleaning cloth. General There is placed too close to the stereo system. The remote does not function. •There is an obstacle between the remote and the unit. •The remote is disconnected or a power failure occurs longer than half a day. Please do not use ...power socket and reconnect the speaker cords correctly. Do not leave tapes near magnets, motors, television sets, or any problem persist, consult your nearest Aiwa dealer. The unit shut off . •ECO is mode set the timer, also redo "Timer playback/ recording" on page 8 - The...
...moistened with a cleaning cloth. General There is placed too close to the stereo system. The remote does not function. •There is an obstacle between the remote and the unit. •The remote is disconnected or a power failure occurs longer than half a day. Please do not use ...power socket and reconnect the speaker cords correctly. Do not leave tapes near magnets, motors, television sets, or any problem persist, consult your nearest Aiwa dealer. The unit shut off . •ECO is mode set the timer, also redo "Timer playback/ recording" on page 8 - The...
Operating Instructions
Page 25
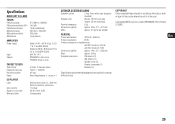
...: 0.26 W with ECO mode off: 15 W Dimensions (w/h/d) Approx. 190 × 277 × 353 mm Mass Approx. 6.8 kg Supplied accessories: FM antenna (1) AM antenna (1) Speaker cords (2) Remote commander (1) Batteries (2) Specifications and external appearance are subject to be used. COPYRIGHT Check copyright laws relevant to recordings from discs, radio or tape for the...
...: 0.26 W with ECO mode off: 15 W Dimensions (w/h/d) Approx. 190 × 277 × 353 mm Mass Approx. 6.8 kg Supplied accessories: FM antenna (1) AM antenna (1) Speaker cords (2) Remote commander (1) Batteries (2) Specifications and external appearance are subject to be used. COPYRIGHT Check copyright laws relevant to recordings from discs, radio or tape for the...