
Operating Instructions
Page 3
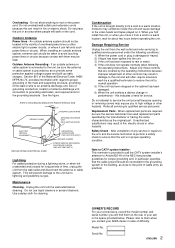
... video heads and tapes played on the rear of your AIWA dealer in the space provided below. Do not use liquid cleaners or aerosol cleaners. Do not attempt to high voltage or other hazards. Replacement Parts - Outdoor Antenna Grounding - Unauthorized substitutions may expose you will often require extensive work by the operating instructions because improper adjustment of time, unplug the unit from the wall...
... video heads and tapes played on the rear of your AIWA dealer in the space provided below. Do not use liquid cleaners or aerosol cleaners. Do not attempt to high voltage or other hazards. Replacement Parts - Outdoor Antenna Grounding - Unauthorized substitutions may expose you will often require extensive work by the operating instructions because improper adjustment of time, unplug the unit from the wall...
Operating Instructions
Page 4
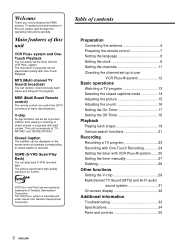
... stereo and bilingual TV programs. MBR (Multi Brand Remote control) The remote control can play back S-VHS recorded tape. This unit corresponds to closed caption is manufactured under license from viewing or listening to use VCR Plus+® system 12 Basic operations Watching a TV program 13 Selecting the closed captions mode 14 Adjusting the picture 15 Adjusting the sound 16 Setting the On-Timer 17 Setting the Off-Timer 18 Playback Playing back a tape 19 Various...
... stereo and bilingual TV programs. MBR (Multi Brand Remote control) The remote control can play back S-VHS recorded tape. This unit corresponds to closed caption is manufactured under license from viewing or listening to use VCR Plus+® system 12 Basic operations Watching a TV program 13 Selecting the closed captions mode 14 Adjusting the picture 15 Adjusting the sound 16 Setting the On-Timer 17 Setting the Off-Timer 18 Playback Playing back a tape 19 Various...
Operating Instructions
Page 8
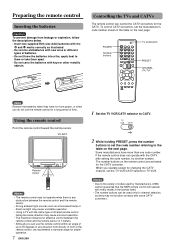
... ambient light sources such as illustrated. • Do not mix old batteries with new ones or different types of infrared remote control facing the same direction may not function correctly with every model of the brands listed. • The number buttons can be used only for channel selection, but they have more power, or when you operate except for the CATV converter. VX-S207 Remote sensor...
... ambient light sources such as illustrated. • Do not mix old batteries with new ones or different types of infrared remote control facing the same direction may not function correctly with every model of the brands listed. • The number buttons can be used only for channel selection, but they have more power, or when you operate except for the CATV converter. VX-S207 Remote sensor...

Operating Instructions
Page 10
... the clock adjustment signal or reception signal is set AUTO CLOCK to correct flashes. UP, then press ENTER. 9 ENGLISH CANCEL In this case, you have to change the minutes setting in step 3 appears. 2 Press SET/TRACKING + or - In this case, you must set the minutes. to set the time manually. to select SYSTEM SET-UP, then press ENTER. 7 Press ENTER to select SYSTEM SET- Reset the digits using the SET/TRACKING + or...
... the clock adjustment signal or reception signal is set AUTO CLOCK to correct flashes. UP, then press ENTER. 9 ENGLISH CANCEL In this case, you have to change the minutes setting in step 3 appears. 2 Press SET/TRACKING + or - In this case, you must set the minutes. to set the time manually. to select SYSTEM SET-UP, then press ENTER. 7 Press ENTER to select SYSTEM SET- Reset the digits using the SET/TRACKING + or...
Operating Instructions
Page 11
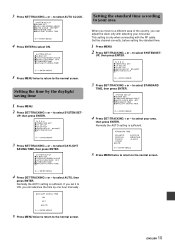
... channel correctly, before setting the standard time. 1 Press MENU. 2 Press SET/TRACKING + or - UP, then press ENTER. 3 Press SET/TRACKING + or - Normally the AUTO setting is only when connecting with selecting your area, then press ENTER. ENGLISH 10 This setting is sufficient. Normally the AUTO setting is sufficient. 3 Press SET/TRACKING + or - If you set it to ON, you can adjust the clock only with the RF cable. Setting...
... channel correctly, before setting the standard time. 1 Press MENU. 2 Press SET/TRACKING + or - UP, then press ENTER. 3 Press SET/TRACKING + or - Normally the AUTO setting is only when connecting with selecting your area, then press ENTER. ENGLISH 10 This setting is sufficient. Normally the AUTO setting is sufficient. 3 Press SET/TRACKING + or - If you set it to ON, you can adjust the clock only with the RF cable. Setting...

Operating Instructions
Page 12
... according to the connections to select AUTO CH MEMORY, then press ENTER. to the antenna connector 4 Press SET/TRACKING + or - TV VCR/CATV Number buttons MENU SET/TRACKING +/- Adding or erasing the channels manually If the Auto Channel Memory does not set the channels correctly, add them manually for watching TV programs. Also, you can skip the channels which are scanned and stored in TV mode. • Set the TV VCR/CATV selector...
... according to the connections to select AUTO CH MEMORY, then press ENTER. to the antenna connector 4 Press SET/TRACKING + or - TV VCR/CATV Number buttons MENU SET/TRACKING +/- Adding or erasing the channels manually If the Auto Channel Memory does not set the channels correctly, add them manually for watching TV programs. Also, you can skip the channels which are scanned and stored in TV mode. • Set the TV VCR/CATV selector...

Operating Instructions
Page 13
... enter tens and ones digits. or the number buttons to select GUIDE CH SET, then press ENTER. When you need to coordinate these numbers by locating guide channel 38 (under GUIDE CH). In this process until all channels match. UP, then press ENTER. 3 Press SET/TRACKING + or - to display VCR CH "14," then press ENTER. For example, SHOWTIME is listed in the channel line up chart (under...
... enter tens and ones digits. or the number buttons to select GUIDE CH SET, then press ENTER. When you need to coordinate these numbers by locating guide channel 38 (under GUIDE CH). In this process until all channels match. UP, then press ENTER. 3 Press SET/TRACKING + or - to display VCR CH "14," then press ENTER. For example, SHOWTIME is listed in the channel line up chart (under...

Operating Instructions
Page 14
... 110 120 SLEEP 120 Headphones jack VOLUME POWER +/- To select VHF/UHF broadcast using the number buttons Set the TV VCR/CATV selector to enter the ones digit. 3 Press VOLUME + or - The remaining time appears on the front lights. 2 Press CHANNEL N or M repeatedly, or the number buttons to enter the ones digit. To cancel the sleep timer Press SLEEP repeatedly until "SLEEP 0" appears. 13 ENGLISH To recall a previous channel Press PREV.CH to switch back and...
... 110 120 SLEEP 120 Headphones jack VOLUME POWER +/- To select VHF/UHF broadcast using the number buttons Set the TV VCR/CATV selector to enter the ones digit. 3 Press VOLUME + or - The remaining time appears on the front lights. 2 Press CHANNEL N or M repeatedly, or the number buttons to enter the ones digit. To cancel the sleep timer Press SLEEP repeatedly until "SLEEP 0" appears. 13 ENGLISH To recall a previous channel Press PREV.CH to switch back and...

Operating Instructions
Page 15
... the channels are transmitted on the screen in other information. These transmissions do not allow time for editing. • Some cable systems and copy protection systems may interfere with the closed caption mode TEXT CH1, TEXT CH2 will reappear when the signal is normal with a programming schedule or other languages are changed . • If the captions signal is lost due to select the caption mode. ENGLISH...
... the channels are transmitted on the screen in other information. These transmissions do not allow time for editing. • Some cable systems and copy protection systems may interfere with the closed caption mode TEXT CH1, TEXT CH2 will reappear when the signal is normal with a programming schedule or other languages are changed . • If the captions signal is lost due to select the caption mode. ENGLISH...

Operating Instructions
Page 16
... colors greener redder SHARPNESS makes the picture clearer makes the picture softer Before starting Set the TV VCR/CATV selector to select TV SET- Tip To reset all the items to the initial setting, press CANCEL in step 5. 4 Press ENTER repeatedly to select the item to the normal screen. After several seconds from releasing the button, the display returns to adjust. to adjust the setting. to select PICTURE...
... colors greener redder SHARPNESS makes the picture clearer makes the picture softer Before starting Set the TV VCR/CATV selector to select TV SET- Tip To reset all the items to the initial setting, press CANCEL in step 5. 4 Press ENTER repeatedly to select the item to the normal screen. After several seconds from releasing the button, the display returns to adjust. to adjust the setting. to select PICTURE...

Operating Instructions
Page 18
... set the channel number, then press ENTER. 8 Press SET/TRACKING + or - ENTER VX-S207 6 Press SET/TRACKING + or - WKL-day of timer, then press ENTER. MENU SET/TRACKING +/- To change the minutes setting in ten minutes, press and hold SET/TRACKING + or -. MON-SAT: Daily program from Monday to select ON/OFF TIMER, then press ENTER. 17 ENGLISH to Friday. MON-FRI: Daily program from Monday to select...
... set the channel number, then press ENTER. 8 Press SET/TRACKING + or - ENTER VX-S207 6 Press SET/TRACKING + or - WKL-day of timer, then press ENTER. MENU SET/TRACKING +/- To change the minutes setting in ten minutes, press and hold SET/TRACKING + or -. MON-SAT: Daily program from Monday to select ON/OFF TIMER, then press ENTER. 17 ENGLISH to Friday. MON-FRI: Daily program from Monday to select...

Operating Instructions
Page 19
... the time. Press MENU 3 times to return to cancel this timer is changed to correct flashes. to display "LINE1" (from AUDIO/VIDEO IN jacks on the rear) or "LINE2" (from AUDIO/VIDEO IN jacks on to a programmed channel at the programmed time. Setting the Off-Timer Once this function. to select OFF TIMER, then press ENTER. to select ON/OFF TIMER, then press ENTER. 4 Press SET/TRACKING + or - to select TV SET- to display SET, then press ENTER. CONTINUE ENGLISH...
... the time. Press MENU 3 times to return to cancel this timer is changed to correct flashes. to display "LINE1" (from AUDIO/VIDEO IN jacks on the rear) or "LINE2" (from AUDIO/VIDEO IN jacks on to a programmed channel at the programmed time. Setting the Off-Timer Once this function. to select OFF TIMER, then press ENTER. to select ON/OFF TIMER, then press ENTER. 4 Press SET/TRACKING + or - to select TV SET- to display SET, then press ENTER. CONTINUE ENGLISH...
Operating Instructions
Page 20
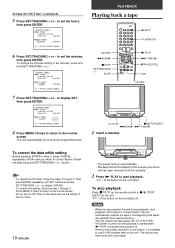
... start playback. PLAYBACK Playing back a tape zEJECT TV MONITOR 6 Press SET/TRACKING + or - Press MENU 3 times to return to use S-VHS cassette tape on the unit lights. To change the minutes setting in step 7, press CANCEL repeatedly until SET flashes and press SET/TRACKING + or - The unit automatically turns off . to the normal screen. Reset the data using the SET/TRACKING + or - "D" of the button on this unit...
... start playback. PLAYBACK Playing back a tape zEJECT TV MONITOR 6 Press SET/TRACKING + or - Press MENU 3 times to return to use S-VHS cassette tape on the unit lights. To change the minutes setting in step 7, press CANCEL repeatedly until SET flashes and press SET/TRACKING + or - The unit automatically turns off . to the normal screen. Reset the data using the SET/TRACKING + or - "D" of the button on this unit...
Operating Instructions
Page 21
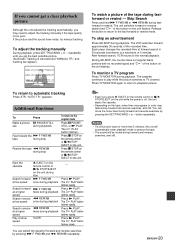
... automatically enter playback mode to the fast-forward or rewind mode. To monitor a TV program Press TV MONITOR during fastforward or rewind - Press d PLAY. To watch a picture of forward search in 30 seconds increments to TV channel. Each press changes the recorded time of the tape during playback. If the picture and the sound have noise, try manual tracking. "AUTO TR." During AD-SKIP...
... automatically enter playback mode to the fast-forward or rewind mode. To monitor a TV program Press TV MONITOR during fastforward or rewind - Press d PLAY. To watch a picture of forward search in 30 seconds increments to TV channel. Each press changes the recorded time of the tape during playback. If the picture and the sound have noise, try manual tracking. "AUTO TR." During AD-SKIP...
Operating Instructions
Page 24
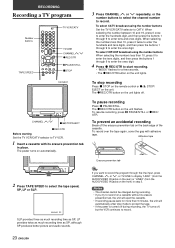
... the power is turned off during recording. • If you want to record the program through 9 to enter the ones digit. 4 Press w REC/OTR to CATV. To pause recording Press a PAUSE/STILL. To select CATV broadcast using the number buttons When selecting the numbers less than 10, press 0 to enter the tens digits, and then press the buttons 1 through the line input, press CHANNEL...
... the power is turned off during recording. • If you want to record the program through 9 to enter the ones digit. 4 Press w REC/OTR to CATV. To pause recording Press a PAUSE/STILL. To select CATV broadcast using the number buttons When selecting the numbers less than 10, press 0 to enter the tens digits, and then press the buttons 1 through the line input, press CHANNEL...

Operating Instructions
Page 27
... a program Press MENU. to select the unnecessary program, and press CANCEL. Changing the setting To set . to display the timer program list. Then press SET/TRACKING + or - to select SP, LP or SLP. 6 Press VCR PLUS+ button or ENTER. Cancel an unnecessary program. • To confirm the setting, select TIMER REC SET in the menu. Then refer to activate timer recordings. Tips • If "PROGRAM FULL" flashes and the timer program list on step 1, 8 programs are not operable. To operate...
... a program Press MENU. to select the unnecessary program, and press CANCEL. Changing the setting To set . to display the timer program list. Then press SET/TRACKING + or - to select SP, LP or SLP. 6 Press VCR PLUS+ button or ENTER. Cancel an unnecessary program. • To confirm the setting, select TIMER REC SET in the menu. Then refer to activate timer recordings. Tips • If "PROGRAM FULL" flashes and the timer program list on step 1, 8 programs are not operable. To operate...

Operating Instructions
Page 28
... screen. • When the power supply is interrupted for more than 5 seconds, the preset program is selected. 1 Press MENU. 2 Press SET/TRACKING + or - The unit automatically starts recording at the programmed time. to select TIMER REC SET, then press ENTER. 3 Press SET/TRACKING + or - to display "L1" (from the AUDIO/VIDEO IN jacks on the rear) or "L2" (from the AUDIO/VIDEO IN jacks on and the channel you want to set another program...
... screen. • When the power supply is interrupted for more than 5 seconds, the preset program is selected. 1 Press MENU. 2 Press SET/TRACKING + or - The unit automatically starts recording at the programmed time. to select TIMER REC SET, then press ENTER. 3 Press SET/TRACKING + or - to display "L1" (from the AUDIO/VIDEO IN jacks on the rear) or "L2" (from the AUDIO/VIDEO IN jacks on and the channel you want to set another program...

Operating Instructions
Page 32
... Hi-Fi audio sound system to the primary sound, select OFF in the VHS Hi-Fi audio sound system. It can record and play back the audio signal in step 4. to select SAP. 4 Press ENTER to select ON. 5 Press MENU twice to return to the normal screen. 6 Press CHANNEL N, M or the number buttons to select the channel number to select TV SET-UP, then press ENTER. When it satisfies the assigned cable frequencies...
... Hi-Fi audio sound system to the primary sound, select OFF in the VHS Hi-Fi audio sound system. It can record and play back the audio signal in step 4. to select SAP. 4 Press ENTER to select ON. 5 Press MENU twice to return to the normal screen. 6 Press CHANNEL N, M or the number buttons to select the channel number to select TV SET-UP, then press ENTER. When it satisfies the assigned cable frequencies...
Operating Instructions
Page 34
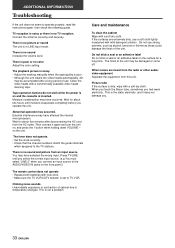
... you connect an input source to the AUDIO/VIDEO IN jacks on , and press the 1 button while holding down VOLUME - TV reception is noisy or there is in LINE input mode. There is no picture or sound The unit is no color Adjust the color setting. There is the static electricity, and it again and turn the unit on the front panel.) The remote control does not operate • Replace both...
... you connect an input source to the AUDIO/VIDEO IN jacks on , and press the 1 button while holding down VOLUME - TV reception is noisy or there is in LINE input mode. There is no picture or sound The unit is no color Adjust the color setting. There is the static electricity, and it again and turn the unit on the front panel.) The remote control does not operate • Replace both...
Operating Instructions
Page 35
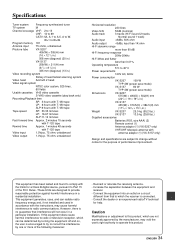
....5(H) mm (171/4 × 145/8 × 151/4 in.) Weight VX-S207 25.0 kg (55.2 lbs.) VX-S137 13.5 kg (29.8 lbs.) Supplied accessories Batteries (R03, size AAA) (2) Remote control (1) Antenna adaptor (1) (VX-S207 only) VHF/UHF telecopic antenna with antenna adaptor (1) (VX-S137 only) Design and specifications are subject to change without notice for help. However, there is connected. - Caution Modifications or adjustment to this product, which the receiver is...
....5(H) mm (171/4 × 145/8 × 151/4 in.) Weight VX-S207 25.0 kg (55.2 lbs.) VX-S137 13.5 kg (29.8 lbs.) Supplied accessories Batteries (R03, size AAA) (2) Remote control (1) Antenna adaptor (1) (VX-S207 only) VHF/UHF telecopic antenna with antenna adaptor (1) (VX-S137 only) Design and specifications are subject to change without notice for help. However, there is connected. - Caution Modifications or adjustment to this product, which the receiver is...
