
Operating Instructions
Page 3
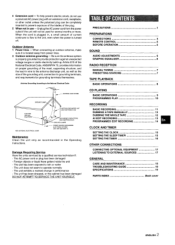
... antenna grounding - Be sure the antenna system is plugged in, a small amount of the mast, supporting structure, and the lead-in performance - PRECAUTIONS l PREPARATIONS CONNECTIONS 3 REMOTE CONTROL 5 BEFORE OPERATION 5 SOUND AUDIO ADJUSTMENTS 6 GRAPHIC EQUALIZER 6 RADIO RECEPTION MANUAL TUNING 7 PRESETTING STATIONS 7 TAPE PLAYBACK BASIC OPERATIONS 8 CD PLAYING BASIC OPERATIONS 9 PROGRAMMED PLAY 10...
... antenna grounding - Be sure the antenna system is plugged in, a small amount of the mast, supporting structure, and the lead-in performance - PRECAUTIONS l PREPARATIONS CONNECTIONS 3 REMOTE CONTROL 5 BEFORE OPERATION 5 SOUND AUDIO ADJUSTMENTS 6 GRAPHIC EQUALIZER 6 RADIO RECEPTION MANUAL TUNING 7 PRESETTING STATIONS 7 TAPE PLAYBACK BASIC OPERATIONS 8 CD PLAYING BASIC OPERATIONS 9 PROGRAMMED PLAY 10...
Operating Instructions
Page 4
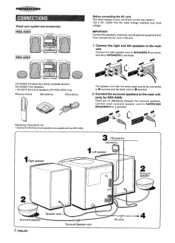
... equipment first. Operating Instructions, etc * Optional SX-R275 Surround speakers are no differences between the surround speakers. CX-NA303 Compact disc stereo cassette reciever SX-NA302 Front speakers * SX-R275 Surround speakers (For NSX-A304 only) Remote control m AM antenna FM antenna The speaker cord with the NSX-A304. AC cord ®4 Check...
... equipment first. Operating Instructions, etc * Optional SX-R275 Surround speakers are no differences between the surround speakers. CX-NA303 Compact disc stereo cassette reciever SX-NA302 Front speakers * SX-R275 Surround speakers (For NSX-A304 only) Remote control m AM antenna FM antenna The speaker cord with the NSX-A304. AC cord ®4 Check...
Operating Instructions
Page 6
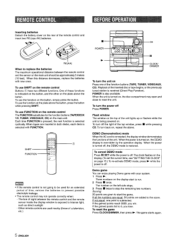
... The FUNCTION substitutes for an extended period of time, remove the batteries to prevent possible electrolyte leakage. The line of sight between the remote control and the sensor on the main unit should be used nearby (those of a television, etc.) ,-~"- -. When the unit is selected ...SET while the power is off Press POWER. The number on , repeat the above. To use SHIFT on the remote control Buttons @ have two different functions. q If the remote control is not going to be approximately 5 meters (16 feet). Inserting batteries Detach the battery cover on the rear...
... The FUNCTION substitutes for an extended period of time, remove the batteries to prevent possible electrolyte leakage. The line of sight between the remote control and the sensor on the main unit should be used nearby (those of a television, etc.) ,-~"- -. When the unit is selected ...SET while the power is off Press POWER. The number on , repeat the above. To use SHIFT on the remote control Buttons @ have two different functions. q If the remote control is not going to be approximately 5 meters (16 feet). Inserting batteries Detach the battery cover on the rear...

Operating Instructions
Page 7
...plugged in. Select one of the display 1 Press CLOCK/DIMMER twice so that "DIMMER" is turned off position to the PHONES jack with the remote control press T-BASS while pressing SHIFT. To cancel the selected mode Press the selected button again. r ROCK- DIMMER 2- No sound is displayed. ...on the main unit, or press VOLUME on the buttons light off . "GEQ OFF is dimmer than DIMMER 1, and the illumination on the remote control. DIMMER 1: The illumination of the display is resumed. To select with heavy bass and fine treble. DIMMER 2: The illumination of the ...
...plugged in. Select one of the display 1 Press CLOCK/DIMMER twice so that "DIMMER" is turned off position to the PHONES jack with the remote control press T-BASS while pressing SHIFT. To cancel the selected mode Press the selected button again. r ROCK- DIMMER 2- No sound is displayed. ...on the main unit, or press VOLUME on the buttons light off . "GEQ OFF is dimmer than DIMMER 1, and the illumination on the remote control. DIMMER 1: The illumination of the display is resumed. To select with heavy bass and fine treble. DIMMER 2: The illumination of the ...
Operating Instructions
Page 8
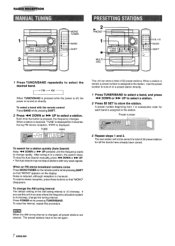
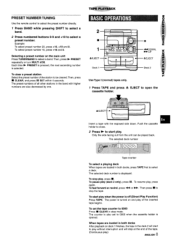
... interval, repeat this unit in consecutive each band is turned on the display. When an FM stereo broadcast contains noise Press MONO TUNER on the remote control while pressing SHIFT so that "MONO disappears. order for 2 seconds. 1 h 2 f MONO TUNER BAND SHIFT .2 PRESET 1 s MULTI JOG ... A preset number beginning from 1 in an area where the frequency allocation system is pressed, the frequency changes. To stop at stations with the remote control Press BAND while pressing SHIFT. 2 Press + DOWN or W UP to change the tuning interval. To select a band with very weak ...
... interval, repeat this unit in consecutive each band is turned on the display. When an FM stereo broadcast contains noise Press MONO TUNER on the remote control while pressing SHIFT so that "MONO disappears. order for 2 seconds. 1 h 2 f MONO TUNER BAND SHIFT .2 PRESET 1 s MULTI JOG ... A preset number beginning from 1 in an area where the frequency allocation system is pressed, the frequency changes. To stop at stations with the remote control Press BAND while pressing SHIFT. 2 Press + DOWN or W UP to change the tuning interval. To select a band with very weak ...
Operating Instructions
Page 9
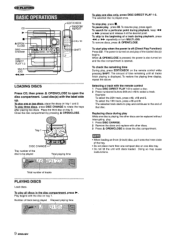
... 1 finishes, the tape in stop at the end of the station to selecl a deck. The counter is off (Direct Play Function) Press TAPE. Use the remote control to select the preset number directly. 1 Press BAND while pressing SHIFT to select a band. 2 Press numbered buttons O-9 and +1 O to open the cassette holder. Selecting...
... 1 finishes, the tape in stop at the end of the station to selecl a deck. The counter is off (Direct Play Function) Press TAPE. Use the remote control to select the preset number directly. 1 Press BAND while pressing SHIFT to select a band. 2 Press numbered buttons O-9 and +1 O to open the cassette holder. Selecting...
Operating Instructions
Page 10
.... Selecting a track with the disc on tray 1. q Do not place more than one compact disc on one or two discs, place the discs on the remote control while pressing SHIFT. To plav all tracks finish playing is also turned on tray 3. Play begins with the... remote control 1 Press DISC DIRECT PLAY 1-3 to select a disc. 2 Press numbered buttons O-9 and +1 O to close the disc compartment. Tray 1 DISC CHANGE~ Tray number of the disc ...
.... Selecting a track with the disc on tray 1. q Do not place more than one compact disc on one or two discs, place the discs on the remote control while pressing SHIFT. To plav all tracks finish playing is also turned on tray 3. Play begins with the... remote control 1 Press DISC DIRECT PLAY 1-3 to select a disc. 2 Press numbered buttons O-9 and +1 O to close the disc compartment. Tray 1 DISC CHANGE~ Tray number of the disc ...
Operating Instructions
Page 11
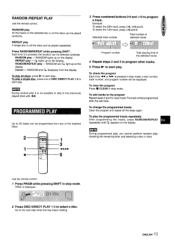
...a disc number, track number, and program number will be played repeatedly, Press RANDOM/REPEAT while pressing SHIFT. Go to select a disc. Use the remote control. REPEAT play . RANDOM/REPEAT play - To ~lav all the discs can be displayed. To add tracks to start play - ~ lights up... 2 and 3 to program other tracks. 5 Press -to start play , checking the remaining time, and selecting a disc or track, u Use the remote control. 1 Press PRGM while pressing SHIFT in stop mode. To change the programmed tracks Clear the program and repeat all the steps again. ENGLISH 1() RANDOM...
...a disc number, track number, and program number will be played repeatedly, Press RANDOM/REPEAT while pressing SHIFT. Go to select a disc. Use the remote control. REPEAT play . RANDOM/REPEAT play - To ~lav all the discs can be displayed. To add tracks to start play - ~ lights up... 2 and 3 to program other tracks. 5 Press -to start play , checking the remaining time, and selecting a disc or track, u Use the remote control. 1 Press PRGM while pressing SHIFT in stop mode. To change the programmed tracks Clear the program and repeat all the steps again. ENGLISH 1() RANDOM...
Operating Instructions
Page 14
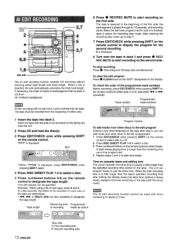
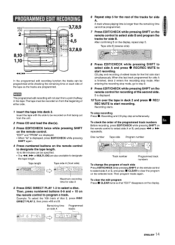
... Repeat steps 2 and 3 to select tracks. If necessary, the order of tracks is rearranged so that "EDIT" disappears on the remote control to display the program for 10 seconds, and recording starts. q When "PRGM" is cut short. (Al: Artificial Intelligence) ...m Al edit recording will not start from the beginning of either side. 6 Press q REC/REC MUTE to start recording on the remote control to select side A or B, and press + or E repeatedly. This unit can be recorded from a point halfway into deck 2. MULTI JOG n ~.-. ~-+ ._ \ f-3q7 -.~lf...
... Repeat steps 2 and 3 to select tracks. If necessary, the order of tracks is rearranged so that "EDIT" disappears on the remote control to display the program for 10 seconds, and recording starts. q When "PRGM" is cut short. (Al: Artificial Intelligence) ...m Al edit recording will not start from the beginning of either side. 6 Press q REC/REC MUTE to start recording on the remote control to select side A or B, and press + or E repeatedly. This unit can be recorded from a point halfway into deck 2. MULTI JOG n ~.-. ~-+ ._ \ f-3q7 -.~lf...
Operating Instructions
Page 15
...track whose playing time is longer than the remaining time cannot be programmed. ~~; ~,. ,~,>,,: :.:,8S":':;/ 7 Press EDIT/CHECK while pressing SHIFT on the! ,# remote control to select side B and program the tracks for side A 5 Press DISC DIRECT PLAY 1-3 to select a disc. "EDIT" and "PRGM" are ...function the tracks can be programmed while checking the remaining time on each side Press EDIT/CHECK while pressing SHIFT on tht? remote control for side A is displayed, press EDIT/CHECK while pressing SHIFT again. 4 Press numbered buttons on side A Programmed tracks...
...track whose playing time is longer than the remaining time cannot be programmed. ~~; ~,. ,~,>,,: :.:,8S":':;/ 7 Press EDIT/CHECK while pressing SHIFT on the! ,# remote control to select side B and program the tracks for side A 5 Press DISC DIRECT PLAY 1-3 to select a disc. "EDIT" and "PRGM" are ...function the tracks can be programmed while checking the remaining time on each side Press EDIT/CHECK while pressing SHIFT on tht? remote control for side A is displayed, press EDIT/CHECK while pressing SHIFT again. 4 Press numbered buttons on side A Programmed tracks...
Operating Instructions
Page 16
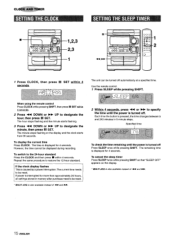
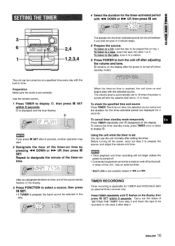
... all settings stored in 5-minute steps. MULTI JOG is also available instead of U and W. 15 ENGLISH To display the current time Press CLOCK. Use the remote control. 1 Press SLEEP while pressing SHIFT. Each time the button is turned off automatically at a specified time. i--r 1 11 II 9 1,2,3 1 2 ...2,3 r P--A-a 1 1 u, 1 Press CLOCK, then press II SET within 4 seconds. When using the remote control Press CLOCK while pressing SHIFT, then press II SET !Mt!lin 4 seconds. 2 Press + DOWN or > UP to be turned off . The hour ...
... all settings stored in 5-minute steps. MULTI JOG is also available instead of U and W. 15 ENGLISH To display the current time Press CLOCK. Use the remote control. 1 Press SLEEP while pressing SHIFT. Each time the button is turned off automatically at a specified time. i--r 1 11 II 9 1,2,3 1 2 ...2,3 r P--A-a 1 1 u, 1 Press CLOCK, then press II SET within 4 seconds. When using the remote control Press CLOCK while pressing SHIFT, then press II SET !Mt!lin 4 seconds. 2 Press + DOWN or > UP to be turned off . The hour ...
Operating Instructions
Page 17
... are displayed for TUNER and VIDEO/AUX (wi'!h an external timer) sources only. The unit can beset between 5 and 240 minutes in timer. Use the remote control. 1 Press TIMER to turn the unit off with the built-in 5-minute steps. The volume level is automatically set to 16 when the power...
... are displayed for TUNER and VIDEO/AUX (wi'!h an external timer) sources only. The unit can beset between 5 and 240 minutes in timer. Use the remote control. 1 Press TIMER to turn the unit off with the built-in 5-minute steps. The volume level is automatically set to 16 when the power...


