
Operating Instructions
Page 2
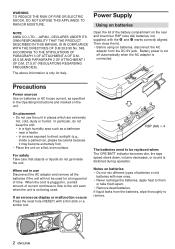
... of time. Power Supply Using on batteries Open the lid of batteries or old batteries with a thin stick or a similar tool. Notes on batteries • Do not mix different types of the battery compartment on the unit. WARNING TO REDUCE THE RISK OF FIRE OR ELECTRIC SHOCK, DO NOT EXPOSE THIS APPLIANCE TO RAIN OR MOISTURE. When the cord is plugged in the Operating Instructions...
... of time. Power Supply Using on batteries Open the lid of batteries or old batteries with a thin stick or a similar tool. Notes on batteries • Do not mix different types of the battery compartment on the unit. WARNING TO REDUCE THE RISK OF FIRE OR ELECTRIC SHOCK, DO NOT EXPOSE THIS APPLIANCE TO RAIN OR MOISTURE. When the cord is plugged in the Operating Instructions...
Operating Instructions
Page 3
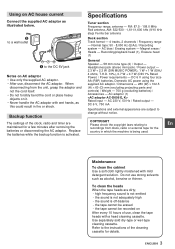
... solution. When disconnecting from discs, radio or external tape for details. Headphones jack (stereo mini-jack) / Power output - 2.3 W + 2.3 W (DIN MUSIC POWER), 1 W + 1 W (EIAJ 4 ohms, T.H.D. 10%), 0.7 W + 0.7 W (DIN 1% Rated Power) / Power requirements - Replace country in fire or shock. the tape cannot be erased - Tuner section Frequency range, antenna - Refer to change without notice. Using on AC adaptor • Use only the supplied AC adaptor. • After use strong solvents such as alcohol, benzine or thinner. Recording/playback head (1), Erasure head...
... solution. When disconnecting from discs, radio or external tape for details. Headphones jack (stereo mini-jack) / Power output - 2.3 W + 2.3 W (DIN MUSIC POWER), 1 W + 1 W (EIAJ 4 ohms, T.H.D. 10%), 0.7 W + 0.7 W (DIN 1% Rated Power) / Power requirements - Replace country in fire or shock. the tape cannot be erased - Tuner section Frequency range, antenna - Refer to change without notice. Using on AC adaptor • Use only the supplied AC adaptor. • After use strong solvents such as alcohol, benzine or thinner. Recording/playback head (1), Erasure head...
Operating Instructions
Page 4
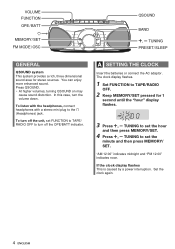
... unit, set FUNCTION to TAPE/ RADIO OFF to set the hour and then press MEMORY/SET. 4 Press +, - A SETTING THE CLOCK Insert the batteries or connect the AC adaptor. TUNING to turn the volume down. To listen with the headphones, connect headphones with a stereo mini plug to set the minute and then press MEMORY/ SET. TUNING to the \ (Headphones) jack. VOLUME FUNCTION OPE / BATT \ MEMORY/ SET FM MODE/ OSC QSOUND BAND +, - You can enjoy more enhanced sound. Set the clock again. 4 ENGLISH TUNING PRESET / SLEEP...
... unit, set FUNCTION to TAPE/ RADIO OFF to set the hour and then press MEMORY/SET. 4 Press +, - A SETTING THE CLOCK Insert the batteries or connect the AC adaptor. TUNING to turn the volume down. To listen with the headphones, connect headphones with a stereo mini plug to set the minute and then press MEMORY/ SET. TUNING to the \ (Headphones) jack. VOLUME FUNCTION OPE / BATT \ MEMORY/ SET FM MODE/ OSC QSOUND BAND +, - You can enjoy more enhanced sound. Set the clock again. 4 ENGLISH TUNING PRESET / SLEEP...
Operating Instructions
Page 5
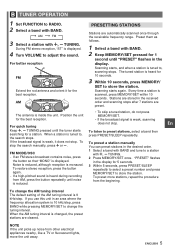
... lights, move the unit away. ENGLISH 5 During FM stereo reception, "ST" is changed, the preset stations are automatically scanned once through the receivable frequency range. AM PRESETTING STATIONS Stations are cleared. Preset them as follows. 1 Select a band with +, - Every time a station is monaural. When the AM tuning interval is displayed. 4 Turn VOLUME to a station with BAND. 2 Keep MEMORY/SET pressed for 1 second until the tuner starts searching for the best reception. B TUNER OPERATION 1 Set FUNCTION...
... lights, move the unit away. ENGLISH 5 During FM stereo reception, "ST" is changed, the preset stations are automatically scanned once through the receivable frequency range. AM PRESETTING STATIONS Stations are cleared. Preset them as follows. 1 Select a band with +, - Every time a station is monaural. When the AM tuning interval is displayed. 4 Turn VOLUME to a station with BAND. 2 Keep MEMORY/SET pressed for 1 second until the tuner starts searching for the best reception. B TUNER OPERATION 1 Set FUNCTION...

Operating Instructions
Page 6
... on the cassette tape with the exposed side up and the side to TAPE/RADIO OFF. 2 Place your finger on only one side of the tape. 1 Insert a tape with adhesive tape, etc. f F FWD/g REWIND - Refer to "TUNER OPERATION". 3 Press w REC to the sound source. VOLUME FUNCTION MEMORY/ SET PRESET / SLEEP C TAPE OPERATION MIC +, - TUNING C TAPE OPERATION Use Type I (normal) tapes only. PLAYING A TAPE 1 Set FUNCTION to be recorded facing out. 2 Tune to a station. To record from built-in microphone, set FUNCTION to release f, g. - Recording is...
... on the cassette tape with the exposed side up and the side to TAPE/RADIO OFF. 2 Place your finger on only one side of the tape. 1 Insert a tape with adhesive tape, etc. f F FWD/g REWIND - Refer to "TUNER OPERATION". 3 Press w REC to the sound source. VOLUME FUNCTION MEMORY/ SET PRESET / SLEEP C TAPE OPERATION MIC +, - TUNING C TAPE OPERATION Use Type I (normal) tapes only. PLAYING A TAPE 1 Set FUNCTION to be recorded facing out. 2 Tune to a station. To record from built-in microphone, set FUNCTION to release f, g. - Recording is...
Operating Instructions
Page 7
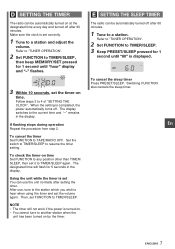
... turned off . The display switches to a station and adjust the volume. Refer to "TUNER OPERATION". 2 Set FUNCTION to a station. Follow steps 3 to TAPE/RADIO OFF. To cancel the timer Set FUNCTION to 4 of "SETTING THE CLOCK". E SETTING THE SLEEP TIMER The radio can use , tune to the station which you wish to hear when using the timer and set correctly. 1 Tune to the current time and "-" remains in the display. Make sure the clock is turned on by the timer. The designated time will not work...
... turned off . The display switches to a station and adjust the volume. Refer to "TUNER OPERATION". 2 Set FUNCTION to a station. Follow steps 3 to TAPE/RADIO OFF. To cancel the timer Set FUNCTION to 4 of "SETTING THE CLOCK". E SETTING THE SLEEP TIMER The radio can use , tune to the station which you wish to hear when using the timer and set correctly. 1 Tune to the current time and "-" remains in the display. Make sure the clock is turned on by the timer. The designated time will not work...


