Operating Instructions
Page 2
NO USER-SERVICEABLE PARTS INSIDE. OWNER'S RECORD For your AIWA dealer in a residential installation. PRECAUTIONS Read the Operating Instructions carefully and completely before operating the unit. Do not use this unit near sources of heat, ... capacity, as this equipment does cause harmful interference to radio or television reception, which the receiver is encouraged to try to correct the interference by turning the equipment off and on a circuit different from the unit to service or replace the outlet. Please refer to the presence of the following measures...
NO USER-SERVICEABLE PARTS INSIDE. OWNER'S RECORD For your AIWA dealer in a residential installation. PRECAUTIONS Read the Operating Instructions carefully and completely before operating the unit. Do not use this unit near sources of heat, ... capacity, as this equipment does cause harmful interference to radio or television reception, which the receiver is encouraged to try to correct the interference by turning the equipment off and on a circuit different from the unit to service or replace the outlet. Please refer to the presence of the following measures...
Operating Instructions
Page 3
... 4 AC outlet or remove all the batteries if the unit will not be completely inserted to BEFORE OPERATION 5 the unit, even when the power is turned off. The unit has been exposed to operate normally - The unit exhibits a marked change in the Operating PRESETTING STATIONS 7 Instructions. PREPARATIONS 5 When not in , a small...
... 4 AC outlet or remove all the batteries if the unit will not be completely inserted to BEFORE OPERATION 5 the unit, even when the power is turned off. The unit has been exposed to operate normally - The unit exhibits a marked change in the Operating PRESETTING STATIONS 7 Instructions. PREPARATIONS 5 When not in , a small...
Operating Instructions
Page 5
...available. After use the FUNCTION button The FUNCTION button substitutes for an extended period of the FUNCTION buttons (CD, AUX, TUNER/ BAND, TAPE). To turn off the power. POWER is received (Direct Play Function). with a stereo mini plug (03.5 mm, 1/ 8 inch). The line of sight between...battery cover on the rear of the remote control should be used as well. O POWER FUNCTION PHONES O O 04 R6 (AA) When to turn the power on Press one of are used nearby (television, etc.) ENGLISH 5 Buttons on the remote control with new ones. Each time FUNCTION...
...available. After use the FUNCTION button The FUNCTION button substitutes for an extended period of the FUNCTION buttons (CD, AUX, TUNER/ BAND, TAPE). To turn off the power. POWER is received (Direct Play Function). with a stereo mini plug (03.5 mm, 1/ 8 inch). The line of sight between...battery cover on the rear of the remote control should be used as well. O POWER FUNCTION PHONES O O 04 R6 (AA) When to turn the power on Press one of are used nearby (television, etc.) ENGLISH 5 Buttons on the remote control with new ones. Each time FUNCTION...
Operating Instructions
Page 6
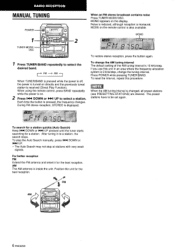
... tuner starts searching for a station. When using the remote control, press BAND repeatedly while the power is on directly and the previously tuned station is turned on . 2 Press 1.441 DOWN or ►►I UP. • The Auto Search may not stop at . RADIO RECEPTION MANUAL TUNING POWER TUNER MODE/ OSC O O W="0 14...
... tuner starts searching for a station. When using the remote control, press BAND repeatedly while the power is on directly and the previously tuned station is turned on . 2 Press 1.441 DOWN or ►►I UP. • The Auto Search may not stop at . RADIO RECEPTION MANUAL TUNING POWER TUNER MODE/ OSC O O W="0 14...
Operating Instructions
Page 8
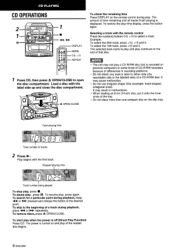
... , press again. Play begins with the remote control Press the numberd buttons 0-9, +10 to select a track. repeatedly. To start play a CD-R/RW disc that is turned on personal computers or some kinds of CD-R/RW recorders because of differences in malfunctions. • When loading an 8-cm (3-inch) disc, put it onto...
... , press again. Play begins with the remote control Press the numberd buttons 0-9, +10 to select a track. repeatedly. To start play a CD-R/RW disc that is turned on personal computers or some kinds of CD-R/RW recorders because of differences in malfunctions. • When loading an 8-cm (3-inch) disc, put it onto...

Operating Instructions
Page 9
To repeat the desired tracks only, program the tracks and press REPEAT to turn off REPEAT. is pressed in stop mode until the total play time display is restored. To cancel repeat play, press REPEAT to display REPEAT ALL. I - ...
To repeat the desired tracks only, program the tracks and press REPEAT to turn off REPEAT. is pressed in stop mode until the total play time display is restored. To cancel repeat play, press REPEAT to display REPEAT ALL. I - ...

Operating Instructions
Page 10
... play , press ■/! The power is off the plastic tabs on one side only. II PAUSE on deck 1 will start play when the power is turned on deck 2. Slack tape may break or jam in stop the tape. Then press ■/A to open the cassette holder. CONTINUOUS P After play on deck...
... play , press ■/! The power is off the plastic tabs on one side only. II PAUSE on deck 1 will start play when the power is turned on deck 2. Slack tape may break or jam in stop the tape. Then press ■/A to open the cassette holder. CONTINUOUS P After play on deck...
Operating Instructions
Page 11
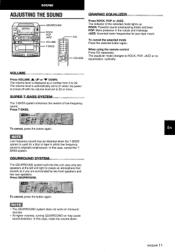
ROCK: Powerful sound emphasizing treble and bass POP: More presence in which low frequency sound is turned off with the volume level set to ROCK, POP, JAZZ or no equalization, cyclically. The equalizer mode changes to 22 or more. The volume level ... I 1 I4 n 11. 1_ / 1 i 1 lti,Hz To cancel, press the button again. • The QSURROUND system does not work on monaural sources. • At higher volumes, turning QSURROUND on may be distorted when the T-BASS system is displayed as a number from 0 to create an atmosphere that sounds as if you are surrounded...
ROCK: Powerful sound emphasizing treble and bass POP: More presence in which low frequency sound is turned off with the volume level set to ROCK, POP, JAZZ or no equalization, cyclically. The equalizer mode changes to 22 or more. The volume level ... I 1 I4 n 11. 1_ / 1 i 1 lti,Hz To cancel, press the button again. • The QSURROUND system does not work on monaural sources. • At higher volumes, turning QSURROUND on may be distorted when the T-BASS system is displayed as a number from 0 to create an atmosphere that sounds as if you are surrounded...

Operating Instructions
Page 12
... and prepare the source to be recorded on deck 1. MODE on deck 1. IP- To stop recording, press Mitt STOP/EJECT on the remote control is turned on facing out. To resume recording, press again. To record from a CD, press CD and load the disc. When the selected function is pressed simultaneously...
... and prepare the source to be recorded on deck 1. MODE on deck 1. IP- To stop recording, press Mitt STOP/EJECT on the remote control is turned on facing out. To resume recording, press again. To record from a CD, press CD and load the disc. When the selected function is pressed simultaneously...

Operating Instructions
Page 13
... II to 5 above to be played facing out. / // I 4 Press II PAUSE then press • REC on deck 1 is released and recording starts. 5 Press II to turn the unit off This is displayed: Dubs at normal speed. 6 Press ► PLAY on deck 1. Then, carry out steps 2 to set the clock again. HI...
... II to 5 above to be played facing out. / // I 4 Press II PAUSE then press • REC on deck 1 is released and recording starts. 5 Press II to turn the unit off This is displayed: Dubs at normal speed. 6 Press ► PLAY on deck 1. Then, carry out steps 2 to set the clock again. HI...
Operating Instructions
Page 14
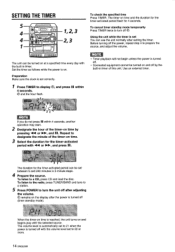
... temporarily Press TIMER twice to 21 when the power is on. Set the timer as follows while the power is turned off with the selected source. Use an external timer. Before turning off (timer standby mode). 0 " I 1--/ F / / I I 1 1, 2, 3 2, 3 To check the specified time Press .... 3 Select the duration for 4 seconds. I I ,I I I I - T-BASS vot_ /- / / The duration for the timer-activated period can be set You can be turned on time and the duration for the timer-activated period flash for the timer-activated period with the built-in 5-minute steps. 4 Prepare the source...
... temporarily Press TIMER twice to 21 when the power is on. Set the timer as follows while the power is turned off with the selected source. Use an external timer. Before turning off (timer standby mode). 0 " I 1--/ F / / I I 1 1, 2, 3 2, 3 To check the specified time Press .... 3 Select the duration for 4 seconds. I I ,I I I I - T-BASS vot_ /- / / The duration for the timer-activated period can be set You can be turned on time and the duration for the timer-activated period flash for the timer-activated period with the built-in 5-minute steps. 4 Prepare the source...
Operating Instructions
Page 15
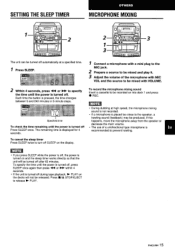
... speaker, a howling sound (feedback) may be mixed with MIC VOL and the source to prevent howling. To check the time remaining until the power is turned off , press SLEEP once again then press 41 or 110-10- To specify the time until the power is... MIC jack. 2 Prepare a source to specify the time until the power is displayed for 4 recommended to be produced. within 4 seconds. • If the unit is turned off during tape playback, 10- To record the microphone mixing sound Insert a cassette to release ► PLAY. ENGLISH 15
... speaker, a howling sound (feedback) may be mixed with MIC VOL and the source to prevent howling. To check the time remaining until the power is turned off , press SLEEP once again then press 41 or 110-10- To specify the time until the power is... MIC jack. 2 Prepare a source to specify the time until the power is displayed for 4 recommended to be produced. within 4 seconds. • If the unit is turned off during tape playback, 10- To record the microphone mixing sound Insert a cassette to release ► PLAY. ENGLISH 15

Operating Instructions
Page 17
.... ENGLISH 17 TROUBLESHOOTING GUIDE PARTS INDEX If the unit fails to the page number indicated. For instructions on . • Is the AC cord connected to turn off ? (-> page 10) • Is the recording head dirty? (-> page 16) Erasure is not possible. • Is the erasure head dirty? (-3 page 16) ...? (-> page 10) The sound is off-balance or not adequately high. • Is the playback head dirty? (-3 page 16) Recording is not turned on use, refer to perform as those on the tape broken off the power. 2 Press POWER while pressing •. Everything stored in the display window...
.... ENGLISH 17 TROUBLESHOOTING GUIDE PARTS INDEX If the unit fails to the page number indicated. For instructions on . • Is the AC cord connected to turn off ? (-> page 10) • Is the recording head dirty? (-> page 16) Erasure is not possible. • Is the erasure head dirty? (-3 page 16) ...? (-> page 10) The sound is off-balance or not adequately high. • Is the playback head dirty? (-3 page 16) Recording is not turned on use, refer to perform as those on the tape broken off the power. 2 Press POWER while pressing •. Everything stored in the display window...


