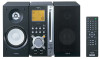

Operating Instructions
Page 5
... this system cannot play back the following formats: - continued 5GB Playable discs You can play • An 8 cm disc converted to a standard disc using the remote, but the same operations can have up to 31 characters long. There are several specification levels. A Multi Session CD is a recording method that enables adding...
... this system cannot play back the following formats: - continued 5GB Playable discs You can play • An 8 cm disc converted to a standard disc using the remote, but the same operations can have up to 31 characters long. There are several specification levels. A Multi Session CD is a recording method that enables adding...
Operating Instructions
Page 8
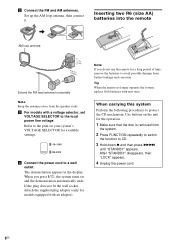
... press M> until "STANDBY" appears. After "STANDBY" disappears, then "LOCK" appears. 4 Unplug the power cord. 8GB When you do not use the remote for models equipped with an adaptor). When carrying this system Perform the following procedures to the local power line voltage. Inserting two R6 (size AA...) batteries into the remote AM loop antenna AM LOOP (CFOMA7X5IAΩL) Extend the FM lead antenna horizontally Note Keep the antennas away from battery leakage and ...
... press M> until "STANDBY" appears. After "STANDBY" disappears, then "LOCK" appears. 4 Unplug the power cord. 8GB When you do not use the remote for models equipped with an adaptor). When carrying this system Perform the following procedures to the local power line voltage. Inserting two R6 (size AA...) batteries into the remote AM loop antenna AM LOOP (CFOMA7X5IAΩL) Extend the FM lead antenna horizontally Note Keep the antennas away from battery leakage and ...
Operating Instructions
Page 9
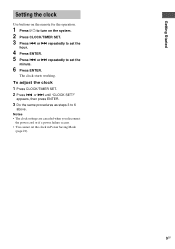
... the minute. 6 Press ENTER. or > repeatedly to turn on the system. 2 Press CLOCK/TIMER SET. 3 Press . Getting Started Setting the clock Use buttons on the remote for the operation. 1 Press ?/1 to set the hour. 4 Press ENTER. 5 Press . or > until "CLOCK SET?"
... the minute. 6 Press ENTER. or > repeatedly to turn on the system. 2 Press CLOCK/TIMER SET. 3 Press . Getting Started Setting the clock Use buttons on the remote for the operation. 1 Press ?/1 to set the hour. 4 Press ENTER. 5 Press . or > until "CLOCK SET?"

Operating Instructions
Page 11
... on the disc in a track* Switch to 8 levels. • MP3 audio tracks are many layers. • When the disc is recorded, you want using the remote during Normal Play. Press . repeatedly after step 2. Press X. Notes • You cannot change the play a track by CD power manage function (page 14). CD/MP3...
... on the disc in a track* Switch to 8 levels. • MP3 audio tracks are many layers. • When the disc is recorded, you want using the remote during Normal Play. Press . repeatedly after step 2. Press X. Notes • You cannot change the play a track by CD power manage function (page 14). CD/MP3...
Operating Instructions
Page 18
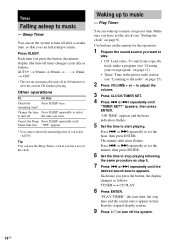
... until the desired sound source appears. Make sure you press the button, the minute display (the turn off the system. 18GB Use buttons on the remote for the operation. 1 Prepare the sound source you select "AUTO". or > repeatedly until Timer function "OFF" appears. * You cannot check the remaining time if you...
... until the desired sound source appears. Make sure you press the button, the minute display (the turn off the system. 18GB Use buttons on the remote for the operation. 1 Prepare the sound source you select "AUTO". or > repeatedly until Timer function "OFF" appears. * You cannot check the remaining time if you...
Operating Instructions
Page 31
... a disc that this unit are unbalanced. • Check the speaker connections and placement. Numbers (0 to the system. • Point the remote at high volume, the speaker vibration may not be played. Speakers Sound comes from the system, or placing them on the disc is loaded.)... separate stands. The disc does not eject. • Consult your Aiwa dealer or local authorized Aiwa service facility. MP3 audio tracks take longer to start play. The remote does not function. • Remove the obstacle. • Move the remote closer to 9) - Disc access takes a long time. •...
... a disc that this unit are unbalanced. • Check the speaker connections and placement. Numbers (0 to the system. • Point the remote at high volume, the speaker vibration may not be played. Speakers Sound comes from the system, or placing them on the disc is loaded.)... separate stands. The disc does not eject. • Consult your Aiwa dealer or local authorized Aiwa service facility. MP3 audio tracks take longer to start play. The remote does not function. • Remove the obstacle. • Move the remote closer to 9) - Disc access takes a long time. •...
Operating Instructions
Page 36
...215; 224.8 × 327.1 mm Speakers: Approx. 115 × 225 × 223 mm Mass Amplifier/Tuner/CD section AWP-ZP5: Approx. 4.4 kg AWP-ZP3/ZP1: Approx. 4.2 kg Speakers: Approx. 3.8 kg net per port CD player section System Laser Frequency response Compact disc ...60 Hz Adjustable with an impedance of 8 ohms or more SPEAKERS: Accepts impedance of 6 ohms USB hub ports (AWP-ZP5 only) Maximum current consumption: 100 mA per speaker Supplied accessories Remote commander (1) R6 (size AA) batteries (2) AM loop antenna (1) FM lead antenna (1) Speaker cables (2) USB cable...
...215; 224.8 × 327.1 mm Speakers: Approx. 115 × 225 × 223 mm Mass Amplifier/Tuner/CD section AWP-ZP5: Approx. 4.4 kg AWP-ZP3/ZP1: Approx. 4.2 kg Speakers: Approx. 3.8 kg net per port CD player section System Laser Frequency response Compact disc ...60 Hz Adjustable with an impedance of 8 ohms or more SPEAKERS: Accepts impedance of 6 ohms USB hub ports (AWP-ZP5 only) Maximum current consumption: 100 mA per speaker Supplied accessories Remote commander (1) R6 (size AA) batteries (2) AM loop antenna (1) FM lead antenna (1) Speaker cables (2) USB cable...
Operating Instructions
Page 37
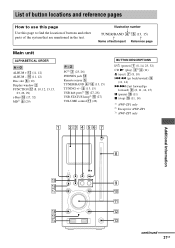
O ALBUM + qs (11, 12) ALBUM - Z PC2) 3 (23, 26) PHONES jack qd Remote sensor 5 TUNER/BAND 41)6 (13, 15) TUNING +/- 9 (13, 15) USB hub ports3) qf (27, 28) USB STATUS lamp3) qg (27) VOLUME control qa (26) BUTTON ...)4 (11) Z (eject) 7 (8, 10) .m (go back/rewind) 9 (11, 14) M> (fast forward/go forward) 9 (8, 11, 14, 15) X (pause) qk (11) x (stop) ql (11, 14) 1) AWP-ZP1 only 2) Except for AWP-ZP1 3) AWP-ZP5 only 1 23 4 56 7 Additional Information 8 ql 9 qk qj 0 qa qh qs qg qf qd continued 37GB qh (11, 12) Disc slot 8 (10) Display...
O ALBUM + qs (11, 12) ALBUM - Z PC2) 3 (23, 26) PHONES jack qd Remote sensor 5 TUNER/BAND 41)6 (13, 15) TUNING +/- 9 (13, 15) USB hub ports3) qf (27, 28) USB STATUS lamp3) qg (27) VOLUME control qa (26) BUTTON ...)4 (11) Z (eject) 7 (8, 10) .m (go back/rewind) 9 (11, 14) M> (fast forward/go forward) 9 (8, 11, 14, 15) X (pause) qk (11) x (stop) ql (11, 14) 1) AWP-ZP1 only 2) Except for AWP-ZP1 3) AWP-ZP5 only 1 23 4 56 7 Additional Information 8 ql 9 qk qj 0 qa qh qs qg qf qd continued 37GB qh (11, 12) Disc slot 8 (10) Display...
Operating Instructions
Page 38
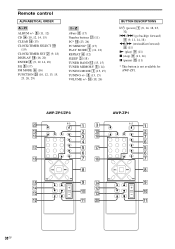
qa 38GB AWP-ZP5/ZP3 AWP-ZP1 w; 13 1 ql 2 ql 2 qk 3 qk 7 4 6 qj 5 qj 5 6 6 qh 7 qh 7 8 8 qg 9 qf 9 qf qs 0 0 qd qd qs qa w; H ALBUM +/- 8 (11,...(9, 18) DISPLAY qk (16, 20) ENTER 8 (9, 12, 14, 18) EQ 8 (17) FM MODE 6 (16) FUNCTION w; (10, 12, 13, 15, 23, 26, 29) I - Remote control ALPHABETICAL ORDER A - Z i-Bass 8 (17) Number buttons qj (11) PC* qg (23, 26) PC MIXING* 4 (17) PLAY MODE 7 (11, 12) REPEAT 6 (12) SLEEP 3 ..., 18) m/M (rewind/fast forward) 8 (11) N (play) 9 (11) x (stop) qa (11, 14) X (pause) qd (11) * This button is not available for AWP-ZP1.
qa 38GB AWP-ZP5/ZP3 AWP-ZP1 w; 13 1 ql 2 ql 2 qk 3 qk 7 4 6 qj 5 qj 5 6 6 qh 7 qh 7 8 8 qg 9 qf 9 qf qs 0 0 qd qd qs qa w; H ALBUM +/- 8 (11,...(9, 18) DISPLAY qk (16, 20) ENTER 8 (9, 12, 14, 18) EQ 8 (17) FM MODE 6 (16) FUNCTION w; (10, 12, 13, 15, 23, 26, 29) I - Remote control ALPHABETICAL ORDER A - Z i-Bass 8 (17) Number buttons qj (11) PC* qg (23, 26) PC MIXING* 4 (17) PLAY MODE 7 (11, 12) REPEAT 6 (12) SLEEP 3 ..., 18) m/M (rewind/fast forward) 8 (11) N (play) 9 (11) x (stop) qa (11, 14) X (pause) qd (11) * This button is not available for AWP-ZP1.