Operating Instructions
Page 1
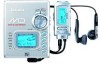
WARNING TO REDUCE THE RISK OF FIRE OR ELECTRIC SHOCK, DO NOT EXPOSE THIS APPLIANCE TC) RAIN OR MOISTURE. AM-F70 Serial No. - Model No. Please refer tothem when you will find it in the disc holder) in case of difficulty. Mini Dist' MINIDISC RECORDER GRABADOR DE MINIDISCOS AM=F70 OPERATING INSTRUCTIONS INSTRUCCIONES DE MANEJO MODE D'EMPLOI OWNER'S RECORD For your convenience, record the model number and serial number (you contact your Aiwa dealer in the space provided below.
WARNING TO REDUCE THE RISK OF FIRE OR ELECTRIC SHOCK, DO NOT EXPOSE THIS APPLIANCE TC) RAIN OR MOISTURE. AM-F70 Serial No. - Model No. Please refer tothem when you will find it in the disc holder) in case of difficulty. Mini Dist' MINIDISC RECORDER GRABADOR DE MINIDISCOS AM=F70 OPERATING INSTRUCTIONS INSTRUCCIONES DE MANEJO MODE D'EMPLOI OWNER'S RECORD For your convenience, record the model number and serial number (you contact your Aiwa dealer in the space provided below.
Operating Instructions
Page 2
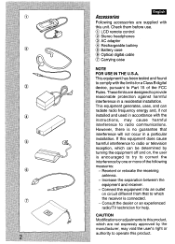
... cause harmful interference to radio communications. Check them before use. @) LCD remote control @) Stereo headphones @ AC adaptor @ Rechargeable battery @) Battery case @ Optical digital cable @) Carrying case NOTE FOR USE IN THE U.S.A. Accessories mm Following accessories are supplied with the instructions, may void the user's right or authority to operate this product. Consult the dealer or an experienced radio~V technician for a Class B digital device, pursuant to Parl...
... cause harmful interference to radio communications. Check them before use. @) LCD remote control @) Stereo headphones @ AC adaptor @ Rechargeable battery @) Battery case @ Optical digital cable @) Carrying case NOTE FOR USE IN THE U.S.A. Accessories mm Following accessories are supplied with the instructions, may void the user's right or authority to operate this product. Consult the dealer or an experienced radio~V technician for a Class B digital device, pursuant to Parl...

Operating Instructions
Page 4
... CURRENT ....12 USING ON DRY CELL BATTERIES ...14 PREPARATIONS 16 RECORDING Recording methods and connections ...20 Basic operation . . . . .. . 26 Adjusting the recording level 30 USABLE FUNCTIONSFOR RECOROING Registering the index mark 32 Selecting a marker function 34 Extended recording (Monaural recording 36 Synchronized analog recording ..........38 Synchronized digital recording 38 PLAYBACK Basic operation 40 To change the display 44 Title search function . 46 Other playback modes . . . 48 Programmed play 50 EOITING...
... CURRENT ....12 USING ON DRY CELL BATTERIES ...14 PREPARATIONS 16 RECORDING Recording methods and connections ...20 Basic operation . . . . .. . 26 Adjusting the recording level 30 USABLE FUNCTIONSFOR RECOROING Registering the index mark 32 Selecting a marker function 34 Extended recording (Monaural recording 36 Synchronized analog recording ..........38 Synchronized digital recording 38 PLAYBACK Basic operation 40 To change the display 44 Title search function . 46 Other playback modes . . . 48 Programmed play 50 EOITING...
Operating Instructions
Page 10
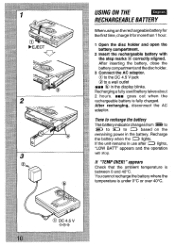
... the operation will stop. /f "TEMP OVER!" Recharging a fully used battery takes about 2 hours. USING ON THE mm RECHARGEABLE BATTERY When using on the remaining power in the battery. After inserting the battery, close the battery compartment and the disc holder. 3 Connect the AC adaptor. @)to the DC 4.5 V jack @to ~ based on the rechargeable battery for the first time, charge it for more than 1 hour. 1 Open...
... the operation will stop. /f "TEMP OVER!" Recharging a fully used battery takes about 2 hours. USING ON THE mm RECHARGEABLE BATTERY When using on the remaining power in the battery. After inserting the battery, close the battery compartment and the disc holder. 3 Connect the AC adaptor. @)to the DC 4.5 V jack @to ~ based on the rechargeable battery for the first time, charge it for more than 1 hour. 1 Open...
Operating Instructions
Page 14
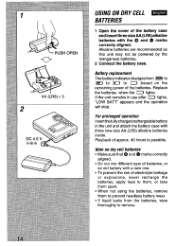
Replace the batteries when the ~ lights. Playback of batteries, or an old battery with a new one. q When not using the batteries, remove them apart. Alkaline batteries are recommended as this unit may not be powered by the manganese batteries. 2 Connect the battery case. Batte~ replacement The battery indicator changes from the batteries, wipe thoroughly to them, or take them to D based on dry cell batteries q Make sure that 0 and @ marks correctly aligned. q To...
Replace the batteries when the ~ lights. Playback of batteries, or an old battery with a new one. q When not using the batteries, remove them apart. Alkaline batteries are recommended as this unit may not be powered by the manganese batteries. 2 Connect the battery case. Batte~ replacement The battery indicator changes from the batteries, wipe thoroughly to them, or take them to D based on dry cell batteries q Make sure that 0 and @ marks correctly aligned. q To...
Operating Instructions
Page 16
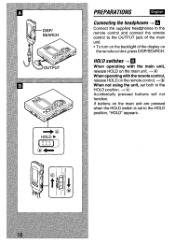
... unit, release HOLD on the main unit. + @ When operating with the remote control, release HOLD on the remote control, press DISP/SEARCH. PREPARATIONS m Connecting the headphones+ u Connect the supplied headphones to the remote control and connect the remote control to the OUTPUT jack of the display on the remote control. + @ : When not using the unit, set to the HOLD position. + @ Accidentally pressed buttons will not a+@ HOLD ®...
... unit, release HOLD on the main unit. + @ When operating with the remote control, release HOLD on the remote control, press DISP/SEARCH. PREPARATIONS m Connecting the headphones+ u Connect the supplied headphones to the remote control and connect the remote control to the OUTPUT jack of the display on the remote control. + @ : When not using the unit, set to the HOLD position. + @ Accidentally pressed buttons will not a+@ HOLD ®...
Operating Instructions
Page 18
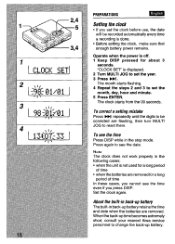
... clock again. q Before setting the clock, make sure that enough battety power remains. When the back-uptime becomes extremely short, consult your nearest Aiwa service personnel to change the back-up battery retains the time and date when the batteries are flashing, then turn MULTI JOG to set the clock before use, the date will rerecorded automatically everytime a recording is not used for a long period of time In these cases...
... clock again. q Before setting the clock, make sure that enough battety power remains. When the back-uptime becomes extremely short, consult your nearest Aiwa service personnel to change the back-up battery retains the time and date when the batteries are flashing, then turn MULTI JOG to set the clock before use, the date will rerecorded automatically everytime a recording is not used for a long period of time In these cases...
Operating Instructions
Page 26
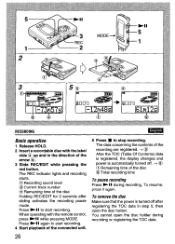
... direction of the disc @Total recording time To pause recording Press -II during recording or registering the TOC data. 5 -II 5 MODE + 1 1 15(3 @ RECORDING Basic operation 1 Release HOLD. 2 Insert a recordable disc with the remote control, press ~11 while pressing MODE. Press - You cannot open the disc holder. The REC indicator lights and recording starts. @ Recording sound level @ Current track number @ Remaining time of the connected unit. 26 5 Press s to start recording. 4 Start playback of the disc Holding...
... direction of the disc @Total recording time To pause recording Press -II during recording or registering the TOC data. 5 -II 5 MODE + 1 1 15(3 @ RECORDING Basic operation 1 Release HOLD. 2 Insert a recordable disc with the remote control, press ~11 while pressing MODE. Press - You cannot open the disc holder. The REC indicator lights and recording starts. @ Recording sound level @ Current track number @ Remaining time of the connected unit. 26 5 Press s to start recording. 4 Start playback of the disc Holding...
Operating Instructions
Page 28
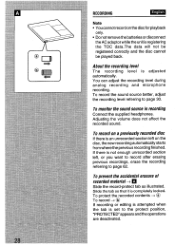
... registered correctly and the disc cannot be played back. About the recording level The recording level is registering the TOC data. RECORDING Note q Youcannotrecord onthediscforplay back only. q Donotremove the batteries ordisconnect theAC adaptor while the unit is adjusted automatically. Adjusting the volume does not affect the recorded sound. To monitor the sound source in recording Connect the supplied headphones. Slide the tab...
... registered correctly and the disc cannot be played back. About the recording level The recording level is registering the TOC data. RECORDING Note q Youcannotrecord onthediscforplay back only. q Donotremove the batteries ordisconnect theAC adaptor while the unit is adjusted automatically. Adjusting the volume does not affect the recorded sound. To monitor the sound source in recording Connect the supplied headphones. Slide the tab...
Operating Instructions
Page 30
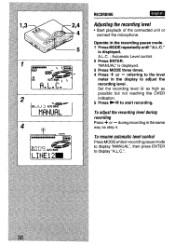
... -II to start recording. Set the recording level @ as high as step 4. A.L.C. : Automatic Level control 2 Press ENTER. "MANUAL" is displayed. during recording Press + or - RECORDING m Adjusting the recording level q Start playback of the connected unit or connect the microphone. To adjust the recording level during recording in the display to display "A.L.C.". To resume automatic level control Press MODE while in the recording pause mode. 1 Press MODE repeatedly until "A.L.C." Operate in recording pause mode to display "MANUAL", then press ENTER...
... -II to start recording. Set the recording level @ as high as step 4. A.L.C. : Automatic Level control 2 Press ENTER. "MANUAL" is displayed. during recording Press + or - RECORDING m Adjusting the recording level q Start playback of the connected unit or connect the microphone. To adjust the recording level during recording in the display to display "A.L.C.". To resume automatic level control Press MODE while in the recording pause mode. 1 Press MODE repeatedly until "A.L.C." Operate in recording pause mode to display "MANUAL", then press ENTER...
Operating Instructions
Page 36
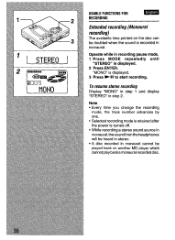
... headphones will be played back on the disc can be doubled when the sound is displayed. 2 Press ENTER. q A disc recorded in monaural cannot be heard in monaural. 1 2 3 'bIEEu USABLEFUNCTIONSFOR m RECORDING Extended recording (Monaural recording) The available time printed on another MD player which cannot play backa monaural recorded disc. Note c Every time you change the recording mode, the track number advances by one. "MONO is turned off.
... headphones will be played back on the disc can be doubled when the sound is displayed. 2 Press ENTER. q A disc recorded in monaural cannot be heard in monaural. 1 2 3 'bIEEu USABLEFUNCTIONSFOR m RECORDING Extended recording (Monaural recording) The available time printed on another MD player which cannot play backa monaural recorded disc. Note c Every time you change the recording mode, the track number advances by one. "MONO is turned off.

Operating Instructions
Page 38
... disc space. 1 Set SYNCHROto ON. 2 Start recording. When recording a meeting , it will only record when someone is no sound, and resumes automatically when the sound begins again. After recording, press 9. Synchronized digital recording During digital recording from an Aiwa mini component, the recording is displayed and ~ indicator blinks in recording pause mode. q Connectthe unittoan Aiwaminicomponent with the operation of Aiwa mini component. The recording pauses when the sound source isbelow a certain...
... disc space. 1 Set SYNCHROto ON. 2 Start recording. When recording a meeting , it will only record when someone is no sound, and resumes automatically when the sound begins again. After recording, press 9. Synchronized digital recording During digital recording from an Aiwa mini component, the recording is displayed and ~ indicator blinks in recording pause mode. q Connectthe unittoan Aiwaminicomponent with the operation of Aiwa mini component. The recording pauses when the sound source isbelow a certain...

Operating Instructions
Page 40
... while in the direction of the arrow @. 3 Press ph. @Current track number @ Elapsed time of the current track 4 Adjust the VOLUME with MULTI JOG. The power is automatically turned off after about 5 seconds. fiic operation Buttonto press Signal sound To pause -II during hip, hip, hip, playback bip n.. When operating with the remote control, press VOL +/-. PLAYBACK mm Basic operation 1 Release HOLD. 2 Insert a disc...
... while in the direction of the arrow @. 3 Press ph. @Current track number @ Elapsed time of the current track 4 Adjust the VOLUME with MULTI JOG. The power is automatically turned off after about 5 seconds. fiic operation Buttonto press Signal sound To pause -II during hip, hip, hip, playback bip n.. When operating with the remote control, press VOL +/-. PLAYBACK mm Basic operation 1 Release HOLD. 2 Insert a disc...

Operating Instructions
Page 48
...: opening the disc holder recording or editing the disc The play mode changes to page 50. + Normal play The programmed tracks are played in random order. 4' @ Programmed play Note q The selected playback mode does not change when the power is turned off. - Each time the button is pressed, the play mode changes in the following order. @All-repeat play All tracks are played repeatedly. + @One-track repeat play Current track is played repeatedly. + @ Random play All tracks are played in programmed...
...: opening the disc holder recording or editing the disc The play mode changes to page 50. + Normal play The programmed tracks are played in random order. 4' @ Programmed play Note q The selected playback mode does not change when the power is turned off. - Each time the button is pressed, the play mode changes in the following order. @All-repeat play All tracks are played repeatedly. + @One-track repeat play Current track is played repeatedly. + @ Random play All tracks are played in programmed...

Operating Instructions
Page 54
... press FFl. If the AC adaptor is disconnected or the batteries are removed before the display goes out, the data is to be changed flashes. Note q When you operate during random, repeat c~r programmed play, the play mode changes to normal play. /Vote on editing Ele sure to press s after operation to be deleted flashes. When the character is flashing, press DISP/l NS, then press M To insert a space between...
... press FFl. If the AC adaptor is disconnected or the batteries are removed before the display goes out, the data is to be changed flashes. Note q When you operate during random, repeat c~r programmed play, the play mode changes to normal play. /Vote on editing Ele sure to press s after operation to be deleted flashes. When the character is flashing, press DISP/l NS, then press M To insert a space between...

Operating Instructions
Page 68
... HOLD switch is set to be recorded. q The TOC data is damaged by the SCMS standard. + See "About the Serial Copy Management System (SCMS)" on the disc. No Signal q Playback of MD on page 76. OPEN q The disc holder IS not closed. CAUTION ! TEMP OVER ! MD GUIDE MESSAGES BLANK DISC q Nothing is recorded on page 22. q The combine function was used while playing...
... HOLD switch is set to be recorded. q The TOC data is damaged by the SCMS standard. + See "About the Serial Copy Management System (SCMS)" on the disc. No Signal q Playback of MD on page 76. OPEN q The disc holder IS not closed. CAUTION ! TEMP OVER ! MD GUIDE MESSAGES BLANK DISC q Nothing is recorded on page 22. q The combine function was used while playing...
Operating Instructions
Page 71
... the disc holder completely. q Reset the unit by pressing the RESET button on the disc. c Use a recordable disc. q Inserf the batteries correctly. The sound noisy. q Recharge the rechargeable battery or replace the dty cell batteries. 71 q Connect the AC adaptor firmly. Recording date is close to perform as described in these Operating InstructIons, check the following guide. Erroneous display/operation occur. Operation does not start. q If the unit is...
... the disc holder completely. q Reset the unit by pressing the RESET button on the disc. c Use a recordable disc. q Inserf the batteries correctly. The sound noisy. q Recharge the rechargeable battery or replace the dty cell batteries. 71 q Connect the AC adaptor firmly. Recording date is close to perform as described in these Operating InstructIons, check the following guide. Erroneous display/operation occur. Operation does not start. q If the unit is...
Operating Instructions
Page 74
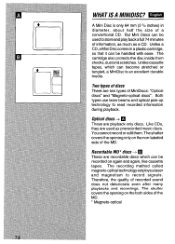
.... But Mini Discs can be used as a CD. The shutter covers the opening only on the both sides of recorded sound does not deteriorate even after many playbacks and recordings. m4 u WHAT ISA MINIDISC? m A Mini Disc is an excellent durable media. Both types use laser beams and optical pick-up technology to record signals. The recording method called magneto-optical technology...
.... But Mini Discs can be used as a CD. The shutter covers the opening only on the both sides of recorded sound does not deteriorate even after many playbacks and recordings. m4 u WHAT ISA MINIDISC? m A Mini Disc is an excellent durable media. Both types use laser beams and optical pick-up technology to record signals. The recording method called magneto-optical technology...
Operating Instructions
Page 78
.... The total of the CD. Even if the recorded section is performed by editing may not be joined. When recording from a CD through digital inputs, small tracks may not be created depending on the contents of the recorded time and the remaining time on a disc is needed in recording. Tracks created by the minimum unit of the disc (60-minute...
.... The total of the CD. Even if the recorded section is performed by editing may not be joined. When recording from a CD through digital inputs, small tracks may not be created depending on the contents of the recorded time and the remaining time on a disc is needed in recording. Tracks created by the minimum unit of the disc (60-minute...
Operating Instructions
Page 80
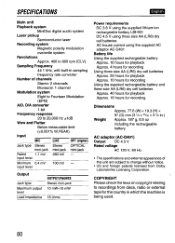
... output level Load imoedance OUTPUT/PHONES Stereo mmi-jack 10 mW+10 mW 16 ohms Power requiramants DC 3.6 V using the supplied lithium-ion rechargeable battery LIB-901 DC 4.5 V using three size AA (LR6) dry cell batteries AC house current using the supplied AC adaptor AC-D401 Battery life Using the supplied rechargeable battery Approx. 10 hours for playback Approx. 4 hours for recording Using three...
... output level Load imoedance OUTPUT/PHONES Stereo mmi-jack 10 mW+10 mW 16 ohms Power requiramants DC 3.6 V using the supplied lithium-ion rechargeable battery LIB-901 DC 4.5 V using three size AA (LR6) dry cell batteries AC house current using the supplied AC adaptor AC-D401 Battery life Using the supplied rechargeable battery Approx. 10 hours for playback Approx. 4 hours for recording Using three...


