
Operating Instructions
Page 1
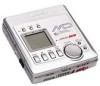
a.1111 Mini Disc MINIDISC RECORDER GRABADOR DE MINIDISCOS AM-C80 OPERATING INSTRUCTIONS INSTRUCCIONES DE MANEJO MODE D'EMPLOI OWNER'S RECORD For your Aiwa dealer in the space provided below. Please refer to them when you contact your convenience, record the model number and serial number (you will find it in the disc holder) in case of difficulty. AM-C80 Serial No. WARNING TO REDUCE THE RISK OF FIRE OR ELECTRIC SHOCK, DO NOT EXPOSE THIS APPLIANCE TO RAIN OR MOISTURE. Model No.
a.1111 Mini Disc MINIDISC RECORDER GRABADOR DE MINIDISCOS AM-C80 OPERATING INSTRUCTIONS INSTRUCCIONES DE MANEJO MODE D'EMPLOI OWNER'S RECORD For your Aiwa dealer in the space provided below. Please refer to them when you contact your convenience, record the model number and serial number (you will find it in the disc holder) in case of difficulty. AM-C80 Serial No. WARNING TO REDUCE THE RISK OF FIRE OR ELECTRIC SHOCK, DO NOT EXPOSE THIS APPLIANCE TO RAIN OR MOISTURE. Model No.

Operating Instructions
Page 2
... equipment and receiver. - Check them before use. 0 , LCD remote control ® Stereo headphones ® AC adaptor ® Battery case ® Optical digital cable Car kit (for the operating instructions, please refer to provide reasonable protection against harmful interference in a particular installation. These >limits are designed to another sheet) NOTE FOR USE IN THE U.S.A. Connect the equipment into an outlet on , the...
... equipment and receiver. - Check them before use. 0 , LCD remote control ® Stereo headphones ® AC adaptor ® Battery case ® Optical digital cable Car kit (for the operating instructions, please refer to provide reasonable protection against harmful interference in a particular installation. These >limits are designed to another sheet) NOTE FOR USE IN THE U.S.A. Connect the equipment into an outlet on , the...
Operating Instructions
Page 4
... USING ON DRY CELL BATTERIES 14 PREPARATIONS 16 RECORDING t Recording methods and connections 20 Basic operation 26 Adjusting the recording level 30 USABLE FUNCTIONS FOR RECORDING Registering the index mark 32 4•4* .fa Selecting a marker function 34 Extended recording (Monaural recording) 36 Synchronized analog recording 38 Synchronized digital recording 38 • 044 PLAYBACK Basic operation 40 To change the display 44 Title search function 46 Other playback modes 48 Programmed play...
... USING ON DRY CELL BATTERIES 14 PREPARATIONS 16 RECORDING t Recording methods and connections 20 Basic operation 26 Adjusting the recording level 30 USABLE FUNCTIONS FOR RECORDING Registering the index mark 32 4•4* .fa Selecting a marker function 34 Extended recording (Monaural recording) 36 Synchronized analog recording 38 Synchronized digital recording 38 • 044 PLAYBACK Basic operation 40 To change the display 44 Title search function 46 Other playback modes 48 Programmed play...

Operating Instructions
Page 14
... 4.5 V USING ON DRY CELL English BATTERIES 1 Open the cover of electrolyte leakage or explosions, never recharge the batteries, apply heat to them, or take few seconds for the display to, change to remove. 14 Connect the battery case. Battery replacement The battery indicator changes from the batteries, wipe thoroughly to the correct one . • To prevent the risk of the battery case andinsertthreesize AA (LR6)alkaline batteries with three new size...
... 4.5 V USING ON DRY CELL English BATTERIES 1 Open the cover of electrolyte leakage or explosions, never recharge the batteries, apply heat to them, or take few seconds for the display to, change to remove. 14 Connect the battery case. Battery replacement The battery indicator changes from the batteries, wipe thoroughly to the correct one . • To prevent the risk of the battery case andinsertthreesize AA (LR6)alkaline batteries with three new size...

Operating Instructions
Page 18
... battery retains the time and date when the batteries are removed. The clock starts from the 00 seconds. Note The clock does not work properly in the following cases: • when the unit is done. • Before setting the clock, make sure that enough battery power remains. Operate when the power is displayed. 2 Turn MULTI JOG to set the year. 3 Press NI The month starts flashing. 4 Repeat the steps 2 and 3 to set the clock...
... battery retains the time and date when the batteries are removed. The clock starts from the 00 seconds. Note The clock does not work properly in the following cases: • when the unit is done. • Before setting the clock, make sure that enough battery power remains. Operate when the power is displayed. 2 Turn MULTI JOG to set the year. 3 Press NI The month starts flashing. 4 Repeat the steps 2 and 3 to set the clock...

Operating Instructions
Page 26
... red button. To remove the disc Make sure that the power is automatically turned off after sliding activates the recording pause mode. The REC indicator lights and recording starts. ® Recording sound level ® Current track number ® Remaining time of the connected unit. 5 Press • to stop recording. You cannot open the disc holder. Press to start recording. To resume, press it again. Press PP-II again to start recording. 4 Start playback...
... red button. To remove the disc Make sure that the power is automatically turned off after sliding activates the recording pause mode. The REC indicator lights and recording starts. ® Recording sound level ® Current track number ® Remaining time of the connected unit. 5 Press • to stop recording. You cannot open the disc holder. Press to start recording. To resume, press it again. Press PP-II again to start recording. 4 Start playback...
Operating Instructions
Page 28
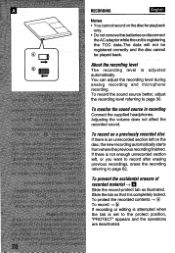
... new recording automatically starts from where the previous recording finished. To prevent the accidental erasure of recorded material -> El Slide the record-protect tab as illustrated. Adjusting the volume does not affect the recorded sound. If there is an unrecorded section left , or you want to record after erasing previous recordings, erase the recording referring to page 30. To monitor the sound source in recording Connect the...
... new recording automatically starts from where the previous recording finished. To prevent the accidental erasure of recorded material -> El Slide the record-protect tab as illustrated. Adjusting the volume does not affect the recorded sound. If there is an unrecorded section left , or you want to record after erasing previous recordings, erase the recording referring to page 30. To monitor the sound source in recording Connect the...
Operating Instructions
Page 30
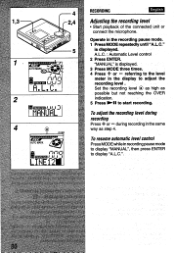
... meter in recording pause mode to display "MANUAL", then press ENTER to display "A.L.C.". 30 during recording Press + or - is displayed. 3 Press MODE three times. 4 Press + or - AUTO MARK Ipa ti 111111 KO" TRACK NO LINE12111, RECORDING English Adjusting the recording level • Start playback of the connected unit or connect the microphone. To resume automatic level control Press MODE while in the display to start recording. Operate in the recording pause mode. 1 Press MODE repeatedly until...
... meter in recording pause mode to display "MANUAL", then press ENTER to display "A.L.C.". 30 during recording Press + or - is displayed. 3 Press MODE three times. 4 Press + or - AUTO MARK Ipa ti 111111 KO" TRACK NO LINE12111, RECORDING English Adjusting the recording level • Start playback of the connected unit or connect the microphone. To resume automatic level control Press MODE while in the display to start recording. Operate in the recording pause mode. 1 Press MODE repeatedly until...
Operating Instructions
Page 34
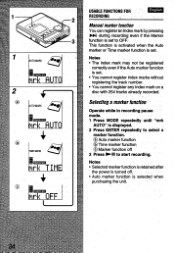
... I. Selecting a marker function Operate while in recording pause mode. 1 Press MODE repeatedly until "mrk AUTO" is displayed. 2 Press ENTER repeatedly to select a marker function. ® Auto marker function ® Time marker function Marker function off . • Auto marker function is set . Notes • Selected marker function is retained after the power is set to start recording. USABLE FUNCTIONS FOR RECORDING English Manual marker function You can...
... I. Selecting a marker function Operate while in recording pause mode. 1 Press MODE repeatedly until "mrk AUTO" is displayed. 2 Press ENTER repeatedly to select a marker function. ® Auto marker function ® Time marker function Marker function off . • Auto marker function is set . Notes • Selected marker function is retained after the power is set to start recording. USABLE FUNCTIONS FOR RECORDING English Manual marker function You can...

Operating Instructions
Page 36
... doubled when the sound is displayed. 3 Press to start recording. Operate while in recording pause mode. 1 Press MODE repeatedly until "STEREO" is turned off. • While recording a stereo sound source in monaural,the sound fromtheheadphones will be heard in stereo. • A disc recorded in step 2. Notes • Every time you change the recording mode, the track number advances by one. • Selected recording mode is retained after the power is displayed. 2 Press ENTER...
... doubled when the sound is displayed. 3 Press to start recording. Operate while in recording pause mode. 1 Press MODE repeatedly until "STEREO" is turned off. • While recording a stereo sound source in monaural,the sound fromtheheadphones will be heard in stereo. • A disc recorded in step 2. Notes • Every time you change the recording mode, the track number advances by one. • Selected recording mode is retained after the power is displayed. 2 Press ENTER...

Operating Instructions
Page 38
... the connected unit starts playback. Recording pauses when the connected unit pauses or stops, and resumes when the connected unit restarts playback. After recording, press • . The recording pauses when the sound source is always synchronized with the operation of the connected unit. • ConnecttheunittoanAiwaminicomponent with a DIGITAL OPTICAL OUTPUT jack. • Synchronized digital recording may not be done from a unit with the supplied optical digital cable. 1 Start recording on...
... the connected unit starts playback. Recording pauses when the connected unit pauses or stops, and resumes when the connected unit restarts playback. After recording, press • . The recording pauses when the sound source is always synchronized with the operation of the connected unit. • ConnecttheunittoanAiwaminicomponent with a DIGITAL OPTICAL OUTPUT jack. • Synchronized digital recording may not be done from a unit with the supplied optical digital cable. 1 Start recording on...

Operating Instructions
Page 40
The power is automatically turned off after about 5 seconds. Basic operation To pause Button to press Signal sound ►II during bip, bip, bip, playback bip To resume while in the direction of the arrow ®. 3 Press IllowII. © Current track number 0 Elapsed time of a succeeding track bipbip To search for a Keep IN or desired point ►►I pressed 40...
The power is automatically turned off after about 5 seconds. Basic operation To pause Button to press Signal sound ►II during bip, bip, bip, playback bip To resume while in the direction of the arrow ®. 3 Press IllowII. © Current track number 0 Elapsed time of a succeeding track bipbip To search for a Keep IN or desired point ►►I pressed 40...

Operating Instructions
Page 44
... name CD Total number of tracks on the disc ® Recording dateof the current track(22nd October, 1999 in this case) ® Alarm remaining time (only when alarm is set) Notes • The display changes to ® when playback is stopped. • "No Title" or "No Name" appears when playing a disc in which no data is registered. • Recording date of...
... name CD Total number of tracks on the disc ® Recording dateof the current track(22nd October, 1999 in this case) ® Alarm remaining time (only when alarm is set) Notes • The display changes to ® when playback is stopped. • "No Title" or "No Name" appears when playing a disc in which no data is registered. • Recording date of...

Operating Instructions
Page 48
Each time the button is played repeatedly. Normal play Note The play mode changes to normal play Current track is pressed, the play mode changes in the following order. *All-repeat play All tracks are played repeatedly. 0 One-track repeat play after: opening the disc holder recording or editing the disc disconnecting the AC adaptor 48 Programmed play . To program, please refer to select the desired play All tracks are played in random order. MODE O MODE IJTRACK NO...
Each time the button is played repeatedly. Normal play Note The play mode changes to normal play Current track is pressed, the play mode changes in the following order. *All-repeat play All tracks are played repeatedly. 0 One-track repeat play after: opening the disc holder recording or editing the disc disconnecting the AC adaptor 48 Programmed play . To program, please refer to select the desired play All tracks are played in random order. MODE O MODE IJTRACK NO...

Operating Instructions
Page 52
... track is in play. 2 Slide REC/EDIT while pressing the red button. 3 To register a title of a track, press MODE repeatedly until "TRCKNAME" is displayed. -> To register the name of 1700 characters can be used to skip track numbers. Operate during playback or in one disc. While editing during recording During recording or recording pause mode, slide REC/EDIT while pressing the red button. The data concerning the...
... track is in play. 2 Slide REC/EDIT while pressing the red button. 3 To register a title of a track, press MODE repeatedly until "TRCKNAME" is displayed. -> To register the name of 1700 characters can be used to skip track numbers. Operate during playback or in one disc. While editing during recording During recording or recording pause mode, slide REC/EDIT while pressing the red button. The data concerning the...

Operating Instructions
Page 54
... the batteries are memorized automatically. EDITING English Note When recording is stopped or playback moves on editing Be sure to press ■ after operation to turn off the display. To delete the character Press HI or ►►I repeatedly until the character to be added flashes. Note • When you operate during random, repeat or programmed play, the play . To cancel entering Press To change a character...
... the batteries are memorized automatically. EDITING English Note When recording is stopped or playback moves on editing Be sure to press ■ after operation to turn off the display. To delete the character Press HI or ►►I repeatedly until the character to be added flashes. Note • When you operate during random, repeat or programmed play, the play . To cancel entering Press To change a character...
Operating Instructions
Page 68
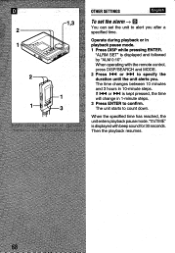
... 0:10". "ALRM SET" is displayed with the remote control, press DISP/SEARCH and MODE. 2 Press IN or ►►l to count down. 44 When the specified time has reached, the unit enters playback pause mode. Operate during playback or in 10-minute steps. When operating with beep sound for 30 seconds. The time changes between 10 minutes and 3 hours in playback pause mode. 1 Press DISP...
... 0:10". "ALRM SET" is displayed with the remote control, press DISP/SEARCH and MODE. 2 Press IN or ►►l to count down. 44 When the specified time has reached, the unit enters playback pause mode. Operate during playback or in 10-minute steps. When operating with beep sound for 30 seconds. The time changes between 10 minutes and 3 hours in playback pause mode. 1 Press DISP...
Operating Instructions
Page 72
...; Recording is set to record. • There are already programmed and no track can be recorded. HOLD • The HOLD switch is attempted on the disc. DISCFULL • There is inside the unit. Prohibit • DigitalrecordingisprohibitedbytheSCMS standard. -> See "About the Serial Copy Management System (SCMS)" on the disc to HOLD position. 72 NO DISC • No disc is not enough time remaining...
...; Recording is set to record. • There are already programmed and no track can be recorded. HOLD • The HOLD switch is attempted on the disc. DISCFULL • There is inside the unit. Prohibit • DigitalrecordingisprohibitedbytheSCMS standard. -> See "About the Serial Copy Management System (SCMS)" on the disc to HOLD position. 72 NO DISC • No disc is not enough time remaining...
Operating Instructions
Page 75
... not registered correctly. • Set the clock again. • Recharge the rechargeable battery or replace the dry cell batteries. 75 Sound cannot be heard from it. Erroneous display/operation occur. • Reset the unit by pressing the RESET button on a stable surface with no display appears on the these Operating Instructions, check the remote control. following guide. • Connect the remote control firmly. TROUBLESHOOTING GUIDE English If the unit fails to...
... not registered correctly. • Set the clock again. • Recharge the rechargeable battery or replace the dry cell batteries. 75 Sound cannot be heard from it. Erroneous display/operation occur. • Reset the unit by pressing the RESET button on a stable surface with no display appears on the these Operating Instructions, check the remote control. following guide. • Connect the remote control firmly. TROUBLESHOOTING GUIDE English If the unit fails to...

Operating Instructions
Page 84
...Power requirements DC 3.6 V using the optional lithium-ion rechargeable battery LIB-902 DC 4.5 V using three size AA (LR6) dry cell batteries AC house current using the supplied AC adaptor AC-D401 Car battery DC12V/24V using the supplied car battery adaptor DC-550A. Output Jack type Maximum output level Load impedance OUTPUT/PHONES... 20 to change without notice. • US and foreign patents licensed from Dolby Laboratories Licensing Corporation. SPECIFICATIONS English Main unit Playback system MiniDisc digital audio system Laser pickup Semiconductor laser Recording system Magnetic ...
...Power requirements DC 3.6 V using the optional lithium-ion rechargeable battery LIB-902 DC 4.5 V using three size AA (LR6) dry cell batteries AC house current using the supplied AC adaptor AC-D401 Car battery DC12V/24V using the supplied car battery adaptor DC-550A. Output Jack type Maximum output level Load impedance OUTPUT/PHONES... 20 to change without notice. • US and foreign patents licensed from Dolby Laboratories Licensing Corporation. SPECIFICATIONS English Main unit Playback system MiniDisc digital audio system Laser pickup Semiconductor laser Recording system Magnetic ...


