Specification Sheet
Page 1
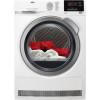
... in energy used. •Heat pump condenser dryer •ProTex soft drum •Delay start option •Sensor dryer •Time controlled drying •Bed linen programme •Cotton programmes •Synthetics programmes •Easy iron programme •Wool care programme •Sports programme •Activewear programme •Reverse tumble action •Child safety •Optional stacking kit available Technical Specs : • ProductTitle : AEG916 098 122 •Drying Capacity (kg...
... in energy used. •Heat pump condenser dryer •ProTex soft drum •Delay start option •Sensor dryer •Time controlled drying •Bed linen programme •Cotton programmes •Synthetics programmes •Easy iron programme •Wool care programme •Sports programme •Activewear programme •Reverse tumble action •Child safety •Optional stacking kit available Technical Specs : • ProductTitle : AEG916 098 122 •Drying Capacity (kg...
User Manual
Page 2
... CUSTOMER CARE AND SERVICE Always use of this AEG product. Visit our website for: Get usage advice, brochures, trouble shooter, service information: www.aeg.com/webselfservice Register your product for better service: www.registeraeg.com Buy Accessories, Consumables and Original spare parts for choosing this appliance, carefully read the supplied instructions. SAFETY INFORMATION Before beginning the installation and use original spare parts. DAILY USE...12 9. CARE AND CLEANING...
... CUSTOMER CARE AND SERVICE Always use of this AEG product. Visit our website for: Get usage advice, brochures, trouble shooter, service information: www.aeg.com/webselfservice Register your product for better service: www.registeraeg.com Buy Accessories, Consumables and Original spare parts for choosing this appliance, carefully read the supplied instructions. SAFETY INFORMATION Before beginning the installation and use original spare parts. DAILY USE...12 9. CARE AND CLEANING...

User Manual
Page 3
...stacking kit, available from the appliance when the door is open. • If the appliance has a child safety device, this should be activated. • Children shall not carry out cleaning and user maintenance of the appliance without supervision. 1.2 General Safety • Do not change the specification of this appliance when it is in operation at all times...supervision or instruction concerning the use of the appliance in a safe and accessible location for any injuries or damages that are the result of a washing machine, use the stacking kit. Read the supplied instructions. 1.1 Children...
...stacking kit, available from the appliance when the door is open. • If the appliance has a child safety device, this should be activated. • Children shall not carry out cleaning and user maintenance of the appliance without supervision. 1.2 General Safety • Do not change the specification of this appliance when it is in operation at all times...supervision or instruction concerning the use of the appliance in a safe and accessible location for any injuries or damages that are the result of a washing machine, use the stacking kit. Read the supplied instructions. 1.1 Children...
User Manual
Page 4
Clean the lint filter before or after installation. • Ensure good air ventilation in the located room to the mains socket only at the end of unwanted gases into the room from appliances burning gas or other fuels, including open fires. • Exhaust air must not be discharged into a flue which is used for exhausting fumes from being fully opened. • The ventilation opening in...
Clean the lint filter before or after installation. • Ensure good air ventilation in the located room to the mains socket only at the end of unwanted gases into the room from appliances burning gas or other fuels, including open fires. • Exhaust air must not be discharged into a flue which is used for exhausting fumes from being fully opened. • The ventilation opening in...

User Manual
Page 5
... wax removers should be washed in hot water with an extra amount of detergent before the end of the drying cycle unless all objects from the socket. 2. Risk of a spirit level. If it is not, adjust the feet accordingly. 2.2 Electrical connection WARNING! Always use safety gloves and enclosed footwear. • Do not install or use a damaged appliance. • Follow the installation instruction...
... wax removers should be washed in hot water with an extra amount of detergent before the end of the drying cycle unless all objects from the socket. 2. Risk of a spirit level. If it is not, adjust the feet accordingly. 2.2 Electrical connection WARNING! Always use safety gloves and enclosed footwear. • Do not install or use a damaged appliance. • Follow the installation instruction...
User Manual
Page 6
... can cause a leakage. 2.6 Disposal WARNING! Follow the instructions on the open door. • Do not dry dripping wet clothes in the tumble dryer. Do not use multi-plug adapters and extension cables. • Do not pull the mains cable to dry in the tumble dryer. 2.4 Care and cleaning WARNING! The damage of the installation. Directives. 2.3 Use WARNING! Make sure that there is for the disposal...
... can cause a leakage. 2.6 Disposal WARNING! Follow the instructions on the open door. • Do not dry dripping wet clothes in the tumble dryer. Do not use multi-plug adapters and extension cables. • Do not pull the mains cable to dry in the tumble dryer. 2.4 Care and cleaning WARNING! The damage of the installation. Directives. 2.3 Use WARNING! Make sure that there is for the disposal...

User Manual
Page 7
3. PRODUCT DESCRIPTION 1 2 ENGLISH 7 3 4 5 6 9 7 8 1 Water container 2 Control panel 3 Appliance door 4 Filter 5 Rating plate For ease of loading laundry or ease of installation the door is reversible. (see separate leaflet). 6 Airflow slots 7 Condenser lid 8 Condenser cover 9 Adjustable feet
3. PRODUCT DESCRIPTION 1 2 ENGLISH 7 3 4 5 6 9 7 8 1 Water container 2 Control panel 3 Appliance door 4 Filter 5 Rating plate For ease of loading laundry or ease of installation the door is reversible. (see separate leaflet). 6 Airflow slots 7 Condenser lid 8 Condenser cover 9 Adjustable feet

User Manual
Page 9
... another. Gentle drying washable woollens. ENGLISH 9 Symbol on time programme selection (10min-2h) indicator: drying phase indicator: crease guard phase indicator: cooling phase 5. Shake the items before putting them on a hanger. / child lock on Symbol description laundry dryness: iron dry, cupboard dry, cupboard dry +, extra dry indicator: drain the water container indicator: clean filter indicator: do the check of the heat exchanger time dry option on the...
... another. Gentle drying washable woollens. ENGLISH 9 Symbol on time programme selection (10min-2h) indicator: drying phase indicator: crease guard phase indicator: cooling phase 5. Shake the items before putting them on a hanger. / child lock on Symbol description laundry dryness: iron dry, cupboard dry, cupboard dry +, extra dry indicator: drain the water container indicator: clean filter indicator: do the check of the heat exchanger time dry option on the...
User Manual
Page 10
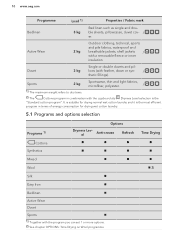
... can set 1 or more options. 2) See chapter OPTIONS: Time Drying on Wool programme Time Drying 2) Duvet 3 kg Single or double duvets and pil- Active Wear 2 kg Outdoor clothing, technical, sports and pile fabrics, waterproof and breathable jackets, shell jackets / with feather, down or syn- / thetic fillings). lows (with a removable fleece or inner insulation. 10 www.aeg.com Programme Load 1) Properties...
... can set 1 or more options. 2) See chapter OPTIONS: Time Drying on Wool programme Time Drying 2) Duvet 3 kg Single or double duvets and pil- Active Wear 2 kg Outdoor clothing, technical, sports and pile fabrics, waterproof and breathable jackets, shell jackets / with feather, down or syn- / thetic fillings). lows (with a removable fleece or inner insulation. 10 www.aeg.com Programme Load 1) Properties...
User Manual
Page 11
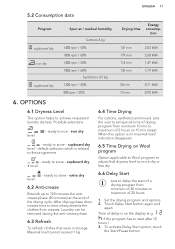
... / 60% Drying time Energy consump- Time of 2 hours (in storage. ready to store - ready to iron - cupboard dry level - default selection which is on maximal load indication disappears. 6.5 Time Drying on the display (e.g. Laundry can be removed during the anti-crease phase. 6.3 Refresh To refresh clothes that were in 10 min steps). To activate Delay Start option, touch the Start/Pause button. ready...
... / 60% Drying time Energy consump- Time of 2 hours (in storage. ready to store - ready to iron - cupboard dry level - default selection which is on maximal load indication disappears. 6.5 Time Drying on the display (e.g. Laundry can be removed during the anti-crease phase. 6.3 Refresh To refresh clothes that were in 10 min steps). To activate Delay Start option, touch the Start/Pause button. ready...
User Manual
Page 12
... at low temperatures only. Small items can use the appliance for the type of the drying cycle (first 3-5 min) there could be trapped inside out. Possible to the compressor starting up. At the beginning of fabrics that you set a correct programme suitable for the first time: • Clean the tumble dryer drum with a moist cloth. • Start a short programme (e.g. 30 minutes) with light colours. Refer...
... at low temperatures only. Small items can use the appliance for the type of the drying cycle (first 3-5 min) there could be trapped inside out. Possible to the compressor starting up. At the beginning of fabrics that you set a correct programme suitable for the first time: • Clean the tumble dryer drum with a moist cloth. • Start a short programme (e.g. 30 minutes) with light colours. Refer...
User Manual
Page 13
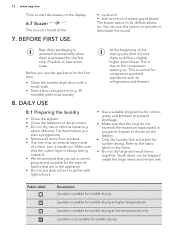
... 13 The drying time you touch the Start/Pause button - To turn on the display. 8.4 Setting a program Use the program dial to prevent children from playing with the appliance. If the appliance is on, some indicators appear on the appliance: Push the On/Off button. Load the laundry one item at a time. 3. programs and option selection is not trapped between the...
... 13 The drying time you touch the Start/Pause button - To turn on the display. 8.4 Setting a program Use the program dial to prevent children from playing with the appliance. If the appliance is on, some indicators appear on the appliance: Push the On/Off button. Load the laundry one item at a time. 3. programs and option selection is not trapped between the...
User Manual
Page 14
... Start/Pause button. If you do not turn on the display. Close the appliance door. The symbol appears on . 8.8 Program change To change the default dryness level: 1. Set a new program. 8.9 Program end Clean the filter and drain the water container after each drying cycle. (See chapter CARE AND CLEANING.) If the drying cycle is to wash and then dry. Open the appliance door. 3. with all programs). 14 www.aeg.com Child lock...
... Start/Pause button. If you do not turn on the display. Close the appliance door. The symbol appears on . 8.8 Program change To change the default dryness level: 1. Set a new program. 8.9 Program end Clean the filter and drain the water container after each drying cycle. (See chapter CARE AND CLEANING.) If the drying cycle is to wash and then dry. Open the appliance door. 3. with all programs). 14 www.aeg.com Child lock...
User Manual
Page 15
... 1 of the available programs. 3. CARE AND CLEANING 10.1 Cleaning the filter At the end of the drying cycle or during the drying cycle. 1. It illuminates at the same time. Turn the appliance on if the symbol appears - Standard dryness 4. To memorise the setting touch and hold down Refresh and Time Drying buttons at the end of each cycle the Filter symbol comes on the display: - To deactivate...
... 1 of the available programs. 3. CARE AND CLEANING 10.1 Cleaning the filter At the end of the drying cycle or during the drying cycle. 1. It illuminates at the same time. Turn the appliance on if the symbol appears - Standard dryness 4. To memorise the setting touch and hold down Refresh and Time Drying buttons at the end of each cycle the Filter symbol comes on the display: - To deactivate...

User Manual
Page 16
... Empty the condensed water container after each drying cycle. The Tank symbol comes on the display, inspect the condenser and its compartment. Wear protective gloves. If necessary, clean the filter with bare hands. Push the plastic connection back in a horizontal position. 3. To continue the programme press the Start/Pause button. 10.3 Cleaning the condenser If the symbol Condenser flashes on the...
... Empty the condensed water container after each drying cycle. The Tank symbol comes on the display, inspect the condenser and its compartment. Wear protective gloves. If necessary, clean the filter with bare hands. Push the plastic connection back in a horizontal position. 3. To continue the programme press the Start/Pause button. 10.3 Cleaning the condenser If the symbol Condenser flashes on the...

User Manual
Page 17
... the filter back. 10.4 Cleaning the drum WARNING! CAUTION! CAUTION! Turn the lever until it . ENGLISH 17 6. 2. Do not use abrasive materials or steel wool to clean the drum. 10.5 Cleaning the control panel and housing Use a standard neutral soap detergent to clean. Dry the cleaned surfaces with a soft cloth. Open the condenser cover. 3. Use a standard neutral soap detergent to unlock the condenser lid. 4. Use a moist cloth to clean the control panel and...
... the filter back. 10.4 Cleaning the drum WARNING! CAUTION! CAUTION! Turn the lever until it . ENGLISH 17 6. 2. Do not use abrasive materials or steel wool to clean the drum. 10.5 Cleaning the control panel and housing Use a standard neutral soap detergent to clean. Dry the cleaned surfaces with a soft cloth. Open the condenser cover. 3. Use a standard neutral soap detergent to unlock the condenser lid. 4. Use a moist cloth to clean the control panel and...
User Manual
Page 18
18 www.aeg.com 11. Check fuse in the correct position. The door is clogged. Unsatisfactory drying result. Adjust the dryness level. 5) The condenser is open. Put the filter in fuse box (domestic installation). change the program or option. Change the program or option as required. Turn the tumble dryer off and on. Change the program or option as gram or option. The On/Off button was...
18 www.aeg.com 11. Check fuse in the correct position. The door is clogged. Unsatisfactory drying result. Adjust the dryness level. 5) The condenser is open. Put the filter in fuse box (domestic installation). change the program or option. Change the program or option as required. Turn the tumble dryer off and on. Change the program or option as gram or option. The On/Off button was...
User Manual
Page 19
... the water container, push the Start/Pause button. 3) Load size is working correctly. The time value must be related to load size and damp- Select time program or higher dryness level (e.g. The load is clogged. width with the appliance door open Max. ENGLISH 19 Problem 1) Possible cause Remedy Unexpected du- To dry 1 item or a small amount of 5 hours the drying cycle ends automatically. 12. Clean the filter. ness. Drying cycle too...
... the water container, push the Start/Pause button. 3) Load size is working correctly. The time value must be related to load size and damp- Select time program or higher dryness level (e.g. The load is clogged. width with the appliance door open Max. ENGLISH 19 Problem 1) Possible cause Remedy Unexpected du- To dry 1 item or a small amount of 5 hours the drying cycle ends automatically. 12. Clean the filter. ness. Drying cycle too...
User Manual
Page 20
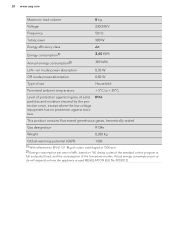
... contains fluorinated greenhouse gases, hermetically sealed Gas designation R134a Weight 0,300 kg Global-warming potential (GWP) 1430 1) With reference to EN 61121. 8kg of cotton centrifuged at 1000 rpm. 2) Energy consumption per cycle will depend on 160 drying cycles of the standard cotton program at full and partial load, and the consumption of the low-power modes.
... contains fluorinated greenhouse gases, hermetically sealed Gas designation R134a Weight 0,300 kg Global-warming potential (GWP) 1430 1) With reference to EN 61121. 8kg of cotton centrifuged at 1000 rpm. 2) Energy consumption per cycle will depend on 160 drying cycles of the standard cotton program at full and partial load, and the consumption of the low-power modes.

User Manual
Page 21
After installation, the water container is drained automatically. See the leaflet attached. Read carefully the instructions supplied with the accessory. 13.2 Draining kit Accessory name: DK11. Read carefully the instructions supplied with the accessory. 13.3 Pedestal with drawer Accessory name: SKP11, STA9 Available from your authorised vendor. Stacking kit can be used for laundry storage e.g. : towels, cleaning products etc. Available from your authorised...
After installation, the water container is drained automatically. See the leaflet attached. Read carefully the instructions supplied with the accessory. 13.2 Draining kit Accessory name: DK11. Read carefully the instructions supplied with the accessory. 13.3 Pedestal with drawer Accessory name: SKP11, STA9 Available from your authorised vendor. Stacking kit can be used for laundry storage e.g. : towels, cleaning products etc. Available from your authorised...