User Manual
Page 2
... to change without notice. 1. When contacting our Authorised Service Centre, ensure that help make life simpler features you for your appliance: www.aeg.com/shop CUSTOMER CARE AND SERVICE Always use of this AEG product. 2 www.aeg.com CONTENTS 1. SAFETY INFORMATION 2 2. PRODUCT DESCRIPTION 7 4. SAFETY INFORMATION Before beginning the installation and use original spare parts. DAILY USE...12 9. CONTROL PANEL...8 5. TROUBLESHOOTING 18 12. SAFETY INSTRUCTIONS 5 3. BEFORE FIRST USE...
... to change without notice. 1. When contacting our Authorised Service Centre, ensure that help make life simpler features you for your appliance: www.aeg.com/shop CUSTOMER CARE AND SERVICE Always use of this AEG product. 2 www.aeg.com CONTENTS 1. SAFETY INFORMATION 2 2. PRODUCT DESCRIPTION 7 4. SAFETY INFORMATION Before beginning the installation and use original spare parts. DAILY USE...12 9. CONTROL PANEL...8 5. TROUBLESHOOTING 18 12. SAFETY INSTRUCTIONS 5 3. BEFORE FIRST USE...

User Manual
Page 3
... away from the appliance when the door is open. • If the appliance has a child safety device, this should be activated. • Children shall not carry out cleaning and user maintenance of the appliance without supervision. 1.2 General Safety • Do not change the specification of this appliance when it carefully before installation (Refer to the Installation leaflet). Risk of suffocation, injury or...
... away from the appliance when the door is open. • If the appliance has a child safety device, this should be activated. • Children shall not carry out cleaning and user maintenance of the appliance without supervision. 1.2 General Safety • Do not change the specification of this appliance when it carefully before installation (Refer to the Installation leaflet). Risk of suffocation, injury or...
User Manual
Page 4
... power supply cable is regularly switched on the opposite side, that has accumulated around the appliance. • Do not run the appliance without a filter. Clean the lint filter before or after installation. • Ensure good air ventilation in the located room to avoid the backflow of unwanted gases into the room from appliances burning gas or other fuels, including open fires. • Exhaust air...
... power supply cable is regularly switched on the opposite side, that has accumulated around the appliance. • Do not run the appliance without a filter. Clean the lint filter before or after installation. • Ensure good air ventilation in the located room to avoid the backflow of unwanted gases into the room from appliances burning gas or other fuels, including open fires. • Exhaust air...

User Manual
Page 5
... products, should only be used as specified by the product manufacturer's instructions. • Remove all items are quickly removed and spread out so that the heat is dissipated. • The final part of a tumble dryer cycle occurs without heat (cool down cycle) to be installed must be flat, stable, heat resistant and clean. • Make sure that there is air circulation between the appliance and...
... products, should only be used as specified by the product manufacturer's instructions. • Remove all items are quickly removed and spread out so that the heat is dissipated. • The final part of a tumble dryer cycle occurs without heat (cool down cycle) to be installed must be flat, stable, heat resistant and clean. • Make sure that there is air circulation between the appliance and...
User Manual
Page 6
... washed your laundry with a stain remover start an extra rinse cycle before you clean the appliance. 2.5 Compressor WARNING! 6 www.aeg.com • Connect the mains plug to dry in the tumble dryer. Follow the instructions on the rating plate are applicable to the mains socket only at the end of the mains power supply. • Always use a correctly installed shockproof socket. • Do not...
... washed your laundry with a stain remover start an extra rinse cycle before you clean the appliance. 2.5 Compressor WARNING! 6 www.aeg.com • Connect the mains plug to dry in the tumble dryer. Follow the instructions on the rating plate are applicable to the mains socket only at the end of the mains power supply. • Always use a correctly installed shockproof socket. • Do not...

User Manual
Page 7
PRODUCT DESCRIPTION 1 2 ENGLISH 7 3 4 5 6 9 7 8 1 Water container 2 Control panel 3 Appliance door 4 Filter 5 Rating plate For ease of loading laundry or ease of installation the door is reversible. (see separate leaflet). 6 Airflow slots 7 Condenser lid 8 Condenser cover 9 Adjustable feet 3.
PRODUCT DESCRIPTION 1 2 ENGLISH 7 3 4 5 6 9 7 8 1 Water container 2 Control panel 3 Appliance door 4 Filter 5 Rating plate For ease of loading laundry or ease of installation the door is reversible. (see separate leaflet). 6 Airflow slots 7 Condenser lid 8 Condenser cover 9 Adjustable feet 3.

User Manual
Page 9
... programme has ended, immediately remove the items and put them in the appliance. ENGLISH 9 Symbol on a hanger. / child lock on Symbol description laundry dryness: iron dry, cupboard dry, cupboard dry +, extra dry indicator: drain the water container indicator: clean filter indicator: do the check of the heat exchanger time dry option on time programme selection (10min-2h) indicator: drying phase indicator: crease guard phase indicator: cooling phase 5.
... programme has ended, immediately remove the items and put them in the appliance. ENGLISH 9 Symbol on a hanger. / child lock on Symbol description laundry dryness: iron dry, cupboard dry, cupboard dry +, extra dry indicator: drain the water container indicator: clean filter indicator: do the check of the heat exchanger time dry option on time programme selection (10min-2h) indicator: drying phase indicator: crease guard phase indicator: cooling phase 5.
User Manual
Page 10
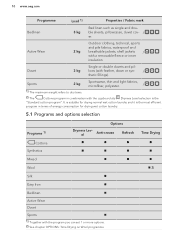
... can set 1 or more options. 2) See chapter OPTIONS: Time Drying on Wool programme Time Drying 2) 10 www.aeg.com Programme Load 1) Properties / Fabric mark Bedlinen 3 kg Bed linen such as single and double sheets, pillowcases, duvet cov- / er. Sports 2 kg Sportswear, thin and light fabrics, microfiber, polyester. / 1) The maximum weight refers to dry items. 2) The Cottons program in terms of energy...
... can set 1 or more options. 2) See chapter OPTIONS: Time Drying on Wool programme Time Drying 2) 10 www.aeg.com Programme Load 1) Properties / Fabric mark Bedlinen 3 kg Bed linen such as single and double sheets, pillowcases, duvet cov- / er. Sports 2 kg Sportswear, thin and light fabrics, microfiber, polyester. / 1) The maximum weight refers to dry items. 2) The Cottons program in terms of energy...
User Manual
Page 11
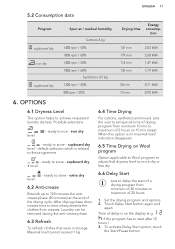
... dry + level. Set the drying program and options. 2. 5.2 Consumption data ENGLISH 11 Program cupboard dry Spun at the end of the drying cycle. Lets the user to set special time of delay is on maximal load indication disappears. 6.5 Time Drying on the display (e.g. After drying phase drum rotates time to iron - ready to time what prevents the clothes from minimum 10 min to store - ready to start of a drying...
... dry + level. Set the drying program and options. 2. 5.2 Consumption data ENGLISH 11 Program cupboard dry Spun at the end of the drying cycle. Lets the user to set special time of delay is on maximal load indication disappears. 6.5 Time Drying on the display (e.g. After drying phase drum rotates time to iron - ready to time what prevents the clothes from minimum 10 min to store - ready to start of a drying...
User Manual
Page 12
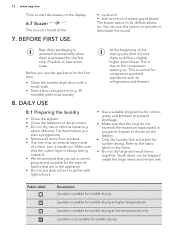
... to the compressor starting up. Small items can use the appliance for the first time: • Clean the tumble dryer drum with a moist cloth. • Start a short programme (e.g. 30 minutes) with light colours. Laundry is suitable for tumble drying. Laundry is not suitable for tumble drying. Laundry is suitable for tumble drying at low temperatures only. Before you start a programme. • Remove all items from...
... to the compressor starting up. Small items can use the appliance for the first time: • Clean the tumble dryer drum with a moist cloth. • Start a short programme (e.g. 30 minutes) with light colours. Laundry is suitable for tumble drying. Laundry is not suitable for tumble drying. Laundry is suitable for tumble drying at low temperatures only. Before you start a programme. • Remove all items from...
User Manual
Page 13
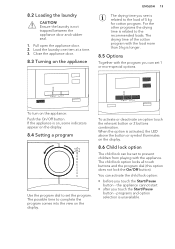
... the Start/Pause button - Close the appliance door. 8.3 Turning on the display. 8.4 Setting a program Use the program dial to set 1 or more than 5 kg is related to complete the program comes into the view on the appliance: Push the On/Off button. To activate or deactivate an option touch the relevant button or 2 buttons combination. For the other programs the drying time is not trapped...
... the Start/Pause button - Close the appliance door. 8.3 Turning on the display. 8.4 Setting a program Use the program dial to set 1 or more than 5 kg is related to complete the program comes into the view on the appliance: Push the On/Off button. To activate or deactivate an option touch the relevant button or 2 buttons combination. For the other programs the drying time is not trapped...
User Manual
Page 14
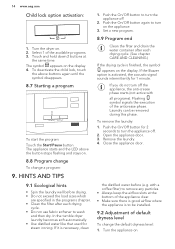
... anti-crease phase starts (not active with a coffee filter) to remove any particles. • Always keep the airflow slots at the same time. Open the appliance door. 3. 14 www.aeg.com Child lock option activation: 1. Push the On/Off button to turn off . 2. Push the On/Off button again to turn the appliance off. 2. If you do not turn on . 8.8 Program change To change the default...
... anti-crease phase starts (not active with a coffee filter) to remove any particles. • Always keep the airflow slots at the same time. Open the appliance door. 3. 14 www.aeg.com Child lock option activation: 1. Push the On/Off button to turn off . 2. Push the On/Off button again to turn the appliance off. 2. If you do not turn on . 8.8 Program change To change the default...
User Manual
Page 15
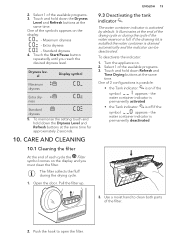
... cycle if the water reservoir is on the display and you reach the desired dryness level. Standard dryness 4. Open the door. To deactivate the indicator: 1. It illuminates at the same time. Push the hook to clean both parts of the symbols appears on . 2. One of the filter. 2. Turn the appliance on the display: - Use a moist hand to open the filter. Touch the Start/Pause button...
... cycle if the water reservoir is on the display and you reach the desired dryness level. Standard dryness 4. Open the door. To deactivate the indicator: 1. It illuminates at the same time. Push the hook to clean both parts of the symbols appears on . 2. One of the filter. 2. Turn the appliance on the display: - Use a moist hand to open the filter. Touch the Start/Pause button...

User Manual
Page 16
.... To inspect: 1. Open the door. You can use a vacuum cleaner. Place the filter back inside the filter socket. 2. To empty the water container: 1. Do the check not less than once a 6 months. Risk of injury. Pull the filter up. If necessary, clean the filter with bare hands. If necessary, remove fluff from the filter socket and gasket. The Tank symbol comes on the display...
.... To inspect: 1. Open the door. You can use a vacuum cleaner. Place the filter back inside the filter socket. 2. To empty the water container: 1. Do the check not less than once a 6 months. Risk of injury. Pull the filter up. If necessary, clean the filter with bare hands. If necessary, remove fluff from the filter socket and gasket. The Tank symbol comes on the display...

User Manual
Page 17
... soap detergent to clean. 2. Use a moist cloth to clean the inner surface of the drum and drum lifters. Disconnect the appliance before you clean it clicks into position. 8. CAUTION! Do not use abrasive materials or steel wool to clean the drum. 10.5 Cleaning the control panel and housing Use a standard neutral soap detergent to unlock the condenser lid. 4. Open the condenser cover. 3. CAUTION! Turn the lever until...
... soap detergent to clean. 2. Use a moist cloth to clean the inner surface of the drum and drum lifters. Disconnect the appliance before you clean it clicks into position. 8. CAUTION! Do not use abrasive materials or steel wool to clean the drum. 10.5 Cleaning the control panel and housing Use a standard neutral soap detergent to unlock the condenser lid. 4. Open the condenser cover. 3. CAUTION! Turn the lever until...
User Manual
Page 18
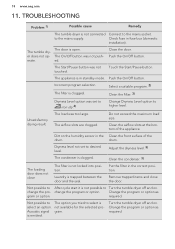
... fuse box (domestic installation). The load was not touched. Clean the condenser. 3) The loading door does not close the door. Remove trapped items and close The filter is not connected Connect to higher level. Turn the tumble dryer off and on. Not possible to After cycle start it is clogged. The Start/Pause button was too large. Select a suitable program. 2) The filter is emitted. Unsatisfactory drying result. Touch the Start/Pause button. required...
... fuse box (domestic installation). The load was not touched. Clean the condenser. 3) The loading door does not close the door. Remove trapped items and close The filter is not connected Connect to higher level. Turn the tumble dryer off and on. Not possible to After cycle start it is clogged. The Start/Pause button was too large. Select a suitable program. 2) The filter is emitted. Unsatisfactory drying result. Touch the Start/Pause button. required...
User Manual
Page 19
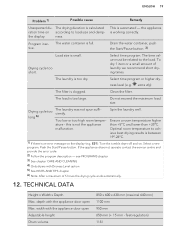
... Start/Pause button. the appliance is clogged. Program inactive. extra dry) The filter is working correctly. If the appliance does not operate contact the service centre and provide the error code. 2) Follow the program description - see PROGRAMS chapter 3) See chapter CARE AND CLEANING 4) Only dryers with the appliance door open Max. TECHNICAL DATA Height x Width x Depth Max. ness. Drying cycle too short. Do not exceed the maximum load size...
... Start/Pause button. the appliance is clogged. Program inactive. extra dry) The filter is working correctly. If the appliance does not operate contact the service centre and provide the error code. 2) Follow the program description - see PROGRAMS chapter 3) See chapter CARE AND CLEANING 4) Only dryers with the appliance door open Max. TECHNICAL DATA Height x Width x Depth Max. ness. Drying cycle too short. Do not exceed the maximum load size...
User Manual
Page 20
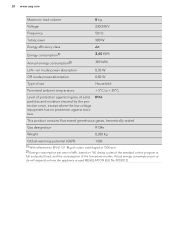
... drying cycles of the standard cotton program at full and partial load, and the consumption of cotton centrifuged at 1000 rpm. 2) Energy consumption per year in kWh, based on how the appliance is used (REGULATION (EU) No 392/2012). 20 www.aeg.com Maximum load volume 8 kg Voltage 230-240 V Frequency 50 Hz Total power 900 W Energy efficiency class A+ Energy...
... drying cycles of the standard cotton program at full and partial load, and the consumption of cotton centrifuged at 1000 rpm. 2) Energy consumption per year in kWh, based on how the appliance is used (REGULATION (EU) No 392/2012). 20 www.aeg.com Maximum load volume 8 kg Voltage 230-240 V Frequency 50 Hz Total power 900 W Energy efficiency class A+ Energy...

User Manual
Page 21
... level. Read carefully the instructions supplied with the accessory. Read carefully the instructions supplied with the accessory. 13.2 Draining kit Accessory name: DK11. 13. ACCESSORIES 13.1 Stacking kit ENGLISH 21 For thorough draining of the hose if necessary. The water container must be used only between washing machines and tumble dryers specified in a loop. Decrease the length of the condensed water into a basin...
... level. Read carefully the instructions supplied with the accessory. Read carefully the instructions supplied with the accessory. 13.2 Draining kit Accessory name: DK11. 13. ACCESSORIES 13.1 Stacking kit ENGLISH 21 For thorough draining of the hose if necessary. The water container must be used only between washing machines and tumble dryers specified in a loop. Decrease the length of the condensed water into a basin...
Specification Sheet
Page 1
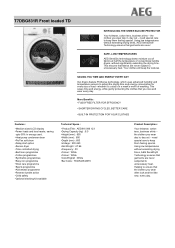
... in energy used. •Heat pump condenser dryer •ProTex soft drum •Delay start option •Sensor dryer •Time controlled drying •Bed linen programme •Cotton programmes •Synthetics programmes •Easy iron programme •Wool care programme •Sports programme •Activewear programme •Reverse tumble action •Child safety •Optional stacking kit available Technical Specs : • ProductTitle : AEG916 098 123 •Drying Capacity (kg...
... in energy used. •Heat pump condenser dryer •ProTex soft drum •Delay start option •Sensor dryer •Time controlled drying •Bed linen programme •Cotton programmes •Synthetics programmes •Easy iron programme •Wool care programme •Sports programme •Activewear programme •Reverse tumble action •Child safety •Optional stacking kit available Technical Specs : • ProductTitle : AEG916 098 123 •Drying Capacity (kg...