Product Manual
Page 2
... it . PRODUCT DESCRIPTION 5 3. USING THE APPLIANCE 11 8. CARE AND CLEANING 14 10. INSTALLATION 20 13. CONTROL PANEL 7 5. TECHNICAL INFORMATION 19 12. When contacting Service, ensure that help make life simpler - Model, PNC, Serial Number. Please spend a few minutes reading to get the very best from it to change without notice. The information can be found on ordinary appliances. 2 www.aeg.com CONTENTS 1. SAFETY INSTRUCTIONS 3 2. HINTS...
... it . PRODUCT DESCRIPTION 5 3. USING THE APPLIANCE 11 8. CARE AND CLEANING 14 10. INSTALLATION 20 13. CONTROL PANEL 7 5. TECHNICAL INFORMATION 19 12. When contacting Service, ensure that help make life simpler - Model, PNC, Serial Number. Please spend a few minutes reading to get the very best from it to change without notice. The information can be found on ordinary appliances. 2 www.aeg.com CONTENTS 1. SAFETY INSTRUCTIONS 3 2. HINTS...
Product Manual
Page 3
... and wax removers should you attempt to modify this user manual carefully, including its operation and safety features. Read the instruction manual before the appliance use. 1.1 General safety • It is not intended for their safety. • Make sure that have been in the tumble dryer. • If you must execute an extra rinse cycle before using the appliance, read this product in...
... and wax removers should you attempt to modify this user manual carefully, including its operation and safety features. Read the instruction manual before the appliance use. 1.1 General safety • It is not intended for their safety. • Make sure that have been in the tumble dryer. • If you must execute an extra rinse cycle before using the appliance, read this product in...
Product Manual
Page 4
... volatile cleaning fluids are used for other fuels, including open fires. 1.2 Installation • This appliance is dissipated. • Lint must not be allowed to dry in the tumble dryer. Children should not be done by the fabric softener manufacturer. • Risk of electric shock! 4 www.aeg.com WARNING! • Risk of clothing label. • Do not dry not washed items in...
... volatile cleaning fluids are used for other fuels, including open fires. 1.2 Installation • This appliance is dissipated. • Lint must not be allowed to dry in the tumble dryer. Children should not be done by the fabric softener manufacturer. • Risk of electric shock! 4 www.aeg.com WARNING! • Risk of clothing label. • Do not dry not washed items in...
Product Manual
Page 6
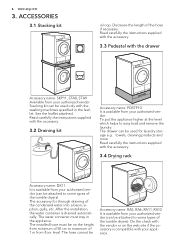
... the tumble dryers) The accessory for laundry storage e.g. : towels, cleaning products and more. The water container must be attached to some types of the tumble dryers). Stacking kit can be used only with the washing machines specified in the leaflet. To put the appliance higher at the level which helps to maximum of the condensed water into a basin, siphon, gully, etc. The installed hose must stay...
... the tumble dryers) The accessory for laundry storage e.g. : towels, cleaning products and more. The water container must be attached to some types of the tumble dryers). Stacking kit can be used only with the washing machines specified in the leaflet. To put the appliance higher at the level which helps to maximum of the condensed water into a basin, siphon, gully, etc. The installed hose must stay...
Product Manual
Page 7
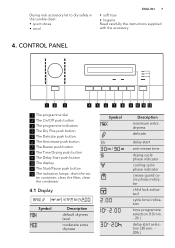
... carefully the instructions supplied with the accessory. 4. ter container, clean the filter, clean the condenser 4.1 Display Symbol Description default dryness level moderate extra dryness Symbol m/ m - CONTROL PANEL 12 3 4 5 6 7 8 9 10 11 12 1 The programme dial 2 The On/Off push button 3 The programme indicators 4 The Dry Plus push button 5 The Delicate push button 6 The Anticrease push button 7 The Buzzer push button 8 The Time Drying push button 9 The Delay Start...
... carefully the instructions supplied with the accessory. 4. ter container, clean the filter, clean the condenser 4.1 Display Symbol Description default dryness level moderate extra dryness Symbol m/ m - CONTROL PANEL 12 3 4 5 6 7 8 9 10 11 12 1 The programme dial 2 The On/Off push button 3 The programme indicators 4 The Dry Plus push button 5 The Delicate push button 6 The Anticrease push button 7 The Buzzer push button 8 The Time Drying push button 9 The Delay Start...
Product Manual
Page 8
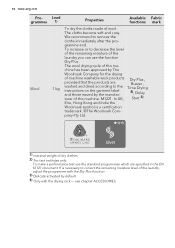
BEFORE FIRST USE Clean the tumble dryer drum with a moist cloth or set by the user. Drying level: applicable to use short times. all except Time Drying Jeans To dry leisure clothing such as : single and double sheet, pillowcase, bedspread. thetic fillings). To dry one item or small quantities of moist cloths. 6. all except Time Drying Bed Linen 3 kg To dry bed linen such as 8 kg...
BEFORE FIRST USE Clean the tumble dryer drum with a moist cloth or set by the user. Drying level: applicable to use short times. all except Time Drying Jeans To dry leisure clothing such as : single and double sheet, pillowcase, bedspread. thetic fillings). To dry one item or small quantities of moist cloths. 6. all except Time Drying Bed Linen 3 kg To dry bed linen such as 8 kg...
Product Manual
Page 9
... teamed with a removable fleece or inner insulation. Load grammes 1) Properties Iron Dry 3,5 kg To dry synthetic pieces of fabric and its finish. Drying level: applicable to the different types of clothing. Drying 3) 2 kg To dry sportswear, thin and light fabrics, microfiber, polyester, which are not ironed. Put fabrics in the tumble dryer straight. Available Fabric functions mark all except Time Drying 3) The...
... teamed with a removable fleece or inner insulation. Load grammes 1) Properties Iron Dry 3,5 kg To dry synthetic pieces of fabric and its finish. Drying level: applicable to the different types of clothing. Drying 3) 2 kg To dry sportswear, thin and light fabrics, microfiber, polyester, which are not ironed. Put fabrics in the tumble dryer straight. Available Fabric functions mark all except Time Drying 3) The...
Product Manual
Page 10
... level of the laundry you can use the function Dry Plus . chine has been approved by The Woolmark Company for the drying of machine washable wool products Dry Plus , provided that the products are specified in the EN 61121 document. In UK, 4), Delay Start 3) Eire, Hong Kong and India the Woolmark symbol is necessary to the Time Drying instructions...
... level of the laundry you can use the function Dry Plus . chine has been approved by The Woolmark Company for the drying of machine washable wool products Dry Plus , provided that the products are specified in the EN 61121 document. In UK, 4), Delay Start 3) Eire, Hong Kong and India the Woolmark symbol is necessary to the Time Drying instructions...
Product Manual
Page 11
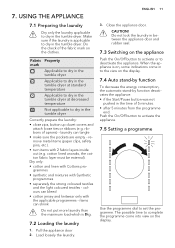
... appliance: • if the Start/Pause button was not pushed in between the appliance door and rubber seal. 7.3 Switching on the display. laundry can shrink Do not put more laundry than the maximum load which is 8kg. 7.2 Loading the laundry 1. cotton lined anoraks, the cotton fabric layer must be external). Make sure if the laundry is on, some indications come into view on the appliance...
... appliance: • if the Start/Pause button was not pushed in between the appliance door and rubber seal. 7.3 Switching on the display. laundry can shrink Do not put more laundry than the maximum load which is 8kg. 7.2 Loading the laundry 1. cotton lined anoraks, the cotton fabric layer must be external). Make sure if the laundry is on, some indications come into view on the appliance...

Product Manual
Page 12
... the sound. 7.11 The Time Drying function Operates only with the programme you can be set 1 or more than 5 kg is related to get the laundry more dried. 7.8 The Delicate function To dry more lightly the sensitive and temperature sensitive textiles (e.g. You can use this function does not lock On/Off button). Lets the user to maximum of the delay come into...
... the sound. 7.11 The Time Drying function Operates only with the programme you can be set 1 or more than 5 kg is related to get the laundry more dried. 7.8 The Delicate function To dry more lightly the sensitive and temperature sensitive textiles (e.g. You can use this function does not lock On/Off button). Lets the user to maximum of the delay come into...
Product Manual
Page 13
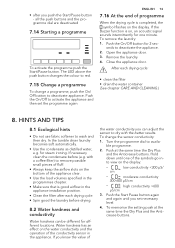
... filter • drain the water container (See chapter CARE AND CLEANING.) 8. onds to available programme. 2. Close the appliance door. Push at the same time the Dry Plus and the Anticrease buttons. Water hardness has an effect on the display: - Push the Start Pause button again and again until one minute. Push the On/Off to red. 7.15 Change a programme To change the sensor conductivity: 1. Remove the laundry...
... filter • drain the water container (See chapter CARE AND CLEANING.) 8. onds to available programme. 2. Close the appliance door. Push at the same time the Dry Plus and the Anticrease buttons. Water hardness has an effect on the display: - Push the Start Pause button again and again until one minute. Push the On/Off to red. 7.15 Change a programme To change the sensor conductivity: 1. Remove the laundry...
Product Manual
Page 14
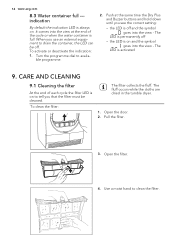
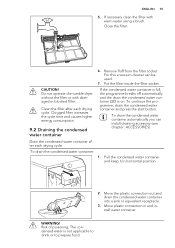
...CARE AND CLEANING 9.1 Cleaning the filter At the end of the cycle or when the water container is full. The fluff occurs while the cloths are dried in the tumble dryer. 1. Open the filter. 4. It comes into the view at the same time the Dry Plus and Buzzer buttons and hold down until you use an external equipment to clean the filter. Turn...the end of each cycle the filter LED is off - The LED is on . the LED is permanently off and the symbol goes into the view - To clean the filter: The filter collects the fluff. When you see the correct setting: - Open the door. 2. The LED...
...CARE AND CLEANING 9.1 Cleaning the filter At the end of the cycle or when the water container is full. The fluff occurs while the cloths are dried in the tumble dryer. 1. Open the filter. 4. It comes into the view at the same time the Dry Plus and Buzzer buttons and hold down until you use an external equipment to clean the filter. Turn...the end of each cycle the filter LED is off - The LED is on . the LED is permanently off and the symbol goes into the view - To clean the filter: The filter collects the fluff. When you see the correct setting: - Open the door. 2. The LED...
Product Manual
Page 15
... and keep it in and install water container. Close the filter. 6. Move plastic connection in horizontal position. 2. To drain the condensed water container: 1. The condensed water is on. Do not operate the tumble dryer without the filter or with warm water using a brush. Clogged filter increases the cycle time and causes higher energy consumption. 9.2 Draining the condensed water container If the condensed water container is full, the programme breaks...
... and keep it in and install water container. Close the filter. 6. Move plastic connection in horizontal position. 2. To drain the condensed water container: 1. The condensed water is on. Do not operate the tumble dryer without the filter or with warm water using a brush. Clogged filter increases the cycle time and causes higher energy consumption. 9.2 Draining the condensed water container If the condensed water container is full, the programme breaks...
Product Manual
Page 16
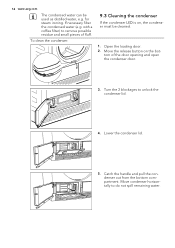
... button on , the condenser must be used as distilled water, e.g. Turn the 2 blockages to remove possible residue and small pieces of the door opening and open the condenser door. 3. Lower the condenser lid. 5. with a coffee filter) to unlock the condenser lid. 4. Catch the handle and pull the condenser out from the bottom compartment. Open the loading door. 2. 16 www.aeg.com The condensed water can be cleaned. 1. If necessary filter...
... button on , the condenser must be used as distilled water, e.g. Turn the 2 blockages to remove possible residue and small pieces of the door opening and open the condenser door. 3. Lower the condenser lid. 5. with a coffee filter) to unlock the condenser lid. 4. Catch the handle and pull the condenser out from the bottom compartment. Open the loading door. 2. 16 www.aeg.com The condensed water can be cleaned. 1. If necessary filter...

Product Manual
Page 17
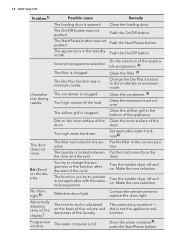
...! Use a standard neutral soap detergent to mains supply. TROUBLE SHOOTER AND SERVICE 10.1 Troubleshooting Problem1) Possible cause The tumble dryer does The tumble dryer is blocked with a soft cloth. Check fuse in vertical position over a basin or paddling. Close the condenser lid. 9. and drum ribs. Dry the cleaned surfaces with fluff. Clean the condenser in fuse box (domestic installation). This could cause leaks. Do not use furniture cleaning agents or cleaning...
...! Use a standard neutral soap detergent to mains supply. TROUBLE SHOOTER AND SERVICE 10.1 Troubleshooting Problem1) Possible cause The tumble dryer does The tumble dryer is blocked with a soft cloth. Check fuse in vertical position over a basin or paddling. Close the condenser lid. 9. and drum ribs. Dry the cleaned surfaces with fluff. Clean the condenser in fuse box (domestic installation). This could cause leaks. Do not use furniture cleaning agents or cleaning...
Product Manual
Page 18
... grill is opened. Defective drum light. Close the loading door. Put the filter in the the door and the seal. Push the On/Off button. Set applicable water hardness4). drum. Possible cause Remedy The loading door is clogged. tion. Clean the airflow grill in minimum mode. Make the new selection. Dirt on . Turn the tumble dryer off and on the display.) Programme inactive. Incorrect programme selection. function. The laundry is calculated...
... grill is opened. Defective drum light. Close the loading door. Put the filter in the the door and the seal. Push the On/Off button. Set applicable water hardness4). drum. Possible cause Remedy The loading door is clogged. tion. Clean the airflow grill in minimum mode. Make the new selection. Dirt on . Turn the tumble dryer off and on the display.) Programme inactive. Incorrect programme selection. function. The laundry is calculated...

Product Manual
Page 19
... an error message on when you open the door and goes off and on. Push the Start/Pause button. To replace the internal lamp, contact the service centre. Do not look directly into the beam of time programme. The laundry not spun sufficiently. Does not operate? - The time value must be related to use short times. Obey the maximum load volume. see PROGRAMMES chapter 3) see CARE AND CLEANING...
... an error message on when you open the door and goes off and on. Push the Start/Pause button. To replace the internal lamp, contact the service centre. Do not look directly into the beam of time programme. The laundry not spun sufficiently. Does not operate? - The time value must be related to use short times. Obey the maximum load volume. see PROGRAMMES chapter 3) see CARE AND CLEANING...
Product Manual
Page 20
... cotton laundry with cupboard dry programme + 280 kg with iron dry programme + 150 kg of the appliance. feet regulation) the appliance weight 41 kg maximum load volume 8 kg voltage 230-240 V frequency 50 Hz necessary fuse 13 A total power 2800 W energy efficiency class B energy consumption kWh/cycle 1) 4,48 kWh annual energy consumption2) 268,8 kWh type of wood or equivalent. 20 www.aeg...
... cotton laundry with cupboard dry programme + 280 kg with iron dry programme + 150 kg of the appliance. feet regulation) the appliance weight 41 kg maximum load volume 8 kg voltage 230-240 V frequency 50 Hz necessary fuse 13 A total power 2800 W energy efficiency class B energy consumption kWh/cycle 1) 4,48 kWh annual energy consumption2) 268,8 kWh type of wood or equivalent. 20 www.aeg...
Product Manual
Page 21
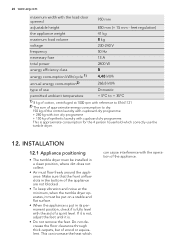
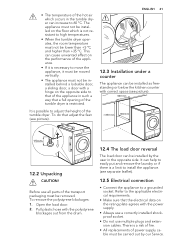
... appliance to adjust the height of the tumble dryer. Before use multiple plugs and extension cables. To remove the polystyrene blockages: 1. Pull plastic hose with the polystyrene blockages out from the drum. 12.4 The load door reversal The load door can help to easily put and remove the laundry or if there is a limit to install the appliance. (see picture). 600 mm > 850...
... appliance to adjust the height of the tumble dryer. Before use multiple plugs and extension cables. To remove the polystyrene blockages: 1. Pull plastic hose with the polystyrene blockages out from the drum. 12.4 The load door reversal The load door can help to easily put and remove the laundry or if there is a limit to install the appliance. (see picture). 600 mm > 850...
Product Manual
Page 22
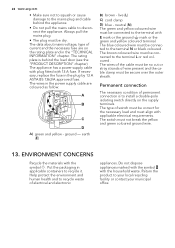
... office. earth (E) B) brown - 22 www.aeg.com • Make sure not to squash or cause damage to the mains plug and cable behind the load door (see the "PRODUCT DESCRIPTION" chapter). If necessary, replace the fuse in the "TECHNICAL INFORMATION" chapter. The data about mains voltage, type of switch must be correct for the necessary load and must be secure over...
... office. earth (E) B) brown - 22 www.aeg.com • Make sure not to squash or cause damage to the mains plug and cable behind the load door (see the "PRODUCT DESCRIPTION" chapter). If necessary, replace the fuse in the "TECHNICAL INFORMATION" chapter. The data about mains voltage, type of switch must be correct for the necessary load and must be secure over...


