
Product Manual
Page 2
... INSTRUCTIONS 5 3. CONTROL PANEL...9 6. Please spend a few minutes reading to give you impeccable performance for many years, with innovative technologies that you for your appliance: www.aeg.com/shop CUSTOMER CARE AND SERVICE Always use original spare parts. PRODUCT DESCRIPTION 7 4. PROGRAMME TABLE 10 7. HINTS AND TIPS...16 11. CARE AND CLEANING 17 12. ACCESSORIES...8 5. Visit our website for: Get usage advice, brochures, trouble shooter, service information: www.aeg...
... INSTRUCTIONS 5 3. CONTROL PANEL...9 6. Please spend a few minutes reading to give you impeccable performance for many years, with innovative technologies that you for your appliance: www.aeg.com/shop CUSTOMER CARE AND SERVICE Always use original spare parts. PRODUCT DESCRIPTION 7 4. PROGRAMME TABLE 10 7. HINTS AND TIPS...16 11. CARE AND CLEANING 17 12. ACCESSORIES...8 5. Visit our website for: Get usage advice, brochures, trouble shooter, service information: www.aeg...
Product Manual
Page 3
...; Connect the mains plug to the Installation leaflet). • Do not install the appliance behind a lockable door, a sliding door or a door with the appliance for exhausting fumes from appliances burning other fuels. (if applicable) Always keep the instructions with a hinge on top of a washing machine, use of the installation. SAFETY INFORMATION Before the installation and use the stacking kit. Read it carefully before installation (Refer to the...
...; Connect the mains plug to the Installation leaflet). • Do not install the appliance behind a lockable door, a sliding door or a door with the appliance for exhausting fumes from appliances burning other fuels. (if applicable) Always keep the instructions with a hinge on top of a washing machine, use of the installation. SAFETY INFORMATION Before the installation and use the stacking kit. Read it carefully before installation (Refer to the...
Product Manual
Page 4
... be damaged. • Before maintenance, deactivate the appliance and disconnect the mains plug from pockets such as lighters and matches. • Never stop a tumble dryer before the end of the drying cycle unless all items are quickly removed and spread out so that the heat is damaged, it must be replaced by the fabric softener instructions. • Remove all objects from the...
... be damaged. • Before maintenance, deactivate the appliance and disconnect the mains plug from pockets such as lighters and matches. • Never stop a tumble dryer before the end of the drying cycle unless all items are quickly removed and spread out so that the heat is damaged, it must be replaced by the fabric softener instructions. • Remove all objects from the...

Product Manual
Page 5
... because it is fully level with the power supply. Risk of suffocation, injury or permanent disability. • This appliance can be used by children without supervision. 2. Risk of the appliance in its permanent position, check if it . • Cleaning and user maintenance shall not be earthed. • Make sure that the electrical information on the rating plate agrees with...
... because it is fully level with the power supply. Risk of suffocation, injury or permanent disability. • This appliance can be used by children without supervision. 2. Risk of the appliance in its permanent position, check if it . • Cleaning and user maintenance shall not be earthed. • Make sure that the electrical information on the rating plate agrees with...
Product Manual
Page 6
... of the system can cause health problems to get closed in the tumble dryer. 2.4 Care and cleaning WARNING! Follow the instructions on the open door. • Do not dry dripping wet clothes in the appliance. The appliance has a 13 amp mains plug. Risk of injury, electrical shock, fire, burns or damage ...appliance. If it . • Remove the door catch to prevent children and pets to people and pets. • Do not sit or stand on the fabric label. • If you have washed your laundry with a stain remover start an extra rinse cycle before you start the dryer. • Do not drink or ...
... of the system can cause health problems to get closed in the tumble dryer. 2.4 Care and cleaning WARNING! Follow the instructions on the open door. • Do not dry dripping wet clothes in the appliance. The appliance has a 13 amp mains plug. Risk of injury, electrical shock, fire, burns or damage ...appliance. If it . • Remove the door catch to prevent children and pets to people and pets. • Do not sit or stand on the fabric label. • If you have washed your laundry with a stain remover start an extra rinse cycle before you start the dryer. • Do not drink or ...

Product Manual
Page 7
It can help to easily put and remove the laundry or if there is a limit to lock the heat exchanger cover 11 Rating plate The load door can be installed by the user in the opposite side. 3. PRODUCT DESCRIPTION 1 2 ENGLISH 7 3 4 11 5 10 6 9 7 8 1 Water container 2 Control panel 3 Appliance door 4 Filter 5 The button to open the heat exchanger door 6 Airflow slots 7 Adjustable feet 8 Heat exchanger door 9 Heat exchanger cover 10 The knob to install the appliance (see separate leaflet).
It can help to easily put and remove the laundry or if there is a limit to lock the heat exchanger cover 11 Rating plate The load door can be installed by the user in the opposite side. 3. PRODUCT DESCRIPTION 1 2 ENGLISH 7 3 4 11 5 10 6 9 7 8 1 Water container 2 Control panel 3 Appliance door 4 Filter 5 The button to open the heat exchanger door 6 Airflow slots 7 Adjustable feet 8 Heat exchanger door 9 Heat exchanger cover 10 The knob to install the appliance (see separate leaflet).
Product Manual
Page 8
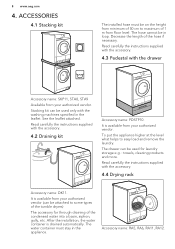
.... Read carefully the instructions supplied with the accessory. 4.3 Pedestal with the washing machines specified in the leaflet. Read carefully the instructions supplied with the accessory. 4.4 Drying rack Accessory name: DK11. To put the appliance higher at the level what helps to some types of the tumble dryers) The accessory for laundry storage e.g. : towels, cleaning products and more. It is drained automatically. The water container must...
.... Read carefully the instructions supplied with the accessory. 4.3 Pedestal with the washing machines specified in the leaflet. Read carefully the instructions supplied with the accessory. 4.4 Drying rack Accessory name: DK11. To put the appliance higher at the level what helps to some types of the tumble dryers) The accessory for laundry storage e.g. : towels, cleaning products and more. It is drained automatically. The water container must...
Product Manual
Page 9
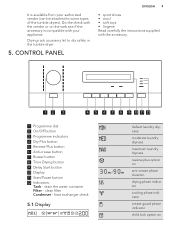
.... Do the check with the vendor or on CONTROL PANEL ENGLISH 9 • sport shoes • wool • soft toys • lingerie Read carefully the instructions supplied with the accessory. 12 3 4 5 6 7 8 9 10 11 12 1 Programme dial 2 On/Off button 3 Programme indicators 4 Dry Plus button 5 Reverse Plus button 6 Anti-crease button 7 Buzzer button 8 Time Drying button 9 Delay Start button 10 Display 11 Start/Pause button 12 Indicators: Tank - clean filter Condenser...
.... Do the check with the vendor or on CONTROL PANEL ENGLISH 9 • sport shoes • wool • soft toys • lingerie Read carefully the instructions supplied with the accessory. 12 3 4 5 6 7 8 9 10 11 12 1 Programme dial 2 On/Off button 3 Programme indicators 4 Dry Plus button 5 Reverse Plus button 6 Anti-crease button 7 Buzzer button 8 Time Drying button 9 Delay Start button 10 Display 11 Start/Pause button 12 Indicators: Tank - clean filter Condenser...
Product Manual
Page 10
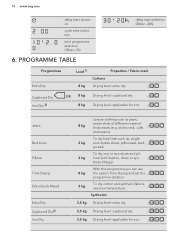
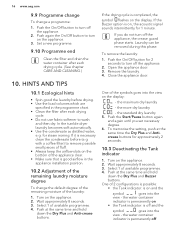
... and synthetic fabrics, uses low temperature. / Synthetics 3,5 kg Drying level: extra dry. / 3,5 kg Drying level: cupboard dry. / 3,5 kg Drying level: applicable for iron. / Jeans Bed Linen Pillows Time Drying Extra Quick Mixed Extra Dry Cupboard Dry2) Iron Dry 8 kg 3 kg 3 kg 8 kg 3 kg Leisure clothing such as : single and double sheet, pillowcase, bed- / spread. 10 www.aeg.com delay start selection (30min...
... and synthetic fabrics, uses low temperature. / Synthetics 3,5 kg Drying level: extra dry. / 3,5 kg Drying level: cupboard dry. / 3,5 kg Drying level: applicable for iron. / Jeans Bed Linen Pillows Time Drying Extra Quick Mixed Extra Dry Cupboard Dry2) Iron Dry 8 kg 3 kg 3 kg 8 kg 3 kg Leisure clothing such as : single and double sheet, pillowcase, bed- / spread. 10 www.aeg.com delay start selection (30min...

Product Manual
Page 11
... cloths made of machine washable wool products provided that the products are washed and dried according to dry items. 2) For test institutes only: Standard programmes for tests are not ironed. 1 kg To dry silk/lingerie with the Dry Plus option Clean the filter after the programme end. Programmes Easy Iron Active Wear Sports Silk/Lingerie Wool 4) ENGLISH 11 Load 1) Properties / Fabric...
... cloths made of machine washable wool products provided that the products are washed and dried according to dry items. 2) For test institutes only: Standard programmes for tests are not ironed. 1 kg To dry silk/lingerie with the Dry Plus option Clean the filter after the programme end. Programmes Easy Iron Active Wear Sports Silk/Lingerie Wool 4) ENGLISH 11 Load 1) Properties / Fabric...
Product Manual
Page 13
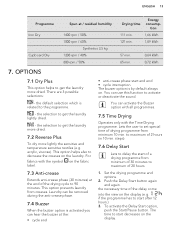
... Start/Pause button. the selection to get the laundry more lightly the sensitive and temperature sensitive textiles (e.g. This option helps also to activate or deactivate the sound. You can use this function to decrease the creases on the display. steps). 7.6 Delay Start Lets to 90 minutes. the necessary time of the drying cycle to delay the start after 12 hours.) 3. Laundry can be removed...
... Start/Pause button. the selection to get the laundry more lightly the sensitive and temperature sensitive textiles (e.g. This option helps also to activate or deactivate the sound. You can use this function to decrease the creases on the display. steps). 7.6 Delay Start Lets to 90 minutes. the necessary time of the drying cycle to delay the start after 12 hours.) 3. Laundry can be removed...
Product Manual
Page 14
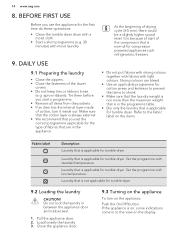
... door and rubber seal. 1. If the appliance is always external • We recommend that is applicable for the first time do these operations: • Clean the tumble dryer drum with a moist cloth. • Start a short programme (e.g. 30 minutes) with light colours. BEFORE FIRST USE Before you set the correct programme applicable for tumble dryer. Set the programme with low temperature. Refer to the view on the display. Laundry...
... door and rubber seal. 1. If the appliance is always external • We recommend that is applicable for the first time do these operations: • Clean the tumble dryer drum with a moist cloth. • Start a short programme (e.g. 30 minutes) with light colours. BEFORE FIRST USE Before you set the correct programme applicable for tumble dryer. Set the programme with low temperature. Refer to the view on the display. Laundry...

Product Manual
Page 15
... the display comes into the view. 9.7 Child lock option The child lock can set the programme. Push at the same time and hold down the Dry Plus and Reverse Plus buttons . Child lock option activation: 1. ENGLISH 15 To activate or deactivate the option push the applicable button . the appliance cannot start the programme: Push the Start/Pause button. Turn on the dryer. 2. The appliance starts...
... the display comes into the view. 9.7 Child lock option The child lock can set the programme. Push at the same time and hold down the Dry Plus and Reverse Plus buttons . Child lock option activation: 1. ENGLISH 15 To activate or deactivate the option push the applicable button . the appliance cannot start the programme: Push the Start/Pause button. Turn on the dryer. 2. The appliance starts...
Product Manual
Page 16
Set a new programme. 9.10 Programme end Clean the filter and drain the water container after each drying cycle. (See chapter CARE AND CLEANING.) 10. If it is on the display: - Select 1 of available programmes. 4. Push at the same time the Dry Plus and Anticrease buttons for 2 seconds to turn off the appliance. 2. If the drying cycle is completed, the symbol flashes on the appliance. 2. Laundry can...
Set a new programme. 9.10 Programme end Clean the filter and drain the water container after each drying cycle. (See chapter CARE AND CLEANING.) 10. If it is on the display: - Select 1 of available programmes. 4. Push at the same time the Dry Plus and Anticrease buttons for 2 seconds to turn off the appliance. 2. If the drying cycle is completed, the symbol flashes on the appliance. 2. Laundry can...
Product Manual
Page 17
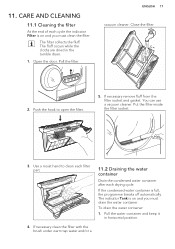
... can use a vacuum cleaner. CARE AND CLEANING 11.1 Cleaning the filter At the end of each cycle the indicator Filter is full, the programme breaks off automatically. If necessary remove fluff from the filter socket and gasket. To drain the water container: 1. Close the filter. 2. Push the hook to clean each drying cycle. Open the door. Use a moist hand to open the filter. 5. The fluff occurs while the cloths are dried...
... can use a vacuum cleaner. CARE AND CLEANING 11.1 Cleaning the filter At the end of each cycle the indicator Filter is full, the programme breaks off automatically. If necessary remove fluff from the filter socket and gasket. To drain the water container: 1. Close the filter. 2. Push the hook to clean each drying cycle. Open the door. Use a moist hand to open the filter. 5. The fluff occurs while the cloths are dried...

Product Manual
Page 18
... press the Start/Pause button. 11.3 Cleaning the heat exchanger If the indicator Condenser flashes, do the inspection: 1. Open the door. Pull the filter. 4. Move plastic connection in and install water container. 4. If there is a dirt, clean it. If necessary clean the small water filter from the bottom of the heat exchanger and its compartment. Turn the blockage to open the heat exchanger door. 5. To do...
... press the Start/Pause button. 11.3 Cleaning the heat exchanger If the indicator Condenser flashes, do the inspection: 1. Open the door. Pull the filter. 4. Move plastic connection in and install water container. 4. If there is a dirt, clean it. If necessary clean the small water filter from the bottom of the heat exchanger and its compartment. Turn the blockage to open the heat exchanger door. 5. To do...

Product Manual
Page 19
Use a standard neutral soap detergent to remove the fluff from the heat exchanger and its compartment. Do not use furniture cleaning agents or cleaning agents which can use abrasive materials or steel wool to clean the drum. 11.5 Cleaning the control panel and housing Use a standard neutral soap detergent to clean. ENGLISH 19 9. Dry the cleaned surfaces with a soft cloth. Do not use wet cloth and/or a vacuum cleaner with the brush...
Use a standard neutral soap detergent to remove the fluff from the heat exchanger and its compartment. Do not use furniture cleaning agents or cleaning agents which can use abrasive materials or steel wool to clean the drum. 11.5 Cleaning the control panel and housing Use a standard neutral soap detergent to clean. ENGLISH 19 9. Dry the cleaned surfaces with a soft cloth. Do not use wet cloth and/or a vacuum cleaner with the brush...
Product Manual
Page 20
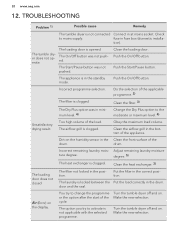
... button. Too high volume of the cycle. Dirt on . Adjust remaining laundry moisture ture degree. Put the filter in the position. The tumble dryer does not operate. Push the Start/Pause button. Do the selection of the applicable programme. 2) The filter is clogged. degree. 5) The heat exchanger is opened. Clean the heat exchanger. 3) The loading door does not closed The filter not locked in the correct position. fuse...
... button. Too high volume of the cycle. Dirt on . Adjust remaining laundry moisture ture degree. Put the filter in the position. The tumble dryer does not operate. Push the Start/Pause button. Do the selection of the applicable programme. 2) The filter is clogged. degree. 5) The heat exchanger is opened. Clean the heat exchanger. 3) The loading door does not closed The filter not locked in the correct position. fuse...
Product Manual
Page 21
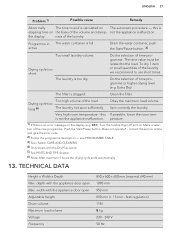
... times. Clean the filter. Drying cycle too Too high volume of the laundry. Spin correctly the laundry. TECHNICAL DATA Height x Width x Depth Max. feet regulation) 118 l 8 kg 230 - 240 V 50 Hz active. long 6) The laundry not spun sufficiently. this is too dry. Make a selection of time programme. contact the service centre and give the error code. 2) Follow the programme description - width with the appliance door open Adjustable height Drum...
... times. Clean the filter. Drying cycle too Too high volume of the laundry. Spin correctly the laundry. TECHNICAL DATA Height x Width x Depth Max. feet regulation) 118 l 8 kg 230 - 240 V 50 Hz active. long 6) The laundry not spun sufficiently. this is too dry. Make a selection of time programme. contact the service centre and give the error code. 2) Follow the programme description - width with the appliance door open Adjustable height Drum...
Product Manual
Page 22
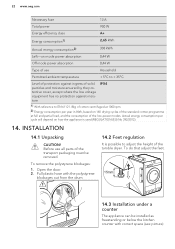
... low-power modes. To remove the polystyrene blockages: 1. To do that adjust the feet. 15mm 14.3 Installation under a counter The appliance can be removed. Pull plastic hose with correct space (see picture). Open the door. 2. 22 www.aeg.com Necessary fuse 13 A Total power 950 W Energy efficiency class A+ Energy consumption1) 2,65 kWh Annual energy consumption2) 308 kWh Left-on mode power absorption 0,44 W Off mode power absorption 0,44 W Type of use all parts...
... low-power modes. To remove the polystyrene blockages: 1. To do that adjust the feet. 15mm 14.3 Installation under a counter The appliance can be removed. Pull plastic hose with correct space (see picture). Open the door. 2. 22 www.aeg.com Necessary fuse 13 A Total power 950 W Energy efficiency class A+ Energy consumption1) 2,65 kWh Annual energy consumption2) 308 kWh Left-on mode power absorption 0,44 W Off mode power absorption 0,44 W Type of use all parts...


